经过前几篇的学习与了解,我们可以对springboot自定义一个starter,可以让springboot项目启动时做一些我们想做的事情(比如监听端口等)
具体实现步骤:
1.新建一个MAVEN项目
2.pom文件引入必须要的依赖(如果需要其他功能,需要引入其他依赖,比如数据库等),以及继承springboot
在这里 我maven项目的groupId,artifactId,version为
    <groupId>org.jym</groupId>
    <artifactId>com-jym-starter-test</artifactId>
    <version>1.0-SNAPSHOT</version>
需要继承:
    <parent>
        <groupId>org.springframework.boot</groupId>
        <artifactId>spring-boot-starter-parent</artifactId>
        <version>2.2.2.RELEASE</version>
    </parent>
需要引入:
    <dependencies>
        <!-- springboot自定义starter规范 -->
        <dependency>
            <groupId>org.springframework.boot</groupId>
            <artifactId>spring-boot-autoconfigure</artifactId>
        </dependency>
    </dependencies>
3.然后编写业务代码,这里写一个简单的输出语句:
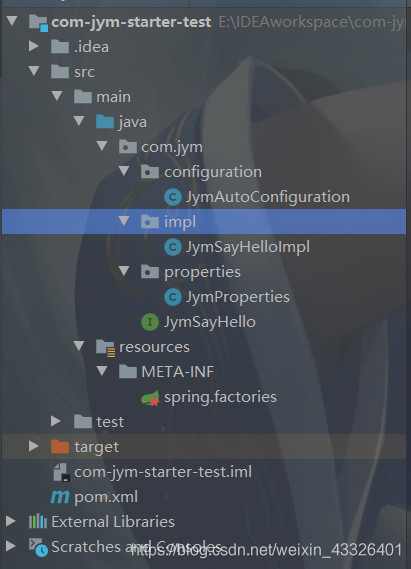
项目结构图:
先说配置类:
@ConfigurationProperties注解:说明该类是维护属性的类,属性可以在application.properties中配置,注解的值为路径,例如:com.jym.name=12138
package com.jym.properties;

import org.springframework.boot.context.properties.ConfigurationProperties;

/**
 * @program: com-jym-starter-test
 * @description: 配置属性的类,开发者可在springboot配置文件里配置
 * @author: jym
 * @create: 2020/01/24
 */
@ConfigurationProperties("com.jym")
public class JymProperties {

    private String name = "jym";  // 默认值为jym

    public String getName() {
        return name;
    }

    public void setName(String name) {
        this.name = name;
    }

}
接口:
package com.jym;

/**
 * @program: com-jym-starter-test
 * @description: 一个测试接口
 * @author: jym
 * @create: 2020/01/24
 */
public interface JymSayHello {

    void sayHello();
}
实现类:
package com.jym.impl;

import com.jym.JymSayHello;
import com.jym.properties.JymProperties;
import org.springframework.beans.factory.annotation.Autowired;

/**
 * @program: com-jym-starter-test
 * @description: 对JymSayHello的实现
 * @author: jym
 * @create: 2020/01/24
 */
public class JymSayHelloImpl implements JymSayHello {

    @Autowired
    private JymProperties jymProperties;

    @Override
    public void sayHello() {
        String name = jymProperties.getName();
        System.out.println(name+": hello,springboot");
    }
}
模仿springboot的源码的流程,编写配置类:
package com.jym.configuration;

import com.jym.JymSayHello;
import com.jym.impl.JymSayHelloImpl;
import com.jym.properties.JymProperties;
import org.springframework.boot.autoconfigure.condition.ConditionalOnMissingBean;
import org.springframework.boot.autoconfigure.condition.ConditionalOnMissingClass;
import org.springframework.boot.context.properties.EnableConfigurationProperties;
import org.springframework.context.annotation.Bean;
import org.springframework.context.annotation.Configuration;

/**
 * @program: com-jym-starter-test
 * @description: 配置类,需要在springboot启动时自动加载进去
 * @author: jym
 * @create: 2020/01/24
 */
// 说明配置类
@Configuration
// 条件注解,只有在classpath下指定class文件时,才被实例化bean
@ConditionalOnMissingClass
// 可以通过spring.properties配置属性
@EnableConfigurationProperties({JymProperties.class})
public class JymAutoConfiguration {

    // 将JymSayHelloImpl注入进IOC容器里,方法名为BeanId
    @Bean
    // 条件注解,意思是:仅当ioc容器中不存在指定类型bean时,才会创建
    @ConditionalOnMissingBean
    public JymSayHello jymSayHello (){
        return new JymSayHelloImpl();
    }

}
在源码流程中,还会有spring.factories文件,所以我们也需要,把我们的配置类维护进spring.factories文件中:
org.springframework.boot.autoconfigure.EnableAutoConfiguration=com.jym.configuration.JymAutoConfiguration
4.写完后需要用MAVEN打包,否则本地MAVEN仓库里没有,引不到会报错
执行mvn clean install
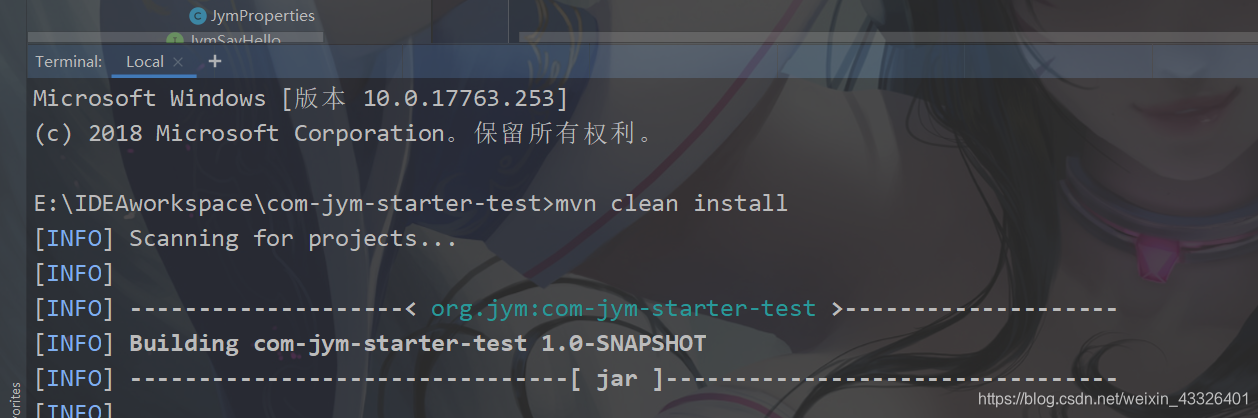
然后就完成了自定义starter!!
5.进入需要引入该starter项目的springboot项目,在pom文件里添加依赖:
需要输入正确的groupId,artifactId,version
扫描二维码关注公众号,回复:
9020873 查看本文章

        <!-- 引入自定义starter -->
        <dependency>
            <groupId>org.jym</groupId>
            <artifactId>com-jym-starter-test</artifactId>
            <version>1.0-SNAPSHOT</version>
        </dependency>
6.在application.properties中配置name属性,如果不配置,会用默认值
com.jym.name=12138
测试代码:
package com.jym.demo;

import com.jym.JymSayHello;
import org.springframework.beans.factory.annotation.Autowired;
import org.springframework.boot.CommandLineRunner;
import org.springframework.boot.SpringApplication;
import org.springframework.boot.autoconfigure.SpringBootApplication;

/**
 * @author Administrator
 */
@SpringBootApplication()
public class DemoApplication implements CommandLineRunner {

    @Autowired
    private JymSayHello jymSayHello;

    public static void main(String[] args) {
        new SpringApplication(DemoApplication.class).run();
    }

    public void run(String... args) {
        jymSayHello.sayHello();
    }
}
启动后控制台成功打印:

