用Tkinter打造GUI开发工具(2)Tkinter工作原理
Tcl/Tk是面向过程的脚本程序,Tkinter是在Tcl/Tk基础上的面向对象程序。我们主要使用Tkinter模块开发图形,因此读者需要掌握面向对象程序开发知识。
Python程序对英文大小写敏感,命令关键字和变量名称区分大小英文字母,即程序中字母大小写不同,代表不同含义。Tkinter模块名在Python2和Python3不同。
在Python2中装载Tkinter模块命令:
import Tkinter
在Python3中装载Tkinter模块命令:
import tkinter
从上面命令可以看到,Tkinter模块在程序中的大小写字母不同。这里主要讲解Python3的使用,只使用Python3中装载Tkinter模块命令。
为了便于书写程序及区分不同模块中的函数或方法,我们一般给Tkinter模块加上“tk”别名。
import tkinter as tk
我们使用帮助命令查看Tkinter帮助信息。
import  tkinter  as  tk
help(tk)
Tkinter帮助开始就说明“Tkinter是Tcl / Tk的包装器函数”,也就是说Tkinter通过类封装了Tcl / Tk的函数来实现的。Tkinter提供的类允许显示、定位、控制部件。顶层的小部件是Tk和Toplevel。其他小部件(widgets)有Frame、 Label、Entry、Text、Canvas、Button、Radiobutton、Checkbutton、Scale、Listbox、Scrollbar、OptionMenu、Spinbox、LabelFrame 和 PanedWindow等。
小部件的属性指定关键字参数。关键字参数具有相同的名称作为在Tk中的相应的资源。这说明所有继承Widget类的小部件,拥有共同的Widget类属性。
小部件位置由Place、Pack或Grid类来进行管理。每个小部件(every Widget)可以在需要的地方使用Place、Pack或Grid方法。
行为是通过资源绑定到事件(如关键字参数命令)或bind方法来实现。
Tkinter类的构成
Tkinter是在Tcl/Tk基础上的面向对象程序,Tkinter是封装了Tcl / Tk组件的类。这节了解Tkinter类的层次结构。通过了解Tkinter类层次结构,可以清楚知道那些小部件有什么属性。
Tkinter的最基本类是Wm类和Misc类。
Wm类提供了窗口管理器的通信函数。
Misc类定义内部部件的常用方法。
XView类,混合类,能查询和改变小部件窗口的水平位置。
YView类,混合类,能查询和改变小部件窗口的垂直位置。
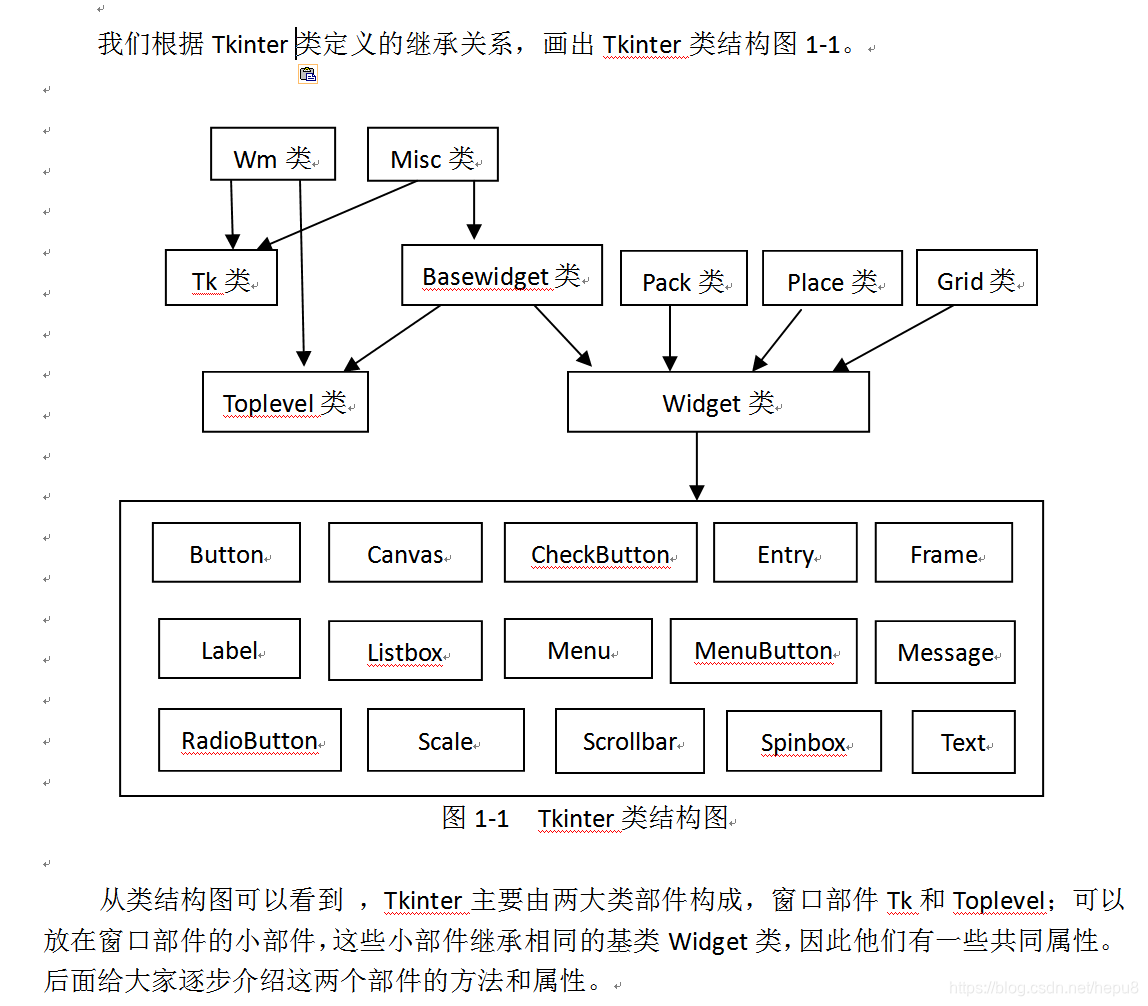
在Tkinter中的窗口部件有Tk和Toplevel。其中Tk是最顶层窗口部件,它负责管理Tkinter的运行,其它所有部件都建立在Tk窗口部件基础上,以此很多程序员喜欢用root来表示。一旦Tk部件发生销毁,即执行root.destroy()方法,所有部件将同时销毁。结束Tk程序,关闭Tk主窗口。
Tk类只重构了destroy方法,大多数方法还是来自于Misc类和Wm类。
Misc类提供了数十种用于Tk的方法和属性,例如重要的mainloop()和bind()方法,Tk类中并没有定义过,因此Tk类许多方法都继承于Misc类。
Misc类定义的一些方法如下,这里只给出定义,省却去实现的代码。
 class Misc:
    def wait_variable(self, name='PY_VAR'):
    def wait_window(self, window=None):
    def wait_visibility(self, window=None):
    def setvar(self, name='PY_VAR', value='1'):
    def getvar(self, name='PY_VAR'):
    def getint(self, s):
    def getdouble(self, s):
    def getboolean(self, s):
    def focus_set(self):
    def focus_force(self):
    def focus_get(self):
    def winfo_height(self):
    def winfo_rootx(self):
    def winfo_rooty(self):
    def winfo_screenheight(self):
    def winfo_screenwidth(self):
    def winfo_width(self):
    def winfo_x(self):
    def winfo_y(self):
    def update(self):
    def bind(self, sequence=None, func=None, add=None):
...
上面列出了Misc类常用的方法,还有许多方法都省略掉。因源代码非常长,读者有兴趣可以去阅读Tkinter的源代码。
清楚Misc类的方法后,我们可以在程序中获取这些信息。下面给出使用Misc类方法的程序示例。
# -*- coding: utf-8 -*-
import  tkinter  as  tk
root =tk.Tk()
root.update()
screenwidth = root.winfo_screenwidth()  #获取屏幕宽度(单位:像素)
screenheight = root.winfo_screenheight()  #获取屏幕高度(单位:像素)
win_width = root.winfo_width()   #获取窗口宽度(单位:像素)
win_height = root.winfo_height()  #获取窗口高度(单位:像素)
x=root.winfo_x()   #获取窗口x坐标(单位:像素)
y=root.winfo_y()   #获取窗口y坐标(单位:像素)
print('屏幕大小screenwidth,screenheight :',screenwidth,screenheight)
print('窗口大小win_width,win_height :',win_width,win_height)
print('窗口位置x,y :',x,y)
root.mainloop()
程序运行结果:(注意:窗口位置和大小没有定义,数值随机。)
屏幕大小screenwidth,screenheight : 2560 1440
窗口大小win_width,win_height : 200 200
窗口位置x,y : 275 275
上面我们了解了Misc类,以及一些方法的使用,Wm类能给Tk组件提供什么方法?
Wm类在说明上写道,Wm类提供了窗口管理器的通信函数。下面看看Wm类的方法定义,省却去实现的代码。
class Wm:
    def wm_aspect(self,
              minNumer=None, minDenom=None,
              maxNumer=None, maxDenom=None):
    def wm_attributes(self, *args):
    def wm_command(self, value=None):
    def wm_deiconify(self):
    def wm_forget(self, window): # new in Tk 8.5
    def wm_focusmodel(self, model=None):
    def wm_frame(self):
    def wm_geometry(self, newGeometry=None):
    def wm_grid(self,
         baseWidth=None, baseHeight=None,
         widthInc=None, heightInc=None):
    def wm_group(self, pathName=None):
    def wm_iconbitmap(self, bitmap=None, default=None):
    def wm_iconify(self):
    def wm_iconmask(self, bitmap=None):
    def wm_iconname(self, newName=None):
    def wm_iconphoto(self, default=False, *args): # new in Tk 8.5
    def wm_iconwindow(self, pathName=None):
    def wm_manage(self, widget): # new in Tk 8.5
    def wm_maxsize(self, width=None, height=None):
    def wm_minsize(self, width=None, height=None):
    def wm_overrideredirect(self, boolean=None):
    def wm_positionfrom(self, who=None):
    def wm_protocol(self, name=None, func=None):
    def wm_resizable(self, width=None, height=None):
    def wm_state(self, newstate=None):
    def wm_title(self, string=None):
    def wm_transient(self, master=None):
    def wm_withdraw(self):
....
上面列出了Wm类常用的方法,还有许多方法都省略掉。因源代码非常长,读者有兴趣可以去阅读Tkinter的源代码。
Wm类是Tkinter的X窗口实现类,因此很多方法可以省略掉“wm_”。
例如:root.wm_title(string=None),可以用命令root. title(string=None)替代,作用一样。
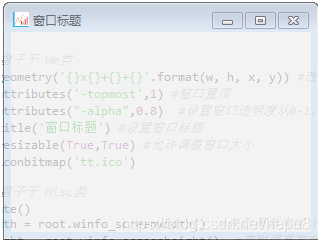
既然Tk类也继承了Wm类,因此我们在Tk类的对象中,使用Wm类中的方法。下面给出使用Wm类方法的程序示例。
import  tkinter  as  tk
root =tk.Tk()
w=300
h=200
x=100
y=200
#下面方法基于Wm类
root.wm_geometry('{}x{}+{}+{}'.format(w, h, x, y)) #改变窗口位置和大小
root.wm_attributes('-topmost',1) #窗口置顶
root.wm_attributes("-alpha",0.8)  #设置窗口透明度从0-1,1是不透明,0是全透明
root.wm_title('窗口标题') #设置窗口标题
root.wm_resizable(True,True) #允许调整窗口大小
root.wm_iconbitmap('tt.ico') #改变窗口图标

#下面方法基于Misc类
root.update()
screenwidth = root.winfo_screenwidth()  #获取屏幕宽度(单位:像素)
screenheight = root.winfo_screenheight()  #获取屏幕高度(单位:像素)
win_width = root.winfo_width()   #获取窗口宽度(单位:像素)
win_height = root.winfo_height()  #获取窗口高度(单位:像素)
x=root.winfo_x()   #获取窗口x坐标(单位:像素)
y=root.winfo_y()   #获取窗口y坐标(单位:像素)
print('屏幕大小screenwidth,screenheight :',screenwidth,screenheight)
print('窗口大小win_width,win_height :',win_width,win_height)
print('窗口位置x,y :',x,y)
root.mainloop()
程序运行结果。
屏幕大小screenwidth,screenheight : 2560 1440
窗口大小win_width,win_height : 300 200
窗口位置x,y : 100 200
Toplevel类继承了BaseWidget类和Wm类。BaseWidget类继承了Misc类。
Toplevel类只重构了destroy()方法,其它方法还是来自于Misc类。因此Toplevel类除了destroy()方法与Tk类不同外,其它属性都是相同的。
