Android特有的数据结构有
- ArrayMap
- ArraySet
- SparseArray
首先来看SparseArray,
该类的官方说明:(自己更改了些)
SparseArray是类型的Map,比HashMap<Integers, Object>的内存效率更高,因为避免了对int的封装,并且不依赖于Entry结构。
SparseArray比HashMap更省内存,它对数据采取了压缩的方式来表示稀疏数组的数据,从而节约内存空间,SparseArray只能存储key为int类型的数据,同时,SparseArray在添加、查找、删除数据数据时候,使用的是二分查找法
首先来比较一下SparseArray和HashMap的时间和空间消耗
正向插入时
		HashMap<Integer, String> map = new HashMap<Integer, String>();
        long start = System.currentTimeMillis();
        for (i = 0; i < 200000; i++) {
            map.put(i, String.valueOf(i));
        }
        long memory = Runtime.getRuntime().totalMemory();
        long end = System.currentTimeMillis();
        long usedTime = end - start;
        System.out.println("HashMap消耗的时间是:" + usedTime + ",HashMap占用的内存是:" + memory);
SparseArray消耗的时间是:289,SparseArray占用的内存是:16717752
SparseArray消耗的时间是:296,SparseArray占用的内存是:14958680
SparseArray消耗的时间是:281,SparseArray占用的内存是:20211466
        SparseArray<String> sparse = new SparseArray<>();
        long start1 = System.currentTimeMillis();
        for (i = 0; i < 200000; i++) {
            sparse.put(i, String.valueOf(i));
        }
        long memory1 = Runtime.getRuntime().totalMemory();
        long end1 = System.currentTimeMillis();
        long usedTime1 = end1 - start1;
        System.out.println("SparseArray消耗的时间是:" + usedTime1 + ",SparseArray占用的内存是:" + memory1);
HashMap消耗的时间是:357,HashMap占用的内存是:31697720
HashMap消耗的时间是:385,HashMap占用的内存是:22725386
HashMap消耗的时间是:623,HashMap占用的内存是:35866772
可以看出SparseArray明显更优秀
下面反向插入
HashMap:
HashMap消耗的时间是:285,HashMap占用的内存是:13473952
HashMap消耗的时间是:188,HashMap占用的内存是:22003296
HashMap消耗的时间是:281,HashMap占用的内存是:15518096
SparseArray:
SparseArray消耗的时间是:7247,SparseArray占用的内存是:9727932
SparseArray消耗的时间是:7229,SparseArray占用的内存是:10816506
SparseArray消耗的时间是:7133,SparseArray占用的内存是:12589412
这里虽然SparseArray在空间耗费上更优秀,但是其时间耗费非常大,当然反向的毕竟没正向的常用,而且Android中对内存的使用较为限制,所以,在使用<int, Object>时推荐使用SparseArray,其中还有
LongSparseArray <long, Object>
SparseBooleanArray <int, boolean>
SparseIntArray <int, int>
SparseLongArray <int, long>
其中对于Android低版本的需要使用support.v4.util.SparseArrayCompat;里的SparseArrayCompat<int ,object>
下面回到源码:
    private static final Object DELETED = new Object();
    private boolean mGarbage = false;

    private int[] mKeys;
    private Object[] mValues;
    private int mSize;
可以看到其中的key和value都是通过数组的组合来实现的,DELETED(判断是否删除)和mGarbage(判断是否需要垃圾回收)都是标志字段
下面来看append()方法:
	//用于在末尾添加K,V
    public void append(int key, E value) {
    	//如果不是添加到最后,则调用put插入
        if (mSize != 0 && key <= mKeys[mSize - 1]) {
            put(key, value);
            return;
        }

        if (mGarbage && mSize >= mKeys.length) {
            gc();
        }
		//在最后的位置添加
        mKeys = GrowingArrayUtils.append(mKeys, mSize, key);
        mValues = GrowingArrayUtils.append(mValues, mSize, value);
        mSize++;
    }
put()方法:
    public void put(int key, E value) {
    	//二分查找索引
        int i = ContainerHelpers.binarySearch(mKeys, mSize, key);

        if (i >= 0) {
            mValues[i] = value;
        } else {
            i = ~i;//未找到时获取插入位置
			//如果插入位置的值已被标记为DELETED,则覆盖
            if (i < mSize && mValues[i] == DELETED) {
                mKeys[i] = key;
                mValues[i] = value;
                return;
            }
			//如果mGarbage标志为True,且分配大小大于实际数组大小,则执行gc()清楚被标记为DELETED的值
            if (mGarbage && mSize >= mKeys.length) {
                gc();

                // Search again because indices may have changed.
                i = ~ContainerHelpers.binarySearch(mKeys, mSize, key);
            }

            mKeys = GrowingArrayUtils.insert(mKeys, mSize, i, key);
            mValues = GrowingArrayUtils.insert(mValues, mSize, i, value);
            mSize++;
        }
    }
在ContainerHelpers.binarySearch()使用了一个很巧妙的方法
static int binarySearch(int[] array, int size, int value) {
        int lo = 0;
        int hi = size - 1;

        while (lo <= hi) {
            final int mid = (lo + hi) >>> 1;
            final int midVal = array[mid];

            if (midVal < value) {
                lo = mid + 1;
            } else if (midVal > value) {
                hi = mid - 1;
            } else {
                return mid;  // value found
            }
        }
        return ~lo;  // value not present
    }
其返回值,如果找到了则返回mid,未找到则返回~lo(记录插入位置,同时使返回值为负值)
优化的关键gc():处处充满着优化啊,前面提到的DELETED标志字段,在delete/remove方法中会被使用到,这样就避免了每次删除操作都需要将被删除位置后的每个元素索引前移,改成统一一次移动
    public void delete(int key) {
        int i = ContainerHelpers.binarySearch(mKeys, mSize, key);

        if (i >= 0) {
            if (mValues[i] != DELETED) {
                mValues[i] = DELETED;
                mGarbage = true;
            }
        }
    }
    public void remove(int key) {
        delete(key);
    }
此段代码不难理解,便不做过多解释
    private void gc() {
        // Log.e("SparseArray", "gc start with " + mSize);

        int n = mSize;
        //这个o的命名有点随意。。。
        int o = 0;
        int[] keys = mKeys;
        Object[] values = mValues;

        for (int i = 0; i < n; i++) {
            Object val = values[i];

            if (val != DELETED) {
                if (i != o) {
                    keys[o] = keys[i];
                    values[o] = val;
                    values[i] = null;
                }

                o++;
            }
        }

        mGarbage = false;
        //因为o记录着有效元素的个数(未被标注DELETED),所以是去除DELETED标注元素后的元素个数
        mSize = o;

        // Log.e("SparseArray", "gc end with " + mSize);
    }
最后引用别人的总结:
SparseArray有两个优点:1.避免了自动装箱(auto-boxing),2.数据结构不会依赖于外部对象映射。我们知道HashMap 采用一种所谓的“Hash 算法”来决定每个元素的存储位置,存放的都是数组元素的引用,通过每个对象的hash值来映射对象。而SparseArray则是用数组数据结构来保存映射,然后通过折半查找来找到对象。但其实一般来说,SparseArray执行效率比HashMap要慢一点,因为查找需要折半查找,而添加删除则需要在数组中执行,而HashMap都是通过外部映射。但相对来说影响不大,最主要是SparseArray不需要开辟内存空间来额外存储外部映射,从而节省内存。
其中的这个DELETED标志和mGarbage添加的是真的巧妙,阅读源码真的是开拓视野。
好了SparseArray便告一段落
下面来到
ArrayMap
首先要明白ArrayMap是Android专门针对内存优化而设计的,用于取代Java API中的HashMap数据结构。为了更进一步优化key是int类型的Map,提供效率更高的数据结构SparseArray,可避免自动装箱过程。对于key为其他类型则可使用ArrayMap。HashMap的查找和插入时间复杂度为O(1)的代价是牺牲大量的内存来实现的,而SparseArray和ArrayMap性能略逊于HashMap,但更节省内存。
来看一些基本成员变量
	    /**
     * The minimum amount by which the capacity of a ArrayMap will increase.
     * This is tuned to be relatively space-efficient.
     */
    private static final int BASE_SIZE = 4;

    /**
     * Maximum number of entries to have in array caches.
     */
    private static final int CACHE_SIZE = 10;

//缓存的作用是缓存小数组以避免频繁的用new创建新的数组,消耗内存
    static Object[] mBaseCache;
    static int mBaseCacheSize;
    static Object[] mTwiceBaseCache;
    static int mTwiceBaseCacheSize;

    final boolean mIdentityHashCode;
    int[] mHashes;
    Object[] mArray;
    int mSize;
    MapCollections<K, V> mCollections;
首先来看基本的数据操作,append(),put(),remove()
append():
    public void append(K key, V value) {
        int index = mSize;
        //获取hash值,如果为null则为0,如果设置了固定值,则为固定值
        final int hash = key == null ? 0
                : (mIdentityHashCode ? System.identityHashCode(key) : key.hashCode());
        if (index >= mHashes.length) {
            throw new IllegalStateException("Array is full");
        }
        //如果小于当前hash数组中最大的hash值(该mhashes[]数组为递增数组),则使用put()插入到某个位置中
        if (index > 0 && mHashes[index-1] > hash) {
            RuntimeException e = new RuntimeException("here");
            e.fillInStackTrace();
            Log.w(TAG, "New hash " + hash
                    + " is before end of array hash " + mHashes[index-1]
                    + " at index " + index + " key " + key, e);
            put(key, value);
            return;
        }
        //否则插入末尾
        mSize = index+1;
        mHashes[index] = hash;
        index <<= 1;
        mArray[index] = key;
        mArray[index+1] = value;
    }
put():
    public V put(K key, V value) {
        final int hash;
        int index;
        //如果kay为null,hash为0
        if (key == null) {
            hash = 0;
            index = indexOfNull();
        } else {
        //如果设置了固定值,则为固定的hash值
            hash = mIdentityHashCode ? System.identityHashCode(key) : key.hashCode();
            index = indexOf(key, hash);
        }
        //如果找到插入位置,则覆盖并返回原来的value值
        if (index >= 0) {
            index = (index<<1) + 1;
            final V old = (V)mArray[index];
            mArray[index] = value;
            return old;
        }
		//如果没找到,则获得应该插入的下标位置
        index = ~index;//因为ArrayMap也是采用二分查找来插入删除等操作,返回的是取反的值  (见indexOf())
        //如果当前数组已满,则进行扩容,并复制原数组到扩容后数组中
        if (mSize >= mHashes.length) {
            final int n = mSize >= (BASE_SIZE*2) ? (mSize+(mSize>>1))
                    : (mSize >= BASE_SIZE ? (BASE_SIZE*2) : BASE_SIZE);

            if (DEBUG) Log.d(TAG, "put: grow from " + mHashes.length + " to " + n);

            final int[] ohashes = mHashes;
            final Object[] oarray = mArray;
            //此处使用了缓存机制来分配内存,同下面的freeArrays(),后面进行了解
            allocArrays(n);

            if (mHashes.length > 0) {
                if (DEBUG) Log.d(TAG, "put: copy 0-" + mSize + " to 0");
                System.arraycopy(ohashes, 0, mHashes, 0, ohashes.length);
                System.arraycopy(oarray, 0, mArray, 0, oarray.length);
            }

            freeArrays(ohashes, oarray, mSize);
        }
		//如果能直接插入,则插入位置后的元素后移
        if (index < mSize) {
            if (DEBUG) Log.d(TAG, "put: move " + index + "-" + (mSize-index)
                    + " to " + (index+1));
            System.arraycopy(mHashes, index, mHashes, index + 1, mSize - index);
            System.arraycopy(mArray, index << 1, mArray, (index + 1) << 1, (mSize - index) << 1);
        }
		//插入操作
        mHashes[index] = hash;
        mArray[index<<1] = key;
        mArray[(index<<1)+1] = value;
        mSize++;
        return null;
    }
下面来看freeArrays()和allocArrays()
freeArrays():
先讲一下缓存机制的结构,它是一个单向链表,采用头插法,借用[4]中图片
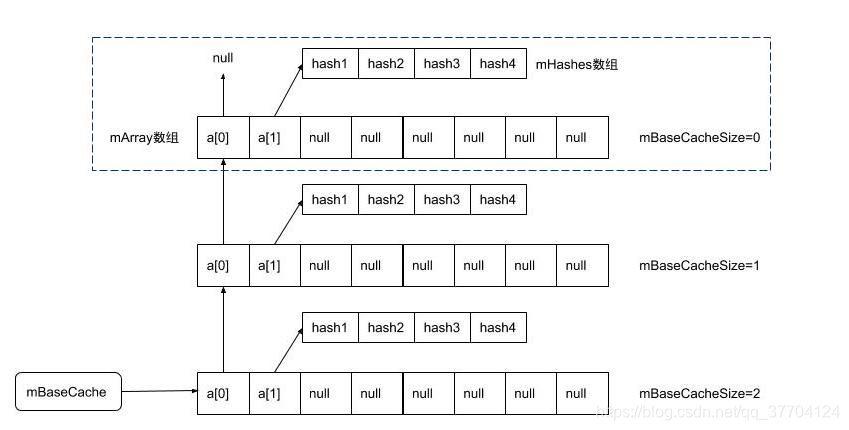
    private static void freeArrays(final int[] hashes, final Object[] array, final int size) {
    	//如果hashes数组长度等于8,下面if为等于4
        if (hashes.length == (BASE_SIZE*2)) {
        //设置同步锁
            synchronized (ArrayMap.class) {
            //未到缓存上限
                if (mTwiceBaseCacheSize < CACHE_SIZE) {
                	//指向原有的缓存数组
                    array[0] = mTwiceBaseCache;
                    //指向hashes数组
                    array[1] = hashes;
                    //剩下的全置为null
                    for (int i=(size<<1)-1; i>=2; i--) {
                        array[i] = null;
                    }
                    //头结点指向当前array数组
                    mTwiceBaseCache = array;
                    //节点数加1
                    mTwiceBaseCacheSize++;
                    if (DEBUG) Log.d(TAG, "Storing 2x cache " + array
                            + " now have " + mTwiceBaseCacheSize + " entries");
                }
            }
        } else if (hashes.length == BASE_SIZE) {
            synchronized (ArrayMap.class) {
                if (mBaseCacheSize < CACHE_SIZE) {
                    array[0] = mBaseCache;
                    array[1] = hashes;
                    for (int i=(size<<1)-1; i>=2; i--) {
                        array[i] = null;
                    }
                    mBaseCache = array;
                    mBaseCacheSize++;
                    if (DEBUG) Log.d(TAG, "Storing 1x cache " + array
                            + " now have " + mBaseCacheSize + " entries");
                }
            }
        }
    }
接下来看allocArrays
这个方法就是将原来缓存中的array[1]指向的hash数组重新赋值给新的mhashes[]数组,
    private void allocArrays(final int size) {
        if (mHashes == EMPTY_IMMUTABLE_INTS) {
            throw new UnsupportedOperationException("ArrayMap is immutable");
        }
        //如果hashes数组长度等于8,同理下面if为等于4
        if (size == (BASE_SIZE*2)) {
            synchronized (ArrayMap.class) {
                if (mTwiceBaseCache != null) {
                	//
                    final Object[] array = mTwiceBaseCache;
                    mArray = array;
                    //指向上一个缓存的缓存池
                    mTwiceBaseCache = (Object[])array[0];
                    //将array[1]指向的hashes数组赋值给hashes数组
                    mHashes = (int[])array[1];
                    //都置为null
                    array[0] = array[1] = null;
                    //缓存数减1
                    mTwiceBaseCacheSize--;
                    if (DEBUG) Log.d(TAG, "Retrieving 2x cache " + mHashes
                            + " now have " + mTwiceBaseCacheSize + " entries");
                    return;
                }
            }
        } else if (size == BASE_SIZE) {
            synchronized (ArrayMap.class) {
                if (mBaseCache != null) {
                    final Object[] array = mBaseCache;
                    mArray = array;
                    mBaseCache = (Object[])array[0];
                    mHashes = (int[])array[1];
                    array[0] = array[1] = null;
                    mBaseCacheSize--;
                    if (DEBUG) Log.d(TAG, "Retrieving 1x cache " + mHashes
                            + " now have " + mBaseCacheSize + " entries");
                    return;
                }
            }
        }
		//当size大小不为4或者8时,则需要通过new来创建新的内存空间了
        mHashes = new int[size];
        mArray = new Object[size<<1];
    }
最后应该就能明白这个缓存机制的作用,就是实现了内存空间的复用,避免了每次添加都使用new来创建新的内存空间,
比如ArrayMap[8]就很好的使用了该缓存机制,而ArrayMap[5/6/7]则浪费了内存空间,现在可以回到put方法中的扩容操作
if (mSize >= mHashes.length) {
			//这个是获取扩容的大小,操作有点多,仔细看还是能理解的
			// - msize>=8时,则扩容后的大小为原来的1.5倍(mSize+(mSize>>1));
			// - msize<4时,则扩容后的大小为(BASE_SIZE)4;
			// - 4<= msize < 8时,则扩容后的大小为(BASE_SIZE*2)8;
            final int n = mSize >= (BASE_SIZE*2) ? (mSize+(mSize>>1))
                    : (mSize >= BASE_SIZE ? (BASE_SIZE*2) : BASE_SIZE);

            if (DEBUG) Log.d(TAG, "put: grow from " + mHashes.length + " to " + n);

            final int[] ohashes = mHashes;
            final Object[] oarray = mArray;
            //从缓存中取出并复用内存空间
            allocArrays(n);

            if (mHashes.length > 0) {
                if (DEBUG) Log.d(TAG, "put: copy 0-" + mSize + " to 0");
                System.arraycopy(ohashes, 0, mHashes, 0, ohashes.length);
                System.arraycopy(oarray, 0, mArray, 0, oarray.length);
            }
			//当mSize大小为BASE_SIZE(4)或者BASE_SIZE*2(8)时,添加到缓存链表中
            freeArrays(ohashes, oarray, mSize);
        }
remove()
    @Override
    public V remove(Object key) {
        final int index = indexOfKey(key);
        if (index >= 0) {
            return removeAt(index);
        }

        return null;
    }
发现实质使用的是removeAt()方法
    public V removeAt(int index) {
    	//获取mArray[2*index + 1]的值,根据上面的存储结构图,可以知道这里是获取原来的value值
        final Object old = mArray[(index << 1) + 1];
        //如果删除的是最后一个元素,则将数组置空
        if (mSize <= 1) {
            // Now empty.
            if (DEBUG) Log.d(TAG, "remove: shrink from " + mHashes.length + " to 0");
            freeArrays(mHashes, mArray, mSize);
            mHashes = EmptyArray.INT;
            mArray = EmptyArray.OBJECT;
            mSize = 0;
        } else {
        	//当数组长度大于BASE_SIZE*2且当前元素数量小于总容量的1/3时
            if (mHashes.length > (BASE_SIZE*2) && mSize < mHashes.length/3) {
                // Shrunk enough to reduce size of arrays.  We don't allow it to
                // shrink smaller than (BASE_SIZE*2) to avoid flapping between
                // that and BASE_SIZE.
                //以下操作收缩内存,释放无用的内存同时不允许它缩小小于(BASE_SIZE * 2)以避免在它和BASE_SIZE之间的抖动。
                //抖动的意思就是介于4和8之间,这样使用不了缓存,浪费内存空间
                final int n = mSize > (BASE_SIZE*2) ? (mSize + (mSize>>1)) : (BASE_SIZE*2);

                if (DEBUG) Log.d(TAG, "remove: shrink from " + mHashes.length + " to " + n);

                final int[] ohashes = mHashes;
                final Object[] oarray = mArray;
                allocArrays(n);

                mSize--;
                //重新调整数组,恢复数据,但是只恢复要被删除的index之前的数据
                if (index > 0) {
                    if (DEBUG) Log.d(TAG, "remove: copy from 0-" + index + " to 0");
                    System.arraycopy(ohashes, 0, mHashes, 0, index);
                    System.arraycopy(oarray, 0, mArray, 0, index << 1);
                }
                //index后的数据前移,覆盖要被删除的数据
                if (index < mSize) {
                    if (DEBUG) Log.d(TAG, "remove: copy from " + (index+1) + "-" + mSize
                            + " to " + index);
                    System.arraycopy(ohashes, index + 1, mHashes, index, mSize - index);
                    System.arraycopy(oarray, (index + 1) << 1, mArray, index << 1,
                            (mSize - index) << 1);
                }
            } else {////当前数组容量<8或者大于总容量的1/3时,不需要收缩数组容量,按普通数组删除操作执行
                mSize--;
                if (index < mSize) {
                    if (DEBUG) Log.d(TAG, "remove: move " + (index+1) + "-" + mSize
                            + " to " + index);
                    System.arraycopy(mHashes, index + 1, mHashes, index, mSize - index);
                    System.arraycopy(mArray, (index + 1) << 1, mArray, index << 1,
                            (mSize - index) << 1);
                }
                mArray[mSize << 1] = null;
                mArray[(mSize << 1) + 1] = null;
            }
        }
        return (V)old;
    }
好了,ArrayMap主要方法也就介绍完了
还有ArraySet
ArraySet和ArrayMap很类似,就不详细介绍了,就是在存储结构方面有差异
总结一下
SparseArray
优点
- 避免了存取元素时的装箱和拆箱(针对key为int和long类型)
- 删除操作效率较高,使用了延迟删除和gc()方法来清理内存
- 二分查找
缺点
- 也是使用了二分查找O(log n)比起hashMap O(1)效率要低很多,但是差距也不会很大
ArrayMap
优点
- 内存利用率高,缓存机制,扩容机制
- 因为存储结构的原因,比HashMap更节省内存
缺点
- 删除插入操作由于使用了二分查找,比起hashMap效率会低很多
可见SparseArray和ArrayMap都是牺牲了一点时间来换取空间,对于Android应用来说,数据量较小的情况下推荐使用SparseArray和ArrayMap,因为这时候时间差异很小,都是会节省大量内存空间
参考:
https://blog.csdn.net/hq942845204/article/details/81293480
https://www.cnblogs.com/RGogoing/p/5095168.html
https://www.cnblogs.com/xiaoweiz/p/3667689.html
http://gityuan.com/2019/01/13/arraymap/
