一、高斯滤波
(1.1)思路
- 加载图像(opencv,截图保存saveROI)
- 边缘轮廓(
高斯滤波,cv2.GaussianBlur)
- 图像去噪(numpy二值化处理)
- 轮廓提取(canny检测,cv2.findContours)
- 绘制轮廓(cv2.drawContours)
(1.2)源码
参考于:基于opencv和Tensorflow的实时手势识别(1)
import cv2
import os
import numpy as np
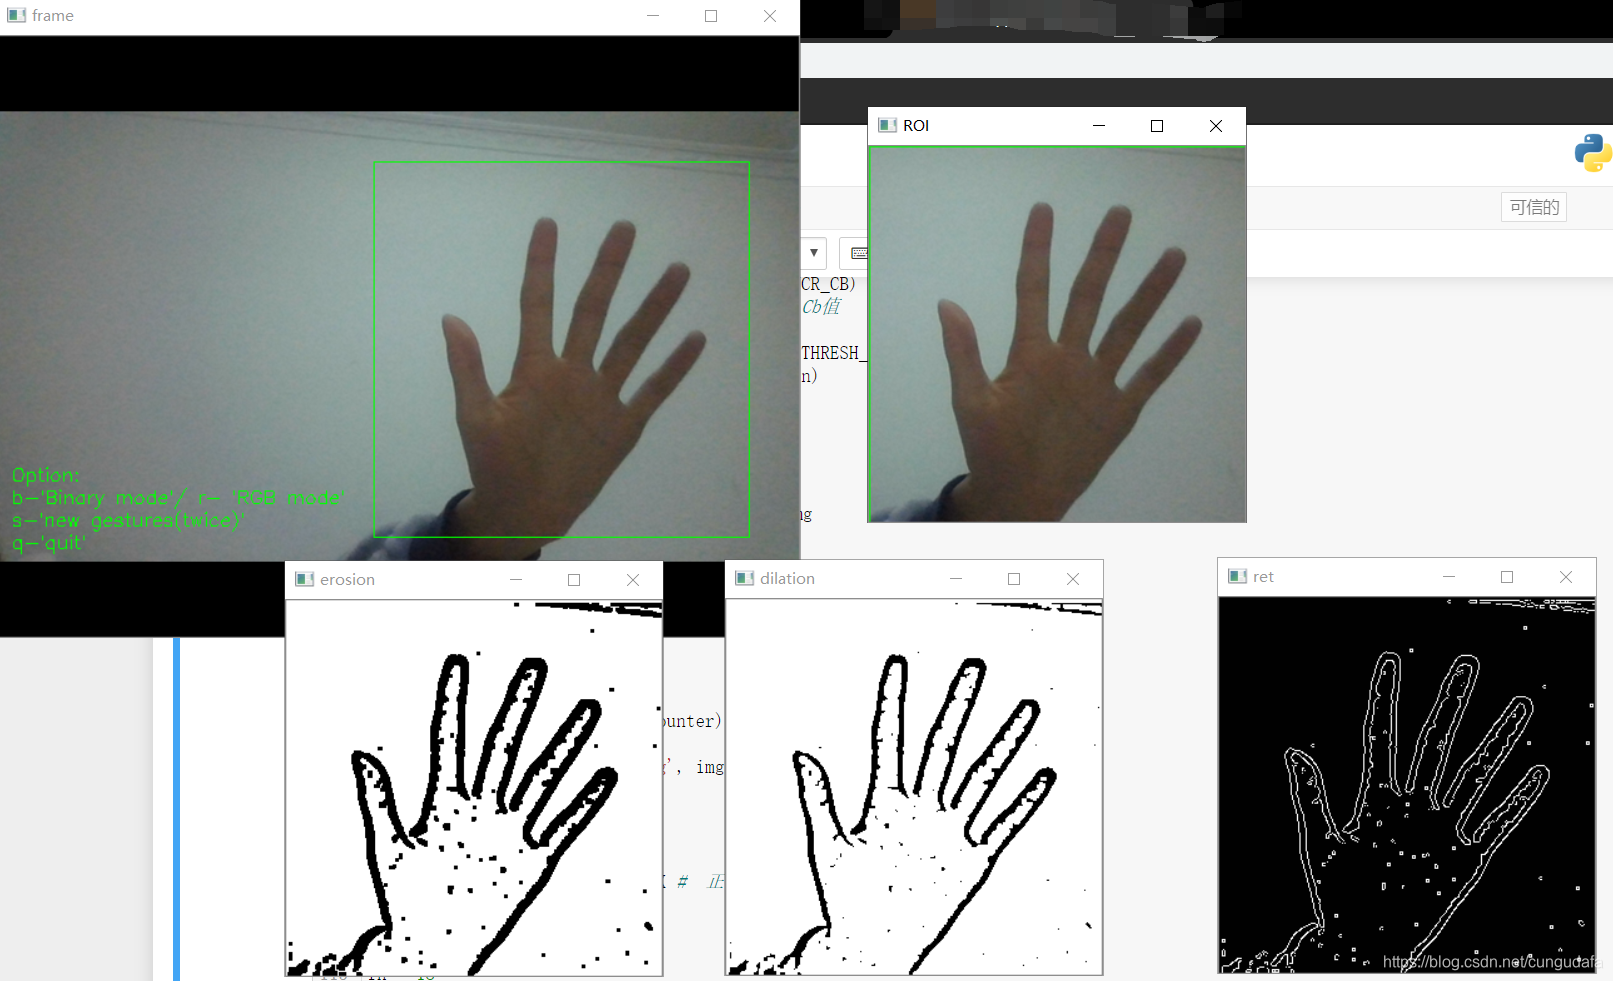
def binaryMask(frame, x0, y0, width, height):
cv2.rectangle(frame, (x0, y0), (x0+width, y0+height), (0, 255, 0))
roi = frame[y0:y0+height, x0:x0+width]
gray = cv2.cvtColor(roi, cv2.COLOR_BGR2GRAY)
blur = cv2.GaussianBlur(gray, (5, 5), 2)
th3 = cv2.adaptiveThreshold(blur, 255, cv2.ADAPTIVE_THRESH_GAUSSIAN_C, cv2.THRESH_BINARY_INV, 11, 2)
ret, res = cv2.threshold(th3, 70, 255, cv2.THRESH_BINARY_INV+cv2.THRESH_OTSU)
"这里可以插入代码调用网络"
kernel = np.ones((3,3), np.uint8)
erosion = cv2.erode(res, kernel)
cv2.imshow("erosion",erosion)
dilation = cv2.dilate(erosion, kernel)
cv2.imshow("dilation",dilation)
binaryimg = cv2.Canny(res, 50, 200)
h = cv2.findContours(binaryimg,cv2.RETR_TREE,cv2.CHAIN_APPROX_NONE)
contours = h[0]
ret = np.ones(res.shape, np.uint8)
cv2.drawContours(ret,contours,-1,(255,255,255),1)
cv2.imshow("ret", ret)
if saveImg == True and binaryMode == True:
saveROI(res)
elif saveImg == True and binaryMode == False:
saveROI(roi)
return res
def saveROI(img):
global path, counter, gesturename, saveImg
if counter > numofsamples:
saveImg = False
gesturename = ''
counter = 0
return
counter += 1
name = gesturename + str(counter)
print("Saving img: ", name)
cv2.imwrite(path+name+'.png', img)
time.sleep(0.05)
font = cv2.FONT_HERSHEY_SIMPLEX
size = 0.5
fx = 10
fy = 355
fh = 18
x0 = 300
y0 = 100
width = 300
height = 300
numofsamples = 300
counter = 0
gesturename = ''
path = ''
binaryMode = False
saveImg = False
cap = cv2.VideoCapture(0)
while(True):
ret, frame = cap.read()
frame = cv2.flip(frame, 2)
roi = binaryMask(frame, x0, y0, width, height)
cv2.putText(frame, "Option: ", (fx, fy), font, size, (0, 255, 0))
cv2.putText(frame, "b-'Binary mode'/ r- 'RGB mode' ", (fx, fy + fh), font, size, (0, 255, 0))
cv2.putText(frame, "s-'new gestures(twice)'", (fx, fy + 2 * fh), font, size, (0, 255, 0))
cv2.putText(frame, "q-'quit'", (fx, fy + 3 * fh), font, size, (0, 255, 0))
key = cv2.waitKey(1) & 0xFF
if key == ord('b'):
binaryMode = True
print("Binary Threshold filter active")
elif key == ord('r'):
binaryMode = False
if key == ord('i'):
y0 = y0 - 5
elif key == ord('k'):
y0 = y0 + 5
elif key == ord('j'):
x0 = x0 - 5
elif key == ord('l'):
x0 = x0 + 5
if key == ord('q'):
break
if key == ord('s'):
"""录制新的手势(训练集)"""
if gesturename != '':
saveImg = True
else:
print("Enter a gesture group name first, by enter press 'n'! ")
saveImg = False
elif key == ord('n'):
gesturename = (input("enter the gesture folder name: "))
os.makedirs(gesturename)
path = "./" + gesturename + "/"
cv2.imshow('frame', frame)
if (binaryMode):
cv2.imshow('ROI', roi)
else:
cv2.imshow("ROI", frame[y0:y0+height, x0:x0+width])
cap.release()
cv2.destroyAllWindows()
二、YCrCb肤色检测
(2.1)思路
- 加载图像(opencv,截图保存saveROI)
- 肤色检测(
YCrCb颜色空间的Cr分量+Otsu法阈值分割算法)
- 图像去噪(numpy二值化处理)
- 轮廓提取(canny检测,cv2.findContours)
- 绘制轮廓(cv2.drawContours)
(2.2)源码
import cv2
import os
import numpy as np
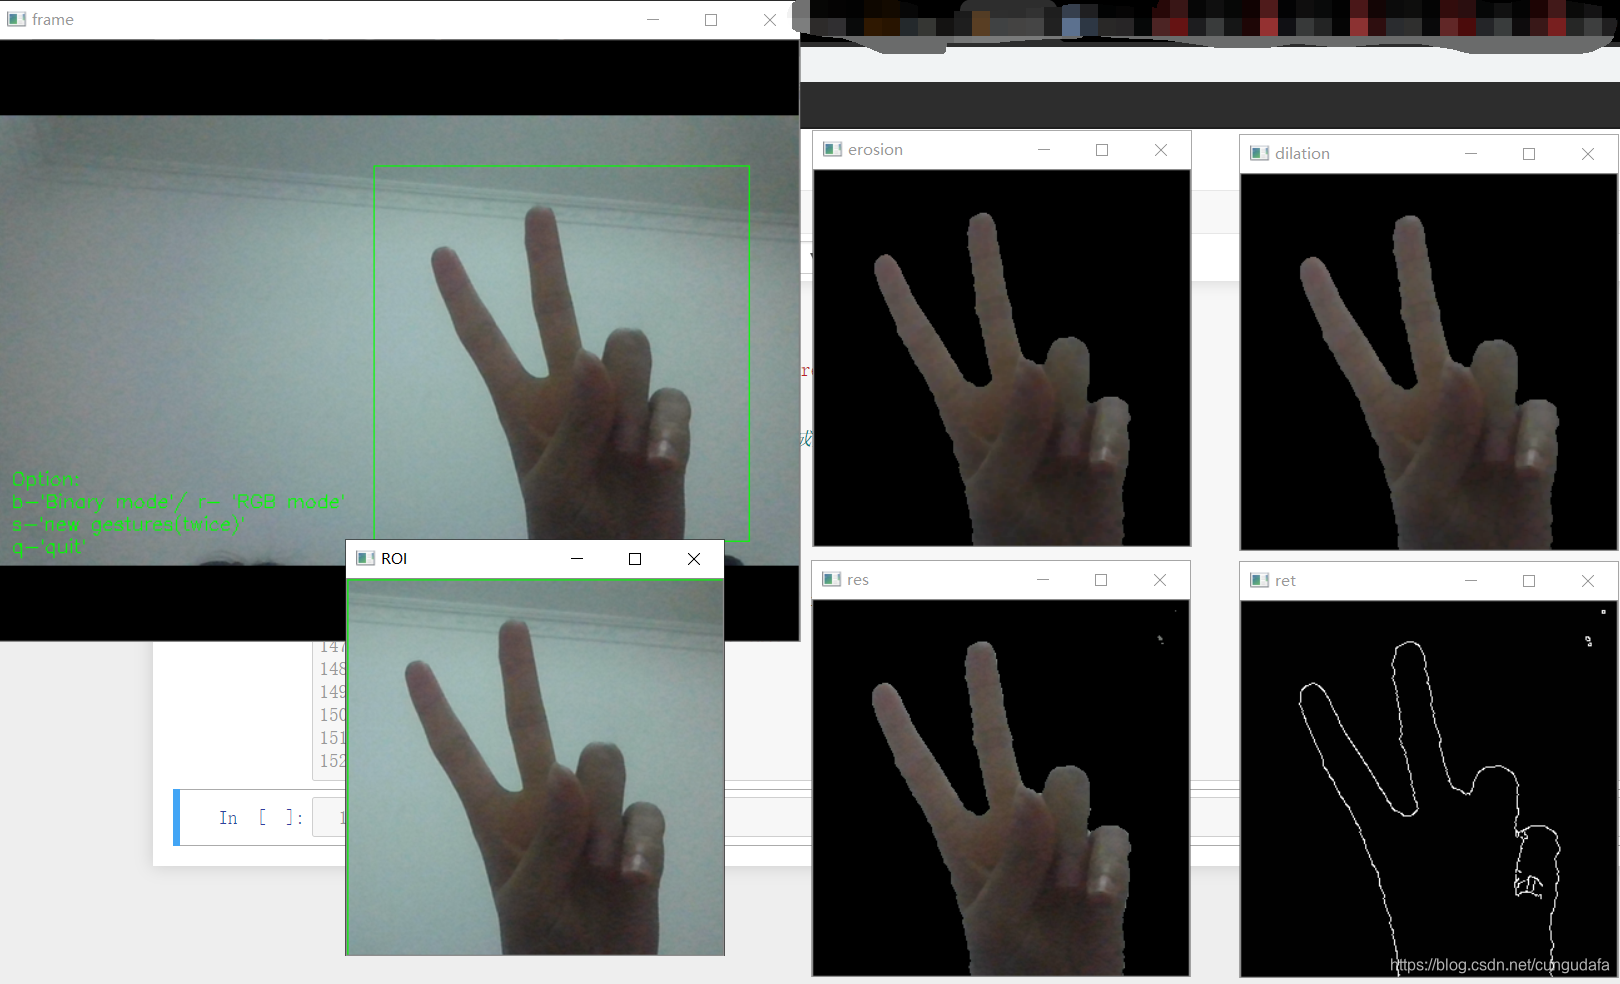
def binaryMask(frame, x0, y0, width, height):
cv2.rectangle(frame,(x0,y0),(x0+width, y0+height),(0,255,0))
roi = frame[y0:y0+height, x0:x0+width]
cv2.imshow("roi", roi)
res = skinMask(roi)
cv2.imshow("res", res)
"这里可以插入代码调用网络"
kernel = np.ones((3,3), np.uint8)
erosion = cv2.erode(res, kernel)
cv2.imshow("erosion",erosion)
dilation = cv2.dilate(erosion, kernel)
cv2.imshow("dilation",dilation)
binaryimg = cv2.Canny(res, 50, 200)
h = cv2.findContours(binaryimg,cv2.RETR_TREE,cv2.CHAIN_APPROX_NONE)
contours = h[0]
ret = np.ones(res.shape, np.uint8)
cv2.drawContours(ret,contours,-1,(255,255,255),1)
cv2.imshow("ret", ret)
if saveImg == True and binaryMode == True:
saveROI(res)
elif saveImg == True and binaryMode == False:
saveROI(roi)
return res
def skinMask(roi):
YCrCb = cv2.cvtColor(roi, cv2.COLOR_BGR2YCR_CB)
(y,cr,cb) = cv2.split(YCrCb)
cr1 = cv2.GaussianBlur(cr, (5,5), 0)
_, skin = cv2.threshold(cr1, 0, 255, cv2.THRESH_BINARY + cv2.THRESH_OTSU)
res = cv2.bitwise_and(roi,roi, mask = skin)
return res
def saveROI(img):
global path, counter, gesturename, saveImg
if counter > numofsamples:
saveImg = False
gesturename = ''
counter = 0
return
counter += 1
name = gesturename + str(counter)
print("Saving img: ", name)
cv2.imwrite(path+name+'.png', img)
time.sleep(0.05)
font = cv2.FONT_HERSHEY_SIMPLEX
size = 0.5
fx = 10
fy = 355
fh = 18
x0 = 300
y0 = 100
width = 300
height = 300
numofsamples = 300
counter = 0
gesturename = ''
path = ''
binaryMode = False
saveImg = False
cap = cv2.VideoCapture(0)
while(True):
ret, frame = cap.read()
frame = cv2.flip(frame, 2)
roi = binaryMask(frame, x0, y0, width, height)
cv2.putText(frame, "Option: ", (fx, fy), font, size, (0, 255, 0))
cv2.putText(frame, "b-'Binary mode'/ r- 'RGB mode' ", (fx, fy + fh), font, size, (0, 255, 0))
cv2.putText(frame, "s-'new gestures(twice)'", (fx, fy + 2 * fh), font, size, (0, 255, 0))
cv2.putText(frame, "q-'quit'", (fx, fy + 3 * fh), font, size, (0, 255, 0))
key = cv2.waitKey(1) & 0xFF
if key == ord('b'):
binaryMode = True
print("Binary Threshold filter active")
elif key == ord('r'):
binaryMode = False
if key == ord('i'):
y0 = y0 - 5
elif key == ord('k'):
y0 = y0 + 5
elif key == ord('j'):
x0 = x0 - 5
elif key == ord('l'):
x0 = x0 + 5
if key == ord('q'):
break
if key == ord('s'):
"""录制新的手势(训练集)"""
if gesturename != '':
saveImg = True
else:
print("Enter a gesture group name first, by enter press 'n'! ")
saveImg = False
elif key == ord('n'):
gesturename = (input("enter the gesture folder name: "))
os.makedirs(gesturename)
path = "./" + gesturename + "/"
cv2.imshow('frame', frame)
if (binaryMode):
cv2.imshow('ROI', roi)
else:
cv2.imshow("ROI", frame[y0:y0+height, x0:x0+width])
cap.release()
cv2.destroyAllWindows()
三、傅里叶描述子提取手部轮廓
(3.1)思路
- 加载图像(opencv,截图保存saveROI)
- 肤色检测(YCrCb颜色空间的Cr分量+Otsu法阈值分割算法)
- 图像去噪(numpy二值化处理)
- 轮廓提取(canny检测,cv2.findContours->
傅里叶描述子Laplacian)
二次去噪(numpy二值化处理)- 绘制轮廓(cv2.drawContours)
(3.2)源码
import cv2
import os
import numpy as np
MIN_DESCRIPTOR = 32
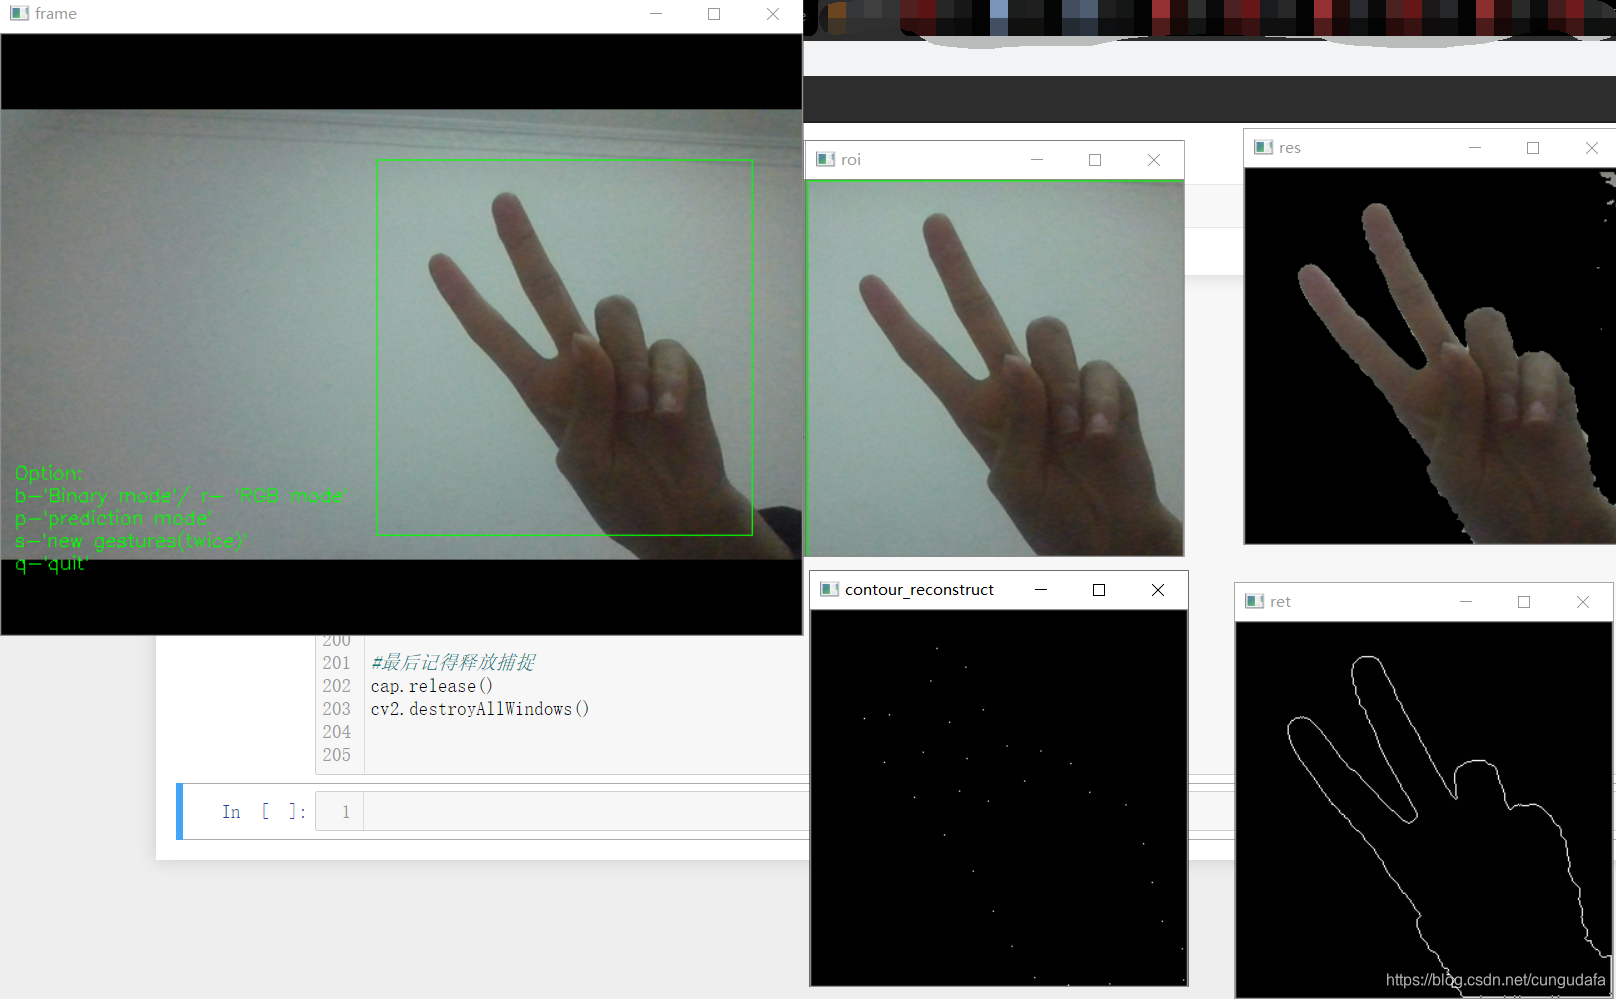
def fourierDesciptor(res):
gray = cv2.cvtColor(res, cv2.COLOR_BGR2GRAY)
dst = cv2.Laplacian(gray, cv2.CV_16S, ksize = 3)
Laplacian = cv2.convertScaleAbs(dst)
contour = find_contours(Laplacian)
contour_array = contour[0][:, 0, :]
ret_np = np.ones(dst.shape, np.uint8)
ret = cv2.drawContours(ret_np,contour[0],-1,(255,255,255),1)
cv2.imshow("ret", ret)
contours_complex = np.empty(contour_array.shape[:-1], dtype=complex)
contours_complex.real = contour_array[:,0]
contours_complex.imag = contour_array[:,1]
fourier_result = np.fft.fft(contours_complex)
descirptor_in_use = truncate_descriptor(fourier_result)
reconstruct(ret, descirptor_in_use)
return ret, descirptor_in_use
def find_contours(Laplacian):
h = cv2.findContours(Laplacian,cv2.RETR_EXTERNAL,cv2.CHAIN_APPROX_NONE)
contour = h[0]
contour = sorted(contour, key = cv2.contourArea, reverse=True)
return contour
def truncate_descriptor(fourier_result):
descriptors_in_use = np.fft.fftshift(fourier_result)
center_index = int(len(descriptors_in_use) / 2)
low, high = center_index - int(MIN_DESCRIPTOR / 2), center_index + int(MIN_DESCRIPTOR / 2)
descriptors_in_use = descriptors_in_use[low:high]
descriptors_in_use = np.fft.ifftshift(descriptors_in_use)
return descriptors_in_use
def reconstruct(img, descirptor_in_use):
contour_reconstruct = np.fft.ifft(descirptor_in_use)
contour_reconstruct = np.array([contour_reconstruct.real,contour_reconstruct.imag])
contour_reconstruct = np.transpose(contour_reconstruct)
contour_reconstruct = np.expand_dims(contour_reconstruct, axis = 1)
if contour_reconstruct.min() < 0:
contour_reconstruct -= contour_reconstruct.min()
contour_reconstruct *= img.shape[0] / contour_reconstruct.max()
contour_reconstruct = contour_reconstruct.astype(np.int32, copy = False)
black_np = np.ones(img.shape, np.uint8)
black = cv2.drawContours(black_np,contour_reconstruct,-1,(255,255,255),1)
cv2.imshow("contour_reconstruct", black)
return black
def binaryMask(frame, x0, y0, width, height):
cv2.rectangle(frame,(x0,y0),(x0+width, y0+height),(0,255,0))
roi = frame[y0:y0+height, x0:x0+width]
cv2.imshow("roi", roi)
res = skinMask(roi)
cv2.imshow("res", res)
ret, fourier_result = fourierDesciptor(res)
if saveImg == True and binaryMode == True:
saveROI(res)
elif saveImg == True and binaryMode == False:
saveROI(roi)
return res
def skinMask(roi):
YCrCb = cv2.cvtColor(roi, cv2.COLOR_BGR2YCR_CB)
(y,cr,cb) = cv2.split(YCrCb)
cr1 = cv2.GaussianBlur(cr, (5,5), 0)
_, skin = cv2.threshold(cr1, 0, 255, cv2.THRESH_BINARY + cv2.THRESH_OTSU)
res = cv2.bitwise_and(roi,roi, mask = skin)
return res
def saveROI(img):
global path, counter, gesturename, saveImg
if counter > numofsamples:
saveImg = False
gesturename = ''
counter = 0
return
counter += 1
name = gesturename + str(counter)
print("Saving img: ", name)
cv2.imwrite(path+name+'.png', img)
time.sleep(0.05)
font = cv2.FONT_HERSHEY_SIMPLEX
size = 0.5
fx = 10
fy = 355
fh = 18
x0 = 300
y0 = 100
width = 300
height = 300
numofsamples = 300
counter = 0
gesturename = ''
path = ''
binaryMode = False
saveImg = False
cap = cv2.VideoCapture(0)
while(True):
ret, frame = cap.read()
frame = cv2.flip(frame, 2)
roi = binaryMask(frame, x0, y0, width, height)
cv2.putText(frame, "Option: ", (fx, fy), font, size, (0, 255, 0))
cv2.putText(frame, "b-'Binary mode'/ r- 'RGB mode' ", (fx, fy + fh), font, size, (0, 255, 0))
cv2.putText(frame, "p-'prediction mode'", (fx, fy + 2 * fh), font, size, (0, 255, 0))
cv2.putText(frame, "s-'new gestures(twice)'", (fx, fy + 3 * fh), font, size, (0, 255, 0))
cv2.putText(frame, "q-'quit'", (fx, fy + 4 * fh), font, size, (0, 255, 0))
key = cv2.waitKey(1) & 0xFF
if key == ord('b'):
binaryMode = True
print("Binary Threshold filter active")
elif key == ord('r'):
binaryMode = False
if key == ord('i'):
y0 = y0 - 5
elif key == ord('k'):
y0 = y0 + 5
elif key == ord('j'):
x0 = x0 - 5
elif key == ord('l'):
x0 = x0 + 5
if key == ord('p'):
"""调用模型开始预测"""
print("using CNN to predict")
if key == ord('q'):
break
if key == ord('s'):
"""录制新的手势(训练集)"""
if gesturename != '':
saveImg = True
else:
print("Enter a gesture group name first, by enter press 'n'! ")
saveImg = False
elif key == ord('n'):
gesturename = (input("enter the gesture folder name: "))
os.makedirs(gesturename)
path = "./" + gesturename + "/"
cv2.imshow('frame', frame)
if (binaryMode):
cv2.imshow('ROI', roi)
else:
cv2.imshow("ROI", frame[y0:y0+height, x0:x0+width])
cap.release()
cv2.destroyAllWindows()
