BootStrap Table行内编辑
BootStrap作为目前比较流行的一款前端框架,平时开发中也用到的很多,之前在写项目页面用的Bootstrap,数据展示用的BootStrap Table。因为项目需求,需要对表格中某些字段可以直接在表格中编辑保存。
对于BootStrap Table表格内编辑这里整理了两种方法。想了解BootStrap Table的小伙伴可以移步到Bootstrap Table数据表格的使用指南。
第一种方法
通过contenteditable属性设置元素的内容是可编辑。
优点:简单,代码量少。
缺点:由于BootStrap Table表格可以设置显示或隐藏列,所以指定某一列可编辑就比较麻烦。
方法思路
结合BootStrap Table中onClickCell单击单元格事件和onDblClickCell双击单元格事件属性来实现。根据项目需求设置单击或者双击事件触发编辑单元格内容事件。

在渲染表格属性时,添加单击单元格事件属性。

代码如下。
/**
 * onClickCell: 单击单元格触发
 * field    点击单元格的字段名称
 * value    点击单元格的数据值
 * row      点击列的整行数据
 * $element 当前点击td的Dom元素
 */
onClickCell: function(field, value, row, $element) {
    $element.attr('contenteditable', true);
    //元素失去焦点事件
    $element.blur(function() {
    	//单元格修改后的的值
        let tdValue = $element.html();

        console.log(field);
        console.log(tdValue);
        console.log(row);
    })
}
添加上面代码后,就可以看到单元格的可编辑效果了。如下图。

修改后的数据,单元格失去焦点后控制台输出的数据。

可以看出表格内容是修改了,但DOM中的当前行row内容却没有和表格中数据同步,需要通过表格的updateCell方法来更新一下单元格的数据。

修改后代码如下。
onClickCell: function(field, value, row, $element) {
        $element.attr('contenteditable', true);
        //元素失去焦点事件
        $element.blur(function() {
            //单元格修改后的的值
            let tdValue = $element.html();
            let index = $element.parent().data('index');

            //updateCell更新某单元格数据
            $("#tbClass_table").bootstrapTable('updateCell', {
                index: index,       //行索引
                field: field,       //列名
                value: tdValue        //cell值
            })

            console.log(field);
            console.log(tdValue);
            console.log(row);
        })
    }
});
控制台输出内容。

但DOM中的当前行row内容是和表格中是同步的。之后就可以把修改的数据保存到数据库中了。
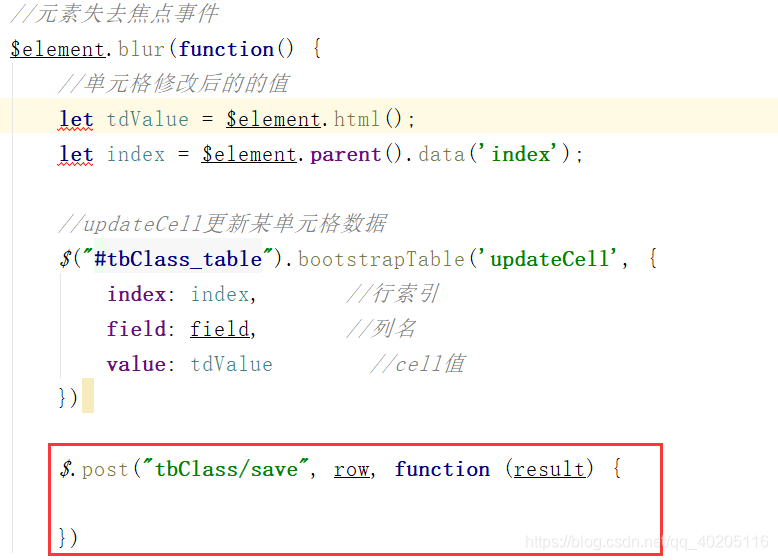
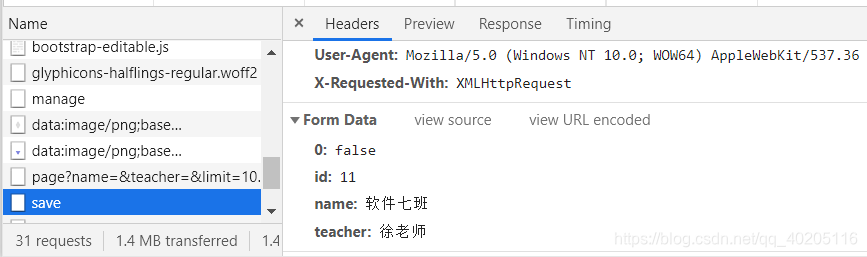
通过AJAX向后台发送编辑保存的请求即可。参数因为row中的数据是和表格中的数据通路边的,所以可以直接把row整体当做参数传递到后台进行修改保存。传递的参数中第一个参数是表格前的复选框值,后台不做处理就可以了。
到这里第一种方法就写完了。下面来看一下第二种方法。
第二种方法
通过bootstrap-editable插件来实现。editable组件是一款用于创建可编辑弹出框的插件,封装的很全面,也很好用。
bootstrap-editable下载地址。
方法思路
和第一种方法一样结合BootStrap Table中onClickCell单击单元格事件和onDblClickCell双击单元格事件属性来实现。根据项目需求设置单击或者双击事件触发编辑单元格内容事件。
之后第一步当然是引入相关的文件了。
<link href="static/bootstrap3-editable/css/bootstrap-editable.css" type="text/css" rel="stylesheet" />
<script src="static/bootstrap3-editable/js/bootstrap-editable.js"></script>
<script src="static/bootstrap3-editable/js/bootstrap-table-editable.js"></script>
其中bootstrap-table-editable.js是下载文件中没有的。bootstrap-table-editable.js其实是对editable做了一个简单的封装,增加了列的editable属性以及编辑保存后的一些事件。使其对表格的操作更简单。bootstrap-table-editable.js文件代码如下。
/**
 * bootstrap-table-editable.js
 * @author zhixin wen <[email protected]>
 * extensions: https://github.com/vitalets/x-editable
 */

!function ($) {

    'use strict';

    $.extend($.fn.bootstrapTable.defaults, {
        editable: true,
        onEditableInit: function () {
            return false;
        },
        onEditableSave: function (field, row, oldValue, $el) {
            return false;
        },
        onEditableShown: function (field, row, $el, editable) {
            return false;
        },
        onEditableHidden: function (field, row, $el, reason) {
            return false;
        }
    });

    $.extend($.fn.bootstrapTable.Constructor.EVENTS, {
        'editable-init.bs.table': 'onEditableInit',
        'editable-save.bs.table': 'onEditableSave',
        'editable-shown.bs.table': 'onEditableShown',
        'editable-hidden.bs.table': 'onEditableHidden'
    });

    var BootstrapTable = $.fn.bootstrapTable.Constructor,
        _initTable = BootstrapTable.prototype.initTable,
        _initBody = BootstrapTable.prototype.initBody;

    BootstrapTable.prototype.initTable = function () {
        var that = this;
        _initTable.apply(this, Array.prototype.slice.apply(arguments));

        if (!this.options.editable) {
            return;
        }

        $.each(this.columns, function (i, column) {
            if (!column.editable) {
                return;
            }

            var _formatter = column.formatter;
            column.formatter = function (value, row, index) {
                var result = _formatter ? _formatter(value, row, index) : value;

                return ['<a href="javascript:void(0)"',
                    ' data-name="' + column.field + '"',
                    ' data-pk="' + row[that.options.idField] + '"',
                    ' data-value="' + result + '"',
                    '>' + '</a>'
                ].join('');
            };
        });
    };

    BootstrapTable.prototype.initBody = function () {
        var that = this;
        _initBody.apply(this, Array.prototype.slice.apply(arguments));

        if (!this.options.editable) {
            return;
        }

        $.each(this.columns, function (i, column) {
            if (!column.editable) {
                return;
            }

            that.$body.find('a[data-name="' + column.field + '"]').editable(column.editable)
                .off('save').on('save', function (e, params) {
                var data = that.getData(),
                    index = $(this).parents('tr[data-index]').data('index'),
                    row = data[index],
                    oldValue = row[column.field];

                row[column.field] = params.submitValue;
                that.trigger('editable-save', column.field, row, oldValue, $(this));
            });
            that.$body.find('a[data-name="' + column.field + '"]').editable(column.editable)
                .off('shown').on('shown', function (e, editable) {
                var data = that.getData(),
                    index = $(this).parents('tr[data-index]').data('index'),
                    row = data[index];

                that.trigger('editable-shown', column.field, row, $(this), editable);
            });
            that.$body.find('a[data-name="' + column.field + '"]').editable(column.editable)
                .off('hidden').on('hidden', function (e, reason) {
                var data = that.getData(),
                    index = $(this).parents('tr[data-index]').data('index'),
                    row = data[index];

                that.trigger('editable-hidden', column.field, row, $(this), reason);
            });
        });
        this.trigger('editable-init');
    };

}(jQuery);
在渲染表格数据时,设置某列可以编辑。
{
field: 'grade',
title: '成绩',
valign: 'middle',
halign: 'center',
align: 'center',
editable: {
type: 'text',
title: '成绩',
//添加效验规则
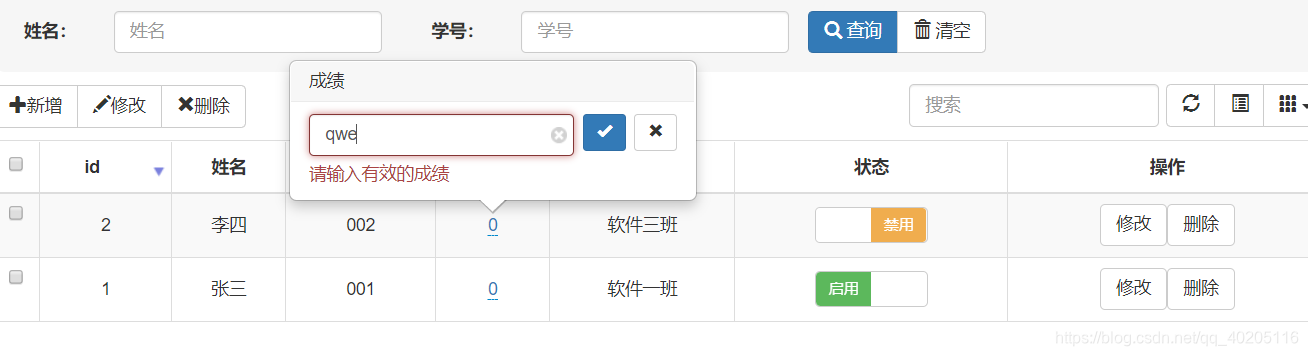
validate: function (value) {
if (!value){
return '成绩不能为空';
}
var regPos = /^\d+(\.\d+)?$/; //非负浮点数
if(!regPos.test(value)) {
return "请输入有效的成绩";
}
}
}
}
设置完成就可以看到效果了。
同样在渲染表格数据时,添加onEditableSave属性。通过onEditableSave方法可以监听输入内容后确定。在此方法中可以通过AJAX请求提交保存修改后的数据。代码如下。
//编辑单元格后保存。
//field 编辑的字段
//row   编辑的当前行
//oldValue  编辑前元素的值。
onEditableSave: function (field, row, oldValue, $el) {
    $.post('student/updateGrade', {id: row.id, grade: row.grade}, function(){
    });
}
后台updateGrade修改保存方法。
@RequestMapping(value = "/updateGrade")
@ResponseBody
public Object updateGrade(Integer id, double grade) {
    try {
        Student stu = studentService.findById(id);
        stu.setGrade(grade);
        studentService.save(stu);
        return new AjaxResult("数据修改成功");
    } catch (Exception e) {
        return new AjaxResult(false, "数据修改失败");
    }
}

点击确定保存后AJAX会向后台发送请求保存修改信息。
需要了解Bootstrap-Switch开关控件的请移步:Bootstrap-Switch开关控件使用指南。
