在工作中经常听到说lnmp架构,那么lnmp架构到底是什么?
lnmp是目前互联网公司主流的一种WEB架构。
lnmp中
l 是linux操作系统
n 是nginx,用于发布web网站(针对的是静态网页,不连接数据库(html))nginx是一个高性能的HTTP和反向代理服务器,也是一个IMAP/POP3/SMTP代理服务器。轻量级的web服务器软件,比apache轻量很多。处理静态网页效率是apache的十倍。
m 是mysql(Mariadb),是关系型数据库,是以二维表格存储的。主要用于存储数据,例如用户名,银行卡账号,余额,工资等。
p 是php((发布的是动态网站等)per或者python),php一种在服务器端执行的嵌入HTML文档的脚本语言,是一门主流的解释型语言。基于拍黄片编写的是php动态网页。动态网页无须编译的,如果要发布或者发布的话,是需要使用php模块或cgi程序的支持。将php动态网页解析为html静态网页,交由nginx或者apache发布。
lnmp就是linux,nginx,mysql和php搭建的一种网站服务器建构。这四种软件均为免费开源软件,组合到一起,成为一个免费、高效、扩展性强的网站服务系统。
lnmp的应用场景
为什么要部署lnmp架构,主要是用于发布web静态+php动态网页。用于通过浏览器进行访问,构成绚丽多彩互联网冲浪。
一、lnmp的工作原理


1、用户通过浏览器访问nginx WEB网站,通过域名解析,发起三次握手
2、当请求到达nginx ,nginx服务器接收到用户的请求之后,先判断请求的url,根据url和locatioj进行匹配,检测请求的web文件是静态还是动态网站;
3、如果是静态html,nginx直接处理并响应给客户端;
4、如果是动态php(per、python),此时nginx不能直接处理,nginx会将请求发送给后端的php模块或者cgi,php解释器将动态网页解析为静态的html网页,然后返回给nginx,此时nginx再将解析后的html静态网页结果返回给客户。
无论请求的是静态网页还是动态网页,客户端收到的结果都是通过nginx响应得到结果
如果php检测到需要连接后端数据库的话,会通过php-mysql连接驱动连接后端的数据库读取和查询数据内容,读取之后再将动态网页解析为静态网页,nginx再将静态网页的内容返回给客户端
Fast CGI
CGI是什么?CGI是通用网关接口,是外部应用程序与Web服务器之间的接口标准,CGI是为了保证web
server传递过来的数据是标准格式的,方便cgi程序的编写者。
fast-CGI是nginx和php之间的一个通信接口,该接口实际处理过程通过启动php-fpm进程来解析php脚本,即php-fpm相当于一个动态应用服务器,从而实现nginx动态解析php。因此,如果nginx服务器需要支持php解析,需要在nginx.conf中增加php的配置;将php脚本转发到fast-CGI进程监听的IP地址和端口(php-fpm.conf中指定)。同时,php安装的时候,需要开启支持fast-CGI选项,并且编译安装php-fpm补丁/扩展,同时,需要启动php-fpm进程,才可以解析nginx通过fastCGI转发过来的php脚本。
Fast-CGI的工作原理
1、Web Server启动时载入Fast-CGI进程管理器(IIS ISAPI或Apache Module)
2、FastCGI进程管理器自身初始化,启动多个CGI解释器进程(可见多个php-cgi)并等待来自Web Server的连接。
3、当客户端请求到达Web Server时,Fast-CGI进程管理器选择并连接到一个CGI解释器。Web server将CGI环境变量和标准输入发送到Fast-CGI子进程php-cgi。
4、Fast-CGI子进程完成处理后将标准输出和错误信息从同一连接返回Web Server。当Fast-CGI子进程关闭连接时,请求便告处理完成。Fast-CGI子进程接着等待并处理来自Fast-CGI进程管理器(运行在Web Server中)的下一个连接。 在CGI模式中,php-cgi在此便退出了。
在上述情况中,你可以想象CGI通常有多慢。每一个Web请求PHP都必须重新解析php.ini、重新载入全部扩展并重初始化全部数据结构。使用Fast-CGI,所有这些都只在进程启动时发生一次。一个额外的好处是,持续数据库连接(Persistent database connection)可以工作。
PHP-CGI
php-cgi 是解释PHP脚本的程序,只是个CGI程序,他自己本身只能解析请求,返回结果,不会进程管理
PHP-FPM
PHP-FPM是一个实现了Fastcgi的程序,PHP-FPM的管理对象是php-cgi。被PHP官方收了。
后来PHP内核集成了PHP-FPM之后就方便多了,使用–enalbe-fpm这个编译参数即可。
1、php-fpm是一个完全独立的程序,不依赖php-cgi,也不依赖php。因为php-fpm是一个内置了php解释器的FastCGI服务,启动时能够自行读取php.ini配置和php-fpm.conf配置.
2、一个master进程,支持多个pool,每个pool由master进程监听不同的端口,pool中有多个worker进程.
3、每个worker进程都内置PHP解释器,并且进程常驻后台,支持prefork动态增加.
4、每个worker进程支持在运行时编译脚本并在内存中缓存生成的opcode来提升性能.
5、每个worker进程支持配置响应指定请求数后自动重启,master进程会重启挂掉的worker进程.
6、每个worker进程能保持一个到MySQL/Memcached/Redis的持久连接,实现"连接池",避免重复建立连接,对程序透明.
7、master进程采用epoll模型异步接收和分发请求,listen监听端口,epoll_wait等待连接,
8、然后分发给对应pool里的worker进程,worker进程accpet请求后poll处理连接,
9、如果worker进程不够用,master进程会prefork更多进程,
A、如果prefork达到了pm.max_children上限,worker进程又全都繁忙,这时master进程会把请求挂起到连接队列backlog里(默认值是511).
软件的部署方式
源码编译安装
1、安装mysql
安装需要的依赖软件


解压mysql软件包并进入:
预编译
cmake -DCMAKE_INSTALL_PREFIX=/usr/local/lnmp/mysql
-DMYSQL_DATADIR=/usr/local/lnmp/mysql/data -DMYSQL_UNIX_ADDR=/usr/local/lnmp/mysql/data/mysql.sock -DWITH_MYISAM_STORAGE_ENGINE=1 -DWITH_INNOBASE_STORAGE_ENGINE=1 -DDEFAULT_CHARSET=utf8 -DDEFAULT_COLLATION=utf8_general_ci -DEXTRA_CHARSETS=all -DWITH_BOOST=boost/boost_1_59_0/

在预编译的时候根据提示安装依赖包。
编译安装
make && make install


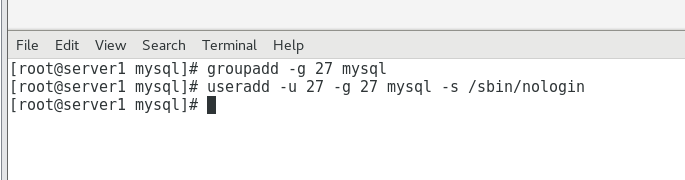
添加MySQL用户及用户组
groupadd -g 27 mysql
useradd -u 27 -g 27 mysql -s /sbin/nologin
配置MySQL环境变量
vim ~/.bash_profile
PATH= HOME/bin
PATH= HOME/bin:/usr/local/lnmp/mysql/bin
source ~/.bash_profile

配置MySQL配置文件
cd support-files/
cp my-default.cnf /etc/my.cnf
vim /etc/my.cnf
mysql安全初始化
[root@server1 support-files]# mysql_secure_installation
Securing the MySQL server deployment.
Enter password for user root: #这里输入初始化给的密码
The existing password for the user account root has expired. Please
set a new password.New password:
Re-enter new password:
VALIDATE PASSWORD PLUGIN can be used to test passwords and improve
security. It checks the strength of password and allows the users to
set only those passwords which are secure enough. Would you like to
setup VALIDATE PASSWORD plugin?Press y|Y for Yes, any other key for No: No Using existing password
for root. Change the password for root ? ((Press y|Y for Yes, any
other key for No) :… skipping. By default, a MySQL installation has an anonymous user,
allowing anyone to log into MySQL without having to have a user
account created for them. This is intended only for testing, and to
make the installation go a bit smoother. You should remove them before
moving into a production environment.Remove anonymous users? (Press y|Y for Yes, any other key for No) :
… skipping.
Normally, root should only be allowed to connect from ‘localhost’.
This ensures that someone cannot guess at the root password from the
network.Disallow root login remotely? (Press y|Y for Yes, any other key for
No) :… skipping. By default, MySQL comes with a database named ‘test’
that anyone can access. This is also intended only for testing, and
should be removed before moving into a production environment.Remove test database and access to it? (Press y|Y for Yes, any other
key for No) :… skipping. Reloading the privilege tables will ensure that all
changes made so far will take effect immediately.
- Reload privilege tables now? (Press y|Y for Yes, any other key for No)
- y Success.
All done!

测试

PHP源码安装


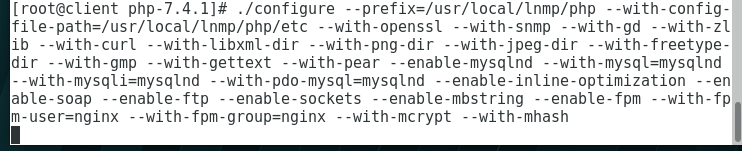
./configure --prefix=/usr/local/lnmp/php --with-config-file-path=/usr/local/lnmp/php/etc --with-openssl --with-snmp --with-gd --with-zlib --with-curl --with-libxml-dir --with-png-dir --with-jpeg-dir --with-freetype-dir --with-gmp --with-gettext --with-pear --enable-mysqlnd --with-mysql=mysqlnd --with-mysqli=mysqlnd --with-pdo-mysql=mysqlnd --enable-inline-optimization --enable-soap --enable-ftp --enable-sockets --enable-mbstring --enable-fpm --with-fpm-user=nginx --with-fpm-group=nginx --with-mcrypt --with-mhash
需要安装
oniguruma-devel-5.9.5-3.el7.x86_64.rpm
oniguruma-5.9.5-3.el7.x86_64.rpm
预编译成功
编译安装
make && make install

复制并配置php配置文件,添加nginx用户
[root@server1 php-7.4.1]# cd /usr/local/lnmp/php/etc/
[root@server1 etc]# ls
pear.conf php-fpm.conf.default php-fpm.d
[root@server1 etc]# useradd nginx
[root@server1 etc]# cp php-fpm.conf.default php-fpm.conf
[root@server1 etc]# vim php-fpm.conf
25 pid = run/php-fpm.pid

复制文件,修改时区
[root@server1 php-7.4.1]# cp php.ini-production /usr/local/lnmp/php/etc/php.ini
[root@server1 php-7.4.1]# vim /usr/local/lnmp/php/etc/php.ini

配置php服务启动脚本
[root@server1 php-7.4.1]# cd sapi/
[root@server1 sapi]# ls
apache2handler cgi cli embed fpm litespeed phpdbg
[root@server1sapi]# cd fpm/
[root@server1 fpm]# ls config.m4 fpm
init.d.php-fpm.in Makefile.frag php-fpm.8 php-fpm.conf
php-fpm.service status.html tests www.conf.in CREDITS init.d.php-fpm LICENSE php-fpm php-fpm.8.in
php-fpm.conf.in php-fpm.service.in status.html.in www.conf
[root@server1 fpm]# cp init.d.php-fpm init.d.php-fpm
init.d.php-fpm.in
[root@server1 fpm]# cp init.d.php-fpm /etc/init.d/php-fpm
[root@server1 fpm]# chmod +x /etc/init.d/php-fpm

测试启动php服务

nginx源码安装


依赖性的解决
yum install pcre-devel -y
预编译
./configure --prefix=/usr/local/lnmp/nginx --with-threads
–with-file-aio --with-http_ssl_module --with-http_stub_status_module --user=nginx --group=nginx

编译安装
make && make intall

修改Nginx配置文件
vim /usr/local/lnmp/nginx/conf/nginx.conf
第65—71行,去掉注释 #
将nginx与php结合起来
2 user nginx nginx;
3 worker_processes auto;
42
43 location / {
44 root html;
45 index index.php index.html index.htm;
46 }65 location ~ .php$ { 66 root html;
67 fastcgi_pass 127.0.0.1:9000; 68
fastcgi_index index.php; 69 #fastcgi_param
SCRIPT_FILENAME /scripts$fastcgi_script_name;
70 include fastcgi.conf;
71 }
cd sbin/
./nginx -t #查看配置文件 ./nginx
-v #查看Nginx版本
制作软链接,并测试
ln -s /usr/local/lnmp/nginx/sbin/nginx /usr/local/sbin/
开启nginx服务,并查看端口
nginx
netstat -antlupe


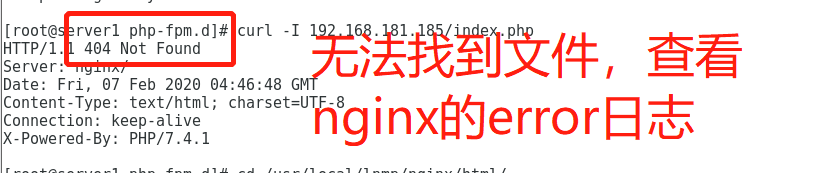
访问测试
cd /usr/local/lnmp/nginx/html/
vim index.php

测试php文件报404,从nginx的error日志中可以看到是无法解析head,这个只能是nginx配置文件的问题,将php的/script更改为$document_root,重新加载nginx.conf文件测试成功


测试成功,nginx编译成功
