nginx架构原理简介以及部署配置
当前参与的项目中,使用nginx做反向代理、负载均衡、访问静态文件以及有关使用https进行通信加密等,因此在此对nginx的相关架构原理、安装部署和配置使用等进行总结介绍,以便后续持续深入研究学习以及为后来者提供参考借鉴。文中不免疏漏之处,希望读者给予批评指正,感激之至!
1. nginx介绍
nginx是一款由俄罗斯的程序设计师Igor Sysoev所开发的开源的、跨平台的高性能web服务器;
有高性能、稳定性高、配置简单、模块结构化、资源消耗低的优点;
支持反向代理、负载均衡、缓存的功能;
其采用多进程+epoll(IO多路复用)模型,也对互联网高并发连接业务有着很好的支持。
2. nginx架构
简单nginx架构:
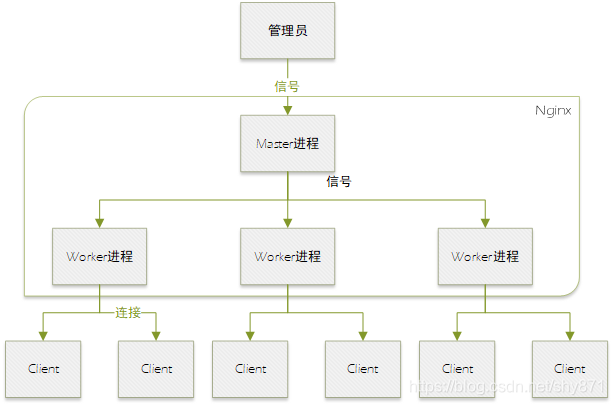
nginx启动后,在unix系统中会以daemon的方式在后台运行,后台进程包含一个master进程和多个worker进程。
(1)master进程
master进程主要用来管理worker进程,包含:接收来自外界的信号,向各worker进程发送信号,监控worker进程的运行状态,当worker进程退出后(异常情况下),会自动重新启动新的worker进程。
(2)worker进程
基本的网络事件,则是放在worker进程中来处理了。多个worker进程之间是对等的,他们同等竞争来自客户端的请求,各进程互相之间是独立的。worker进程的个数是可以设置的,一般设置与机器cpu核数一致,这里面的原因与nginx的进程模型以及事件处理模型是分不开的。
(3)nginx高性能
其一、采用多进程模型,对于每个worker进程来说,独立的进程,不需要加锁,省掉锁带来的开销;
其二、nginx支持epoll处理连接的方法(I/O复用方法)。
3. nginx安装部署
(1)安装gcc
gcc -v
yum -y install gcc
(2)pcre、pcre-devel安装
pcre是一个perl库,包括perl兼容的正则表达式库,nginx的http模块使用pcre来解析正则表达式,所以需要安装pcre库。
yum install -y pcre pcre-devel
(3)zlib安装
zlib库提供了很多种压缩和解压缩方式nginx使用zlib对http包的内容进行gzip,所以需要安装
安装命令:
yum install -y zlib zlib-devel
(4)安装openssl
openssl是web安全通信的基石
安装命令:
yum install -y openssl openssl-devel
(5)安装nginx
1、下载nginx安装包,官网下载地址 https://nginx.org/en/download.html
wget https://nginx.org/download/nginx-1.20.1.tar.gz

2、把压缩包解压到usr/local/
tar -zxvf  nginx-1.20.1.tar.gz

3、切换到cd /usr/local/nginx-1.20.1下面
执行三个命令:
./configure --prefix=/usr/local/nginx --with-http_ssl_module --with-http_stub_status_module --with-http_gzip_static_module
make
make install

4、切换到/usr/local/nginx安装目录conf文件,配置文件nginx.conf,调整端口配置

5、启动nginx服务
切换目录到/usr/local/nginx/sbin下面
启动nginx命令:
./nginx

6、查看nginx服务是否启动成功
ps -ef | grep nginx
(6)nginx添加模块
1、判断模块是否安装
/usr/local/nginx/sbin/nginx -V

2、进入安装解压包重新配置
./configure --with-http_stub_status_module --with-http_ssl_module
其中 --with-http_ssl_module 就是ssl模块

3、编译
make
不要使用make install指令,否则就是覆盖安装。

4、替换nginx二进制文件:
cp ./objs/nginx /usr/local/nginx/sbin/

5、检验
[root@localhost objs]# ./nginx -V
nginx version: nginx/1.20.1
built by gcc 4.8.5 20150623 (Red Hat 4.8.5-44) (GCC)
built with OpenSSL 1.0.2k-fips  26 Jan 2017
TLS SNI support enabled
configure arguments: --with-http_stub_status_module --with-http_ssl_module
4. nginx常用命令
(1)启动nginx: nginx
(2)以特定目录下的配置文件启动:nginx -c  /特定目录/nginx.conf
(3)重新加载配置:nginx -s reload
	执行这个命令后,master进程会等待worker进程处理完当前请求,然后根据最新配置重新创建新的worker进程,完成Nginx配置的热更新。
(4)立即停止服务: nginx -s stop
(5)从容停止服务: nginx -s quit
	执行该命令后,Nginx在完成当前工作任务后再停止。
(6)检查配置文件是否正确 : nginx -t
(7)检查特定目录的配置文件是否正确: nginx -t -c /特定目录/nginx.conf
(8)查看版本信息: nginx -v
5. nginx配置说明
5.1 配置文件结构
#user  nobody;
worker_processes  1;

#error_log  logs/error.log;
#error_log  logs/error.log  notice;
#error_log  logs/error.log  info;

#pid        logs/nginx.pid;

events {
    worker_connections  1024;
}

http {
    include       mime.types;
    default_type  application/octet-stream;

    #log_format  main  '$remote_addr - $remote_user [$time_local] "$request" '
    #                  '$status $body_bytes_sent "$http_referer" '
    #                  '"$http_user_agent" "$http_x_forwarded_for"';

    #access_log  logs/access.log  main;

    sendfile        on;
    #tcp_nopush     on;

    #keepalive_timeout  0;
    keepalive_timeout  65;

    #gzip  on;

    server {
        listen       80;
        server_name  localhost;

        #charset koi8-r;

        #access_log  logs/host.access.log  main;

        location / {
            root   html;
            index  index.html index.htm;
        }

        #error_page  404              /404.html;

        # redirect server error pages to the static page /50x.html
        #
        error_page   500 502 503 504  /50x.html;
        location = /50x.html {
            root   html;
        }

        # proxy the PHP scripts to Apache listening on 127.0.0.1:80
        #
        #location ~ \.php$ {
        #    proxy_pass   http://127.0.0.1;
        #}

        # pass the PHP scripts to FastCGI server listening on 127.0.0.1:9000
        #
        #location ~ \.php$ {
        #    root           html;
        #    fastcgi_pass   127.0.0.1:9000;
        #    fastcgi_index  index.php;
        #    fastcgi_param  SCRIPT_FILENAME  /scripts$fastcgi_script_name;
        #    include        fastcgi_params;
        #}

        # deny access to .htaccess files, if Apache's document root
        # concurs with nginx's one
        #
        #location ~ /\.ht {
        #    deny  all;
        #}
    }

    # another virtual host using mix of IP-, name-, and port-based configuration
    #
    #server {
    #    listen       8000;
    #    listen       somename:8080;
    #    server_name  somename  alias  another.alias;

    #    location / {
    #        root   html;
    #        index  index.html index.htm;
    #    }
    #}


    # HTTPS server
    #
    #server {
    #    listen       443 ssl;
    #    server_name  localhost;

    #    ssl_certificate      cert.pem;
    #    ssl_certificate_key  cert.key;

    #    ssl_session_cache    shared:SSL:1m;
    #    ssl_session_timeout  5m;

    #    ssl_ciphers  HIGH:!aNULL:!MD5;
    #    ssl_prefer_server_ciphers  on;

    #    location / {
    #        root   html;
    #        index  index.html index.htm;
    #    }
    #}

}
5.2 反向代理配置
location /api {
      proxy_pass   http://192.168.65.128:10001/api;
}
5.3 负载均衡配置
nginx默认支持轮询、权重、ip Hash等多种负载均衡策略。
轮询:默认设置方式,每个请求按时间顺序逐一分配到不同的后端服务器进行处理,可以自动剔除宕机服务器。
权重方式:利用weight指定轮询的权重比率,用于后端服务器性能不均的情况。
ip_hash方式:每个请求按照IP的hash结果分配,这样可以让每个访客每次请求都访问同一个后端服务器,可以解决session共享的问题。
upstream api_servers {
	(ip_hash;)
      server  192.168.65.128 (weight=1);
      server  192.168.65.129(weight=3);
}

location /api {
      proxy_pass   http://api_servers;
}
5.4 静态文件配置
(1)root的处理结果是:root路径 + location路径
(2)alias的处理结果是:使用alias路径替换location路径
(3)try_files,是在对vue-router进行History模式进行配置时
location / {
    try_files $uri $uri/ /index.html;
}
关键点1:按指定的file顺序查找存在的文件,并使用第一个找到的文件进行请求处理
关键点2:查找路径是按照给定的root或alias为根路径来查找的
关键点3:如果给出的file都没有匹配到,则重新请求最后一个参数给定的uri,就是新的location匹配
例如:
location /img/ {
    root /opt/html/;
    try_files $uri   $uri/  /img/default.gif;
}
比如 请求 127.0.0.1/img/test.gif 会依次查找 :
1.文件/opt/html/img/test.gif
2.文件夹 /opt/html/img/test.gif/下的index文件
3. 请求127.0.0.1/img/default.gif
6. 参考资料
[1] https://www.nginx.com/
[2] https://blog.51cto.com/longlei/2130185
[3] https://www.cnblogs.com/jasonbourne3/p/14099717.html
[4] https://blog.csdn.net/qq_37345604/article/details/90034424
[5] https://blog.csdn.net/buyueliuying/article/details/89676892
[6] https://blog.csdn.net/duola8789/article/details/107608658