踩坑列表:
- pyinstaller将Py以及图片等依赖文件,一起打包成exe文件
- pyinstaller打包成exe后体积太大(200M+),通过虚拟环境压缩大小(30M+)
- 创建虚拟环境的过程及踩坑
- tkinter GUI图形化界面,导入和导出文件(路径)(图像)
.......待整理
代码:
import tkinter.filedialog
# import tkinter as tk
from tkinter import Button, Tk, Label
import os
# import flag_cv as fc
from PIL import Image
from PIL import ImageTk
from cv2 import imread, imwrite, cvtColor, resize, COLOR_BGR2RGB

def resource_path(relative_path):
    base_path = getattr(
        sys, '_MEIPASS', os.path.dirname(
            os.path.abspath(__file__)))
    return os.path.join(base_path, relative_path)

global_popu_Dic = resource_path("res/flag.jpg")

def deal_flag():
	global panelA, panelB
	global file_path
	global img_save

	file_path = tkinter.filedialog.askopenfilename(title="选择图像", \
		filetypes = [("PNG",".png"), ("JPG", ".jpg")])
	if file_path is not None :
		img_head = imread(file_path)
		img_head1 = img_head.copy()
		img_flag = imread(global_popu_Dic)
		# imwrite("D:/f.jpg", img_flag)
		w_head, h_head = img_head.shape[:2]
		w_flag, h_flag = img_flag.shape[:2]

		scale = w_head / w_flag / 4
		img_flag = resize(img_flag, (0,0), fx = scale, fy = scale)

		w_flag, h_flag = img_flag.shape[:2]
		for c in range(0,3):
			img_head[w_head-w_flag:, h_head-h_flag:, c] = img_flag[:, :, c]

		img_save = img_head.copy()

		img_head = cvtColor(img_head, COLOR_BGR2RGB)
		img_head1 = cvtColor(img_head1, COLOR_BGR2RGB)

		img_head = Image.fromarray(img_head)
		img_head1 = Image.fromarray(img_head1)

		img_head = ImageTk.PhotoImage(img_head)
		img_head1 = ImageTk.PhotoImage(img_head1)

	# if panelA is None or panelB is None:
	if file_path is not None:
		panelA = Label(image = img_head1)
		panelA.image = img_head1
		panelA.pack(side="left", )

		panelB = Label(image = img_head)
		panelB.image = img_head
		panelB.pack(side="right")

def save_file():
	global file_path
 	# img_save
	file_path = tkinter.filedialog.asksaveasfilename(title="保存图片", filetypes = [("PNG",".png")])
	if file_path is not None:
		# print(file_path)
		imwrite(file_path+".png", img_save)


window = Tk()
panelA = None
panelB = None

btn2 = Button(window, text="保存图像", command = save_file)
btn2.pack(side="bottom")

btn1 = Button(window, text="选择图像", command = deal_flag)
btn1.pack(side="bottom")

window.mainloop()
代码解释等我稍后添加(太困了)
参考 https://www.pyimagesearch.com/2016/05/23/opencv-with-tkinter/
参考 https://www.cnblogs.com/dreamboy2000/p/11272384.html
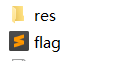
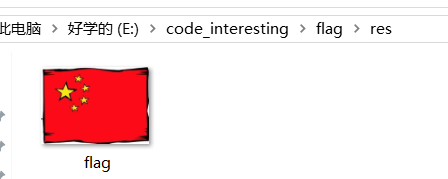
项目目录,及运行效果:

坑爹的打包过程:
依赖文件
由于带一个jpg图像附加文件,所以找了很多博客,总结了一个比较完整的方法:
由于我把文件放到了一个res文件夹里,所以依赖文件就是文件夹
在代码中添加:
# 对xxx.py的修改
# 添加自定义的函数
def resource_path(relative_path):
    base_path = getattr(
        sys, '_MEIPASS', os.path.dirname(
            os.path.abspath(__file__)))
    return os.path.join(base_path, relative_path)

#global_popu_Dic = resource_path("global_popu.tif")  # 打包时使用
global_popu_Dic = "../data/global_popu.tif"         # 调试时使用
pip install pyinstaller
在py文件目录下,cmd执行
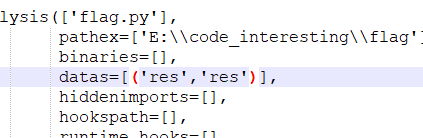
pyi-makespec -D xxx.py生成一个 .spec文件,用记事本打开,为

datas 部分即为依赖的数据,修改为('res','res'),意思为将.py当前目录下的res目录(及其目录中的文件)加入目标exe中,在运行时放在临时文件的根目录下,名称为res,即
然后执行
pyinstaller xxx.spec可以发现在该目录下,出现dist文件夹,其中有一个exe文件,打开即是
参考 https://www.jianshu.com/p/e6d60481887b
参考 https://www.cnblogs.com/darcymei/p/9397173.html
pyinstaller体积压缩
看了很多博客,基本确定原因是打包时自动将其他不需要的库打包进去了,初步解决方式是建立一个虚拟环境
下载pipenv : pip install pipenv
选择一个目录,在该目录下执行
pipenv install --python 3.7
因为自己用的是3.7
然后在pipenv shell 进入环境
- 在环境中执行python如果提示 Warning:This Python interpreter is in a conda environment, but the environment has not been activated.:
- 则 cmd控制台输入:conda activate myenv , 比如在我的电脑中:conda activate D:\Anaconda,所以myenv实际上就是anaconda的安装地址
可以 pip list 查看当前环境下的包,发现较少,即比较纯净

pipenv install 包来添加代码中需要的包
可以在python中import一下,看哪些需要安装

别忘了安装 pyinstaller
最后在该环境下,执行同样的pyinstaller操作
pyi-makespec -F xxx.py
pyinstaller xxx.spec
参考 https://blog.csdn.net/frostime/article/details/90523062
运行出现"Failed to execute script xxx.exe"错误:
可能是缺少某个库
最后
关于添加图标、去掉控制台等,详见
https://blog.csdn.net/zhr1030635594/article/details/98885056
