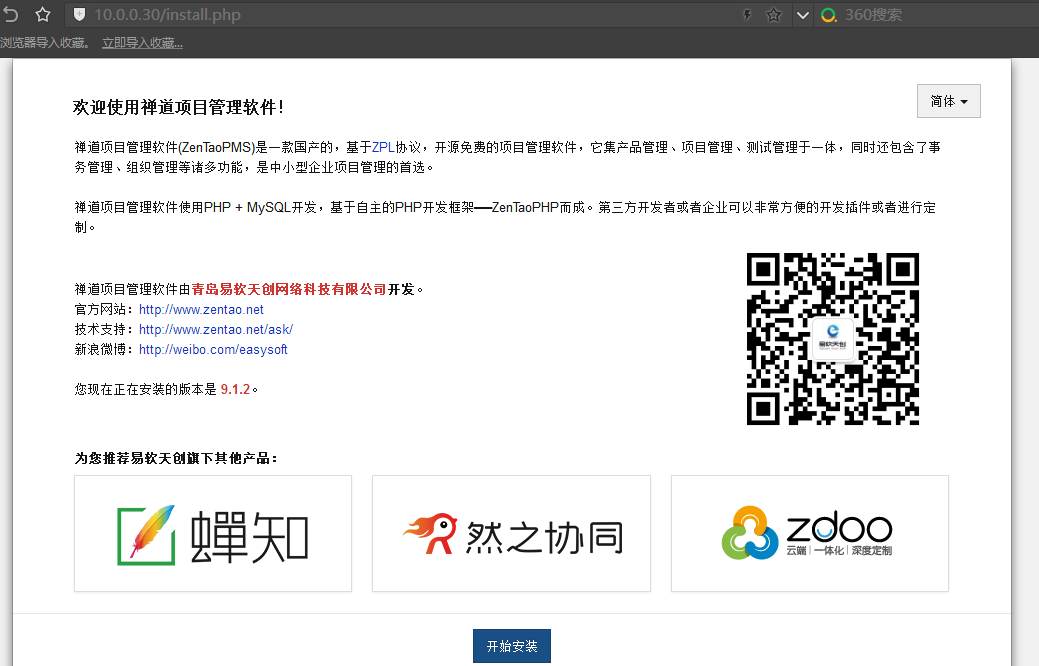
禅道介绍
禅道 项目管理软件 是国产的开源项目管理软件,专注研发项目管理,内置需求管理、任务管理、bug管理、缺陷管理、用例管理、计划发布等功能,实现了软件的完整生命周期管理。
安装禅道环境需要LNMP或者LAMP
环境介绍


 1 [root@web01 ~]# cat /etc/redhat-release
 2
 3 CentOS release 6.8 (Final)
 4
 5 [root@web01 ~]# uname -r
 6
 7 2.6.32-642.el6.x86_64
 8
 9 [root@web01 ~]# uname -m
10
11 x86_64
12
13 更改yum源
14
15 wget -O /etc/yum.repos.d/CentOS-Base.repo http://mirrors.aliyun.com/repo/Centos-6.repo
16
17 wget -O /etc/yum.repos.d/epel.repo http://mirrors.aliyun.com/repo/epel-6.repo
18
19
20
21 关闭防火墙selinux
22
23 /etc/init.d/iptables stop
24
25 sed -i 's/SELINUX=enforcing/SELINUX=disabled/' /etc/selinux/config
26
27 grep SELINUX=disabled /etc/selinux/config
28
29 setenforce 0
30
31
32
33 调整文件描述符
34
35 echo '* - nofile 100000 ' >>/etc/security/limits.conf
安装lnmp环境
编译安装太费时间,这里的lnmp是通过yum安装的。
 1 安装开发包和库文件
 2
 3 yum -y install ntp make openssl openssl-devel pcre pcre-devel libpng libpng-devel libjpeg-6b libjpeg-devel-6b freetype freetype-devel gd gd-devel zlib zlib-devel gcc gcc-c++ libXpm libXpm-devel ncurses ncurses-devel libmcrypt libmcrypt-devel libxml2 libxml2-devel imake autoconf automake screen sysstat compat-libstdc++-33 curl curl-devel
 4
 5 安装nginx
 6
 7 yum install nginx
 8
 9
10
11 安装mysql
12
13 yum install mysql mysql-server mysql-devel
14
15
16
17 安装php
18
19 yum install php lighttpd-fastcgi php-cli php-mysql php-gd php-imap php-ldap php-odbc php-pear php-xml php-xmlrpc php-mbstring php-mcrypt php-mssql php-snmp php-soap php-tidy php-common php-devel php-fpm
20
21
启动lnmp
  1 /etc/init.d/php-fpm start
  2
  3 Starting php-fpm: No log handling enabled - turning on stderr logging
  4
  5 Created directory: /var/lib/net-snmp/mib_indexes
  6
  7                                                            [  OK  ]
  8
  9 netstat -lntup|grep 9000
 10
 11 tcp        0      0 127.0.0.1:9000              0.0.0.0:*                   LISTEN      1419/php-fpm
 12
 13
 14
 15
 16
 17 /etc/init.d/mysqld start
 18
 19 Initializing MySQL database:  WARNING: The host 'web01' could not be looked up with resolveip.
 20
 21 This probably means that your libc libraries are not 100 % compatible
 22
 23 with this binary MySQL version. The MySQL daemon, mysqld, should work
 24
 25 normally with the exception that host name resolving will not work.
 26
 27 This means that you should use IP addresses instead of hostnames
 28
 29 when specifying MySQL privileges !
 30
 31 Installing MySQL system tables...
 32
 33 OK
 34
 35 Filling help tables...
 36
 37 OK
 38
 39
 40
 41 To start mysqld at boot time you have to copy
 42
 43 support-files/mysql.server to the right place for your system
 44
 45
 46
 47 PLEASE REMEMBER TO SET A PASSWORD FOR THE MySQL root USER !
 48
 49 To do so, start the server, then issue the following commands:
 50
 51
 52
 53 /usr/bin/mysqladmin -u root password 'new-password'
 54
 55 /usr/bin/mysqladmin -u root -h web01 password 'new-password'
 56
 57
 58
 59 Alternatively you can run:
 60
 61 /usr/bin/mysql_secure_installation
 62
 63
 64
 65 which will also give you the option of removing the test
 66
 67 databases and anonymous user created by default.  This is
 68
 69 strongly recommended for production servers.
 70
 71
 72
 73 See the manual for more instructions.
 74
 75
 76
 77 You can start the MySQL daemon with:
 78
 79 cd /usr ; /usr/bin/mysqld_safe &
 80
 81
 82
 83 You can test the MySQL daemon with mysql-test-run.pl
 84
 85 cd /usr/mysql-test ; perl mysql-test-run.pl
 86
 87
 88
 89 Please report any problems with the /usr/bin/mysqlbug script!
 90
 91
 92
 93                                                            [  OK  ]
 94
 95 Starting mysqld:                                           [  OK  ]
 96
 97
 98
 99 netstat -lntup|grep mysql
100
101 tcp        0      0 0.0.0.0:3306                0.0.0.0:*                   LISTEN      1618/mysqd
102
103
104
105
106
107 /etc/init.d/nginx start
108
109 Starting nginx:                                            [  OK  ]
修改nginx配置文件
 1  ll /etc/nginx/nginx.conf
 2
 3 -rw-r--r-- 1 root root 1137 2016-10-31 20:37 /etc/nginx/nginx.conf
 4
 5 user nginx;
 6
 7 worker_processes auto;
 8
 9 error_log /var/log/nginx/error.log;
10
11 pid /var/run/nginx.pid;
12
13 events {
14
15     worker_connections  1024;
16
17 }
18
19 http {
20
21     log_format  main  '$remote_addr - $remote_user [$time_local] "$request" '
22
23                       '$status $body_bytes_sent "$http_referer" '
24
25                       '"$http_user_agent" "$http_x_forwarded_for"';
26
27     access_log  /var/log/nginx/access.log  main;
28
29     sendfile            on;
30
31     tcp_nopush          on;
32
33     tcp_nodelay         on;
34
35     keepalive_timeout   65;
36
37     types_hash_max_size 2048;
38
39     include             /etc/nginx/mime.types;
40
41     default_type        application/octet-stream;
42
43     include /etc/nginx/conf.d/*.conf;
44
45 }
46
47 #-----------------------------------------
48
49 server {
50
51         listen 80;
52
53         server_name www.xiaohaozi.org;
54
55 location / {
56
57         root /etc/nginx/html/;
58
59         index index.php;
60
61         }
62
63 location ~* .*\.(php|php5)?$ {
64
65         root /etc/nginx/html/;
66
67         fastcgi_pass  127.0.0.1:9000;
68
69         fastcgi_index index.php;
70
71         include fastcgi.conf;
72
73         }
74
75 }
创建站点目录
1 mkdir /etc/nginx/html/
2
3 wget http://dl.cnezsoft.com/zentao/9.1.2/ZenTaoPMS.9.1.2.zip
4
5 unzip ZenTaoPMS.9.1.2.zip
6
7 cp -a zentaopms/* /etc/nginx/html/
重启nginx直接访问ip,此时发现报403.你如果知道禅道的index文件在哪,也可以直接用ip加index文件路径也是可以访问的。例如(10.0.0.30/www)这样也可以访问到
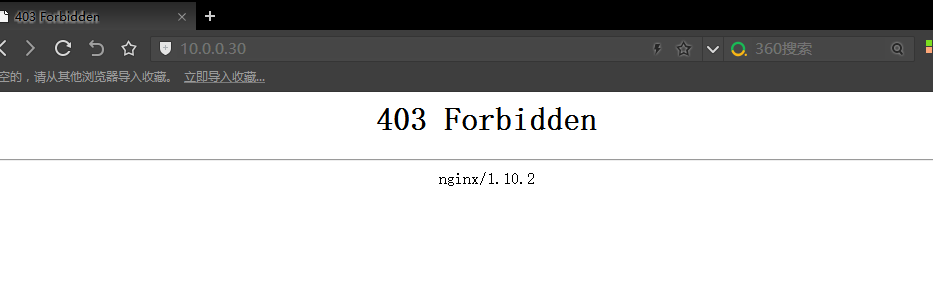
解决办法,查询站点目录下index文件
 1 查看站点目录下,此时发现没有index文件
 2
 3 [root@web01 ~]# ll /etc/nginx/html/
 4
 5 total 40
 6
 7 drwxrwxr-x  3 root root 4096 2017-04-19 13:27 bin
 8
 9 drwxrwxrwx  2 root root 4096 2017-04-19 13:27 config
10
11 drwxrwxr-x  2 root root 4096 2017-04-19 13:27 db
12
13 drwxrwxr-x  2 root root 4096 2017-04-19 13:27 doc
14
15 drwxrwxr-x  3 root root 4096 2017-04-19 13:27 framework
16
17 drwxrwxr-x 24 root root 4096 2017-04-19 13:27 lib
18
19 drwxrwxrwx 50 root root 4096 2017-04-19 13:27 module
20
21 drwxrwxrwx  6 root root 4096 2017-04-19 13:27 tmp
22
23 -rw-rw-r--  1 root root    6 2017-04-19 13:27 VERSION
24
25 drwxrwxrwx  5 root root 4096 2017-04-19 13:27 www
26
27 一顿找最后发现在www目录下
28
29 [root@web01 ~]# ll /etc/nginx/html/www/
30
31 total 192
32
33 -rw-rw-r--  1 root root   4005 2017-04-19 13:27 checktable.php
34
35 drwxrwxrwx  4 root root   4096 2017-04-19 13:27 data
36
37 -rw-rw-r--  1 root root   9622 2017-04-19 13:27 favicon.ico
38
39 -rw-rw-r--  1 root root   2975 2017-04-19 13:27 index.php
40
41 -rw-rw-r--  1 root root   1312 2017-04-19 13:27 install.php
42
43 -rwxr-xr-x  1 root root 147652 2017-04-19 13:27 ioncube.php
44
45 drwxrwxr-x 11 root root   4096 2017-04-19 13:27 js
46
47 -rw-rw-r--  1 root root     26 2017-04-19 13:27 robots.txt
48
49 drwxrwxr-x 10 root root   4096 2017-04-19 13:27 theme
50
51 -rw-rw-r--  1 root root   1729 2017-04-19 13:27 upgrade.php
找到后修改server指定index文件
 1 server {
 2
 3         listen 80;
 4
 5         server_name www.xiaohaozi.org;
 6
 7 location / {
 8
 9         root /etc/nginx/html/www;
10
11         index index.php;
12
13         }
14
15 location ~* .*\.(php|php5)?$ {
16
17         root /etc/nginx/html/www;
18
19         fastcgi_pass  127.0.0.1:9000;
20
21         fastcgi_index index.php;
22
23         include fastcgi.conf;
24
25         }
26
27 }
重启nginx
1 /etc/init.d/nginx restart
2
3 Stopping nginx:                                            [  OK  ]
4
5 Starting nginx:                                            [  OK  ]
访问测试
此时便能发现你访问成了
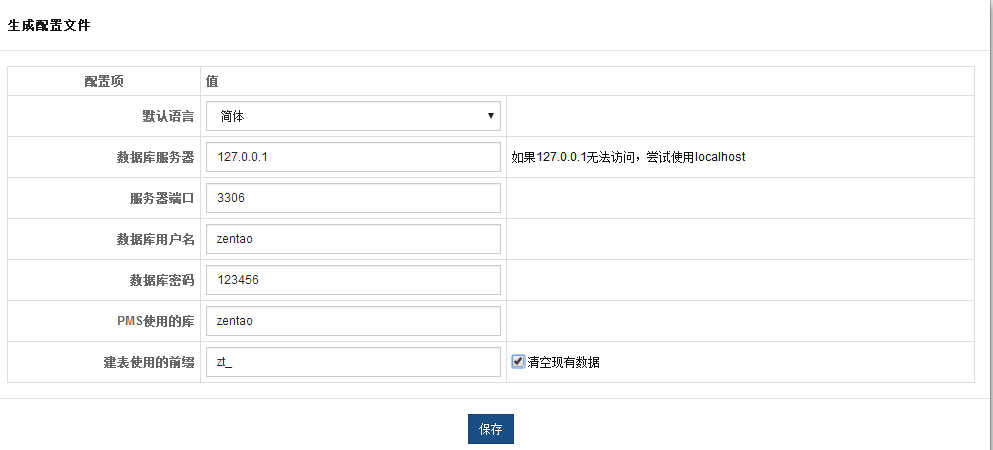
到了第4个下一步说需要数据库用户密码,因为是yum安装的所以还没有设置密码
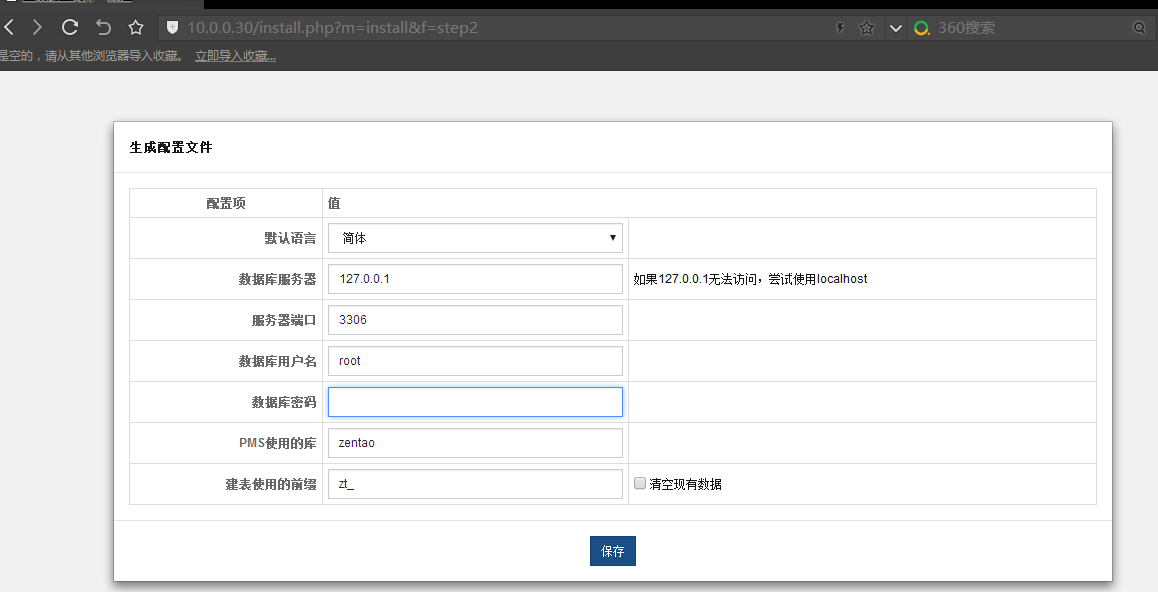
首先跟mysql的root用户设置密码
mysqladmin -uroot password 1q2w3e
进入mysql
 1 mysql -uroot -p1q2w3e
 2
 3 mysql> grant all on zentao.* to zentao@'localhost' identified by '123456';
 4
 5 Query OK, 0 rows affected (0.00 sec)
 6
 7 mysql> create database zentao;
 8
 9 Query OK, 1 row affected (0.00 sec)
10
11 mysql> flush privileges;
12
13 Query OK, 0 rows affected (0.00 sec)