前言
对于安卓开发来说,Bitmap是我们经常提及的话题之一,对于早期安卓开发来说OOM异常与Bitmap的处理紧密相连,稍不留神就来个OOM玩。
现在对于Bitmap的处理大部分情境下就很简单了,一个框架基本全部解决,框架的流行也导致很多开发者一些实现细节不在关心,图片加载立马想到Glide,一行代码解决所有,但是大家应该明白一个道理能写出如此优秀的框架,那肯定是最最基本的技术细节都十分清楚的,所以,我始终认为基础最重要。
上一篇提到图片的质量压缩,本片算是对Bitmap方面知识的补充,主要涉及内存占用大小的计算,尺寸压缩的相关算法,Bitmap复用等方面知识,都是比较简单的。
本篇只是Bitmap方面基础知识的一些梳理,不属于NDK系列文章,好了,进入正文。
Bitmap内存占用
首先我们加载一张500 * 400的图片到内存,显示到250dp * 200dp的图片上,图像放置在res/drawable目录下,图像如下:

加载图片就很简单了,直接用BitmapFactory就可以了,加载完打印出相关信息。
核心代码:
 1        Bitmap bitmap = BitmapFactory.decodeResource(getResources(), R.drawable.icon);
 2        imageView.setImageBitmap(bitmap);
 3
 4        //设备信息
 5        DisplayMetrics dm = new DisplayMetrics();
 6        getWindowManager().getDefaultDisplay().getMetrics(dm);
 7        int densityDpi = dm.densityDpi;
 8        //获取bitmap信息
 9        int byteCount = bitmap.getByteCount();//占用内存大小
10        int width = bitmap.getWidth();
11        int height = bitmap.getHeight();
12        String config = bitmap.getConfig().toString();
13        String bitmapInfo = "width:"+width+"\n"
14                +"height:"+height+"\n"
15                +"config:"+config+"\n"
16                +"byteCount:"+byteCount+"\n"
17                +"densityDpi:"+densityDpi+"\n";
18        info.setText(bitmapInfo);
运行结果:
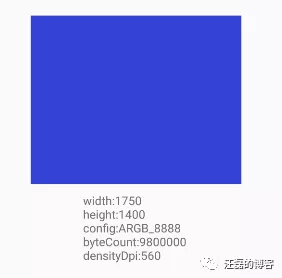
从输出信息来看,bitmap宽高分别为1750,1400,配置为ARGB_8888(如不特殊配置默认格式为ARGB_8888),表示每个像素占用4字节内存,所以总占用内存大小为:
11750 * 1400 *4 = 9800000B ≈ 9.35M
这意味着加载500 * 400大小图片进内存耗费了将近9.35M内存,可见如果不做任何处理加载图片是多么的消耗内存。
这里有两个疑问:
1:图片加载进内存大小怎么由500 * 400变为了1750 * 1400了呢?宽高都增大了3.5倍。
2:上面图片是放入了res/drawable目录下,如果放入其余目录有什么影响吗?毕竟安卓提供了不同目录来存放图片。
接下来我们看一下上面两个问题。
图片加载进内存缩放问题
为了解决这个疑惑,我们就需要看一下源码逻辑了,查找BitmapFactory.decodeResource(getResources(), R.drawable.icon)加载图片的时候到底做了什么操作,源码分析基于android-28。
BitmapFactory.decodeResource(getResources(), R.drawable.icon)调用如下:
 1    public static Bitmap decodeResource(Resources res, int id) {
 2        return decodeResource(res, id, null);
 3    }
 4
 5    public static Bitmap decodeResource(Resources res, int id, Options opts) {
 6       ...
 7       bm = decodeResourceStream(res, value, is, null, opts);
 8       ...
 9       return bm;
10    }
通过上面调用流程可以看到最终调用的是decodeResourceStream方法,接下来我们分析下这个方法:
 1    public static Bitmap decodeResourceStream(@Nullable Resources res,
 2                                              @Nullable TypedValue value,
 3            @Nullable InputStream is, @Nullable Rect pad, @Nullable Options opts) {
 4        validate(opts);
 5        //如果opts为空,这里会初始化一个
 6        if (opts == null) {
 7            opts = new Options();
 8        }
 9        //正常情况下,opts.inDensity会被赋值为图片所在Drawable文件表示的屏幕密度。
10        if (opts.inDensity == 0 && value != null) {
11            final int density = value.density;//图片所在Drawable文件夹的density
12            if (density == TypedValue.DENSITY_DEFAULT) {
13                opts.inDensity = DisplayMetrics.DENSITY_DEFAULT;//特殊情况下,inDensity为默认值160
14            } else if (density != TypedValue.DENSITY_NONE) {
15                opts.inDensity = density;
16            }
17        }
18        //正常情况下,opts.inTargetDensity会被赋值为手机系统密度
19        if (opts.inTargetDensity == 0 && res != null) {
20            opts.inTargetDensity = res.getDisplayMetrics().densityDpi;
21        }
22        return decodeStream(is, pad, opts);
23    }
decodeResourceStream方法里面主要就做了两件事,为opts的inDensity与inTargetDensity属性赋值。
没怎么关注过这两个属性的开发人员可以不是很熟悉,这里解释一下。
inDensity表示图片所在Drawable文件夹所表示的屏幕密度,比如drawable ,mipmap-hdpi,mipmap-xhdpi,mipmap-xxhdpi等所表示的屏幕密度是不一样,具体如下:

inTargetDensity与具体手机屏幕密度有关,不同手机屏幕密度是不一样,比如我测试机是乐视X900+对应屏幕密度是560,可以通过如下代码获取:
1        DisplayMetrics dm = new DisplayMetrics();
2        getWindowManager().getDefaultDisplay().getMetrics(dm);
3        int densityDpi = dm.densityDpi;
到这里似乎明白了这两个参数的意义,但是有什么用呢?似乎和所放没毛关系啊,别急,继续向下看。
decodeResourceStream配置完上述参数后又调用了decodeStream方法,并且将配置后的opts传递过去,接下来我们看下decodeStream方法:
 1    public static Bitmap decodeStream(@Nullable InputStream is, @Nullable Rect outPadding,
 2            @Nullable Options opts) {
 3        // we don't throw in this case, thus allowing the caller to only check
 4        // the cache, and not force the image to be decoded.
 5        if (is == null) {
 6            return null;
 7        }
 8        validate(opts);
 9
10        Bitmap bm = null;
11
12        Trace.traceBegin(Trace.TRACE_TAG_GRAPHICS, "decodeBitmap");
13        try {
14            if (is instanceof AssetManager.AssetInputStream) {
15                final long asset = ((AssetManager.AssetInputStream) is).getNativeAsset();
16                //asset目录下图片通过nativeDecodeAsset加载
17                bm = nativeDecodeAsset(asset, outPadding, opts);
18            } else {
19                //其余目录下图片通过decodeStreamInternal加载
20                bm = decodeStreamInternal(is, outPadding, opts);
21            }
22
23            if (bm == null && opts != null && opts.inBitmap != null) {
24                throw new IllegalArgumentException("Problem decoding into existing bitmap");
25            }
26
27            setDensityFromOptions(bm, opts);
28        } finally {
29            Trace.traceEnd(Trace.TRACE_TAG_GRAPHICS);
30        }
31
32        return bm;
33    }
decodeStream主要逻辑很简单,如果加载assets目录图片则调nativeDecodeAsset来解析加载,其余目录则调用decodeStreamInternal,显然这里调用的是decodeStreamInternal方法:
1    private static Bitmap decodeStreamInternal(@NonNull InputStream is,
2            @Nullable Rect outPadding, @Nullable Options opts) {
3        // ASSERT(is != null);
4        byte [] tempStorage = null;
5        if (opts != null) tempStorage = opts.inTempStorage;
6        if (tempStorage == null) tempStorage = new byte[DECODE_BUFFER_SIZE];
7        return nativeDecodeStream(is, tempStorage, outPadding, opts);
8    }
最终调用的是nativeDecodeStream方法,这个方法是native方法,到这里我们发现java层主要就是配置一些参数,核心的解析是在native层的,可能缩放也在native层来处理的,加下来我们就要去native层来看一下了,看个源码也真是绕~。
BitmapFactory.cpp:
 1static jobject nativeDecodeStream(JNIEnv* env, jobject clazz, jobject is, jbyteArray storage,
 2        jobject padding, jobject options) {
 3
 4    jobject bitmap = NULL;
 5    std::unique_ptr<SkStream> stream(CreateJavaInputStreamAdaptor(env, is, storage));
 6
 7    if (stream.get()) {
 8        std::unique_ptr<SkStreamRewindable> bufferedStream(
 9                SkFrontBufferedStream::Create(stream.release(), SkCodec::MinBufferedBytesNeeded()));
10        SkASSERT(bufferedStream.get() != NULL);
11        //继续调用doDecode方法
12        bitmap = doDecode(env, bufferedStream.release(), padding, options);
13    }
14    return bitmap;
15}
doDecode方法可以说是Bitmap操作的核心所在,这个方法比较较长,这里我只列出与本篇主题相关核心代码:
1static jobject doDecode(JNIEnv* env, SkStreamRewindable* stream, jobject padding, jobject options) {
 2
 3
 4    // Update with options supplied by the client.
 5    if (options != NULL) {
 6        if (env->GetBooleanField(options, gOptions_scaledFieldID)) {
 7            //获取java层配置的图片所在文件夹表示的屏幕密度
 8            const int density = env->GetIntField(options, gOptions_densityFieldID);
 9            //获取java层配置的手机屏幕密度
10            const int targetDensity = env->GetIntField(options, gOptions_targetDensityFieldID);
11            //screenDensity大部分情况下与targetDensity一样
12            const int screenDensity = env->GetIntField(options, gOptions_screenDensityFieldID);
13            if (density != 0 && targetDensity != 0 && density != screenDensity) {
14                //这里就是计算缩放的比率:尼玛可是找了半天
15                scale = (float) targetDensity / density;
16            }
17        }
18    }
19
20    //获取图片原始宽高,就是缩放之前的宽高
21    int scaledWidth = size.width();
22    int scaledHeight = size.height();
23    bool willScale = false;
24
25    // Scale is necessary due to density differences.
26    if (scale != 1.0f) {
27        willScale = true;
28        //缩放逻辑,四舍五入
29        scaledWidth = static_cast<int>(scaledWidth * scale + 0.5f);
30        scaledHeight = static_cast<int>(scaledHeight * scale + 0.5f);
31    }
32
33
34    SkBitmap outputBitmap;
35    if (willScale) {
36
37        const float sx = scaledWidth / float(decodingBitmap.width());
38        const float sy = scaledHeight / float(decodingBitmap.height());
39
40        SkPaint paint;
41        paint.setBlendMode(SkBlendMode::kSrc);
42        paint.setFilterQuality(kLow_SkFilterQuality); // bilinear filtering
43
44        SkCanvas canvas(outputBitmap, SkCanvas::ColorBehavior::kLegacy);
45        //可见最终是通过canvas画出来的
46        canvas.scale(sx, sy);
47        canvas.drawBitmap(decodingBitmap, 0.0f, 0.0f, &paint);
48    } else {
49        outputBitmap.swap(decodingBitmap);
50    }
51
52    // now create the java bitmap
53    return bitmap::createBitmap(env, defaultAllocator.getStorageObjAndReset(),
54            bitmapCreateFlags, ninePatchChunk, ninePatchInsets, -1);
55}
一些核心点在代码上已经标注出来,可见计算缩放是在native层计算的,并且最终通过canvas画出来,缩放的计算方式为:
1scale = (float) targetDensity / density;//手机屏幕密度除以图片所在文件夹表示的密度
到此,这里缩放问题我们终于搞清楚了,并且从源码上也分析了一遍。
我们回过头来再想一下最初的demo缩放问题,从现象到理论,再次回归现象来分析本质:
demo中我们将500*400的图片放入res/drawable中,这个图片目录表示的密度是多少呢?
在分析decodeResourceStream方法的时候,代码中我有个注释:特殊情况下,inDensity为默认值160,我们将图片放入res/drawable中运行的时候源码层就会将inDensity设置为160,你可以理解为这是默认图片文件夹,开发中我们一般也不会将图片大量放入这个目录,一般都适配xxhdpi或者xxxhdpi,而demo我是运行在乐视x900+手机上,对应屏幕密度为560,也就是inTargetDensity值为560,所以计算的scale = 560/160 = 3.5。
到此我相信你已经对图片内存到底占用多大空间这个问题已经完全掌握了,计算公式如下:
1originWidth * originHeight * (inTargetDensity/inDensity) * (inTargetDensity/inDensity) * 每像素占用字节数
图片放入不同文件夹内存占用问题
最开始我们还提出了另一个问题:上面图片是放入了res/drawable目录下,如果放入其余目录有什么影响吗?相信这个问题很简单了,图片放入不同目录对应的inDensity是不一样的,所以最终占用内存也不一样,我们通过demo来感受一下。
我们只将图片从res/drawable目录移到res/mipmap-xxxhdpi目录下,运行demo如下:

宽高变为438,350,不用我多解释了吧,如果你真理解本篇了,就很简单了。
图片尺寸压缩
上一篇提到图片的质量压缩,这里我们再看一下图片的尺寸压缩方面知识,针对图片尺寸的修改其实就是一个图像重新采样的过程,放大图像称为上采样,缩小图像称为下采样。
在安卓中对图片尺寸压缩提供了两种采样算法:临近采样算法与双线性采样算法。
上面提到的两种算法你可能不熟悉,但是代码你肯定用过。
邻近采样
邻近采样是 Android 中常用的压缩方法之一,我们先来看看在 Android 中使用邻近采样的示例代码:
1 BitmapFactory.Options options = new BitmapFactory.Options();
2 options.inSampleSize = 16;
3 Bitmap bitmap = BitmapFactory.decodeResource(getResources(),R.mipmap.resample);
4 Bitmap reSamoleBitmap  =BitmapFactory.decodeResource(getResources(),R.mipmap.resample,options);
我们来看一下邻近采样处理图片的效果:
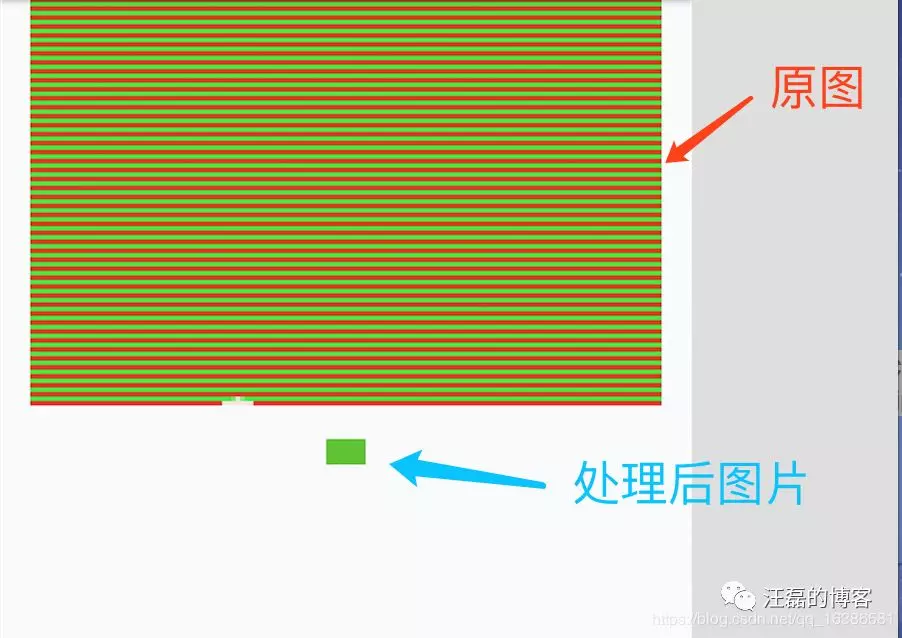
原图是红绿相间的图片,处理后怎么成了纯绿色的图片了呢?这就不得不说邻近采样算法的原理了。
邻近采样算法比较简单粗暴,比如上面我们设置inSampleSize为16,那么就将邻近的16个像素生成一个像素,并且选择其中一个像素作为生成像素,而其余像素直接扔掉。
双线性采样
双线性采样示例代码如下:
1 Bitmap bitmap = BitmapFactory.decodeResource(getResources(),R.mipmap.resample);
2 Bitmap reSamoleBitmap = Bitmap.createScaledBitmap(bitmap,
3 bitmap.getWidth()/2, bitmap.getHeight()/2, true);
或者使用matrix:
1 Bitmap bitmap = BitmapFactory.decodeResource(getResources(),R.mipmap.resample);
2 Matrix matrix = new Matrix();
3 matrix.setScale(0.5f, 0.5f);
4 Bitmap reSamoleBitmap = Bitmap.createBitmap(bitmap, 0, 0,
5 bitmap.getWidth(), bitmap.getHeight(), matrix, true);
createScaledBitmap方法源码中也是通过matrix方式进行缩放的。
双线性采样算法与邻近采样算法不同,双线性采样算法是参考邻近像素点,根据相对位置计算对应权重,经过计算来生成目标图片。
此外,对于图片的采样算法还有双立方算法,Lanczos采样算法等等,这里就不详细介绍了,感兴趣的可以参考腾讯音乐团队写的这篇文章:安卓尺寸压缩分析。
Bitmap内存复用
在Android2.3.3之前谷歌推荐使用Bitmap.recycle()方法进行Bitmap的内存回收,Android3.0之后,强调Bitmap的复用。
Android3.0(API 11之后)引入了BitmapFactory.Options.inBitmap字段,设置此字段之后解码方法会尝试复用一张存在的Bitmap,这意味着Bitmap的内存被复用,避免了内存的回收及申请过程。
Android中内存复用存在几点限制,具体如下:
声明可被复用的Bitmap必须设置inMutable为true。
Android4.4(API 19)之前:
只有格式为jpg、png,宽高相同,inSampleSize为1的Bitmap才可以复用,被复用的Bitmap的inPreferredConfig会覆盖待分配内存的Bitmap设置的inPreferredConfig。
Android4.4(API 19)之后:
被复用的Bitmap的内存必须大于需要申请内存的Bitmap的内存。
可见在API 19之前Bitmap内存复用还是比较严格的。
接下来我们写一个小Demo看一下如何实现Bitmap的复用,代码如下:
1 BitmapFactory.Options options = new BitmapFactory.Options();
2 // 表示Bitmap可被复用
3 options.inMutable = true;
4 options.inDensity = 480;
5 options.inTargetDensity = 480;
6 Bitmap bitmap = BitmapFactory.decodeResource(getResources(),
7                R.mipmap.reuse, options);
8 // 打印信息
9 Log.i(TAG, "bitmap = " + bitmap);
10 Log.i(TAG, "bitmap:ByteCount = " + bitmap.getByteCount() + ":::bitmap:AllocationByteCount = " + bitmap.getAllocationByteCount());
11 // 使用inBitmap属性,这个属性必须设置;
12 options.inBitmap = bitmap;
13 options.inDensity = 480;
14 // 设置缩放宽高为原始宽高一半;
15 options.inTargetDensity = 240;
16 options.inMutable = true;
17 Bitmap bitmapReuse = BitmapFactory.decodeResource(getResources(),
18                R.mipmap.reuse, options);
19 // 打印信息
20 Log.i(TAG, "bitmapReuse = " + bitmapReuse);
21 Log.i(TAG, "bitmap:ByteCount = " + bitmap.getByteCount() + ":::bitmap:AllocationByteCount = " + bitmap.getAllocationByteCount());
22 Log.i(TAG, "bitmapReuse:ByteCount = " + bitmapReuse.getByteCount() + ":::bitmapReuse:AllocationByteCount = " + bitmapReuse.getAllocationByteCount());
代码逻辑很简单,我们首先解码一张图片进内存,再次解码的时候复用已经解码的图片的内存,而不用在开辟新的内存空间,节省了内存的开销与回收。
打印信息如下:
1 //  I/WL: bitmap = android.graphics.Bitmap@4b535d0
2 //  I/WL: bitmap:ByteCount = 892896:::bitmap:AllocationByteCount = 892896
3 //  I/WL: bitmapReuse = android.graphics.Bitmap@4b535d0
4 //  I/WL: bitmap:ByteCount = 223224:::bitmap:AllocationByteCount = 892896
5 //  I/WL: bitmapReuse:ByteCount = 223224:::bitmapReuse:AllocationByteCount = 892896
可以看到Bitmap内存地址是一样的,实现了内存的复用。
getByteCount()获取到的是当前图片应当所占内存大小。
getAllocationByteCount()获取到的是被复用Bitmap真实占用内存大小。
上面例子中第二次解码图片的时候加载进内存需要空间为223224,但是其复用的bitmap内存为892896,所以getByteCount()大小为223224,而getAllocationByteCount()大小为892896。
总结
本篇主要讨论了bitmap加载进内存占用大小,尺寸压缩,以及Bitmap内存复用问题,很简单,都是一些基础的东西,也是面试中经常会考察的点,结合上一篇图片的质量压缩加上这一篇只是个人对这方面技术点的一次小小的总结。
本片到此结束,希望对你有用。
