Mybatis源码分析03-MyBatis概览与源码分析
往期文章链接:
SSM源码分析之Mybatis源码分析01-配置文件的使用
SSM源码分析之Mybatis源码分析02-Mapper与BestPractice
前言
之前的文章我们分析了8种常用的设计模式,另外在mybatis专题的前两篇讲到了mybatis常用的使用规则以及使用技巧。
今天我们来对mybatis源码进行一个整体分析,便于后续手写源码。
这里跟我给出一个学习源码的模式(个人推荐):
以做手机为例:
- 手机都有哪些功能?怎么去使用?(兴趣是最好的老师)
- 将手机拆成零件,逐个分析。(思考问题,为什么要这样做?有没有更好的办法来实现?)
- 将零件组装,大功告成!(当然你也可以根据自己的思考融入创新)
MyBatis概览
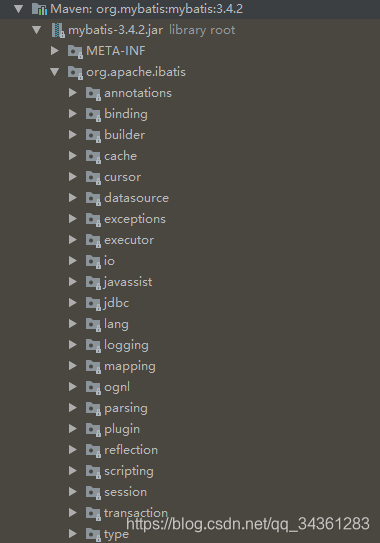
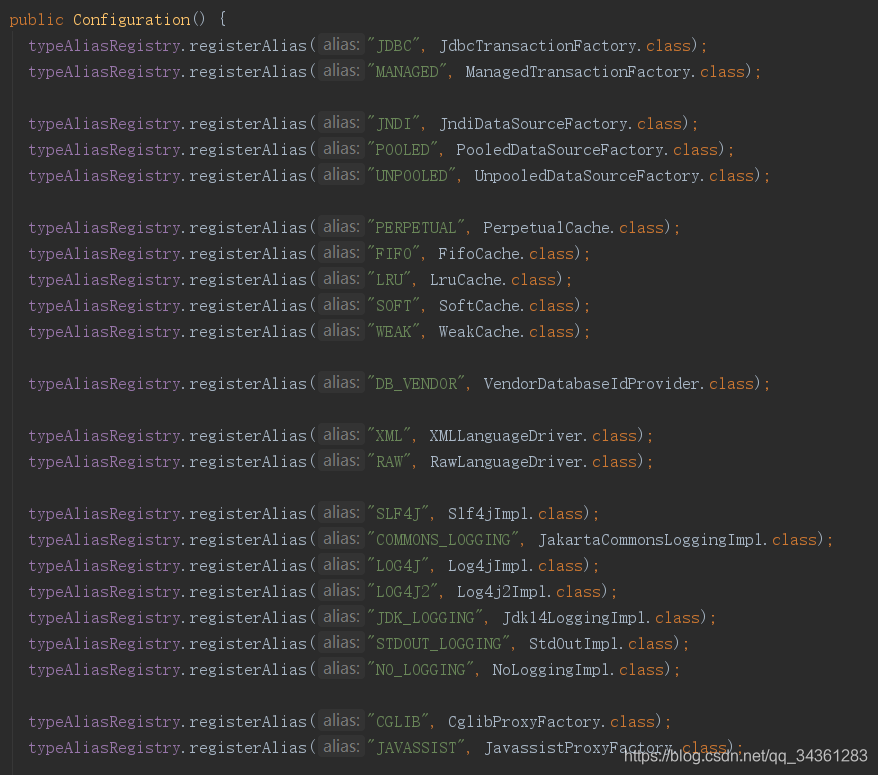
我们以mybatis3.4.2为例,首先查看一下源码的目录结构:
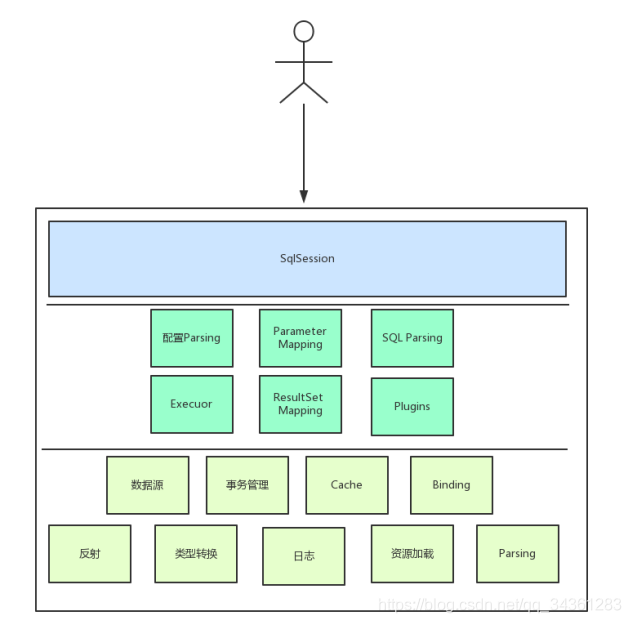
根据模块名称,不难分析出,mybatis的核心组件图:
-
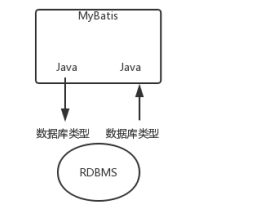
Jdbc怎么实现数据库读取的?
我们可以画一个完整的流程图:

-
MyBatis在jdbc的基础上完成了哪些封装和ORM?

a.MyBatis只完成了ORM的 relation – > object 也就是结果的映射
b.对比 Hibernate 做了全映射

-
MyBatis的ORM是怎么实现的?

我们画一个流程图:

-
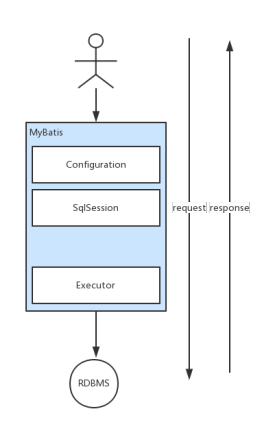
MyBatis架构图

MyBatis源码分析
从哪里作为入口?
我们通过mybatis连接到数据库做一个简单的查询,感受一下源码的设计思路:
public class Demo {
public static SqlSession getSqlSession() throws FileNotFoundException {
//配置文件
InputStream configFile = new FileInputStream(
"D:\\workspace\\idea\\gupaoedu-mybatis\\src\\main\\java\\com\\gupaoedu\\mybatis\\demo\\mybatis-config.xml");
SqlSessionFactory sqlSessionFactory = new SqlSessionFactoryBuilder().build(configFile);
//加载配置文件得到SqlSessionFactory
return sqlSessionFactory.openSession();
}
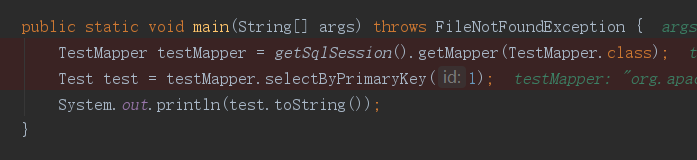
public static void main(String[] args) throws FileNotFoundException {
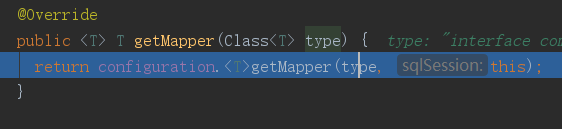
TestMapper testMapper = getSqlSession().getMapper(TestMapper.class);
Test test = testMapper.selectByPrimaryKey(1);
System.out.println(test.toString());
}
}
TestMapper:

这里就是通过加载配置文件,生成SqlSessionFactory,然后调用getMapper找到sql语句返回mapper.java类的实例,调用相关sql语句,最后返回结果
-
找到sql
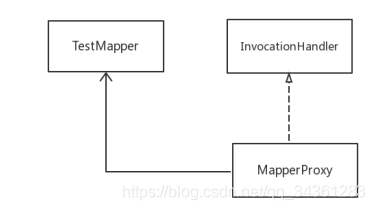
SqlSession 我们之前流程图上重点强调了这个接口,这里使用的是getMapper方法(代理模式)
继续跟进代码

核心实现(动态代理):

注意上面的代码:
mapperProxy从mapperProxyFactory获取一个实例

调用newInstance(动态代理)

这里使用了jdk默认的动态代理方式
因此生成了Mapper.java(TestMapper)的实例 -
参数设置
怎么配置其他的代理方式呢?
注意这个类:org.apache.ibatis.session.Configuration
我们在mybatis的配置文件上:
<configuration>
    <settings>
        <setting name="proxyFactory" value="CGLIB"/>
    </settings>
</configuration>
不知道配置文件怎么配置参数以及值?直接去查mybatis官方文档就可以了
mybatis-configuration配置说明
找到configuration下的setting选项卡:

这不就可以了,标签和值说的很明白了
- 执行
运行我们刚才写的demo,发现成功建立连接,并返回一条数据
(sql文件和代码,均已整理到gitlab上了)地址再发一下:
mybatisDemo-gitlab地址

- 结果映射
- mybatis的动态代理
正常的代理模式

我们发现刚才的demo使用mybatis的动态代理
那么mybatis为什么没有使用ProxyImpl?这样设计有什么好处呢?
我们回到刚才debug的代码:
TestMapper调用方法时,实际上就是进入MapperProxy代理invoke方法,我们来看debug:

这里invoke就是在判断当前的方法是什么类型的。是否是object或是默认方法呢?
然后在cacheMapperMethod方法里,用一个ConcurrentHashMap来存储当前Mapper的所有方法

接下来就是execute方法:
public Object execute(SqlSession sqlSession, Object[] args) {
    Object result;
    switch (command.getType()) {
      case INSERT: {
    	Object param = method.convertArgsToSqlCommandParam(args);
        result = rowCountResult(sqlSession.insert(command.getName(), param));
        break;
      }
      case UPDATE: {
        Object param = method.convertArgsToSqlCommandParam(args);
        result = rowCountResult(sqlSession.update(command.getName(), param));
        break;
      }
      case DELETE: {
        Object param = method.convertArgsToSqlCommandParam(args);
        result = rowCountResult(sqlSession.delete(command.getName(), param));
        break;
      }
      case SELECT:
        if (method.returnsVoid() && method.hasResultHandler()) {
          executeWithResultHandler(sqlSession, args);
          result = null;
        } else if (method.returnsMany()) {
          result = executeForMany(sqlSession, args);
        } else if (method.returnsMap()) {
          result = executeForMap(sqlSession, args);
        } else if (method.returnsCursor()) {
          result = executeForCursor(sqlSession, args);
        } else {
          Object param = method.convertArgsToSqlCommandParam(args);
          result = sqlSession.selectOne(command.getName(), param);
        }
        break;
      case FLUSH:
        result = sqlSession.flushStatements();
        break;
      default:
        throw new BindingException("Unknown execution method for: " + command.getName());
    }
    if (result == null && method.getReturnType().isPrimitive() && !method.returnsVoid()) {
      throw new BindingException("Mapper method '" + command.getName()
          + " attempted to return null from a method with a primitive return type (" + method.getReturnType() + ").");
    }
    return result;
  }
这里有一个问题:这段判断if else 为什么不使用策略模式来改造?
这里仅有5个判断条件,加个策略模式至少要增加7个类,到是显得有点冗余了,所以,设计模式还是应该根据实际场景来设计。(开闭原则)
sqlsession我们并不陌生,通过代理模式,将selectList/selectOne返回
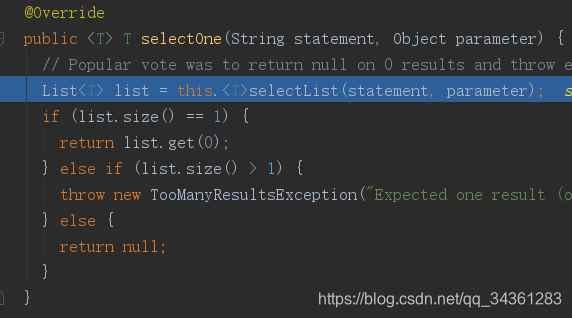
再看这里的selectList/selectOne,实际上就是selectList方法,selectOne不过是调用selectList的方法而已:

execute.query()这里是委托模式
看一下这个executor.query()

DefaultSqlSession封装了一个私有变量Executor,MapperProxy将SqlSession代理,而真正执行sql的是Executor,我们来分析一下Executor这个接口:

BaseExecutor是一个抽象类,实现了Executor接口,CachingExecutor是一个普通类实现了Executor接口。
我们这里做一个抽象化的模型:

考虑到执行过程的问题,将BaseExecutor抽象,然后用4种子类来继承BaseExecutor,而CachingExecutor变不了,基本不用扩展,就直接实现Executor接口即可。

ErrorContext通过ThreadLocal链路追踪
然后看这个方法queryFromDatabase

是不是有点类似于防止缓存击穿的设置?
然后在进入doQuery,进入到SimpleExecutor
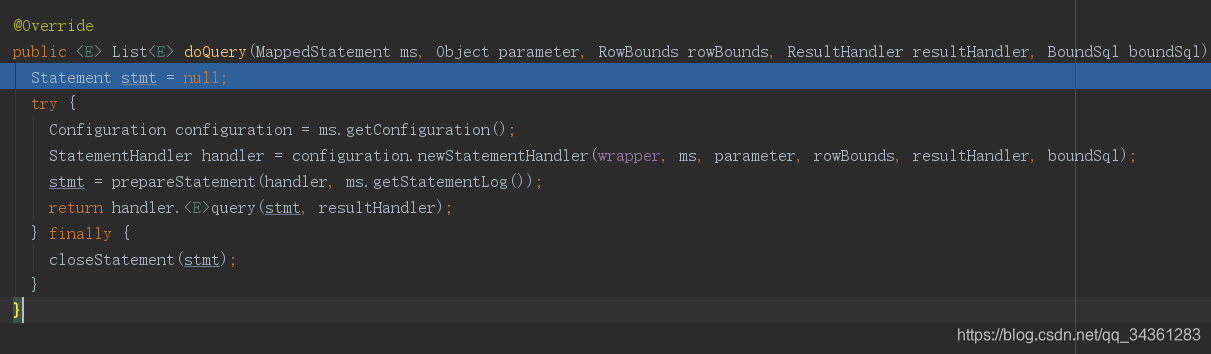
继续调用

赋值:
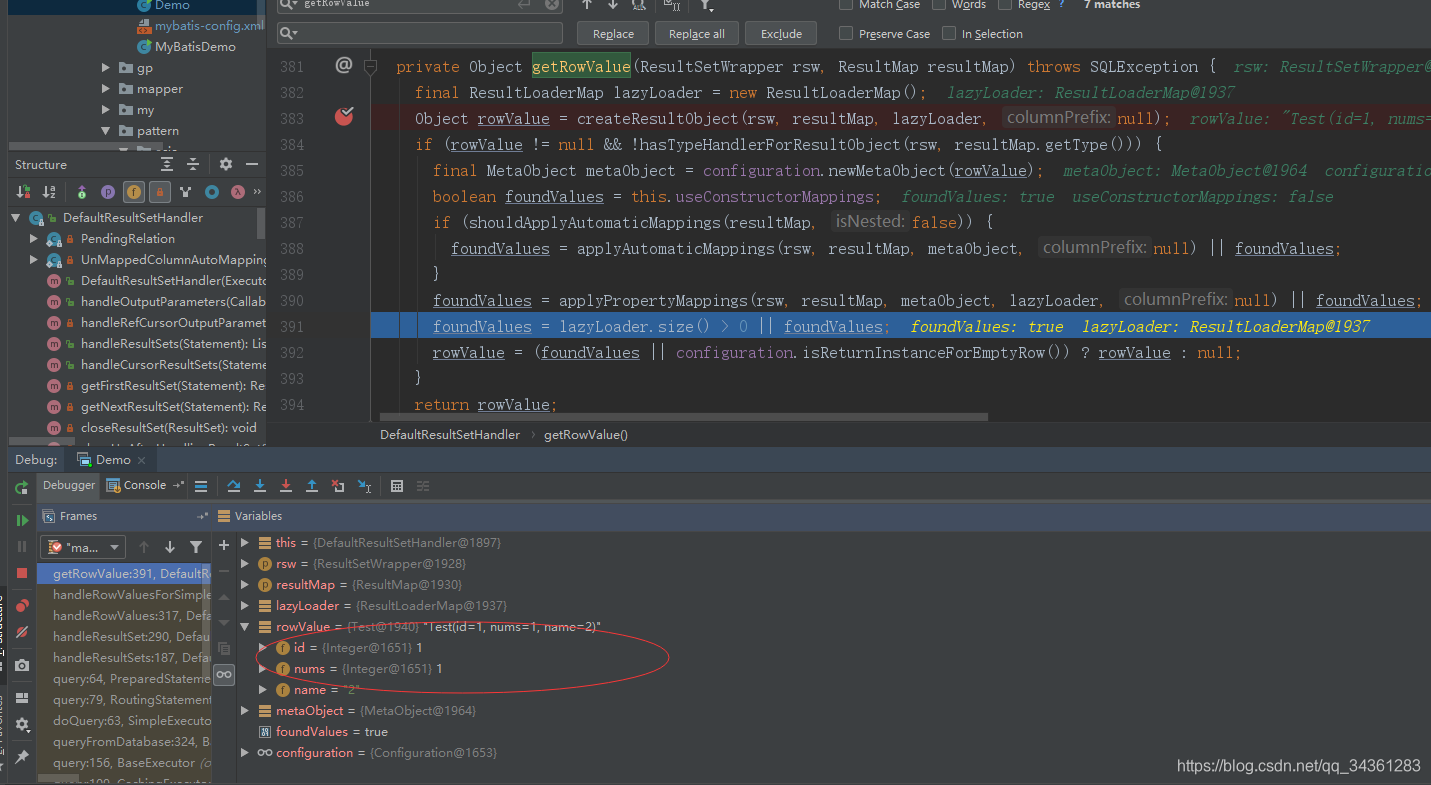
查询完关闭:

一直return:

最后将结果返回:

整理一下刚才我们debug的流程

总结
这篇通过mybatis源码简单的梳理了一下查询数据库的过程,当然mybatis还有一部分组件这里没有介绍,像日志等。下篇我们正式手写mybatis3源码V1.0。
