前言
在学习了Spring4+SpringMVC+mybatis整合以及ssm简单使用后,我们已经基本掌握ssm开发的基础知识,下面将进行ssm高级注解开发,包括的知识有:包装类型pojo参数绑定(即类中不是简单类型的属性,而是另外的pojo),list参数绑定,数据回显,上传图片,json交互,RESTful架构,拦截器等
此次开发是基于上面两篇文章中的项目实现的,上面两篇文章的项目源码请到我的github项目下载
添加按商品名称查询功能
我们已经在mapper包下的ItemsCustomMapper中定义了根据名称来查询的sql片段,
接下来,我们需要在controller类中的queryItems方法绑定ItemsQueryVo对象(即包装类型pojo对象)
原来的queryItems方法
@RequestMapping("/queryItems")
public ModelAndView queryItems() throws Exception{
    List<ItemCustom> itemsList=itemsService.findItemsList(null);
改为
@RequestMapping("/queryItems")
public ModelAndView queryItems(ItemsQueryVo itemsQueryVo) throws Exception{
    //形参上传入了ItemsQueryVo对象,并将形参传入service的findItemsList方法中
    List<ItemCustom> itemsList=itemsService.findItemsList(itemsQueryVo);
在itemsList.jsp页面中对应添加商品名称的查询条件(input输入框)
<form class="layui-form" action="${pageContext.request.contextPath}/items/queryItems.action" method="post">
    <label class="layui-form-label">查询条件</label>
    <div class="layui-input-block">
        <label class="layui-form-label">商品名称</label>
        <div class="layui-input-inline">
<%-- 注意:这里传入的是ItemsQueryVo类下的pojo类ItemCustom下的name属性 --%>
            <input class="layui-input" type="text" name="itemCustom.name">
        </div>
        <div class="layui-input-inline">
            <button class="layui-btn" type="submit" value="查询">查询</button>
        </div>
    </div>
</form>
这里只是取ItemsQueryVo类下的ItemCustom的name属性,若有多层包装类,则按照类名.类名.(...).属性来命名form表单所要传入参数
然后,只要在商品显示页面的商品名称输入框输入所要查找的商品名称,就可以看到相应结果
新增添加商品信息功能
在mapper包下的ItemsMapper.xml下已经编写好往数据库插入记录的insert语句,
由于我这里使用的是sqlserver的id自增类型,不允许再插入id值,需要修改一下
insert语句(使用mysql的自增类型则不用修改),如下:
将body中form表单部分改为
<form class="layui-form" action="${pageContext.request.contextPath}/items/queryItems.action" method="post">
    <label class="layui-form-label">查询条件</label>
    <div class="layui-input-block">
        <label class="layui-form-label">商品名称</label>
        <div class="layui-input-inline">
<%-- 注意:这里传入的是ItemsQueryVo类下的pojo类ItemCustom下的name属性 --%>
            <input class="layui-input" type="text" name="itemCustom.name">
        </div>
        <div class="layui-input-inline">
            <button class="layui-btn" type="submit" value="查询">查询</button>
        </div>
    </div>
</form>
这里只是取ItemsQueryVo类下的ItemCustom的name属性,若有多层包装类,则按照类名.类名.(...).属性来命名form表单所要传入参数
然后,只要在商品显示页面的商品名称输入框输入所要查找的商品名称,就可以看到相应结果
新增添加商品信息功能
在mapper包下的ItemsMapper.xml下已经编写好往数据库插入记录的insert语句,
由于我这里使用的是sqlserver的id自增类型,不允许再插入id值,需要修改一下
insert语句(使用mysql的自增类型则不用修改),如下:
<!--<insert id="insert" parameterType="po.Items">-->
  <!--insert into items (id, name, price, -->
    <!--detail, pic, createtime-->
    <!--)-->
  <!--values (#{id,jdbcType=INTEGER}, #{name,jdbcType=VARCHAR}, #{price,jdbcType=NUMERIC}, -->
    <!--#{detail,jdbcType=VARCHAR}, #{pic,jdbcType=VARCHAR}, #{createtime,jdbcType=TIMESTAMP}-->
    <!--)-->
<!--</insert>-->
<!--<insert id="insertSelective" parameterType="po.Items">-->
  <!--insert into items-->
  <!--<trim prefix="(" suffix=")" suffixOverrides=",">-->
    <!--<if test="id != null">-->
      <!--id,-->
    <!--</if>-->
    <!--<if test="name != null">-->
      <!--name,-->
    <!--</if>-->
    <!--<if test="price != null">-->
      <!--price,-->
    <!--</if>-->
    <!--<if test="detail != null">-->
      <!--detail,-->
    <!--</if>-->
    <!--<if test="pic != null">-->
      <!--pic,-->
    <!--</if>-->
    <!--<if test="createtime != null">-->
      <!--createtime,-->
    <!--</if>-->
  <!--</trim>-->
  <!--<trim prefix="values (" suffix=")" suffixOverrides=",">-->
    <!--<if test="id != null">-->
      <!--#{id,jdbcType=INTEGER},-->
    <!--</if>-->
    <!--<if test="name != null">-->
      <!--#{name,jdbcType=VARCHAR},-->
    <!--</if>-->
    <!--<if test="price != null">-->
      <!--#{price,jdbcType=NUMERIC},-->
    <!--</if>-->
    <!--<if test="detail != null">-->
      <!--#{detail,jdbcType=VARCHAR},-->
    <!--</if>-->
    <!--<if test="pic != null">-->
      <!--#{pic,jdbcType=VARCHAR},-->
    <!--</if>-->
    <!--<if test="createtime != null">-->
      <!--#{createtime,jdbcType=TIMESTAMP},-->
    <!--</if>-->
  <!--</trim>-->
<!--</insert>-->

<!-- 因为id在sqlserver设置为自增型的id,不需要再插入,这里改写一下insert的sql语句,将上面一段注释掉 -->
<!-- 即在insert中不插入id值 -->
<insert id="insert" parameterType="po.Items">
  insert into items (name, price,
  detail, pic, createtime
  )
  values (#{name,jdbcType=VARCHAR}, #{price,jdbcType=NUMERIC},
  #{detail,jdbcType=VARCHAR}, #{pic,jdbcType=VARCHAR}, #{createtime,jdbcType=TIMESTAMP}
  )
</insert>
<insert id="insertSelective" parameterType="po.Items">
  insert into items
  <trim prefix="(" suffix=")" suffixOverrides=",">
    <if test="id != null">
      id,
    </if>
    <if test="name != null">
      name,
    </if>
    <if test="price != null">
      price,
    </if>
    <if test="detail != null">
      detail,
    </if>
    <if test="pic != null">
      pic,
    </if>
    <if test="createtime != null">
      createtime,
    </if>
  </trim>
  <trim prefix="values (" suffix=")" suffixOverrides=",">
    <if test="id != null">
      #{id,jdbcType=INTEGER},
    </if>
    <if test="name != null">
      #{name,jdbcType=VARCHAR},
    </if>
    <if test="price != null">
      #{price,jdbcType=NUMERIC},
    </if>
    <if test="detail != null">
      #{detail,jdbcType=VARCHAR},
    </if>
    <if test="pic != null">
      #{pic,jdbcType=VARCHAR},
    </if>
    <if test="createtime != null">
      #{createtime,jdbcType=TIMESTAMP},
    </if>
  </trim>
</insert>
修改完成后,在service包下的ItemsService新增addItems方法
//添加商品
public void addItems(ItemCustom itemCustom) throws Exception;
在service/impl包下的ItemsServiceImpl重写addItems方法
@Override
public void addItems(ItemCustom itemCustom) throws Exception{
    // 添加商品
    //使用itemsMapper中的insert方法来插入记录
    itemsMapper.insert(itemCustom);
}
在controller包下的ItemsController设置相应的跳转路径
//跳转到添加商品的jsp页面
@RequestMapping("/addItems")
public String add() throws Exception{
    return "addItems";
}

// 提交添加商品请求
@RequestMapping("/addItemsSubmit")
public String addSuccess(ItemCustom itemCustom) throws Exception{
    //编写添加商品的功能
    itemsService.addItems(itemCustom);

    return "forward:addItems.action";
}
在controller中指定了addItems.jsp页面,路径是WEB-INF/jsp/addItems.jsp
<%--
Created by IntelliJ IDEA.
User: 光玉
Date: 2018/4/10
Time: 20:39
To change this template use File | Settings | File Templates.
--%>
<%@ page contentType="text/html;charset=UTF-8" language="java" pageEncoding="utf-8" %>
<html>
<head>
<title>添加商品</title>
<script type="text/javascript" src="<%= request.getContextPath()%>/plugin/layui/layui.all.js"></script>
<link rel="stylesheet" href="<%= request.getContextPath()%>/plugin/layui/css/layui.css">
</head>
<!-- 由于在前端itemsList.jsp使用弹出层将表单传入,
提交按钮也绑定到弹出层的“添加”按钮,这里便不编写“提交”按钮 -->
<body style="background-color: #7e6c75">
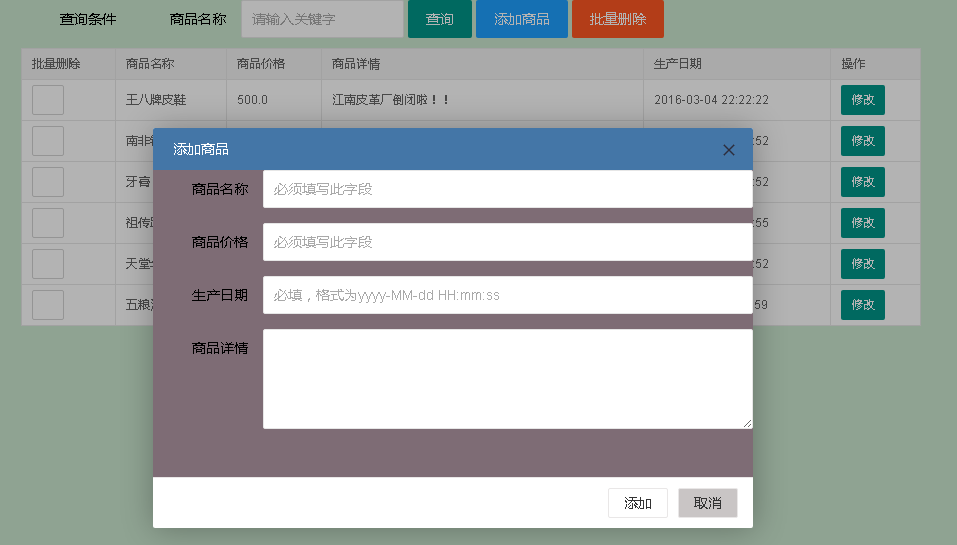
<form id="formSubmit" class="layui-form" action="${pageContext.request.contextPath}/items/addItemsSubmit.action" method="post">
<div class="layui-form-item">
<label class="layui-form-label">商品名称</label>
<div class="layui-input-block">
<input class="layui-input" type="text" name="name" placeholder="必须填写此字段"/>
</div>
</div>
<div class="layui-form-item">
<label class="layui-form-label">商品价格</label>
<div class="layui-input-block">
<input class="layui-input" type="text" name="price" placeholder="必须填写此字段"/>
</div>
</div>
<%--<div class="layui-form-item">
<label class="layui-form-label">商品图片</label>
<div class="layui-input-inline">
<input class="layui-input" type="text" name="pic"/>
</div>
</div>--%>
<div class="layui-form-item">
<label class="layui-form-label">生产日期</label>
<div class="layui-input-block">
<input class="layui-input" type="text" name="createtime" placeholder="必填,格式为yyyy-MM-dd HH:mm:ss"/>
</div>
</div>
<div class="layui-form-item layui-form-text">
<label class="layui-form-label">商品详情</label>
<div class="layui-input-block">
<textarea class="layui-textarea" name="detail"></textarea>
</div>
</div>
<%--<div class="layui-form-item">--%>
<%--<div class="layui-input-block">--%>
<%--<button class="layui-btn" type="submit">提交</button>--%>
<%--<button type="reset" class="layui-btn layui-btn-primary">重置</button>--%>
<%--</div>--%>
<%--</div>--%>
</form>
<script>
layui.use('form', function () {
var form = layui.form;
form.render();
});
</script>
</body>
</html>
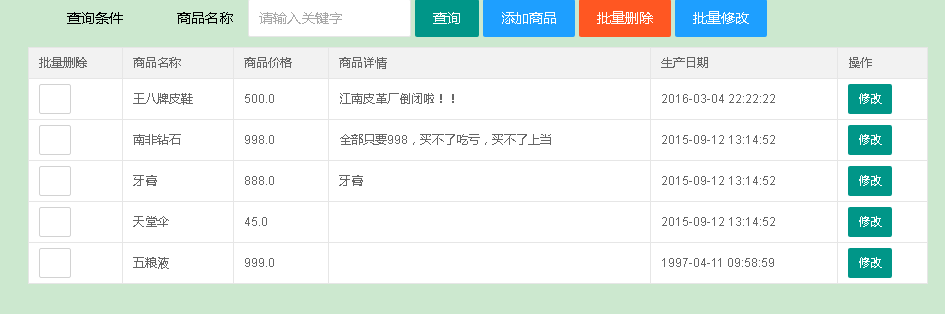
由于下面还要编写批量删除和批量修改功能,所以显示页面itemsList.jsp在编写完批量删除功能后再给出修改后的代码
新增批量删除功能
同样的道理,需要编写ItemsService,ItemsServiceImpl和ItemsController
ItemsService下添加如下代码:
//删除商品
public void deleteItemsById(Integer id) throws Exception;
ItemsServiceImpl下添加如下代码:
@Override
public void deleteItemsById(Integer id) throws Exception{
    // 删除商品
    //使用itemsMapper中的deleteByPrimaryKey方法来删除商品
    itemsMapper.deleteByPrimaryKey(id);
}
ItemsController下添加如下代码:
// 批量删除商品
@RequestMapping("/deleteItems")
public String deleteItems(Integer[] item_id) throws Exception{
    // 传入参数类型为商品的id数组
    // 根据id批量删除商品
    for(int i=0;i<item_id.length;i++){
        itemsService.deleteItemsById(item_id[i]);
    }
    // 完成删除操作后重定向回显示页面
    return "forward:queryItems.action";
}
注意:这里传入的是Integer类型的数组,即绑定数组类型
其实和简单类型一样,这里没有用@RequestParam,所以形参名称必须和
前端jsp传过来的参数名称一样(这里是checkbox复选框的name属性)
新增批量修改功能
我们要对数据进行批量修改操作时,通常要用到List集合来存储相关信息
比如我们要获取批量修改过的商品信息,这时就需要绑定List集合参数来实现
注意:不能直接在形参中定义List,要在包装类中声明List
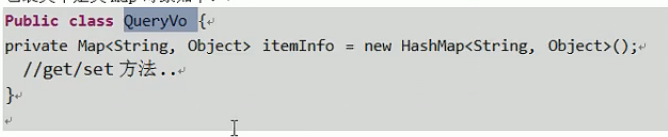
在ItemQueryVo中声明List集合
//批量修改商品的列表
private List<ItemCustom> itemsList;

public List<ItemCustom> getItemsList() {
    return itemsList;
}

public void setItemsList(List<ItemCustom> itemsList) {
    this.itemsList = itemsList;
}
ItemsController添加如下两个方法
// 跳转到批量修改商品页面
@RequestMapping("/editQueryItems")
public ModelAndView editQueryItems(ItemsQueryVo itemsQueryVo) throws Exception{

    List<ItemCustom> itemsList=itemsService.findItemsList(itemsQueryVo);

    ModelAndView modelAndView=new ModelAndView();   //创建视图对象
    modelAndView.addObject("itemsList",itemsList);

    modelAndView.setViewName("editQueryItems");  //指定用户访问的jsp页面地址,前缀和后缀已在前端控制器中配好
    return modelAndView;
}

//批量修改提交后
@RequestMapping("/editQueryItemsSubmit")
public String editQueryItemsSubmit(ItemsQueryVo itemsQueryVo) throws Exception{

    // 获取装有客户表的信息
    List<ItemCustom> editItemsList=itemsQueryVo.getItemsList();
    Integer editId;
    ItemCustom editItem;
    // 更新信息
    // 根据前端传过来的id修改相应内容
    for(int i=0;i<editItemsList.size();i++){
        editId=editItemsList.get(i).getId();
        editItem=editItemsList.get(i);
        itemsService.updateItems(editId,editItem);
    }
    return "forward:queryItems.action";
}
此时商品查询页面ItemsList.jsp的代码为:
<%--
  Created by IntelliJ IDEA.
  User: 光玉
  Date: 2018/4/3
  Time: 18:35
  To change this template use File | Settings | File Templates.
--%>
<%@ page contentType="text/html;charset=UTF-8" language="java" pageEncoding="UTF-8" %>
<%@ taglib prefix="c" uri="http://java.sun.com/jsp/jstl/core" %>
<%@ taglib prefix="fmt" uri="http://java.sun.com/jsp/jstl/fmt" %>

<!DOCTYPE html>
<head>
    <title>查询商品列表</title>
    <meta http-equiv="Content-Type" content="text/html; charset=UTF-8">
    <script type="text/javascript" src="<%= request.getContextPath()%>/plugin/layui/layui.all.js"></script>
    <link rel="stylesheet" href="<%= request.getContextPath()%>/plugin/layui/css/layui.css">
</head>

<body>
<div style="margin-left: 250px">
    <form name="itemsForm" class="layui-form" action="${pageContext.request.contextPath}/items/queryItems.action" method="post">
        <label class="layui-form-label">查询条件</label>
        <div class="layui-input-block">
            <label class="layui-form-label">商品名称</label>
            <div class="layui-input-inline">
                <input class="layui-input" type="text" name="itemCustom.name" placeholder="请输入关键字">
            </div>
            <div class="layui-input-inline">
                <button class="layui-btn" type="submit" id="find">查询</button>
            </div>
            <div class="layui-input-inline">
                <button class="layui-btn layui-btn-normal" type="button" id="add">添加商品</button>
            </div>
            <div class="layui-input-inline">
                <button class="layui-btn layui-btn-danger" type="button" id="delete">批量删除</button>
            </div>
            <div class="layui-input-inline">
                <button class="layui-btn layui-btn-normal" type="button" id="editQuery">批量修改</button>
            </div>
        </div>

        <div style="width: 900px">
            <table class="layui-table" lay-size="sm">
                <thead>
                <th>批量删除</th>
                <th>商品名称</th>
                <th>商品价格</th>
                <th>商品详情</th>
                <th>生产日期</th>
                <th>操作</th>
                </thead>
                <tbody>
                <c:forEach items="${itemsList}" var="item">
                    <tr>
                        <td><input type="checkbox" name="item_id" value="${item.id}"/> </td>
                        <td>${item.name}</td>
                        <td>${item.price}</td>
                        <td>${item.detail}</td>
                        <td><fmt:formatDate value="${item.createtime}" pattern="yyyy-MM-dd HH:mm:ss"/> </td>
                        <td>
                            <a class="layui-btn layui-btn-sm" href="${pageContext.request.contextPath}/items/editItems.action?id=${item.id}">修改</a>
                        </td>
                    </tr>
                </c:forEach>
                </tbody>
            </table>
        </div>
    </form>
</div>

<script>
    //渲染form表单
    layui.use('form', function () {
        var form = layui.form;
        form.render();
    });

    //要使用弹出层layer以及使用jquery的$要使用下面这种方式
    layui.use('layer',function(){
        var layer=layui.layer;
        var $=layui.$;

        // 在弹出层显示添加商品表单
        $("#add").on("click",function(){
            layer.open({
                title:'添加商品',
                type:2,     //表示通过url传入页面
                area:['600px','400px'],
                content:['${pageContext.request.contextPath}/items/addItems.action'],
                skin:'layui-layer-lan',
                btn:['添加','取消'],

                yes: function(index,layero){
                    // 获取iframe中的form表单元素
                    var formSubmit=window.parent.document.getElementById('layui-layer-iframe1').contentWindow.document.getElementById("formSubmit");
                    // 提交form表单
                    formSubmit.submit();
                    layer.msg('操作成功',{
                        icon:1,
                        time:3000
                    });
                    // 提交表单后关闭弹出层窗口
                    layer.close();
                    // 刷新页面
                    location.reload();
                }
            })
        });

        //批量删除商品
        $("#delete").on("click",function () {
            // 因为必须传回一个item_id数组才能执行删除操作,所以要判断是否有复选框被选中
            // 有复选框被选中时
            if($("input[type='checkbox']").is(":checked")){
                layer.alert('确定要删除吗',{
                    icon:3,
                    btn:['确定','取消'],
                    yes:function(){
                        // 修改form表单的提交路径
                        document.itemsForm.action="${pageContext.request.contextPath}/items/deleteItems.action";
                        document.itemsForm.submit();
                        layer.msg('删除成功',{icon:1});
                    }
                });
            }
            // 若没有复选框被选中
            else{
                layer.msg('请至少勾选一个商品',{
                    icon:0,
                    time:3000
                });
            }
        });

        // 进入批量修改页面
        $("#editQuery").on("click",function () {
            document.itemsForm.action="${pageContext.request.contextPath}/items/editQueryItems.action";
            document.itemsForm.submit();
        })
    })
</script>
</body>
</html>
批量修改的editQueryItems.jsp页面如下
<%--
Created by IntelliJ IDEA.
User: 光玉
Date: 2018/4/3
Time: 18:35
To change this template use File | Settings | File Templates.
--%>
<%@ page contentType="text/html;charset=UTF-8" language="java" pageEncoding="UTF-8" %>
<%@ taglib prefix="c" uri="http://java.sun.com/jsp/jstl/core" %>
<%@ taglib prefix="fmt" uri="http://java.sun.com/jsp/jstl/fmt" %>
<!DOCTYPE html>
<head>
<title>批量修改商品</title>
<meta http-equiv="Content-Type" content="text/html; charset=UTF-8">
<script type="text/javascript" src="<%= request.getContextPath()%>/plugin/layui/layui.all.js"></script>
<link rel="stylesheet" href="<%= request.getContextPath()%>/plugin/layui/css/layui.css">
</head>
<body>
<div style="margin-left: 250px">
<form name="editItemsForm" class="layui-form" action="${pageContext.request.contextPath}/items/editQueryItems.action" method="post">
<label class="layui-form-label">查询条件</label>
<div class="layui-input-block">
<label class="layui-form-label">商品名称</label>
<div class="layui-input-inline">
<input class="layui-input" type="text" name="itemCustom.name" placeholder="请输入关键字">
</div>
<div class="layui-input-inline">
<button class="layui-btn" type="submit" id="find">查询</button>
</div>
<div class="layui-input-inline">
<button class="layui-btn layui-btn-normal" type="button" id="editQuery">提交修改</button>
</div>
</div>
<div style="width: 900px">
<table class="layui-table" lay-size="sm">
<thead>
<th>商品名称</th>
<th>商品价格</th>
<th>商品详情</th>
<th>生产日期</th>
</thead>
<tbody>
<c:forEach items="${itemsList}" var="item" varStatus="status">
<tr>
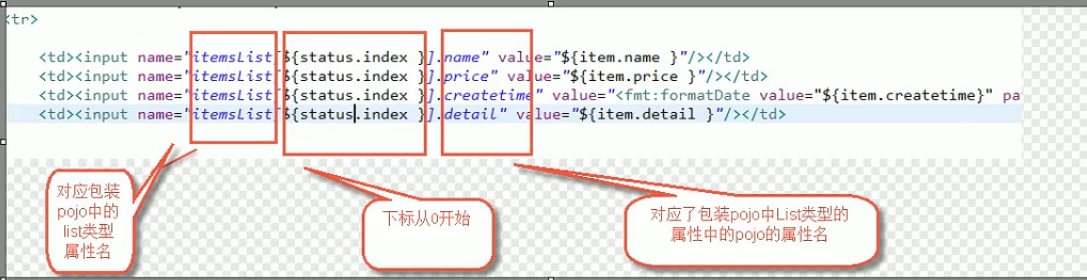
<td class="layui-hide"><input type="text" name="itemsList[${status.index}].id" value="${item.id}"></td>
<td><input type="text" name="itemsList[${status.index}].name" value="${item.name}"/></td>
<td><input type="text" name="itemsList[${status.index}].price" value="${item.price}"/></td>
<td><input type="text" name="itemsList[${status.index}].detail" value="${item.detail}"/></td>
<td><input type="text" name="itemsList[${status.index}].createtime" value="<fmt:formatDate value="${item.createtime}" pattern="yyyy-MM-dd HH:mm:ss"/> "/></td>
<td class="layui-hide"><input type="text" name="itemsList[${status.index}].pic" value="${item.pic}"/></td>
</tr>
</c:forEach>
</tbody>
</table>
</div>
</form>
</div>
<script>
//渲染form表单
layui.use('form', function () {
var form = layui.form;
form.render();
});
var $=layui.$;
$("#editQuery").on("click",function () {
document.editItemsForm.action="${pageContext.request.contextPath}/items/editQueryItemsSubmit.action";
document.editItemsForm.submit();
})
</script>
</body>
</html>
前端jsp中属性名和后台属性的对应关系:
整体运行结果如下:
添加商品:
批量删除商品(未选中复选框和选中时会弹出相应的提示信息)


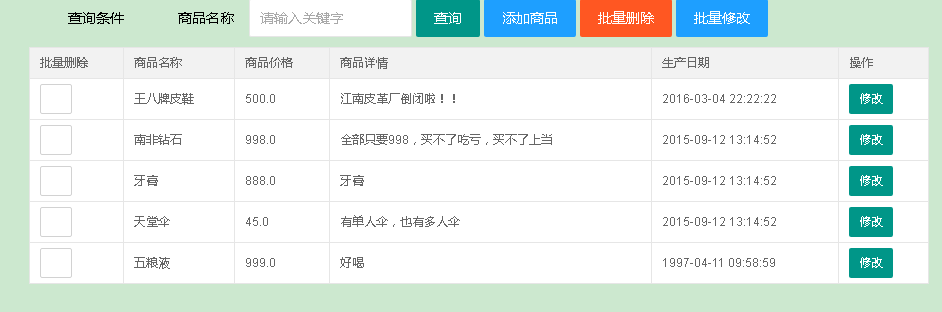
批量修改商品
批量修改前页面
批量修改页面

批量修改后页面
绑定map类型
map类型的绑定和list绑定类似,也是需要在包装类中声明map
参考如下方式进行绑定:

异常处理
系统中的异常分为两类:
- 预期处理异常
- 运行时异常(RuntimeException)
预期异常通过捕获异常来获取异常信息,让我们能根据异常信息来处理异常,
而运行时异常则需要通过规范代码开发,测试等方式来减少其发生次数
1.异常处理的思路
在dao,service,controller层遇到异常时,都会向上抛出异常。这些异常
由springmvc DispatcherServlet前端控制器交给ExceptionResolver异常
处理器进行处理

注意:springmvc全局配置统一的异常处理器(一个系统只有一个异常处理器)
2.编写自定义异常类
在src目录下新建exception包,编写继承Exception的CustomException
package exception;

/**
 * 自定义异常类,用来将预期异常信息返回到程序中
 */
public class CustomException extends Exception{
    // 异常信息(有可能是预期异常或者运行时异常)
    // 需要在CustomExceptionResolver异常处理器判断
    public String message;

    public String CustomException(String message){
        // super(message);
        this.message=message;
    }

    @Override
    public String getMessage() {
        return message;
    }

    public void setMessage(String message) {
        this.message = message;
    }
}
3.编写全局异常处理器
首先我们需要分析异常类型:
如果是系统自定义的异常,则直接取出错误信息,并在错误页面中显示
如果不是系统自定义异常,则需要构造一个自定义异常类型(抛出未知错误)
使用springmvc提供的HandlerExceptionResolver接口
在exception包下创建CustomExceptionResolver.java文件实现HandlerExceptionResolver接口
package exception;

import org.springframework.web.servlet.HandlerExceptionResolver;
import org.springframework.web.servlet.ModelAndView;

import javax.servlet.http.HttpServletRequest;
import javax.servlet.http.HttpServletResponse;

public class CustomExceptionResolver implements HandlerExceptionResolver{

    // 全局异常处理类
    // Exception e就是系统抛出的异常
    @Override
    public ModelAndView resolveException(HttpServletRequest httpServletRequest, HttpServletResponse httpServletResponse, Object o, Exception e) {

        CustomException customException=null;
        String message=null;
        ///如果是系统自定义异常,则直接取出异常
        if(e instanceof CustomException){
            customException=(CustomException)e;
        }
        else{   //否则抛出“未知错误”
            customException=new CustomException("未知错误55555");
        }
        message=customException.getMessage();

        //将错误信息传到显示错误信息的页面
        ModelAndView modelAndView=new ModelAndView();
        modelAndView.addObject("message",message);
        modelAndView.setViewName("errorPage");

        return modelAndView;
    }
}
在dao,controller,service层处抛出的异常都交给异常处理器处理
4.配置全局异常处理器
在springmvc.xml中配置全局异常处理器
<!-- 配置全局异常处理器
     由于实现了HandlerExceptionResolver,系统知道是全局异常处理器
      不需要设置id -->
 <bean class="exception.CustomExceptionResolver"/>
5.测试异常
如果是手动抛出异常,则在错误页面显示自定义异常信息,
如果不是手动抛出异常,说明是运行时错误(比如说:除0)
则在页面中显示“未知错误55555”
可以测试一下根据id查找修改的商品信息
将ItemsServiceImpl中的findItemsById改写一下
@Override
public ItemCustom findItemsById(Integer id) throws Exception{
    //通过mapper包下itemsMapper中的selectByPrimaryKey方法找到相应的item
    Items items=itemsMapper.selectByPrimaryKey(id);

    // 判断根据id找到的items对象是否为空
    // 若为空,则抛出下面的自定义异常
    if(items == null){
        throw new CustomException("修改商品信息错误,不存在对应商品!");
    }

    //考虑到可能扩展另外的属性,这里使用继承了Items类的ItemCustom类
    ItemCustom itemCustom=new ItemCustom();

    //通过spring提供的BeanUtils.copyProperties方法将items的属性拷贝到itemCustom中
    BeanUtils.copyProperties(items,itemCustom);
    return itemCustom;
}
在地址栏中输入http://localhost:8080/ssm-highclass/items/editItems.action?id=555
由于没有id为555的商品信息,系统发现异常后会提交给异常处理器处理
异常处理器会将错误信息显示到页面上
异常可以在service中抛出,也可以在controller中抛出,主要看是否与业务功能有关
与业务功能有关的在service抛出异常,否则在controller抛出异常
图片上传
1.设置上传图片的存储目录
企业一般都是通过服务器存放图片,这里使用的是intellij idea来设置图片存储目录
在tomcat的Deployment下引入External Source,只要是电脑上的一个文件夹就行,
配置路径为/img
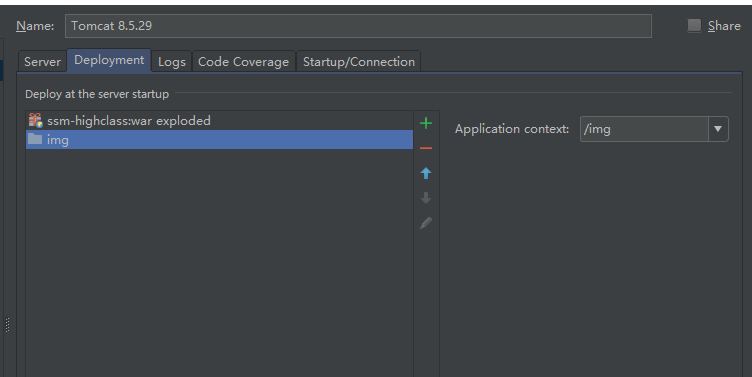
输入http://localhost:8080/img/图片名称即可访问
图片尽量分级存放到相应目录中,提高访问速度
注意:需要在form中添加属性enctype=”multipart/form-data”
需要通过springmvc图片解析器解析
2.配置图片上传解析器
这里需要引入两个包:commons-fileupload-1.2.2.jar和依赖包commons-io-2.4.jar
然后在springmvc.xml中配置图片上传解析器
<!-- 配置图片上传解析器 -->
<!-- springmvc的multipartResolver图片解析器依赖于commons-fileupload.jar包 -->
<bean id="multipartResolver" class="org.springframework.web.multipart.commons.CommonsMultipartResolver">
    <property name="maxUploadSize">
        <!-- 最大上传文件容量(字节为单位) -->
        <!-- 这里设置了最大为10Mb -->
        <value>10485760</value>
    </property>
</bean>
3.编写controller
在controller的editItemsSubmit方法下新增形参MultipartFile items_img
@RequestMapping("/editItemsSubmit")
public String editItemsSubmit(HttpServletRequest request, Integer id, ItemCustom itemCustom, MultipartFile items_img) throws Exception{
    //通过service返回修改后的页面
    //形参中传递了pojo类型参数(即itemCustom)

    // 如果图片不为空
    if(items_img!=null && items_img.getOriginalFilename()!=null && items_img.getOriginalFilename().length()>0){
        //图片上传物理路径
        String img_path="D:\\JavaWeb\\img\\";
        //获取图片原始名称
        String originalFilename=items_img.getOriginalFilename();

        //生成新的图片名称
        //为了避免文件名冲突,使用java的UUID随机生成字符串再加上原来图片后缀名构成新的名字
        String newFileName= UUID.randomUUID() + originalFilename.substring(originalFilename.lastIndexOf("."));
        //新图片
        File newFile=new File(img_path+newFileName);

        //将内存中的数据写入磁盘
        items_img.transferTo(newFile);
        //将新图片名称写到数据库中
        itemCustom.setPic(newFileName);

        System.out.println(newFileName);
    }
    // 更新数据库数据
    itemsService.updateItems(id,itemCustom);

    //重定向到商品查询列表
    return "forward:queryItems.action";
}
在editItems.jsp添加图片显示代码
 <div class="layui-form-item">
     <label class="layui-form-label">商品图片</label>
     <div class="layui-input-inline">
         <c:if test="${itemCustom.pic != null}">
             <%-- 取绝对路径 --%>
             <img src="/img/${itemCustom.pic}" width="100" height="100"/><br/>
         </c:if>
         <input type="file" name="items_img">
<%-- 不写上下面这一行的话就不能把已有的pic的值传回到后台中 --%>
         <input class="layui-hide" type="text" name="pic" value="${itemCustom.pic}"/>
     </div>
 </div>
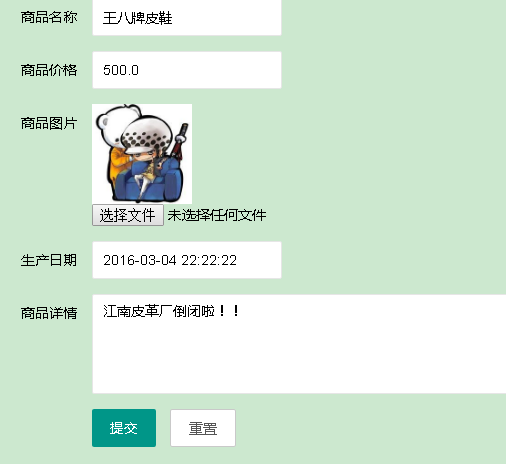
效果如下:
json数据交互
json数据格式比较简单,易于阅读和编写,经常用于接口传输,html中ajax异步刷新等领域中。
使用json格式也比较容易进行解析。
1.springmvc进行json交互过程
首先,我们来了解一下springmvc进行json交互的过程。
客户端发起请求,有两种请求方式
- 请求json串
这种情况下需要使用@RequestBody注解将json串转换为java对象 - 请求key/value
无论是json串还是key/value都要@ResponseBody将java对象转换为json串输出到客户端,不需要@RequestBody转换为java对象
方便客户端进行解析
2.准备环境
springmvc默认使用MappingJacksonHttpMessageConverter对json数据进行转换操作,
这里引入了fastjson-1.2.47.jar包来进行配置
3.配置springmvc的json转换器
我这里使用的是springmvc的注解驱动,需要在注解驱动中加入fastjson的配置
<!-- 这里使用注解驱动来进行配置,在注解驱动中加入fastjson的配置 -->
<mvc:annotation-driven conversion-service="conversionService">
    <mvc:message-converters register-defaults="true">
        <!-- 避免IE执行AJAX时,返回JSON出现下载文件 -->
        <bean id="fastJsonHttpMessageConverter" class="com.alibaba.fastjson.support.spring.FastJsonHttpMessageConverter">
            <property name="supportedMediaTypes">
                <list>
                    <value>application/json;charset=UTF-8</value>
                </list>
            </property>
        </bean>
    </mvc:message-converters>
</mvc:annotation-driven>
4.编写json转换控制器
package controller;

import org.springframework.stereotype.Controller;
import org.springframework.web.bind.annotation.RequestBody;
import org.springframework.web.bind.annotation.RequestMapping;
import org.springframework.web.bind.annotation.RequestMethod;
import org.springframework.web.bind.annotation.ResponseBody;
import po.ItemCustom;

/**
 * json交互的控制器
 */

@Controller
public class JsonTestController {

    /**
     *
     * @param itemCustom(@RequestBody 请求json)(商品信息)
     * @return itemCustom (@ResponseBody 返回json)(商品信息)
     */
    @RequestMapping(value="/requestJson",method = {RequestMethod.POST})
    public @ResponseBody ItemCustom requestJson(@RequestBody ItemCustom itemCustom) throws Exception{
        // 由于请求的是json串,需要使用@RequestBody将json串转换为java对象
        // 由于需要向客户端返回json数据,需要用@ResponseBody将java对象转换为json串
        return itemCustom;
    }


    @RequestMapping("/responseJson")
    public @ResponseBody ItemCustom responseJson(ItemCustom itemCustom) throws Exception{
        // 请求的是key/value,不需要@RequestBody
        // 使用@ResponseBody返回json数据
        return itemCustom;
    }
}
5.编写json测试的jsp文件
在web目录下新建jsonTest.jsp文件,注意不要把文件放到WEB-INF目录下
<%--
  Created by IntelliJ IDEA.
  User: 光玉
  Date: 2018/4/13
  Time: 11:37
  To change this template use File | Settings | File Templates.
--%>
<%@ page contentType="text/html;charset=UTF-8" language="java" pageEncoding="utf-8" %>
<html>
<head>
    <title>json转换测试</title>
    <script type="text/javascript" src="<%= request.getContextPath()%>/plugin/layui/layui.all.js"></script>
    <link rel="stylesheet" href="<%= request.getContextPath()%>/plugin/layui/css/layui.css">
    <%--<script type="text/javascript" src="<%= request.getContextPath()%>/plugin/jquery/jquery.js"></script>--%>
</head>
<body>
    <button class="layui-btn" type="button" id="requestJson">请求json</button>
    <button class="layui-btn layui-btn-normal" type="button" id="responseJson">请求key/value</button>

    <script>
        var $=layui.$;

        // 请求是json串,返回的也是json串
        $("#requestJson").on("click",function () {
            $.ajax({
                type:'post',
                url:'${pageContext.request.contextPath}/requestJson.action',    //设置请求的url
                contentType:'application/json;charset=utf-8',   //将请求类型设置为json格式
                data:'{"name":"天堂伞", "price":"45"}',
                success:function (data) {   //返回json
                    alert(data.name);
                }
            })
        });

        //请求key/value,返回json串
        $("#responseJson").on("click",function () {
            // 请求是json串,返回的也是json串
            $.ajax({
                type:'post',
                url:'${pageContext.request.contextPath}/responseJson.action',    //设置请求的url
                // contentType:'application/json;charset=utf-8',   //默认即为传输key/value格式的数据,不需要设置
                data:'name=毕业花束&price=79',  //key/value类型数据
                success:function (data) {   //返回json
                    alert(data.name);
                }
            })
        })
    </script>
</body>
</html>
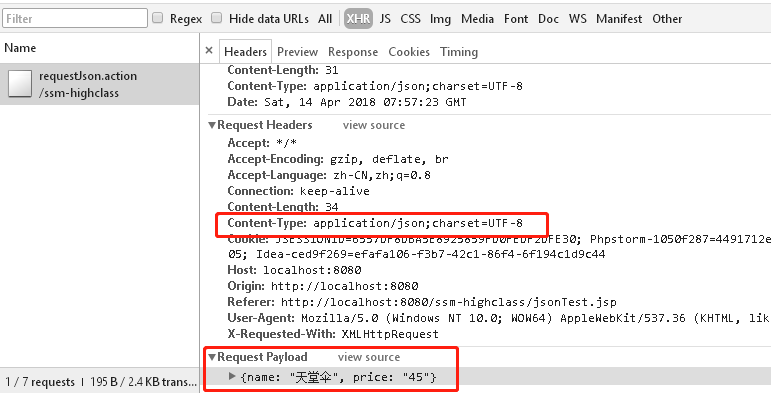
6.查看运行结果
在地址栏中输入http://localhost:8080/ssm-highclass/jsonTest.jsp,显示出两个按钮
“请求json“和”请求key/value“,分别点击,显示效果如下
request请求json的content-type格式以及json格式数据

request请求key/value的content-type格式以及key/value格式数据

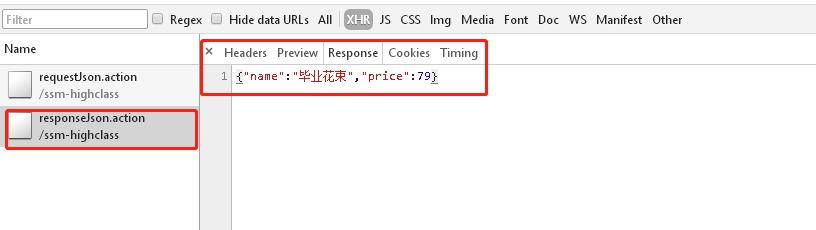
可以看到,两种不同的请求方式,最终都返回json串
7.记录一下配置json踩过的坑
由于我使用的是spring4.x的版本,已经不能再使用Jackson1.x版本来进行配置。
还有就是,在网上看到使用spring4.x配置jackson2.5.0版本,也试着去配了一下,
还是不行。最终还是使用fastjson配置成功。
RESTful架构
1.了解RESTful
RESTful架构,就是目前最流行的一种互联网软件架构。它结构清晰、符合标准、易于理解、扩展方便,所以正得到越来越多网站的采用。若要了解更多概念,可以看看阮一峰的博客
2.使用RESTful
1.需求
使用RESTful方式实现根据id查看商品信息
2.配置前端控制器
之前配置的前端控制器url模式是”.action”,而RESTful方式url模式是”/“
根据RESTful方式配置前端控制器,即在web.xml中添加如下内容
<!-- RESTful前端控制器配置,可以和之前设置的.action前端控制器并存 -->
<servlet>
    <servlet-name>springmvcRESTful</servlet-name>
    <servlet-class>org.springframework.web.servlet.DispatcherServlet</servlet-class>
    <!-- 加载springmvc配置文件 -->
    <init-param>
        <param-name>contextConfigLocation</param-name>
        <!-- 配置文件的地址,如果不配置contextConfigLocation,
             默认查找的配置文件名称是classpath下的:servlet名称+"-servlet.xml"即springmvc-servlet.xml-->
        <param-value>classpath:config/spring/springmvc.xml</param-value>
    </init-param>
</servlet>

<servlet-mapping>
    <servlet-name>springmvcRESTful</servlet-name>
    <!-- 可以配置/  表示此工程所有请求全部由springmvc解析,此方式可以实现RESTful(表征性状态转移,总结起来应该是是一种简洁的架构风格)方式,
                    静态文件不能由springmvc解析,需要特殊处理  -->
    <url-pattern>/</url-pattern>
</servlet-mapping>
3.编写controller
使用了url模板映射方式(结合下面的controller理解)
- 请求参数映射到{id}
- {id}传递到方法里面的@PathVariable(“id”)中
- 通过@Pathvariable把{id}传递到方法里面的id
利用servlet拦截请求目录功能,实现无扩展名的restfull风格
// RESTful格式编写
// 根据id查询商品,输出为json串
// 使用/itemsView/{id}将"{}"里的参数传到@PathVariable指定的名称中
// 若有多个,如:/itemsView/{id}/{name} ,则在形参中再定义相同数量的@PathVariable
@RequestMapping("/itemsView/{id}")
public @ResponseBody ItemCustom itemsView(@PathVariable("id") Integer id) throws Exception{

    ItemCustom itemCustom=itemsService.findItemsById(id);
    return itemCustom;
}
4.查看运行结果
在浏览器地址栏中输入http://localhost:8080/ssm-highclass/items/itemsView/1
可以在页面中看到json格式的数据
但是,在配置了RESTful方式后,当我们要访问web过程中的静态资源时,
会发现访问不了。这是因为springmvc在设置了RESTful方式后会对静态资源
也进行拦截解析。因此,我们要在web.xml中设置静态资源解析方式
在web.xml中添加如下内容:
<!-- 当我们配置了RESTful方式访问时,静态资源(js,css,img...)也会经过springmvc进行解析
     要避免这种情况,就要对静态资源的解析进行配置 -->
<!-- 比如说web/plugin/jquery是放jquery插件的地方,里面包含jqery.js文件
     配置后凡是“/plugin/jquery/”下的请求,都会在过程目录下的“/plugin/jquery/”下找相应文件 -->
<mvc:resources mapping="/plugin/jquery/**" location="/plugin/jquery/"/>
拦截器
用户请求到DispatherServlet中,DispatherServlet调用HandlerMapping查找Handler,HandlerMapping返回一个拦截的链儿(多个拦截),springmvc中的拦截器是通过HandlerMapping来进行拦截的
拦截器通常用于用户认证(登录信息认证之类的),权限认证等方面
1.设置springmvc拦截器方法
在controller包下新建interceptor包,在interceptor包下新建HandlerInterceptorTest1.java继承HandlerInterceptor接口
package controller.interceptor;

import org.springframework.web.servlet.HandlerInterceptor;
import org.springframework.web.servlet.ModelAndView;

import javax.servlet.http.HttpServletRequest;
import javax.servlet.http.HttpServletResponse;

public class HandlerInterceptorTest1 implements HandlerInterceptor{
    // 重写HandlerInterceptor里的三个方法

    @Override
    public boolean preHandle(HttpServletRequest httpServletRequest, HttpServletResponse httpServletResponse, Object o) throws Exception {
        // preHanle方法是在进入handler之前进行拦截
        // 通常用于用户登录认证拦截,用户权限拦截

        System.out.println("HandlerInterceptorTest1....preHandle");

        //返回false表示进行拦截,true则表示不拦截,继续执行handler
        return false;
    }

    @Override
    public void postHandle(HttpServletRequest httpServletRequest, HttpServletResponse httpServletResponse, Object o, ModelAndView modelAndView) throws Exception {
        // postHandle方法是在进入handler之后,返回ModelAndView之前进行拦截
        // 可以在这里边放置一些公共的数据或视图资源

        System.out.println("HandlerInterceptorTest1....postHandle");
    }

    @Override
    public void afterCompletion(HttpServletRequest httpServletRequest, HttpServletResponse httpServletResponse, Object o, Exception e) throws Exception {
        // afterCompletion方法在执行完handler之后执行
        // 做系统统一异常处理,进行方法执行性能监控,在prehandler中设置一个时间点,在afterCompletion设置一个时间点,两个时间点的差就是执行时长
        // 实现系统统一日志记录

        System.out.println("HandlerInterceptorTest1....afterCompletion");
    }
}
再编写一个HandlerInterceptorTest2.java继承HandlerInterceptor接口
package controller.interceptor;

import org.springframework.web.servlet.HandlerInterceptor;
import org.springframework.web.servlet.ModelAndView;

import javax.servlet.http.HttpServletRequest;
import javax.servlet.http.HttpServletResponse;

public class HandlerInterceptorTest2 implements HandlerInterceptor{
    // 重写HandlerInterceptor里的三个方法

    @Override
    public boolean preHandle(HttpServletRequest httpServletRequest, HttpServletResponse httpServletResponse, Object o) throws Exception {
        // preHanle方法是在进入handler之前进行拦截
        // 通常用于用户登录认证拦截,用户权限拦截

        System.out.println("HandlerInterceptorTest2....preHandle");

        //返回false表示进行拦截,true则表示不拦截,继续执行handler
        return false;
    }

    @Override
    public void postHandle(HttpServletRequest httpServletRequest, HttpServletResponse httpServletResponse, Object o, ModelAndView modelAndView) throws Exception {
        // postHandle方法是在进入handler之后,返回ModelAndView之前进行拦截
        // 可以在这里边放置一些公共的数据或视图资源

        System.out.println("HandlerInterceptorTest2....postHandle");
    }

    @Override
    public void afterCompletion(HttpServletRequest httpServletRequest, HttpServletResponse httpServletResponse, Object o, Exception e) throws Exception {
        // afterCompletion方法在执行完handler之后执行
        // 做系统统一异常处理,进行方法执行性能监控,在prehandler中设置一个时间点,在afterCompletion设置一个时间点,两个时间点的差就是执行时长
        // 实现系统统一日志记录

        System.out.println("HandlerInterceptorTest2....afterCompletion");
    }
}
2.全局配置拦截器
在springmvc中添加如下内容:
<!-- 配置全局拦截器 -->
<mvc:interceptors>
    <!-- 配置拦截器1 -->
    <mvc:interceptor>
        <!-- 这里的“/**”表示所有url请求都进行拦截 -->
        <mvc:mapping path="/**"/>
        <bean class="controller.interceptor.HandlerInterceptorTest1"/>
    </mvc:interceptor>
    <!-- 配置拦截器2 -->
    <mvc:interceptor>
        <mvc:mapping path="/**"/>
        <bean class="controller.interceptor.HandlerInterceptorTest2"/>
    </mvc:interceptor>
</mvc:interceptors>
3.测试拦截器
拦截器1和2都放行,测试结果为:
HandlerInterceptor1...preHandle
HandlerInterceptor2...preHandle

HandlerInterceptor2...postHandle
HandlerInterceptor1...postHandle

HandlerInterceptor2...afterCompletion
HandlerInterceptor1...afterCompletion
即preHandle顺序执行,postHandle和afterCompletion倒序执行
拦截器1放行,2拦截(界面显示是空白的,不会出现错误信息,在控制台中查看)
HandlerInterceptor1...preHandle
HandlerInterceptor2...preHandle
HandlerInterceptor1...afterCompletion
可以看出如果preHandle不放行,postHandle、afterCompletion都不执行。只要有一个拦截器不放行,controller不能执行完成。
拦截器1和2都进行拦截,结果为
HandlerInterceptor1...preHandle
说明了只有在前边的拦截器放行后,后边的preHandle方法才会执行
模拟登陆认证
现在的用户登录认证,权限认证大多都通过shiro来实现。由于现在对shiro还不太了解,这里便通过对session的操作,来模拟登陆认证过程
1.编写LoginController控制器
通过LoginController控制器来进行session的管理
在controller包下新建LoginController.java
package controller;

import org.springframework.stereotype.Controller;
import org.springframework.web.bind.annotation.RequestMapping;

import javax.servlet.http.HttpSession;

@Controller
public class LoginController {

    // 登录
    @RequestMapping("/login")
    public String login(HttpSession httpSession,String username,String password){
        // 通过前台登录,将username保存到session中
        httpSession.setAttribute("username",username);

		// 重定向到商品查询页面
        return "redirect:items/queryItems.action";
    }

    // 退出
    @RequestMapping("/logout")
    public String logout(HttpSession httpSession){
        // 让session过期,清除里面保存的username信息
        httpSession.invalidate();

        // 重定向回商品查询页面
        return "redirect:login.action";
    }
}
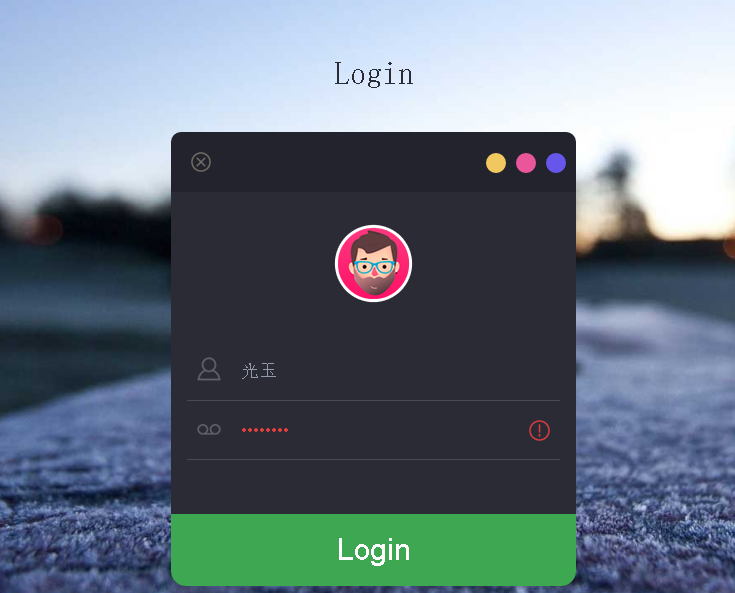
2.编写登录页面
我们需要一个登录页面来进行登录认证
<%--
Created by IntelliJ IDEA.
User: 光玉
Date: 2018/4/14
Time: 22:40
To change this template use File | Settings | File Templates.
--%>
<%@ page contentType="text/html;charset=UTF-8" language="java" pageEncoding="UTF-8" %>
<!DOCTYPE html>
<html>
<head>
<title>登录认证</title>
<meta name="viewport" content="width=device-width, initial-scale=1">
<script type="application/x-javascript"> addEventListener("load", function() { setTimeout(hideURLbar, 0); }, false); function hideURLbar(){ window.scrollTo(0,1); } </script>
<meta name="keywords" content="Login" />
<link href="${pageContext.request.contextPath}/assets/css/style.css" rel='stylesheet' type='text/css' />
<!--webfonts-->
<link href='http://fonts.useso.com/css?family=PT+Sans:400,700,400italic,700italic|Oswald:400,300,700' rel='stylesheet' type='text/css'>
<link href='http://fonts.useso.com/css?family=Exo+2' rel='stylesheet' type='text/css'>
<!--//webfonts-->
<%--<script src="http://ajax.useso.com/ajax/libs/jquery/1.11.0/jquery.min.js"></script>--%>
<script src="${pageContext.request.contextPath}/plugin/jquery/jquery.js"></script>
</head>
<body>
<script>$(document).ready(function(c) {
$('.close').on('click', function(c){
$('.login-form').fadeOut('slow', function(c){
$('.login-form').remove();
});
});
});
</script>
<!--SIGN UP-->
<h1>Login</h1>
<div class="login-form">
<div class="close"> </div>
<div class="head-info">
<label class="lbl-1"> </label>
<label class="lbl-2"> </label>
<label class="lbl-3"> </label>
</div>
<div class="clear"> </div>
<div class="avtar">
<img src="${pageContext.request.contextPath}/assets/images/avtar.png" />
</div>
<form action="${pageContext.request.contextPath}/login.action" method="post">
<input type="text" class="text" name="username" value="username" onfocus="this.value = '';" onblur="if (this.value == '') {this.value = 'username';}" >
<div class="key">
<input type="password" name="password" value="password" onfocus="this.value = '';" onblur="if (this.value == '') {this.value = 'password';}">
</div>
<div class="signin">
<input type="submit" value="Login" >
</div>
</form>
</div>
<div class="copy-rights">
<p>Copyright © 2018.光玉</p>
</div>
</body>
</html>
登录页面所需的静态资源保存在/web/assets下,由于之前设置了RESTful模式,会对静态资源也进行解析,这里需要在springmvc中进行配置
<!-- 在之前配置静态资源的地方添加一下内容 -->
<mvc:resources mapping="/assets/**" location="/assets/"/>
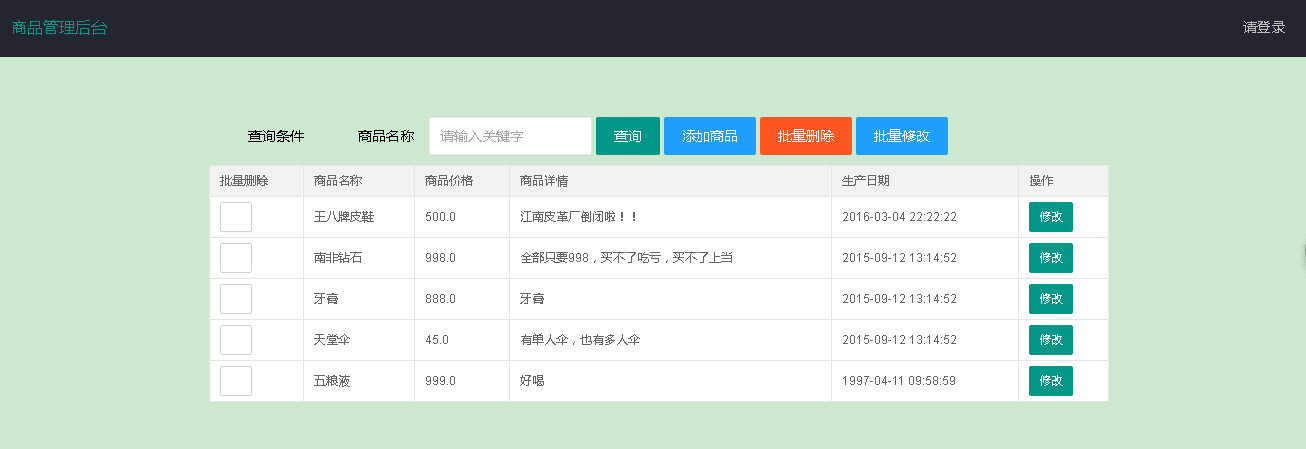
3.在商品查询页面显示用户名
为商品查询页面添加顶部导航栏显示,在用户登录时显示相应的登录名,没有登录时在右上角显示“请登录”。修改后的itemsList.jsp内容如下
<%--
  Created by IntelliJ IDEA.
  User: 光玉
  Date: 2018/4/3
  Time: 18:35
  To change this template use File | Settings | File Templates.
--%>
<%@ page contentType="text/html;charset=UTF-8" language="java" pageEncoding="UTF-8" %>
<%@ taglib prefix="c" uri="http://java.sun.com/jsp/jstl/core" %>
<%@ taglib prefix="fmt" uri="http://java.sun.com/jsp/jstl/fmt" %>

<!DOCTYPE html>
<head>
    <title>查询商品列表</title>
    <meta http-equiv="Content-Type" content="text/html; charset=UTF-8">
    <script type="text/javascript" src="<%= request.getContextPath()%>/plugin/layui/layui.all.js"></script>
    <link rel="stylesheet" href="<%= request.getContextPath()%>/plugin/layui/css/layui.css">
</head>

<!-- 这下面是修改的部分 -->

<body class="layui-layout-body">
<!-- 顶部导航栏 -->
<div class="layui-layout layui-layout-admin">
    <div class="layui-header">
        <div class="layui-logo">商品管理后台</div>
        <ul class="layui-nav layui-layout-right">
            <!-- 判断在session中是否保存着username,若存在,则显示出用户名
                 否则,显示“请登录” -->
            <c:if test="${username != null}">
                <li class="layui-nav-item">
                    <a href="javascript:;">
                        <img src="http://t.cn/RCzsdCq" class="layui-nav-img">
                        ${username}
                    </a>
                </li>
                <li class="layui-nav-item">
                    <a href="${pageContext.request.contextPath}/logout.action">退了</a>
                </li>
            </c:if>
            <c:if test="${username == null}">
                <li class="layui-nav-item">
                    <a href="${pageContext.request.contextPath}/login.jsp">请登录</a>
                </li>
            </c:if>
        </ul>
    </div>
</div>
<div style="margin-left: 250px;margin-top:60px">

<!-- 这上面是修改的部分 -->
    <form name="itemsForm" class="layui-form" action="${pageContext.request.contextPath}/items/queryItems.action" method="post">
        <label class="layui-form-label">查询条件</label>
        <div class="layui-input-block">
            <label class="layui-form-label">商品名称</label>
            <div class="layui-input-inline">
                <input class="layui-input" type="text" name="itemCustom.name" placeholder="请输入关键字">
            </div>
            <div class="layui-input-inline">
                <button class="layui-btn" type="submit" id="find">查询</button>
            </div>
            <div class="layui-input-inline">
                <button class="layui-btn layui-btn-normal" type="button" id="add">添加商品</button>
            </div>
            <div class="layui-input-inline">
                <button class="layui-btn layui-btn-danger" type="button" id="delete">批量删除</button>
            </div>
            <div class="layui-input-inline">
                <button class="layui-btn layui-btn-normal" type="button" id="editQuery">批量修改</button>
            </div>
        </div>

        <div style="width: 900px">
            <table class="layui-table" lay-size="sm">
                <thead>
                <th>批量删除</th>
                <th>商品名称</th>
                <th>商品价格</th>
                <th>商品详情</th>
                <th>生产日期</th>
                <th>操作</th>
                </thead>
                <tbody>
                <c:forEach items="${itemsList}" var="item">
                    <tr>
                        <td><input type="checkbox" name="item_id" value="${item.id}"/> </td>
                        <td>${item.name}</td>
                        <td>${item.price}</td>
                        <td>${item.detail}</td>
                        <td><fmt:formatDate value="${item.createtime}" pattern="yyyy-MM-dd HH:mm:ss"/> </td>
                        <td>
                            <a class="layui-btn layui-btn-sm" href="${pageContext.request.contextPath}/items/editItems.action?id=${item.id}">修改</a>
                        </td>
                    </tr>
                </c:forEach>
                </tbody>
            </table>
        </div>
    </form>
</div>

<script>
    //渲染form表单
    layui.use('form', function () {
        var form = layui.form;
        form.render();
    });

    //要使用弹出层layer以及使用jquery的$要使用下面这种方式
    layui.use('layer',function(){
        var layer=layui.layer;
        var $=layui.$;

        // 在弹出层显示添加商品表单
        $("#add").on("click",function(){
            layer.open({
                title:'添加商品',
                type:2,     //表示通过url传入页面
                area:['600px','400px'],
                content:['${pageContext.request.contextPath}/items/addItems.action'],
                skin:'layui-layer-lan',
                btn:['添加','取消'],

                yes: function(index,layero){
                    // 获取iframe中的form表单元素
                    var formSubmit=window.parent.document.getElementById('layui-layer-iframe1').contentWindow.document.getElementById("formSubmit");
                    // 提交form表单
                    formSubmit.submit();
                    layer.msg('操作成功',{
                        icon:1,
                        time:3000
                    });
                    // 提交表单后关闭弹出层窗口
                    layer.close();
                    // 刷新页面
                    location.reload();
                }
            })
        });

        //批量删除商品
        $("#delete").on("click",function () {
            // 因为必须传回一个item_id数组才能执行删除操作,所以要判断是否有复选框被选中
            // 有复选框被选中时
            if($("input[type='checkbox']").is(":checked")){
                layer.alert('确定要删除吗',{
                    icon:3,
                    btn:['确定','取消'],
                    yes:function(){
                        // 修改form表单的提交路径
                        document.itemsForm.action="${pageContext.request.contextPath}/items/deleteItems.action";
                        document.itemsForm.submit();
                        layer.msg('删除成功',{icon:1});
                    }
                });
            }
            // 若没有复选框被选中
            else{
                layer.msg('请至少勾选一个商品',{
                    icon:0,
                    time:3000
                });
            }
        });

        // 进入批量修改页面
        $("#editQuery").on("click",function () {
            document.itemsForm.action="${pageContext.request.contextPath}/items/editQueryItems.action";
            document.itemsForm.submit();
        })
    })
</script>
</body>
</html>
4.运行结果
由于之前设置了设置了拦截器,在运行之前要先把springmvc.xml设置的拦截器注释掉
即注释掉这一部分
<!-- 配置全局拦截器 -->
<!--<mvc:interceptors>-->
    <!--<!– 拦截器的执行顺序会按照配置的顺序执行 –>-->
    <!--<!– 配置拦截器1 –>-->
    <!--<mvc:interceptor>-->
        <!--<!– 这里的“/**”表示所有url请求都进行拦截 –>-->
        <!--<mvc:mapping path="/**"/>-->
        <!--<bean class="controller.interceptor.HandlerInterceptorTest1"/>-->
    <!--</mvc:interceptor>-->
    <!--<!– 配置拦截器2 –>-->
    <!--<mvc:interceptor>-->
        <!--<mvc:mapping path="/**"/>-->
        <!--<bean class="controller.interceptor.HandlerInterceptorTest2"/>-->
    <!--</mvc:interceptor>-->
<!--</mvc:interceptors>-->
登录页面:
输入用户名后进行登录,用户名显示在右上角
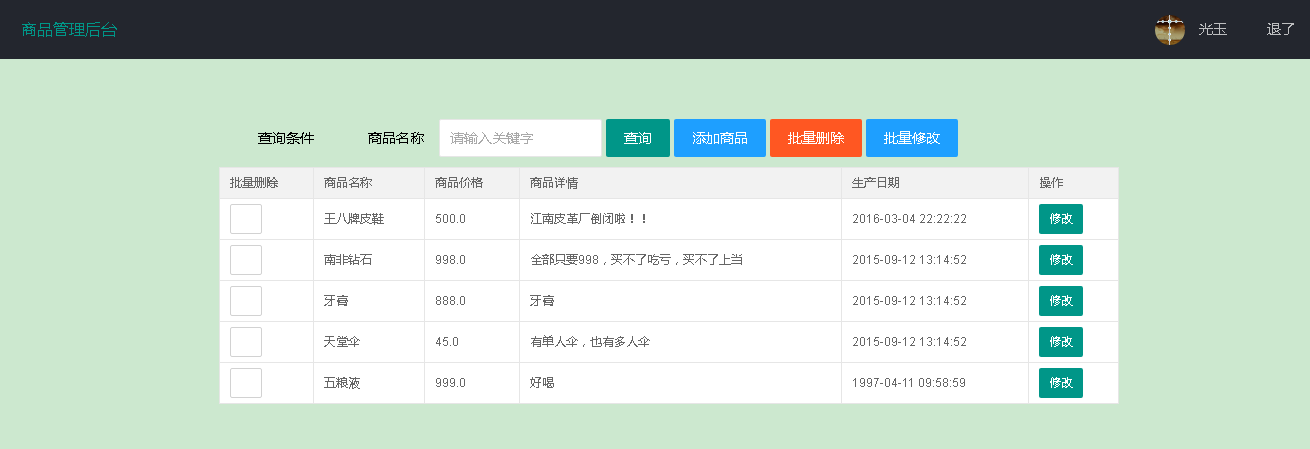
点击右上角的“退出”后,用户信息会被注销
若需要项目源码,可以到 我的github项目:ssm-highclass 下载