【简介】
在实际开发过程中会遇到多数据源的场景,本文主要介绍怎样实现多数据源。
本文只介绍核心的配置,其他的请道友clone项目自行查看
【本文Demo】
https://github.com/qidasheng2012/springboot2.x_ssm/tree/branch-DataSources
【建表】
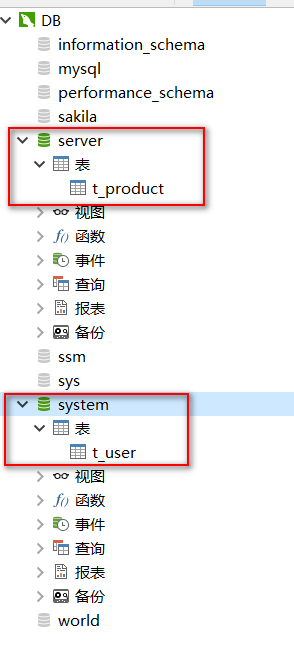
创建两个数据库分别为:system和server
在system中创建user表,在server中创建product表
建表sql,在项目中已给到,看下图:

【application.yml】
道友可以根据自己的数据库配置进行相应调整
#服务器配置
server:
  port: 80


spring:
  #数据源
  datasource:
    # 系统数据源
    system:
      url: jdbc:mysql://localhost:3306/system?serverTimezone=Asia/Shanghai&characterEncoding=utf8
      username: root
      password: 123456
      configuration:
        maximum-pool-size: 10

    # 业务数据源
    server:
      url: jdbc:mysql://localhost:3306/server?serverTimezone=Asia/Shanghai&characterEncoding=utf8
      username: root
      password: 123456
      configuration:
        maximum-pool-size: 10

# 日志
logging:
  level:
    com.springboot.ssm.mapper: debug # 显示执行sql
【config配置】
这块内容是本文的核心所在,请道友仔细查看
注意事项:
- 使用多数据源,其中一个配置类需要添加
@Primary注解 (有且仅有一个配置类需要添加) - 在配置类中需要配置 dao 层所在的包、 Mapper.xml 所在的路径、别名包路径
原理:
- 通过@MapperScan扫描mapper的包路径
- 配置不同的DataSource
- 根据DataSource生成对应SqlSessionFactory 和DataSourceTransactionManager ,在SqlSessionFactory 中配置mapper.xml的路径和别名包扫描路径,当然还可以配置plugin等等
- 根据SqlSessionFactory 生成SqlSessionTemplate
- SqlSessionTemplate封装了SqlSession,SqlSession就是mapper的相关操作
【DB1Config】
package com.springboot.ssm.config.db;

import com.zaxxer.hikari.HikariDataSource;
import org.apache.ibatis.session.SqlSessionFactory;
import org.mybatis.spring.SqlSessionFactoryBean;
import org.mybatis.spring.SqlSessionTemplate;
import org.mybatis.spring.annotation.MapperScan;
import org.springframework.boot.autoconfigure.jdbc.DataSourceProperties;
import org.springframework.boot.context.properties.ConfigurationProperties;
import org.springframework.context.annotation.Bean;
import org.springframework.context.annotation.Configuration;
import org.springframework.context.annotation.Primary;
import org.springframework.core.io.support.PathMatchingResourcePatternResolver;
import org.springframework.jdbc.datasource.DataSourceTransactionManager;

import javax.sql.DataSource;

@Configuration
@MapperScan(
        basePackages = {"com.springboot.ssm.mapper.system"}, // 扫描mapper层所在的包
        sqlSessionTemplateRef = "db1SqlSessionTemplate")
public class DB1Config {

    @Bean
    @Primary
    @ConfigurationProperties(prefix = "spring.datasource.system")
    public DataSourceProperties db1DataSourceProperties() {
        return new DataSourceProperties();
    }

    @Bean
    @Primary
    @ConfigurationProperties(prefix = "spring.datasource.system.configuration")
    public DataSource db1DataSource() {
        return db1DataSourceProperties()
                .initializeDataSourceBuilder()
                .type(HikariDataSource.class) // 可以显示指定连接池,也可以不显示指定;即此行代码可以注释掉
                .build();
    }

    @Bean
    @Primary
    public SqlSessionFactory db1SqlSessionFactory() throws Exception {
        SqlSessionFactoryBean factoryBean = new SqlSessionFactoryBean();
        factoryBean.setDataSource(db1DataSource());
        factoryBean.setMapperLocations(
                new PathMatchingResourcePatternResolver()
                        .getResources("classpath:mapper/system/*.xml")); // xml 所在路径
        factoryBean.setTypeAliasesPackage("com.springboot.ssm.domain"); // 设置扫描别名包路径
        return factoryBean.getObject();
    }

    @Bean
    @Primary
    public DataSourceTransactionManager db1TransactionManager() {
        return new DataSourceTransactionManager(db1DataSource());
    }

    @Bean
    @Primary
    public SqlSessionTemplate db1SqlSessionTemplate() throws Exception {
        return new SqlSessionTemplate(db1SqlSessionFactory());
    }

}
【DB2Config】
package com.springboot.ssm.config.db;

import com.zaxxer.hikari.HikariDataSource;
import org.apache.ibatis.session.SqlSessionFactory;
import org.mybatis.spring.SqlSessionFactoryBean;
import org.mybatis.spring.SqlSessionTemplate;
import org.mybatis.spring.annotation.MapperScan;
import org.springframework.boot.autoconfigure.jdbc.DataSourceProperties;
import org.springframework.boot.context.properties.ConfigurationProperties;
import org.springframework.context.annotation.Bean;
import org.springframework.context.annotation.Configuration;
import org.springframework.core.io.support.PathMatchingResourcePatternResolver;
import org.springframework.jdbc.datasource.DataSourceTransactionManager;

import javax.sql.DataSource;

@Configuration
@MapperScan(
        basePackages = {"com.springboot.ssm.mapper.server"}, // 1. 扫描mapper层所在的包
        sqlSessionTemplateRef = "db2SqlSessionTemplate")
public class DB2Config {

    @Bean
    @ConfigurationProperties(prefix = "spring.datasource.server")
    public DataSourceProperties db2DataSourceProperties() {
        return new DataSourceProperties();
    }

    @Bean
    @ConfigurationProperties(prefix = "spring.datasource.server.configuration")
    public DataSource db2DataSource() {
        return db2DataSourceProperties()
                .initializeDataSourceBuilder()
                .type(HikariDataSource.class) // 可以显示指定连接池,也可以不显示指定;即此行代码可以注释掉
                .build();
    }

    @Bean
    public SqlSessionFactory db2SqlSessionFactory() throws Exception {
        SqlSessionFactoryBean factoryBean = new SqlSessionFactoryBean();
        factoryBean.setDataSource(db2DataSource());
        factoryBean.setMapperLocations(
                new PathMatchingResourcePatternResolver()
                        .getResources("classpath:mapper/server/*.xml")); // xml 所在路径
        factoryBean.setTypeAliasesPackage("com.springboot.ssm.domain"); // 设置扫描别名包路径
        return factoryBean.getObject();
    }

    @Bean
    public DataSourceTransactionManager db2TransactionManager() {
        return new DataSourceTransactionManager(db2DataSource());
    }

    @Bean
    public SqlSessionTemplate db2SqlSessionTemplate() throws Exception {
        return new SqlSessionTemplate(db2SqlSessionFactory());
    }

}
【其他】
其他的就是普通的ssm框架的代码,这里就不一一粘贴出来了,道友可以clone 项目代码自行查看
注意事项:
建包的路径和上面的配置路径保持一致即可,下图给出项目路径,道友结合上面的config配置一起看就一目了然了

【测试】
访问:http://127.0.0.1/user/getAll

访问: http://127.0.0.1/product/getAll

OK!大功告成,访问两个数据源的数据都正常
