在网上看了很多,关于mybatis多数据源的文章,存在很多种实现的方法,有的文章不知所云,所以最终决定使用下面这种方式,因为这种方法使用的人较多。所有参考到的文章都列在了最下方,你也可以去看看
一、多数据源的应用场景
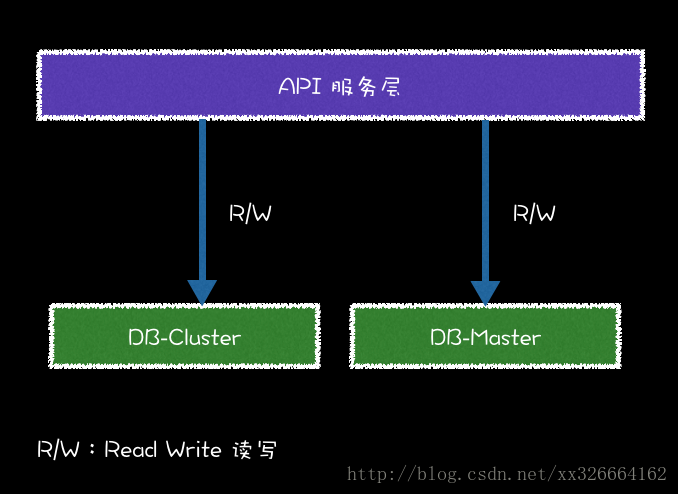
当业务数据量达到了一定程度,DBA 需要合理配置数据库资源。即配置主库的机器高配置,把核心高频的数据放在主库上;把次要的数据放在从库,低配置。开源节流嘛,就这个意思。把数据放在不同的数据库里,就需要通过不同的数据源进行操作数据。下面通过一个示例来演示分别从主库和从库中获取数据,并在业务逻辑层组装返回。逻辑如图:
二、工程代码配置详解
源码下载:https://github.com/ityouknow/spring-boot-examples
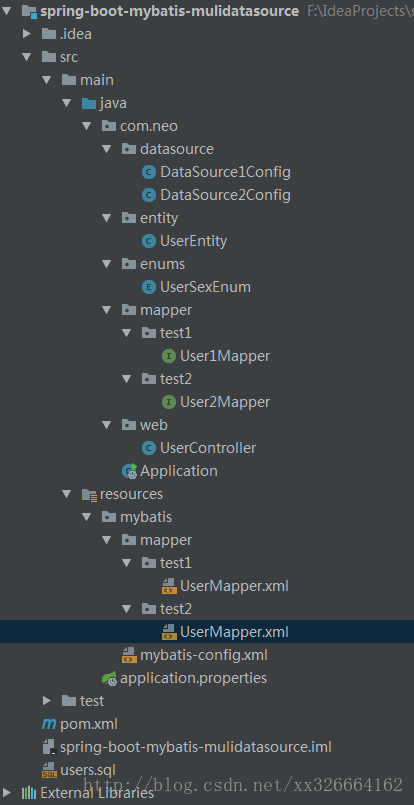
先看一下整个项目的结构:
2.1、pom文件:
<?xml version="1.0" encoding="UTF-8"?>
<project xmlns="http://maven.apache.org/POM/4.0.0" xmlns:xsi="http://www.w3.org/2001/XMLSchema-instance"
    xsi:schemaLocation="http://maven.apache.org/POM/4.0.0 http://maven.apache.org/xsd/maven-4.0.0.xsd">
    <modelVersion>4.0.0</modelVersion>

    <groupId>com.neo</groupId>
    <artifactId>spring-boot-mybatis-mulidatasource</artifactId>
    <version>1.0.0</version>
    <packaging>jar</packaging>

    <name>spring-boot-mybatis-mulidatasource</name>
    <description>Demo project for Spring Boot and mybatis</description>

    <parent>
        <groupId>org.springframework.boot</groupId>
        <artifactId>spring-boot-starter-parent</artifactId>
        <version>1.5.4.RELEASE</version>
        <relativePath/> <!-- lookup parent from repository -->
    </parent>

    <properties>
        <project.build.sourceEncoding>UTF-8</project.build.sourceEncoding>
        <java.version>1.8</java.version>
    </properties>

    <dependencies>
        <dependency>
            <groupId>org.springframework.boot</groupId>
            <artifactId>spring-boot-starter</artifactId>
        </dependency>
        <dependency>
            <groupId>org.springframework.boot</groupId>
            <artifactId>spring-boot-starter-test</artifactId>
            <scope>test</scope>
        </dependency>
        <dependency>
            <groupId>org.springframework.boot</groupId>
            <artifactId>spring-boot-starter-web</artifactId>
        </dependency>
        <dependency>
            <groupId>org.mybatis.spring.boot</groupId>
            <artifactId>mybatis-spring-boot-starter</artifactId>
            <version>1.3.0</version>
        </dependency>
         <dependency>
            <groupId>mysql</groupId>
            <artifactId>mysql-connector-java</artifactId>
        </dependency>
         <dependency>
            <groupId>org.springframework.boot</groupId>
            <artifactId>spring-boot-devtools</artifactId>
            <optional>true</optional>
        </dependency>
    </dependencies>

    <build>
        <plugins>
            <plugin>
                <groupId>org.springframework.boot</groupId>
                <artifactId>spring-boot-maven-plugin</artifactId>
                <configuration>
                    <fork>true</fork>
                </configuration>
            </plugin>
        </plugins>
    </build>
</project>
- 1
- 2
- 3
- 4
- 5
- 6
- 7
- 8
- 9
- 10
- 11
- 12
- 13
- 14
- 15
- 16
- 17
- 18
- 19
- 20
- 21
- 22
- 23
- 24
- 25
- 26
- 27
- 28
- 29
- 30
- 31
- 32
- 33
- 34
- 35
- 36
- 37
- 38
- 39
- 40
- 41
- 42
- 43
- 44
- 45
- 46
- 47
- 48
- 49
- 50
- 51
- 52
- 53
- 54
- 55
- 56
- 57
- 58
- 59
- 60
- 61
- 62
- 63
- 64
- 65
- 66
- 67
- 68
2.2、application.properties
两个数据源配置,test1 、test2两个数据库
mybatis.config-locations=classpath:mybatis/mybatis-config.xml

spring.datasource.test1.driverClassName = com.mysql.jdbc.Driver
spring.datasource.test1.url = jdbc:mysql://localhost:3306/test1?useUnicode=true&characterEncoding=utf-8
spring.datasource.test1.username = root
spring.datasource.test1.password = root

spring.datasource.test2.driverClassName = com.mysql.jdbc.Driver
spring.datasource.test2.url = jdbc:mysql://localhost:3306/test2?useUnicode=true&characterEncoding=utf-8
spring.datasource.test2.username = root
spring.datasource.test2.password = root- 1
- 2
- 3
- 4
- 5
- 6
- 7
- 8
- 9
- 10
- 11
2.3、数据源配置
最主要的就是这里的配置,其他的地方,和单数据库使用基本一样。
test1库和test2库,在使用的过程中必须指定主库,不然会报错。我们把test1作为主数据库。
下面只针对test1的相关代码,进行说明,test2库的代码,除了少了@Primary这个注解,其他都和test1一样
@Configuration
@MapperScan(basePackages = "com.neo.mapper.test1", sqlSessionTemplateRef  = "test1SqlSessionTemplate")
public class DataSource1Config {

    @Bean(name = "test1DataSource")
    @ConfigurationProperties(prefix = "spring.datasource.test1")
    @Primary
    public DataSource testDataSource() {
        return DataSourceBuilder.create().build();
    }

    @Bean(name = "test1SqlSessionFactory")
    @Primary
    public SqlSessionFactory testSqlSessionFactory(@Qualifier("test1DataSource") DataSource dataSource) throws Exception {
        SqlSessionFactoryBean bean = new SqlSessionFactoryBean();
        bean.setDataSource(dataSource);
        bean.setMapperLocations(new PathMatchingResourcePatternResolver().getResources("classpath:mybatis/mapper/test1/*.xml"));
        return bean.getObject();
    }

    @Bean(name = "test1TransactionManager")
    @Primary
    public DataSourceTransactionManager testTransactionManager(@Qualifier("test1DataSource") DataSource dataSource) {
        return new DataSourceTransactionManager(dataSource);
    }

    @Bean(name = "test1SqlSessionTemplate")
    @Primary
    public SqlSessionTemplate testSqlSessionTemplate(@Qualifier("test1SqlSessionFactory") SqlSessionFactory sqlSessionFactory) throws Exception {
        return new SqlSessionTemplate(sqlSessionFactory);
    }

}- 1
- 2
- 3
- 4
- 5
- 6
- 7
- 8
- 9
- 10
- 11
- 12
- 13
- 14
- 15
- 16
- 17
- 18
- 19
- 20
- 21
- 22
- 23
- 24
- 25
- 26
- 27
- 28
- 29
- 30
- 31
- 32
- 33
最关键的地方就是这块了,一层一层注入
- 先创建DataSource,
- 在创建SqlSessionFactory
- 在创建事务Transaction
- 最后包装到SqlSessionTemplate中。
这块的注解就是指明了扫描dao层,并且给dao层注入指定的SqlSessionTemplate。所有@Bean都需要按照命名指定正确。
关于注解的说明:
- @Primary 表示如果在多个同类 Bean 候选时,该 Bean 优先被考虑。「多数据源配置的时候注意,必须要有一个主数据源,用 @Primary 标志该 Bean」
- @MapperScan
- 扫描 Mapper 接口并容器管理,包路径精确到 test1,为了和下面 test2数据源做到精确区分
- 该注解需要修改sqlSessionFactoryRef或者sqlSessionTemplateRef,我上面的代码修改的是sqlSessionTemplateRef
- 该注解指明了扫描dao层,并且给dao层注入指定的SqlSessionTemplate。所有@Bean都需要按照命名指定正确。
- @Value 获取全局配置文件 application.properties 的 key-value 配置,并自动装配
sqlSessionFactoryRef 表示定义了 key ,表示一个唯一 SqlSessionFactory 实例。SqlSessionFactory官方说明,查看这里
2.4、dao层和xml层
dao层和xml需要按照库来分在不同的目录,比如:test1库dao层在com.neo.mapper.test1包下,test2库在com.neo.mapper.test1
dao层Mapper文件
public interface User1Mapper {

    List<UserEntity> getAll();

    UserEntity getOne(Long id);

    void insert(UserEntity user);

    void update(UserEntity user);

    void delete(Long id);

}- 1
- 2
- 3
- 4
- 5
- 6
- 7
- 8
- 9
- 10
- 11
- 12
- 13
xml层
<?xml version="1.0" encoding="UTF-8" ?>
<!DOCTYPE mapper PUBLIC "-//mybatis.org//DTD Mapper 3.0//EN" "http://mybatis.org/dtd/mybatis-3-mapper.dtd" >
<mapper namespace="com.neo.mapper.test1.User1Mapper" >
    <resultMap id="BaseResultMap" type="com.neo.entity.UserEntity" >
        <id column="id" property="id" jdbcType="BIGINT" />
        <result column="userName" property="userName" jdbcType="VARCHAR" />
        <result column="passWord" property="passWord" jdbcType="VARCHAR" />
        <result column="user_sex" property="userSex" javaType="com.neo.enums.UserSexEnum"/>
        <result column="nick_name" property="nickName" jdbcType="VARCHAR" />
    </resultMap>

    <sql id="Base_Column_List" >
        id, userName, passWord, user_sex, nick_name
    </sql>

    <select id="getAll" resultMap="BaseResultMap"  >
       SELECT
       <include refid="Base_Column_List" />
       FROM users
    </select>

    <select id="getOne" parameterType="java.lang.Long" resultMap="BaseResultMap" >
        SELECT
       <include refid="Base_Column_List" />
       FROM users
       WHERE id = #{id}
    </select>

    <insert id="insert" parameterType="com.neo.entity.UserEntity" >
       INSERT INTO
            users
            (userName,passWord,user_sex)
        VALUES
            (#{userName}, #{passWord}, #{userSex})
    </insert>

    <update id="update" parameterType="com.neo.entity.UserEntity" >
       UPDATE
            users
       SET
        <if test="userName != null">userName = #{userName},</if>
        <if test="passWord != null">passWord = #{passWord},</if>
        nick_name = #{nickName}
       WHERE
            id = #{id}
    </update>

    <delete id="delete" parameterType="java.lang.Long" >
       DELETE FROM
             users
       WHERE
             id =#{id}
    </delete>

</mapper>- 1
- 2
- 3
- 4
- 5
- 6
- 7
- 8
- 9
- 10
- 11
- 12
- 13
- 14
- 15
- 16
- 17
- 18
- 19
- 20
- 21
- 22
- 23
- 24
- 25
- 26
- 27
- 28
- 29
- 30
- 31
- 32
- 33
- 34
- 35
- 36
- 37
- 38
- 39
- 40
- 41
- 42
- 43
- 44
- 45
- 46
- 47
- 48
- 49
- 50
- 51
- 52
- 53
- 54
- 55
2.4、测试
测试可以使用SpringBootTest,也可以放到Controller中,这里只贴Controller层的使用
@RestController
public class UserController {

    @Autowired
    private User1Mapper user1Mapper;

    @Autowired
    private User2Mapper user2Mapper;

    @RequestMapping("/getUsers")
    public List<UserEntity> getUsers() {
        List<UserEntity> users=user1Mapper.getAll();
        return users;
    }

    @RequestMapping("/getUser")
    public UserEntity getUser(Long id) {
        UserEntity user=user2Mapper.getOne(id);
        return user;
    }

    @RequestMapping("/add")
    public void save(UserEntity user) {
        user2Mapper.insert(user);
    }

    @RequestMapping(value="update")
    public void update(UserEntity user) {
        user2Mapper.update(user);
    }

    @RequestMapping(value="/delete/{id}")
    public void delete(@PathVariable("id") Long id) {
        user1Mapper.delete(id);
    }

}