文章目录
- 一、目录说明
- 二、pom.xml详解
- 三、application配置信息
- 四、注解
- 1. Application类
- (1)`@SpringBootApplication`
- (2)`@MapperScan("com.abc.springboot.mapper")`(扫描映射文件)
- (3)`@EnableTransactionManagement`(事务)
- (4)`@EnableDubboConfiguration`(Dubbo)
- (5)`@ServletComponentScan("Servlet组件位置")`(Servlet)
- (6)`@EnableScheduling`(定时器)
- 2. Controller层
- 3. Service层
- 4. Dao层接口
- 5. 其它
- 五、配置类
- 六、logback日志
- 七、打包与部署
- 六、其它
一、目录说明
选用模版 Web --> Spring Web --> 2.2.1
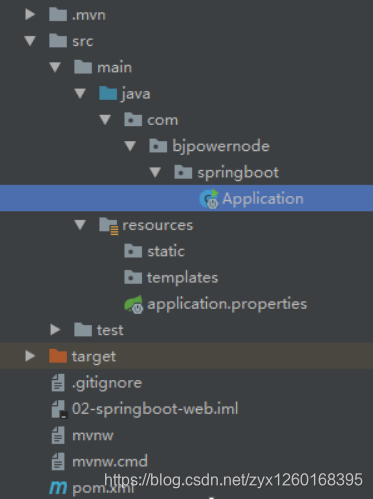
.mvn|mvnw|mvnw.cmd: 使用脚本操作执行 maven 相关命令,国内使用较少,可删除java:存放源文件Application.java:SpringBoot 程序执行的入口,执行该程序中的 main 方法,SpringBoot就启动了- 其它包及类:新创建的类一定要位于 Application 同级目录或者下级目录,否则 SpringBoot 加载不到
resources:存放资源及配置信息static:存放静态资源,如图片、 CSS、 JavaScript 等templates:存放 Web 页面的模板文件application.properties/application.yml:用于存放程序的各种依赖模块的配置信息,比如服务端口,数据库连接配置等(名字必须是application)
test:用来测试.gitignore:使用版本控制工具 git 的时候,设置一些忽略提交的内容pom.xml:用来配置maven
二、pom.xml详解
1. 基本配置
spring-boot-starter-parent 是一个 Springboot 的父级依赖,开发 SpringBoot 程序都需要继承该父级项目,它用来提供相关的 Maven 默认依赖,使用它之后,常用的 jar 包依赖可以省去 version 配置,如果不使用默认的版本,则直接指定version将父类中的version覆盖即可
<?xml version="1.0" encoding="UTF-8"?>
<project xmlns="http://maven.apache.org/POM/4.0.0" xmlns:xsi="http://www.w3.org/2001/XMLSchema-instance"
         xsi:schemaLocation="http://maven.apache.org/POM/4.0.0
         https://maven.apache.org/xsd/maven-4.0.0.xsd">
    <modelVersion>4.0.0</modelVersion>

    <!--继承 SpringBoot 框架的一个父项目,所有自己开发的 Spring Boot 都必须的继承-->
    <parent>
        <groupId>org.springframework.boot</groupId>
        <artifactId>spring-boot-starter-parent</artifactId>
        <version>2.2.2.RELEASE</version>
        <relativePath/> <!-- lookup parent from repository -->
    </parent>

	<!--当前项目的 GAV 坐标-->
    <groupId>com.wkcto.springboot</groupId>
    <artifactId>002-springboot-springmvc</artifactId>
    <version>1.0.0</version>

	<!--maven 项目名称,可以删除-->
	<name>002-springboot-springmvc</name>
	<!--maven 项目描述,可以删除-->
	<description>Demo project for Spring Boot</description>

	<!--maven 属性配置,可以在其它地方通过${}方式进行引用-->
    <properties>
        <java.version>1.8</java.version>
    </properties>

    <dependencies>
        <!--SpringBoot框架web工程的起步依赖-->
        <dependency>
            <groupId>org.springframework.boot</groupId>
            <artifactId>spring-boot-starter-web</artifactId>
        </dependency>

        <!--SpringBoot框架的测试起步依赖-->
        <dependency>
            <groupId>org.springframework.boot</groupId>
            <artifactId>spring-boot-starter-test</artifactId>
            <scope>test</scope>
            <exclusions>
                <exclusion>
                    <groupId>org.junit.vintage</groupId>
                    <artifactId>junit-vintage-engine</artifactId>
                </exclusion>
            </exclusions>
        </dependency>
    </dependencies>

    <build>
        <plugins>
            <!--SpringBoot 提供的打包编译等插件-->
            <plugin>
                <groupId>org.springframework.boot</groupId>
                <artifactId>spring-boot-maven-plugin</artifactId>
            </plugin>
        </plugins>
    </build>
</project>
2. JSP相关配置
(1)JSP解析包(查看JSP页面)
<!--引入 Spring Boot 内嵌的 Tomcat 对 JSP 的解析包,不加解析不了 jsp 页面-->
<!--如果只是使用 JSP 页面,可以只添加该依赖-->
<dependency>
	<groupId>org.apache.tomcat.embed</groupId>
	<artifactId>tomcat-embed-jasper</artifactId>
</dependency>
(2)servlet依赖
<!--如果要使用 servlet 必须添加该以下两个依赖-->
<!-- servlet 依赖的 jar 包-->
<dependency>
	<groupId>javax.servlet</groupId>
	<artifactId>javax.servlet-api</artifactId>
</dependency>
<dependency>
	<groupId>javax.servlet.jsp</groupId>
	<artifactId>javax.servlet.jsp-api</artifactId>
	<version>2.3.1</version>
</dependency>
(3)JSTL依赖
<!--如果使用 JSTL 必须添加该依赖-->
<!--jstl 标签依赖的 jar 包 start-->
<dependency>
	<groupId>javax.servlet</groupId>
	<artifactId>jstl</artifactId>
</dependency>
(4)指定.jsp文件的编译位置
SpringBoot 要求 jsp 文件必须编译到指定的 META-INF/resources 目录下才能访问,否则访问不到。(官方已经建议使用模版技术,后面会讲)
使用<resources>标签要注意:会改变默认 resources 的路径,所以要再写个<resource>来指定原来resource的路径
<resources>
	<resource>
		<!--源文件位置-->
		<directory>src/main/webapp</directory>
		<!--指定编译到 META-INF/resources,该目录不能随便写-->
		<targetPath>META-INF/resources</targetPath>
		<!--指定要把哪些文件编译进去, **表示 webapp 目录及子目录, *.*表示所有文件-->
		<includes>
			<include>**/*.*</include>
		</includes>
	</resource>

	<!--指定默认的resources的资源路径-->
	<resource>
        <directory>src/main/resources</directory>
        <includes>
            <include>**/*.*</include>
        </includes>
    </resource>
</resources>
3. SpringBoot整合MyBatis
(1)相关依赖
<!--MyBatis 整合 SpringBoot 的起步依赖-->
<dependency>
	<groupId>org.mybatis.spring.boot</groupId>
	<artifactId>mybatis-spring-boot-starter</artifactId>
	<version>2.0.0</version>
</dependency>
<!--MySQL 的驱动依赖-->
<dependency>
	<groupId>mysql</groupId>
	<artifactId>mysql-connector-java</artifactId>
</dependency>
(2)将.xml映射文件进行编译
<resources>
	<!--对dao层的xml映射文件进行编译-->
	<resource>
		<directory>src/main/java</directory>
		<includes>
			<include>**/*.xml</include>
		</includes>
	</resource>

	<!--指定默认的resources的资源路径-->
	<resource>
        <directory>src/main/resources</directory>
        <includes>
            <include>**/*.*</include>
        </includes>
    </resource>
</resources>
4. Redis
(1)Redis依赖
<!-- 加载 spring boot redis 包 -->
<dependency>
	<groupId>org.springframework.boot</groupId>
	<artifactId>spring-boot-starter-data-redis</artifactId>
</dependency>
5. Dubbo
(1)相关依赖
Provider 和 Consumer 的依赖配置相同
- Dubbo 集成 SpringBoot 框架起步依赖
- Zookeeper 客户端依赖
- 接口工程依赖
<!--Dubbo 集成 SpringBoot 框架起步依赖-->
<dependency>
	<groupId>com.alibaba.spring.boot</groupId>
	<artifactId>dubbo-spring-boot-starter</artifactId>
	<version>2.0.0</version>
</dependency>

<!--Zookeeper 客户端依赖-->
<dependency>
    <groupId>com.101tec</groupId>
    <artifactId>zkclient</artifactId>
    <version>0.10</version>
    <!--Zookeeper 包中, slf4j-log4j12 和 log4j 存在冲突-->
    <exclusions>
		<exclusion>
			<groupId>log4j</groupId>
			<artifactId>log4j</artifactId>
		</exclusion>
		<exclusion>
			<groupId>org.slf4j</groupId>
			<artifactId>slf4j-log4j12</artifactId>
		</exclusion>
	</exclusions>
</dependency>

<!--还需要加接口工程的依赖,通常是个maven的普通java工程-->
三、application配置信息
同时使用 .properties 和 .yum 配置文件时,默认选择 .properties 配置文件
下面以 .properties 为主说明配置文件
1. 基本配置
- 设置内嵌Tomcat端口号:
server.port=9090 - 设置上下文根,参数开头必须有
/,也就是网站名:server.servlet.context-path=/properties - 多环境配置:选择要激活的环境:
spring.profiles.active=product- 可以在主配置文件的同级目录下配置不同环境的配置文件,这些文件必须以
application-开头(application-环境标识.properties|yml),然后在主配置环境中选择要激活的环境配置文件,等号右边的值和配置文件的环境标识名一致,即只需指定application-之后的名字即可
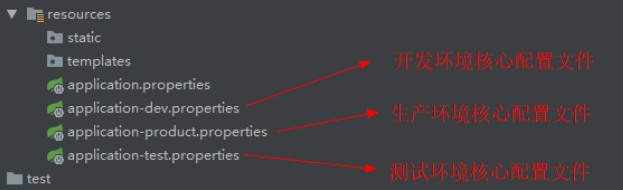
- 可以在主配置文件的同级目录下配置不同环境的配置文件,这些文件必须以
2. SpringMVC视图解析器
spring.mvc.view.prefix=/:前缀,其中:/表示目录为src/main/webappspring.mvc.view.suffix=.jsp:后缀
3. MyBatis相关、
(1)连接MySQL
配置数据库的连接信息,注意这里的驱动类有变化
- 数据库驱动
- 请求地址,加上防止乱码和指定时区的参数
- 用户名
- 密码
spring.datasource.driver-class-name=com.mysql.cj.jdbc.Driver
spring.datasource.url=jdbc:mysql://localhost:3306/springboot?useUnicode=true&characterEncoding=UTF-8&useJDBCCompliantTimezoneShift=true&useLegacyDatetimeCode=false&serverTimezone=CTT
spring.datasource.username=root
spring.datasource.password=123456
(2)映射文件
因为 SpringBoot 不能自动编译接口映射的 xml 文件,还需要手动在 pom 文件中指定,所以有的公司直接将映射文件直接放到 resources 目录下,例如:在 resources 目录下新建目录 mapper 存放映射文件
此时需要指定 Mybatis 映射文件的路径,这个配置只有接口和映射文件不在同一个包的情况下,才需要指定
mybatis.mapper-locations=classpath:mapper/*.xml
4. Redis配置
配置 redis 连接信息,三个基本的要素:地址、端口、密码
spring.redis.host=192.168.92.134
spring.redis.port=6379
spring.redis.password=123456
5. Dubbo配置
(1)Provider
- 应用名称
- 设置当前工程为服务提供者(没有提示)
- 设置注册中心(没有提示)
#配置 dubbo 的服务提供者信息
#服务提供者应用名称(必须写,且不能重复)
spring.application.name=springboot-dubbo-provider
#设置当前工程为服务提供者
spring.dubbo.server=true
#设置注册中心
spring.dubbo.registry=zookeeper://localhost:2181
(2)Consumer
Consumer 与 Provider 的不同之处是 Consumer 不需要指定服务提供者
#设置 dubbo 配置
#设置服务消费者名称
spring.application.name=springboot-dubbo-consumer
#配置 dubbo 注册中心
spring.dubbo.registry=zookeeper://localhost:2181
6. 自定义配置
在配置文件中设置自定义属性
通过如下两种方式来读取自定义属性:
@Value():用于逐个读取 application.properties 中的配置,用在字段上面,使用${配置全名}取值@ConfigurationProperties():将整个文件映射成一个对象, 用于自定义配置项比较多的情况,用在自定义类上,属性要有setter,且与配置文件中的一致prefix/value:将共同的前缀提出来,可以区分同名配置
@Component
@ConfigurationProperties("zyx")
public class ConfigInfo {
    //@Value("${zyx.name}")
    private String name;

	public void setName(String name) {
	    this.name = name;
    }
}
解决使用@ConfigurationProperties注解出现的警告问题,加入下面的依赖:
<!--解决使用@ConfigurationProperties 注解出现警告问题-->
<dependency>
	<groupId>org.springframework.boot</groupId>
	<artifactId>spring-boot-configuration-processor</artifactId>
	<optional>true</optional>
</dependency>
7. 其它注意点
(1)中文乱码
- 一般在配置文件中,不建议出现中文(注释除外)
- 如果有,可以先转化为 ASCII 码
- 位置:File --> Settings --> Editor --> File Encodings

(2)拷贝
如果是从其它地方拷贝的配置文件,一定要将里面的空格删干净
四、注解
1. Application类
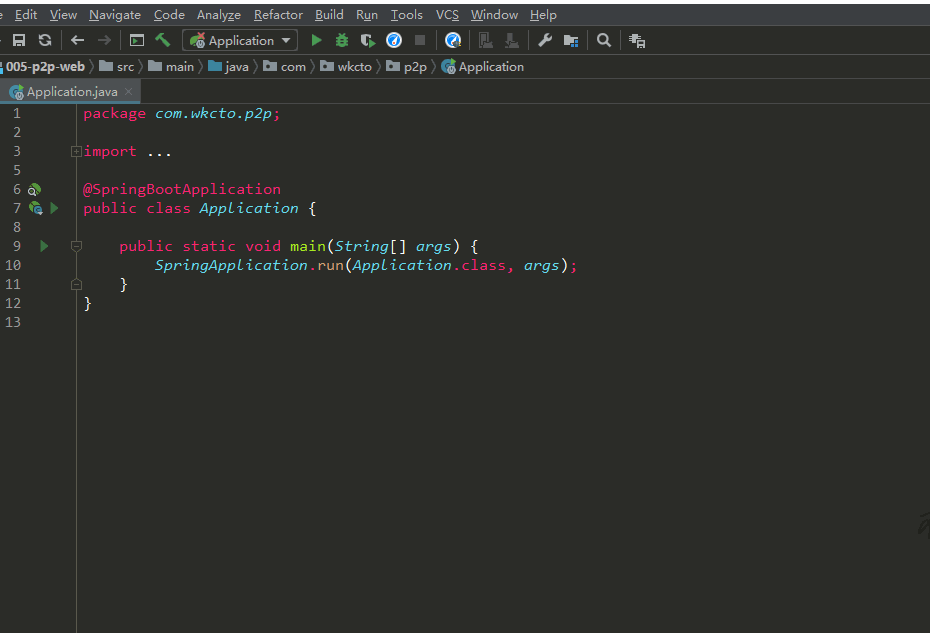
(1)@SpringBootApplication
@SpringBootApplication 注解是 Spring Boot 项目的核心注解,主要作用是开启 Spring 自动配置,如果在 Application 类上去掉该注解,那么不会启动 SpringBoot程序
该类中的 main 方法是一个标准的 Java 程序的 main 方法,主要作用是作为项目启动运行的入口
(2)@MapperScan("com.abc.springboot.mapper")(扫描映射文件)
@MapperScan("com.abc.springboot.mapper")@MapperScan(basePackages = "com.abc.springboot.mapper")
上面两个功能相同,Mybatis 提供的注解:扫描数据持久层的 mapper 映射配置文件,DAO 接口上就不用加@Mapper
属性:
basePackages:通常指定到数据持久层包即可
(3)@EnableTransactionManagement(事务)
开启事务支持,该注解可选,但是使用事务,业务方法上必须添加@Transactional (4.3.1)事务才生效,需要添加 SpringBoot 集成 Mybatis 的起步依赖
(4)@EnableDubboConfiguration(Dubbo)
开启Dubbo配置,使用该注解后,就可以扫描dubbo自己的注解
(5)@ServletComponentScan("Servlet组件位置")(Servlet)
用来扫描Servlet组件的,比如 Servlet 类或者 Filter 过滤器
(6)@EnableScheduling(定时器)
开启扫描定时器注解,会在Spring容器中自动扫描添加了@Scheduled的方法,并按照指定的时间定时执行
2. Controller层
(1)@Controller
@Controller 及 @ResponseBody 依然是我们之前的 Spring MVC,因为 Spring Boot的里面就已经集成好了Spring MVC
(2)@RestController
Spring 4 后新增注解,是@Controller 注解功能的增强,是 @Controller 与@ResponseBody 的组合注解
如果一个 Controller 类添加了@RestController,那么该 Controller 类下的所有方法都相当于添加了@ResponseBody 注解,用于返回字符串或 json 数据,而不需要再为每个方法单独添加@ResponseBody
(3)@RequestMapping相关注解
往方法上添加,指定请求的地址和类型
属性:
- value:请求地址
- method:指定RequestMethod中的常量,表明支持的请求类型
因为通过浏览器输入地址,默认发送的只能是 get 请求, 通过 Http 接口请求工具 Postman 工具,可以模拟发送不同类型的请求,并查询结果
详细使用方法:https://blog.csdn.net/fxbin123/article/details/80428216
@GetMapping:只支持 Get 请求,相当于RequestMapping 和 Get 请求方法的组合- Get 请求主要用于查询操作
@PostMapping:只支持 Post 请求,RequestMapping 和 Post 请求方法的组合- Post 请求主要用户新增数据
@PutMapping:只支持 Put 请求,RequestMapping 和 Put 请求方法的组合- Put 通常用于修改数据
@DeleteMapping:只支持 Delete 请求,RequestMapping 和 Delete 请求方法的组合- Delete 通常用于删除数据
(4)RESTFul
(a)RESTFul简介
REST(英文: Representational State Transfer,简称 REST),如果一个架构符合 REST 原则,就称它为 RESTFul 架构
RESTful 的优点:
- 轻量,直接基于 http,不再需要任何别的诸如消息协议
- 面向资源,一目了然,具有自解释性。
- 数据描述简单,一般以 xml, json 做数据交换。
- 无状态,在调用一个接口(访问、操作资源)的时候,可以不用考虑上下文,不用考虑当前状态,极大的降低了复杂度。
- 简单、低耦合
(b)@PathVariable的使用
@PathVariable:获取 url 中的数据,使用在方法上,与(3)中的注解搭配(使用大括号指定参数)使用,通过value属性找到请求地址中对应的值
例如:
@PostMapping(value = "/springBoot/student/{name}/{age}")
public Object addStudent(@PathVariable("name") String name, @PathVariable("age") Integer age) {}
(c)RESTFul注意事项
注意下面几个个方法的写法:
@PostMapping(value = "/springBoot/{id}/order/{status}")
public Object queryOrder1(@PathVariable("id") Integer id, @PathVariable("status") Integer status) {}

@GetMapping(value = "/springBoot/{status}/order/{id}")
public Object queryOrder2(@PathVariable("id") Integer id, @PathVariable("status") Integer status) {}

@PostMapping(value = "/springBoot/{status}/order/{id}")
public Object queryOrder3(@PathVariable("id") Integer id, @PathVariable("status") Integer status) {}
注意:方法 1 和 2 因为请求方式不同,所以可以正常识别,而方法 1 和 3 虽然两个路径写法改变了,但是由于传递的两个参数都是 int 值,且访求方式均为 Post 所以不知道该交给哪个请求进行处理,就会出现匹配模糊不清的异常,所以要想解决冲突,有两种方式:
- 修改请求路径
- 修改请求方式
(d)RESTFul原则
- 增 post 请求、删 delete 请求、改 put 请求、查 get 请求
- 请求路径不要出现动词
例如:查询订单接口:
/boot/order/1021/1(推荐)/boot/queryOrder/1021/1(不推荐)
- 分页、排序等操作,不需要使用斜杠传参数,即通常传的参数不是数据库表的字段,可以不采用斜杠
例如:订单列表接口:/boot/orders?page=1&sort=desc
(5)@Reference(Dubbo)
相当于Dubbo配置文件中的<dubbo:reference/>,用于服务消费者字段上引用暴露的接口。
该注解常用的属性:
- interfaceName:接口的全限定类名
- interfaceClass:接口的Class文件
- version:版本号
- check:false关闭启动检查
@Reference(interfaceClass = StudentService.class, version = "1.0")
private StudentService studentService;
3. Service层
(1)@Transactional(事务)
在访问数据库的 Service 类的方法上添加注解,添加此注解说明该方法添加的事务管理,与4.1.3一起搭配使用
(2)@Service(Dubbo)
@Service(com.alibaba.dubbo.config.annotation.Service)用在接口的实现类上,相当于Dubbo配置 文件中的<dubbo:service/>,用于指定当前类为哪个接口的实现类。
属性:
- interfaceName:接口的全限定类名
- interfaceClass:接口的Class文件
- version:版本号
- timeout:超时时间
注意:使用了Dubbo包中的@Service后,Service层上就不能再使用Spring提供的@Service(org.springframework.stereotype.Service)了,只能使用@Component
@Component
@Service(interfaceClass = StudentService.class, version = "1.0", timeout = 15000)
public class StudentServiceImpl implements StudentService {}
4. Dao层接口
(1)@Mapper
@Mapper 作用: mybatis 自动扫描数据持久层的映射文件及 DAO 接口的关系,该注解与4.1.2的注解使用其中一个就可以了
5. 其它
(1)@Scheduled(cron="执行时间")(定时器)
使用该注解之前要先开启@EnableScheduling
属性:
- cron:通过cron表达式来指定该方法自动执行的时间
@Component
public class TimerManager {
    @Scheduled(cron = "0/5 * * * * ?")
    public void test() {}
}
cron表达式的写法:https://blog.csdn.net/zyx1260168395/article/details/103797497
五、配置类
1. @Configuration
使用@Configuration注解修饰的类即为配置类,相当于之前 springMVC 中 xml 里的配置
配置类一般放在目录中的 config 包中
2. 拦截器配置类
指定一个配置类(使用@Configuration注解修饰),并 实 现WebMvcConfigurer 接口, 覆盖接口中的 addInterceptors 方法
@Configuration
public class InterceptorConfig implements WebMvcConfigurer {
    @Override
    public void addInterceptors(InterceptorRegistry registry) {
		//定义要拦截的路径
        String[] addPathPatterns = {
                "/user/center",
                "/user/loan/*"
        };
		//定义不需要拦截的路径
        String[] excludePathPtterns = {
                "user/loan/loanInfo"
        };
		//将上面的定义进行注册
        registry.addInterceptor(new UserInterceptor())//指定要注册的拦截器对象
                .addPathPatterns(addPathPatterns)	//添加需要拦截的路径
                .excludePathPatterns(excludePathPtterns);//添加不需要拦截的路径
    }
}
3. Servlet
(1)@WebServlet注解扫描方式实现
- 创建一个Servlet类(继承 HttpServlet 类并重写 doGet() 方法和 doPost() 方法),在该类上使用注解
@WebServlet,要指定 urlPatterns 属性- 属性:
urlPatterns:指定前台发送过来的请求地址
- 属性:
- 在主应用程序 Application 类上添加
@ServletComponentScan注解,要指定value属性- 属性:
value:指定要扫描的 Servlet 类所在包的位置
- 属性:
(2)使用配置类实现
- 创建一个普通的 Servlet 类,不需要加任何的注解
- 编写一个配置类,在该类中注册上面创建的 Servlet 类
@Configuration:指明该类是一个配置类@Bean:相当于原来配置文件中的<bean>标签- 被
@Bean注解修饰的方法,默认方法名就是容器中对象的名字,对象为返回值类型 - 可以通过
@Bean的value属性修改容器中对象的名字
- 被
- 在配置类中获取Spring容器中的对象,直接在方法形参中获取即可,注入方式为先byName,再byType
- 通过
ServletRegistrationBean类注册Servlet
@Configuration
public class ServletConfig {
    @Bean
    public ServletRegistrationBean serv() {

        //将自定义 servlet 注册到注册 Servlet 类中,并指定访问路径
        ServletRegistrationBean s = new ServletRegistrationBean(new MyServlet(), "/springboot/myServlet");
        return s;
    }

	//获取容器中的对象举例(仅限@Configuration修饰的类),通过形参即可获取,注意名字是bean对象的名字
	//这段代码和配置Servlet没有关系,直接去掉即可,只是说明如何从Spring中获取对象
	@Bean
	public Object (ServletRegistrationBean serv){//在方法形参中获取了上面serv()方法创建的serv对象
		......
	}
}
4. Filter过滤器
(1)@WebFilter注解方式
- 创建一个Filter 类(实现 Filter 接口并重写 doFilter() 方法),在该类上使用注解`@WebFilter``,要指定 urlPatterns 属性
- 属性:
urlPatterns:指定前台发送过来的请求地址
- 属性:
- 在主应用程序 Application 类上添加
@ServletComponentScan注解,要指定value属性- 属性:
value:指定要扫描的 Filter 类所在包的位置
- 属性:
(2)配置类
- 创建一个普通的 Filter 类,不需要加任何的注解
- 编写一个配置类,在该类中注册上面创建的 Filter 类
@Configuration:指明该类是一个配置类@Bean:相当于原来配置文件中的<bean>标签- 通过
FilterRegistrationBean类注册 Filter ,addUrlPatterns方法来指定对应的url
@Configuration
public class FilterConfig {

    @Bean
    public FilterRegistrationBean fi() {
        FilterRegistrationBean f = new FilterRegistrationBean(new MyFilter());
        f.addUrlPatterns("/myfilter");
        return null;
    }
}
5. 字符编码过滤器
(1)配置文件方式实现(推荐)
从 springboot 1.4.2 之后开始新增的一种字符编码设置:
直接在SpringBoot 的主配置文件中指定下面的三个参数即可
#设置请求响应的字符编码
spring.http.encoding.enabled=true
spring.http.encoding.force=true
spring.http.encoding.charset=UTF-8
(2)配置类方式实现
- 创建配置类
@Configuration //设置为配置类 public class SystemConfig { @Bean public FilterRegistrationBean characterFilterRegistration() { //设置字符编码过滤器 //CharacterEncoding 是由 Spring 提供的一个字符编码过滤器,之前是配置在web.xml 文件中 CharacterEncodingFilter f = new CharacterEncodingFilter(); //强制使用指定字符编码 f.setForceEncoding(true); //设置指定字符编码 f.setEncoding("UTF-8"); //创建过滤器注册 bean FilterRegistrationBean fb = new FilterRegistrationBean(); //设置字符编码过滤器 fb.setFilter(f); //设置字符编码过滤器路径 fb.addUrlPatterns("/*"); return fb; } } - 关闭 SpringBoot 的 http 字符编码支持,在 SpringBoot 的配置文件中指定:
#关闭 springboot 的 http 字符编码支持
#只有关闭该选项后, spring 字符编码过滤器才生效
spring.http.encoding.enabled=false
六、logback日志
SpringBoot的父工程的依赖中本身就有logback的依赖,所以就可以不需要加logback的依赖
1. 创建配置文件
- Spring Boot 官方推荐优先使用带有 -spring 的文件名作为你的日志配置(如使用 logback-spring.xml ,而不是 logback.xml)的默认的命名规则,并且放在目录
src/main/resources下。也可以在 SpringBoot 的主配置文件中指定日志文件的位置和名字:logging.config=classpath:logging-config.xml - 日志级别从低到高分为 TRACE < DEBUG < INFO < WARN < ERROR < FATAL,如果设置为 WARN,则低于 WARN 的信息都不会输出
- 一般 DAO 层的包的日志级别设置为 DEBUG ,这样就只打印SQL语句
<?xml version="1.0" encoding="UTF-8"?>
<!-- scan:当此属性设置为 true 时,配置文件如果发生改变,将会被重新加载,默认值为true -->
<!-- scanPeriod:设置监测配置文件是否有修改的时间间隔,如果没有给出时间单位,默
认单位是毫秒。当 scan 为 true 时,此属性生效。默认的时间间隔为 1 分钟。 -->
<!-- debug:当此属性设置为 true 时,将打印出 logback 内部日志信息,实时查看
logback 运行状态。默认值为 false。通常不打印 -->
<configuration scan="true" scanPeriod="10 seconds">
    <!--appender标签用于添加一个日志输出的位置,输出到控制台-->
    <appender name="CONSOLE" class="ch.qos.logback.core.ConsoleAppender">
        <!--此日志 appender 是为开发使用,只配置最底级别,控制台输出的日志级别是大于或等于此级别的日志信息-->
        <filter class="ch.qos.logback.classic.filter.ThresholdFilter">
            <level>debug</level>
        </filter>
        <encoder>
        	<!-- 设置日志输出格式 -->
            <Pattern>%date [%-5p] [%thread] %logger{60} [%file : %line] %msg%n</Pattern>
            <!-- 设置字符集 -->
            <charset>UTF-8</charset>
        </encoder>
    </appender>
    <!--输出到文件-->
    <appender name="FILE" class="ch.qos.logback.core.rolling.RollingFileAppender">
        <!--输出到文件的位置-->
        <File>D:/log/stdout.log</File>
        <!--输出的格式-->
        <encoder>
            <pattern>%date [%-5p] %thread %logger{60} [%file : %line] %msg%n</pattern>
        </encoder>
        <rollingPolicy>
                class="ch.qos.logback.core.rolling.TimeBasedRollingPolicy">
            <!-- 添加.gz 历史日志会启用压缩 大大缩小日志文件所占空间 -->
            <!--<fileNamePattern>/home/log/stdout.log.%d{yyyy-MMdd}.log</fileNamePattern>-->
            <fileNamePattern>D:/log/stdout.log.%d{yyyy-MMdd}.log</fileNamePattern>
            <maxHistory>30</maxHistory><!-- 保留 30 天日志 -->
        </rollingPolicy>
    </appender>

	<!--设置dao层的日志级别为DEBUG,这样SQL语句就可以输出出来了-->
    <logger name="com.abc.springboot.mapper" level="DEBUG"/>

    <!--注册上面定义的appender标签-->
	<root level="INFO">
        <appender-ref ref="CONSOLE"/>
        <appender-ref ref="FILE"/>
    </root>
</configuration>
2. 生成日志
- 获取logger日志对象
- 通过logger的对应的方法打印不同级别的日志
一个Service层的例子:
@Service
public class MyService {
    private static final Logger logger = LoggerFactory.getLogger(MyService.class);

    public void a() {
        try {
			//一些代码
        } catch (Exception e) {
            logger.error(e.getLocalizedMessage());
        }
    }
}
七、打包与部署
1. 配置pom.xml
-
指定打包的类型
<packaging>war</packaging> -
指定打出的war包的名字(放到 Tomcat 中时的网站名)
<build> <!--最终打包完的名字--> <finalName>springboot-034</finalName> </build> -
为了保险起见,在打包的时候,建议把下面的配置都加上。
指定配置文件要编译到的类路径:<resources> <resource> <!--源文件夹--> <directory>src/main/webapp</directory> <!--目标文件夹--> <targetPath>META-INF/resources</targetPath> <!--包含的文件--> <includes> <include>**/*.*</include> </includes> </resource> <!--mybatis 的 mapper.xml--> <resource> <directory>src/main/java</directory> <includes> <include>**/*.xml</include> </includes> </resource> <!--src/main/resources 下的所有配置文件编译到 classes 下面去--> <resource> <directory>src/main/resources</directory> <includes> <include>**/*.*</include> </includes> </resource> </resources> -
配置SpringBoot打包插件
<!--SpringBoot 打包插件-->
<plugin>
	<groupId>org.springframework.boot</groupId>
	<artifactId>spring-boot-maven-plugin</artifactId>
</plugin>
2. Application类
程序入口 Application 类需扩展继承 SpringBootServletInitializer 类并覆盖 configure 方法
@SpringBootApplication
public class Application extends SpringBootServletInitializer {

    public static void main(String[] args) {
        SpringApplication.run(Application.class, args);
    }

    @Override
    protected SpringApplicationBuilder configure(SpringApplicationBuilder builder) {
    	//参数为当前 SpringBoot 启动类
        return builder.sources(Application.class);
    }
}
3. 打包
通过 Maven 的 package 命令将 war 包打包到 target 目录下
4. 总结
-
在 IDEA 中直接运行 Spring Boot 程序的 main 方法(开发阶段)
-
用 maven 将 Spring Boot 安装为一个 jar 包,使用 Java 命令运行
java -jar springboot-xxx.jar
可以将该命令封装到一个 Linux 的一个 shell 脚本中(上线部署)- 写一个 shell 脚本(run.sh):
#!/bin/sh java -jar xxx.jar- 赋权限 chmod 777 run.sh
- 启动 shell 脚本: ./run.sh
-
使用 Spring Boot 的 maven 插件将 Springboot 程序打成 war 包,单独部署在 tomcat 中运行
(上线部署常用)
六、其它
1. RedisTemplate
配置了2.4和3.4中的步骤, Spring Boot 将自动配置 RedisTemplate,在需要操作 redis 的类中自动注入 redisTemplate 即可。
- SpringBoot 帮我们自动注入 RedisTemplate 类(@Autowired),泛型里面只能写
<String, String>、<Object, Object>或者什么都不写 redisTemplate.opsFor...():ops是options(操作)的缩写,opsFor…是获取Redis中的一种数据类型,然后操作方法对应类型的方法与redis命令行一样redisTemplate.bound...Ops(Object key):与上面不同的是,该操作在确定了数据类型的同时还绑定了一个 key、value键值对,之后的操作都是对这个键值对进行操作//字符串类型 ValueOperations<Object, Object> vops = redisTemplate.opsForValue(); BoundValueOperations<Object, Object> value = redisTemplate.boundValueOps("key"); //Hash类型 HashOperations<Object, Object, Object> hops = redisTemplate.opsForHash(); BoundValueOperations<Object, Object> value = redisTemplate.boundHashOps("key"); //List类型 ListOperations<Object, Object> lops = redisTemplate.opsForList(); BoundValueOperations<Object, Object> value = redisTemplate.boundListOps("key"); //Set类型 SetOperations<Object, Object> sops = redisTemplate.opsForSet(); BoundValueOperations<Object, Object> value = redisTemplate.boundSetOps("key"); //ZSet类型 ZSetOperations<Object, Object> zsops = redisTemplate.opsForZSet(); BoundValueOperations<Object, Object> value = redisTemplate.boundZSetOps("key");
一个小例子:
@Service
public class StudentServiceImpl implements StudentService {
	@Autowired
	private StudentMapper studentMapper;
	@Autowired
	private RedisTemplate<Object,Object> redisTemplate;
	@Override
	public Long queryAllStudentCount() {
		//设置 redisTemplate 对象 key 的序列化方式,使得在 Redis 客户端工具中可以看到字符串而非二进制
		redisTemplate.setKeySerializer(new StringRedisSerializer());
		//从 redis 缓存中获取总人数
		Long allStudentCount = (Long)redisTemplate.opsForValue().get("allStudentCount");
		//判断是否为空
		if (null == allStudentCount) {
			//去数据库查询,并存放到 redis 缓存中
			allStudentCount = studentMapper.selectAllStudentCount();
			redisTemplate.opsForValue().set("allStudentCount", allStudentCount, 15, TimeUnit.SECONDS);
		}
		return allStudentCount;
	}
}
2. commons-lang3工具类
依赖:
<dependency>
	<!--把Spring等的jdk做了优化-->
    <groupId>org.apache.commons</groupId>
    <artifactId>commons-lang3</artifactId>
</dependency>
这个工具类跟java.lang这个包的作用类似,Commons Lang这一组API也是提供一些基础的、通用的操作和处理,
常用的有:
- ObjectUtils:用于操作Java对象,提供null安全的访问和其他一些功能;
- allNotNull(Object… values):如果有一个元素为空返回false,所有元素不为空或元素为empty返回true
- anyNotNull(Object… values):如果有一个元素不为空返回true
- SystemUtils:在java.lang.System基础上提供更方便的访问,如用户路径、Java版本、时区、操作系统等判断
这里有详解:https://blog.csdn.net/u012240455/article/details/79014224
3. 使用 lombok 简化代码
https://www.cnblogs.com/heyonggang/p/8638374.html
4. Thymeleaf使用详解
请移步到我写的另一篇博客:https://editor.csdn.net/md?articleId=103695925
5. SpringBoot热部署
- 添加依赖:
<!--SpringBoot 热部署依赖--> <dependency> <groupId>org.springframework.boot</groupId> <artifactId>spring-boot-devtools</artifactId> <optional>true</optional> </dependency> - 然后在 Run --> Edit Configurations 进行设置: