里面包括了老生常谈的饿汉式,懒汉式以及枚举类 静态代码块 序列化场景下,多线程场景下的问题。
话不多说,直接开干。
饿汉式就是立即加载的意思,立即加载在中文中有着急,急迫的意思。所以就叫饿汉式吧。
1.饿汉式的最简洁版本
package 单例模式的几种写法.饿汉式;

/**
 * @Author:FuYouJie
 * @Date Create in 2020/1/23 13:32
 */
public class Singleton1 {
    /**饿汉式:直接创建实例 不管你是否需要
     * 1.构造器私有化 外部不能直接new实例化
     * 2.自行创建 并且用静态变量保存
     * 3.声明为public 对外公开这个实例
     * 4.final 修饰
     * 构造器 私有化
     */
    public static final Singleton1 instance=new Singleton1();
    private Singleton1(){}

}
测试代码:
Singleton1 singleton1 = Singleton1.instance;
        Singleton1 s=Singleton1.instance;
        //true
        System.out.println(singleton1==s);
这里先不贴图,结果是一样的哈。==在这里比较的是对象地址。
2.枚举类的简单写法
public enum  SingletonByEnum {
    INSTANCE;
    public void doA(){
        System.out.println("AA");
    }
}
测试代码:
//枚举
        SingletonByEnum instance1 = SingletonByEnum.INSTANCE;
        SingletonByEnum instance2 = SingletonByEnum.INSTANCE;
        //true
System.out.println(instance1.hashCode()==instance2.hashCode());3.静态代码块的写法:
public class SingletonStatic {
    public static final SingletonStatic INSTANCE;
    private String name;
    static {
        Properties properties=new Properties();
        try {
            properties.load(SingletonStatic.class.getClassLoader().getResourceAsStream("single.properties"));
        } catch (IOException e) {
            throw  new RuntimeException();
        }
        INSTANCE = new SingletonStatic(properties.getProperty("name"));
    }
    //构造器 私有化
    private SingletonStatic(String name){
        this.name=name;
    }

    public String getName() {
        return name;
    }

}
这里的静态代码块实现了可以从配置文件给属性复制的功能,避免了在代码里面把属性写死的情况。


小结:饿汉式就是空间换时间,类加载的方式是按需加载,且只加载一次。因此,在上述单例类被加载时,就会实例化一个对象并交给自己的引用,供系统使用。换句话说,在线程访问单例对象之前就已经创建好了。再加上,由于一个类在整个生命周期中只会被加载一次,因此该单例类只会创建一个实例,也就是说,线程每次都只能也必定只可以拿到这个唯一的对象。因此就说,饿汉式单例天生就是线程安全的。
可是常说懒人改变世界,那么就一定有懒汉式。改变世界没有我不知道,至少改变了我的字数。
懒汉式也说延迟加载,就是在调用get方法的时候才创建实例。
1.懒汉式简单版本:
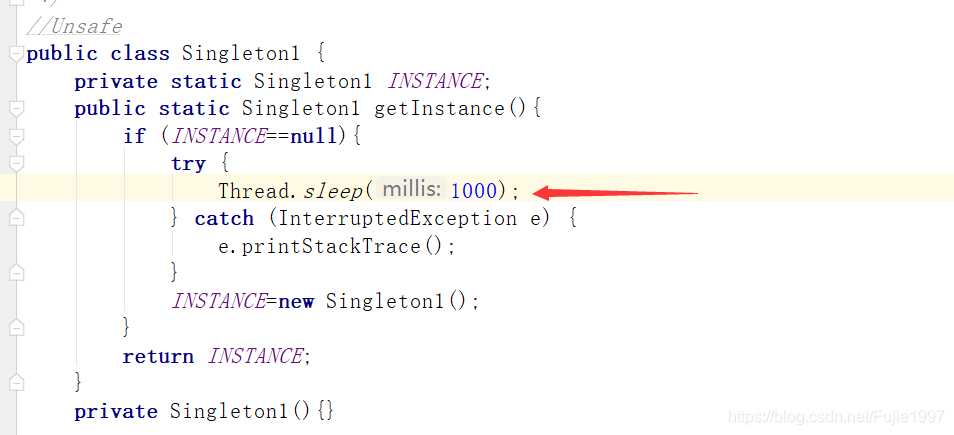
//Unsafe
public class Singleton1 {
    private static Singleton1 INSTANCE;
    public static Singleton1 getInstance(){
        if (INSTANCE==null){
            try {
            //模拟准备时间
                Thread.sleep(1000);
            } catch (InterruptedException e) {
                e.printStackTrace();
            }
            INSTANCE=new Singleton1();
        }
        return INSTANCE;
    }
    private Singleton1(){}

}
==单线程下==,这个代码是没有问题的。
测试代码:
//单线程下
        Singleton1 singleton1=Singleton1.getInstance();
        Singleton1 singleton2=Singleton1.getInstance();
        System.out.println(singleton1==singleton2);
运行结果:

可以看出来对象是一样的。
如果是多线程呢?
首先我们创建一个可以接收返回值的Callable
Callable<Singleton1> callable=new Callable<Singleton1>() {
            @Override
            public Singleton1 call() throws Exception {
                return Singleton1.getInstance();
            }
        };
然后创建一个线程池(因为装了阿里妈妈插件,直接创建线程屏幕一片黄)。
ThreadPoolExecutor threadPoolExecutor=new ThreadPoolExecutor(2,
                2,1,
                TimeUnit.MINUTES,new LinkedBlockingQueue<>(5),
                new ThreadPoolExecutor.CallerRunsPolicy());
然后提交再用Future接收
Future<Singleton1> singleton1Future = threadPoolExecutor.submit(callable);
Future<Singleton1> singleton2Future = threadPoolExecutor.submit(callable);
最后取结果
try {
            //false
            System.out.println(singleton1Future.get().hashCode()==singleton2Future.get().hashCode());
        } catch (InterruptedException e) {
            e.printStackTrace();
        } catch (ExecutionException e) {
            e.printStackTrace();
        }
        threadPoolExecutor.shutdown();
运行结果:
那么这是为啥呢?
在线程1进去的时候,此时对象是不存在的,遇到sleep(1000),线程1开始罚站1秒。
在线程1罚站的时候,线程2也进来了。他们一起在刚才的位置罚站,此时一秒钟还没过去,对象依然不存在。
然后线程1罚站结束,进入后面代码,new一个对象。不久后,线程2到了后面,此时并没有非空判断,所以线程2页创建了一个对象。
解决办法,加锁。这里就使用synchronized
懒汉式方法加锁版本:
public class SingletonWithSynMethod {
    private static SingletonWithSynMethod INSTANCE;
    public synchronized static SingletonWithSynMethod getInstance(){
        if (INSTANCE==null){
            try {
                Thread.sleep(1000);
            } catch (InterruptedException e) {
                e.printStackTrace();
            }
            INSTANCE=new SingletonWithSynMethod();
        }
        return INSTANCE;
    }
    private SingletonWithSynMethod(){}
}
测试一下:
class TestSingletonWithSynMethod{
public static void main(String[] args) {
ThreadPoolExecutor threadPoolExecutor=new ThreadPoolExecutor(2,
2,1,
TimeUnit.MINUTES,new LinkedBlockingQueue<>(5),
new ThreadPoolExecutor.CallerRunsPolicy());
Callable<SingletonWithSynMethod>singleton1=new Callable<SingletonWithSynMethod>() {
@Override
public SingletonWithSynMethod call() throws Exception {
return SingletonWithSynMethod.getInstance();
}
};
Future<SingletonWithSynMethod> future1= threadPoolExecutor.submit(singleton1);
Future<SingletonWithSynMethod> future2= threadPoolExecutor.submit(singleton1);
try {
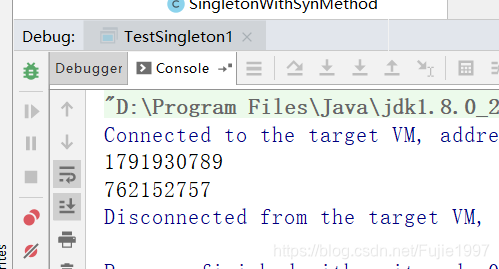
//true
System.out.println(future1.get()==future2.get());
} catch (InterruptedException e) {
e.printStackTrace();
} catch (ExecutionException e) {
e.printStackTrace();
}
threadPoolExecutor.shutdown();
}
}
但是本着锁块不锁方法的意思,我们可以改变一下synchronized的位置。
public class SingletonWithSynBlock {
    private static SingletonWithSynBlock INSTANCE;
    public  static SingletonWithSynBlock getInstance(){
        if (INSTANCE==null){
            try {
                Thread.sleep(1000);
            } catch (InterruptedException e) {
                e.printStackTrace();
            }
            synchronized (SingletonWithSynBlock.class){
                INSTANCE=new SingletonWithSynBlock();
            }
        }
        return INSTANCE;
    }
    private SingletonWithSynBlock(){}
}
你以为这就完事了?
我们运行一下。
运行代码:
class TestSingletonWithSynBlock{
public static void main(String[] args) {
ThreadPoolExecutor threadPoolExecutor=new ThreadPoolExecutor(2,
2,1,
TimeUnit.MINUTES,new LinkedBlockingQueue<>(5),
new ThreadPoolExecutor.CallerRunsPolicy());
Callable<SingletonWithSynBlock> singleton1=new Callable<SingletonWithSynBlock>() {
@Override
public SingletonWithSynBlock call() throws Exception {
return SingletonWithSynBlock.getInstance();
}
};
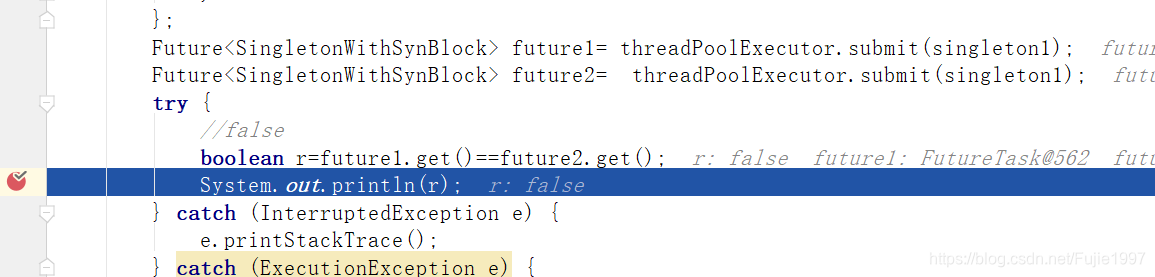
Future<SingletonWithSynBlock> future1= threadPoolExecutor.submit(singleton1);
Future<SingletonWithSynBlock> future2= threadPoolExecutor.submit(singleton1);
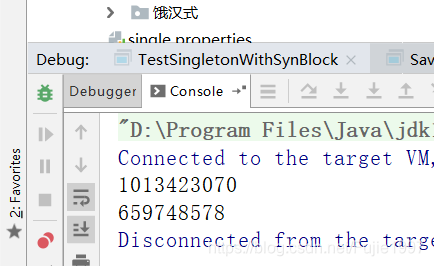
try {
//false
System.out.println(future1.get()==future2.get());
} catch (InterruptedException e) {
e.printStackTrace();
} catch (ExecutionException e) {
e.printStackTrace();
}
threadPoolExecutor.shutdown();
}
}
因此我们引入DCL双检查机制
代码:
public class SingletonWithDCL {
    private volatile static SingletonWithDCL INSTANCE;
    public static SingletonWithDCL getInstance(){
        try {
            if (INSTANCE != null){
            }else {
                Thread.sleep(3000);
                synchronized (SingletonWithDCL.class){
                    if (INSTANCE == null){
                        INSTANCE=new SingletonWithDCL();
                    }
                }
            }
        } catch (InterruptedException e) {
            e.printStackTrace();
        }
        return INSTANCE;
    }
    private SingletonWithDCL(){}
}
测试代码:
class TestSingletonWithDCL{
public static void main(String[] args) {
ThreadPoolExecutor threadPoolExecutor=new ThreadPoolExecutor(2,
2,1,
TimeUnit.MINUTES,new LinkedBlockingQueue<>(5),
new ThreadPoolExecutor.CallerRunsPolicy());
Callable<SingletonWithDCL> singleton1=new Callable<SingletonWithDCL>() {
@Override
public SingletonWithDCL call() throws Exception {
return SingletonWithDCL.getInstance();
}
};
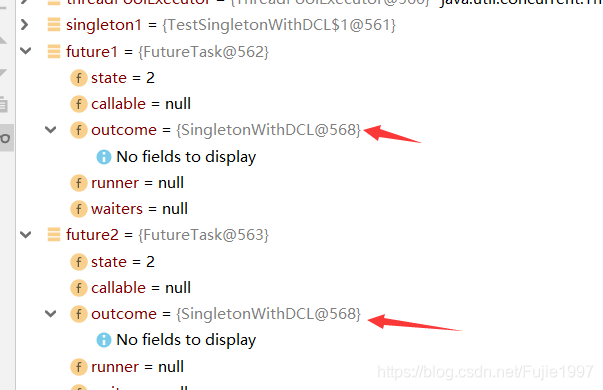
Future<SingletonWithDCL> future1= threadPoolExecutor.submit(singleton1);
Future<SingletonWithDCL> future2= threadPoolExecutor.submit(singleton1);
try {
//true
System.out.println(future1.get()==future2.get());
} catch (InterruptedException e) {
e.printStackTrace();
} catch (ExecutionException e) {
e.printStackTrace();
}
}
}运行:

懒汉模式也是可以用内部类的
public class SingletonWithInner {
    /**
     * 内部类不会随着外部类的加载初始化
     */
    private static class MyClassHandler{
        private static SingletonWithInner INSTANCE=new SingletonWithInner();
    }
    public static SingletonWithInner getInstance(){
        return MyClassHandler.INSTANCE;
    }
    private SingletonWithInner(){}

}
但是没有这样的便宜,内部类在序列化的时候会有问题。
重写内部类
public class SingletonAndSer implements Serializable {
    private static final long serialVersionUID=888L;
    //内部类
    private static class MyClassHandler{
        private static final SingletonAndSer INSTANCE=new SingletonAndSer();
    }
    private SingletonAndSer(){}
    public static SingletonAndSer getInstance(){
        return MyClassHandler.INSTANCE;
    }
//  protected Object readResolve() throws ObjectStreamException{
//      System.out.println("调用了本方法!");
//      return MyClassHandler.INSTANCE;
//  }
}
测试类:
class SaveAndRead{
    public static void main(String[] args) {
            SingletonAndSer singletonAndSer=SingletonAndSer.getInstance();
            try {
            FileOutputStream fosRef=new FileOutputStream(new File("test.txt"));
            ObjectOutputStream oosRef=new ObjectOutputStream(fosRef);
            oosRef.writeObject(singletonAndSer);
            oosRef.close();
            fosRef.close();
            System.out.println(singletonAndSer.hashCode());
        } catch (FileNotFoundException e) {
            e.printStackTrace();
        } catch (IOException e) {
            e.printStackTrace();
        }


        try {
            FileInputStream fileInputStream=new FileInputStream(new File("test.txt"));
            ObjectInputStream objectInputStream=new ObjectInputStream(fileInputStream);
            SingletonAndSer singletonAndSer1= (SingletonAndSer) objectInputStream.readObject();
            objectInputStream.close();
            fileInputStream.close();


            System.out.println(singletonAndSer1.hashCode());
        } catch (FileNotFoundException e) {
            e.printStackTrace();
        } catch (IOException e) {
            e.printStackTrace();
        } catch (ClassNotFoundException e) {
            e.printStackTrace();
        }

    }
}
运行:
纳尼??
如果在反序列化的时候没有指定readResolve 那么还是多例的。
解决办法就是把注释去掉。
添加readResolve方法。
protected Object readResolve() throws ObjectStreamException{
        System.out.println("调用了本方法!");
        return MyClassHandler.INSTANCE;
    }
再运行:
好了,到这里就差不多结束啦。但是最开始的枚举类直接暴露,违反了“职责单一原则”,现在来完善完善。
以Connection为例。
/**
 * @Author:FuYouJie
 * @Date Create in 2020/1/23 16:40
 */
public class Connection {
    String url;
    String name;

    public Connection(String url, String name) {
        this.url = url;
        this.name = name;
    }
}
public class MyObject {
public enum MyEnumSinggleton{
//工厂
connectionFactory;
private Connection connection;
private MyEnumSinggleton(){
System.out.println("创建MyObject");
String url="jdbc:mysql://127.0.0.1:3306/bookdb?characterEncoding=UTF-8&serverTimezone=UTC&useSSL=false";
String username="root";
connection=new Connection(url,username);
}
public Connection getConnection(){
return connection;
}
}
public static Connection getConnection(){
return MyEnumSinggleton.connectionFactory.getConnection();
}
}测试代码:
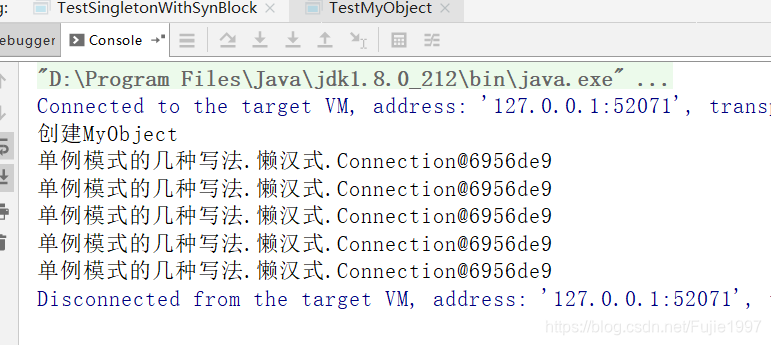
class TestMyObject{
    public static void main(String[] args) throws ExecutionException, InterruptedException {
        ThreadPoolExecutor threadPoolExecutor=new ThreadPoolExecutor(5,
                5,1,
                TimeUnit.MINUTES,new LinkedBlockingQueue<>(5),
                new ThreadPoolExecutor.CallerRunsPolicy());
        Callable<Connection> singleton1=new Callable<Connection>() {
            @Override
            public Connection call() throws Exception {
                return MyObject.getConnection();
            }
        };
        for(int i=0;i<5;i++){
            Future<Connection> future= threadPoolExecutor.submit(singleton1);
            System.out.println(future.get());
        }
        threadPoolExecutor.shutdown();
    }
}
运行:
好嘞,好累。本人微信qazwsxFuYouJie
扔砖可以加微信。
GitHub代码地址:JaveSE知识点