It is easy to run Jenkins in Docker, for example, on an AWS EC2 instance. You just have to make sure that Docker is installed on the EC2 instance, and then run the following docker run command, as described here in the docs:
docker run \
  -d \
  --rm \
  -u root \
  -p 8080:8080 \
  -v jenkins-data:/var/jenkins_home \
  -v /var/run/docker.sock:/var/run/docker.sock \
  jenkinsci/blueocean
If you own the domain mydomain.com, you can then go to your DNS server, create a CNAME record for jenkins.mydomain.com, set its value to the public domain name of your AWS EC2 instance, and your Jenkins installation will be publicly accessible on http://jenkins.mydomain.com.
However, not that the URI scheme is http and not https. The webserver built into Jenkins (Winstone) uses HTTP by default. This means that all traffic sent between you and Jenkins ins unencrypted. So what if you want to use HTTPS so that your traffic gets encrypted?
One option would be to configure the built-in Jenkins Winstone webserver to use HTTPS. This could be done with some hassle, but is not recommended, even by the official Jenkins docs.
There’s a much easier solution, namely using a reverse proxy. In this case, the reverse proxy handles all the HTTPS stuff, which allows you to run Jenkins in its default configuration (using HTTP) behind the reverse proxy. In this tutorial, we are going to use the NGINX reverse proxy, and we will run everything as Docker containers.
For this solution, the following steps are necessary:
- Understand what a reverse proxy is.
- Create a TLS server certificate for
jenkins.mydomain.com. - Run the reverse proxy and Jenkins containers with the right configurations.
In the rest of this article, I am going to describe these steps one by one.
What is a Reverse Proxy?
As always, terms with a “reverse” modifier are not very intuitive. Basically, there are two types of proxies, and they are called forward proxy and reverse proxy. The following figure illustrates what they do:

Forward Proxy
A forward proxy is a server that carries out requests on behalf of a well-defined set of clients to arbitrary servers on the Internet.

For example, if you are using a forward proxy, and you request http://google.com/ from your browser, then your browser doesn’t do this request itself, but forwards it to the forward proxy. The forward proxy performs the request to the google.com webserver, gets the response, and returns this response back to your browser.
The webserver at google.com doesn’t know that the request came originally from you. It can only see the IP address of the forward proxy as the source IP address of the request, but not the IP address of your laptop. So, for the webserver, it looks like the request originated from the forward proxy.
Consequently, one common use case for using forward proxy is hiding your IP address from webservers.
Reverse Proxy
A reverse proxy is a server that receives requests from arbitrary clients over the Internet, and forwards them to one of a well-defined set of servers.
For example, if you have a reverse proxy that runs in front of your webserver for your website http://mydomain.com, then any request to http://mydomain.com is actually received by your reverse proxy, and not by your webserver. The reverse proxy then forwards this request to your webserver, the webserver handles it, returns the response to your reverse proxy, and the reverse proxy returns the response back to the client.
The client making the request doesn’t know that it is actually interacting with a reverse proxy rather than directly with your webserver.
A common use case for a reverse proxy is to make it handle certain tasks so that the application servers behind the reverse proxy don’t need to handle them. One example of such a task is handling the TLS network layer (for example, to implement HTTPS). This is what we are going to do in this article.
A reverse proxy can also be used for load balancing. For example, if you have multiple webservers behind your reverse proxy that serve the same website, then the reverse proxy can distribute incoming requests evenly over these webservers, so that the risk of a single webserver getting overloaded is reduced.
Getting a TLS Server Certificate
In order to use HTTPS, we need to get a public key certificate for the domain that we want to use for our webserver. But to do this, we first need to understand what HTTPS really is.
What is HTTPS?
HTTPS can be rephrased as “HTTP over TLS”. TLS stands for Transport Layer Security and is a cryptographic network protocol layer that can be inserted between the transport layer (e.g. TCP) and the application layer (e.g. HTTP) of the network protocol stack. The following figure illustrates this:

Note: you might often hear the term SSL (Secure Sockets Layer). Indeed, the term SSL is often used interchangeably with TLS, but this is wrong. SSL is the predecessor protocol of TLS and is now deprecated.
So, if HTTP is used alone, we talk about HTTP. If HTTP is used on top of TLS, we talk about HTTPS. In some more detail, if we use HTTP, then the HTTP layer passes messages in in plain text down to the TCP layer (and the same way back when receiving messages). On the other hand, if we use HTTPS, then the HTTP layer passes the plain text messages to to the TLS layer, TLS encrypts these messages and passes them as ciphertexts to TCP (and the same way back when receiving messages).
TLS uses a symmetric encryption algorithm to encrypt messages. This algorithm, as well as the symmetric key, are negotiated between the client and the server during an initial handshake. The symmetric encryption provides confidentiality of the communication.
In addition to confidentiality, TLS also provides server authentication. This means that a server (e.g. webserver) has to prove its identity to the client (e.g. browser). This is done by public key cryptography and a TLS server certificate. I will explain in the next section how this works.
TLS also defines client authentication. That means that a client (e.g. browser) has to prove its identity to the server (e.g. webserver) by the means of a TLS client certificate. However, this feature is rarely used in practice.
TLS Server Authentication
A server that wants to authenticate itself to its clients needs to have a private and a public key, as well as a certificate for the public key. Upon connection with a client, the client sends a so-called challenge, an arbitrary piece of data, to the server, and requests the server to encrypt this piece of data with the server’s private key.
The server then sends the encrypted challenge back to the client, along with the server certificate. The client then decrypts the encrypted challenge with the server’s public key (which is in the certificate). If the decryption succeeds, the client knows that the server it is talking to must be really the subject that is listed in the certificate. This is because only this subject is supposed to have the private key that corresponds to the public key in the certificate.
What is a Public Key Certificate?
The following is a short excursus into public-key cryptography. It explains how certificates work, including the concepts of chain of trust and root certificate.
If you don’t want to know how certificates work, but just want to get one, you can jump directly to “How To Get a Certificate?”.
A public key certificate is a text document that contains three pieces of information:
- A description of a subject (for example, an individual, a company, or a webserver identified by a domain name)
- A public key
- A digital signature of a trusted third-party that attests that this public key belongs to this subject
In fact, all that a certificate does is confirming that a given public key belongs to a given subject.
For example, if a subject is called Google and has a public key P, then a corresponding certificate would say: “I confirm that the public key P belongs to Google”.
The trustworthiness of a certificate relies on the digital signature of a trusted third-party that confirms the content of the certificate. This digital signature is provided by the issuer of the certificate. An issuer of certificates is called a certificate authority (CA).
A digital signature of a document is typically nothing else than a hash of the document encrypted with the signer’s private key. If this signature can be decrypted with the signer’s public key, then we know that the signature must have been made by this signer, because this signer is the only subject that has access to this private key.
When a client validates the certificate of a server, it also has to validate the digital signature of the CA on this certificate. This is done, as mentioned, by trying to decrypt the signature with the CA’s public key (which is publicly known). But now the client seems to be back on square one: it has a subject (the CA) and a public key that claims to be the CA’s public key, but no proof that this public key really belongs to this CA.
The solution is yet another certificate. Namely a certificate issued by yet another CA, say CA-2, that confirms that the public key, that claims to be the public key of the first CA, say CA-1, is really CA-1’s public key. And this certificate bears the digital signature of CA-2. But as a client we still can’t stop here. We also have to verify the signature of CA-2 on this certificate. For this we need CA-2’s public key (which is publicly available). And now again, we have a subject (CA-2) and a public key, but no proof that this public key really belongs to CA-2. The solution is… yet another certificate. Namely a certificate issued by CA-3 confirming that the public key in question really is the public key of CA-2. And this certificate bears the digital signature of CA-3, which we in turn need to verify.
The following figure illustrates this process:

You can see that this results in a chain of certificates which is called the chain of trust. The chain of trust can theoretically be infinitely long, but in practice it isn’t. Typical chains of trust for websites consist of three to four certificates.
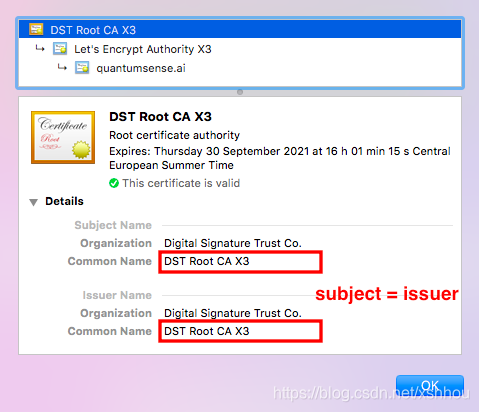
So where does the chain of trust end? The answer is with a so-called root certificate. A root certificate is a certificate whose signature does not need to be verified. In particular root certificates are self-signed, that is, the digital signature is made by the same CA that issues the certificate.
Root certificates are issued by root-CAs, and a root certificate typically confirms that the public key that the root-CA claims is theirs, is really the root-CA’s public key. And this confirmation is not done by someone else, but by the root-CA itself. You can see in the following picture that the subject and the issuer of a root certificate is the same.
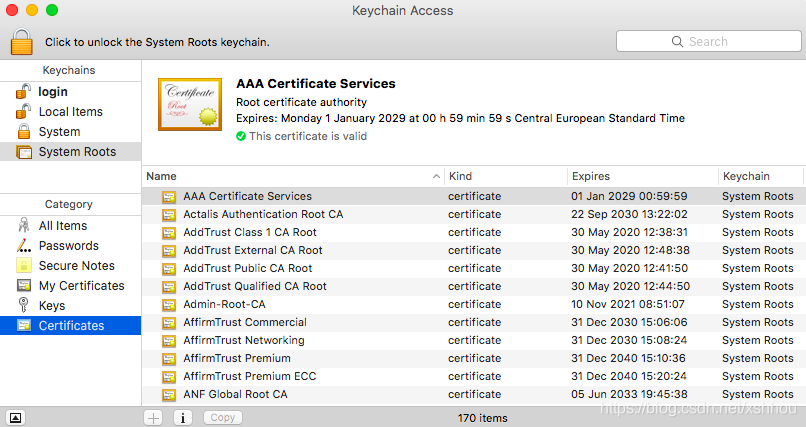
So how can we trust a root-CA and a root certificate? The answer is that they are trusted under human terms rather than cryptographic terms. Root-CA’s are regulated and under public scrutiny, and root certificates are typically hand-picked by browser and operating-system vendors and a fixed set of them is included in their products. For example, on macOS, you can see the set of trusted root certificates in Keychain Access (these root certificates are also used by Google Chrome):
This excursion to the chain of trust and root certificates was just for information. You normally don’t have to deal with it. The only exception is if you have to verify a root certificate that is not known by your system (e.g. by your browser or operating system). In this case, you have to install this root certificate on your system (if you trust it, of course).
However, what you need to know is how to get a certificate for your own domain name in order to set up HTTPS for your webserver. This is the topic of the next section.
How To Get a Certificate?
So how can we get a public key certificate for setting up Jenkins with HTTPS? In general, for obtaining a certificate, you have to go to a certificate authority (CA) with your public key and some information about yourself (the subject), and ask the CA to create a certificate for you (you do a so-called certificate signing request).
The CA then verifies that you really are who you claim to be. If successful, they create your certificate and return it to you along with all the certificates of the chain of trust (except the root certificate). That is, you get not only your own certificate back, but also the CA’s certificate, and the certificate of the CA that signed this CA’s certificate, and so on.
Unfortunately, most traditional CAs are commercial entities and getting a certificate is not free. Moreover, a certificate signing request is a manual procedure and may take a long time to complete.
However, there is an alternative solution.
A Free Solution
可以用阿里云、腾讯云等替代
Let’s Encrypt is a non-profit CA that issues certificate completely free of charge. Moreover, they use the Automatic Certificate Management Environment (ACME) protocol, which automates the identity verification and certificate issuing process. With this solution, getting a certificate is not only free, but a matter of a just a few minutes.
The recommended way to get a certificate from Let’s Encrypt is to use Certbot which is an ACME client.
In our case, we want to use the certificate as a TLS server certificate for accessing Jenkins with HTTPS via our domain name jenkins.mydomain.com. In this case, the subject of the certificate will be simply the domain name jenkins.mydomain.com, and we have to prove to Let’s Encrypt that we are the owner of this domain name.
All this will be done completely automatically by Certbot by the means of DNS records that we have to create for this domain.
The generic instructions for getting a certificate with Certbot from Let’s Encrypt are here. It basically consists of the following steps:
- On your DNS server, create a CNAME or ALIAS record for the domain
jenkins.mydomain.compointing to a host that you have access to. - Log in to this host and install Certbot.
- Run
certbot certonly.
That’s it! Certbot creates a public/private key pair for you, does the domain ownership verification by the means of the DNS records, and gets a public key certificate for the subject jenkins.mydomain.com from Let’s Encrypt.
Certbot saves the certificate in the following directory on the local host:
/etc/letsencrypt/live/jenkins.mydomain.com
In particular, this directory will contain the following relevant files (among some other files which are not needed):
fullchain.pem: the chain of trust including your certificate (excluding the root certificate).privkey.pem: your private key.
These files are all you need to set up HTTPS for Jenkins with an NGINX reverse proxy, as explained in the next section.
Set Up NGINX and Jenkins in Docker
We have the following objectives:
- Run Jenkins in Docker.
- Access Jenkins with HTTPS.
- Handle HTTPS by a reverse proxy, and leave Jenkins in default HTTP configuration.
The following figure illustrates the architecture of the solution:
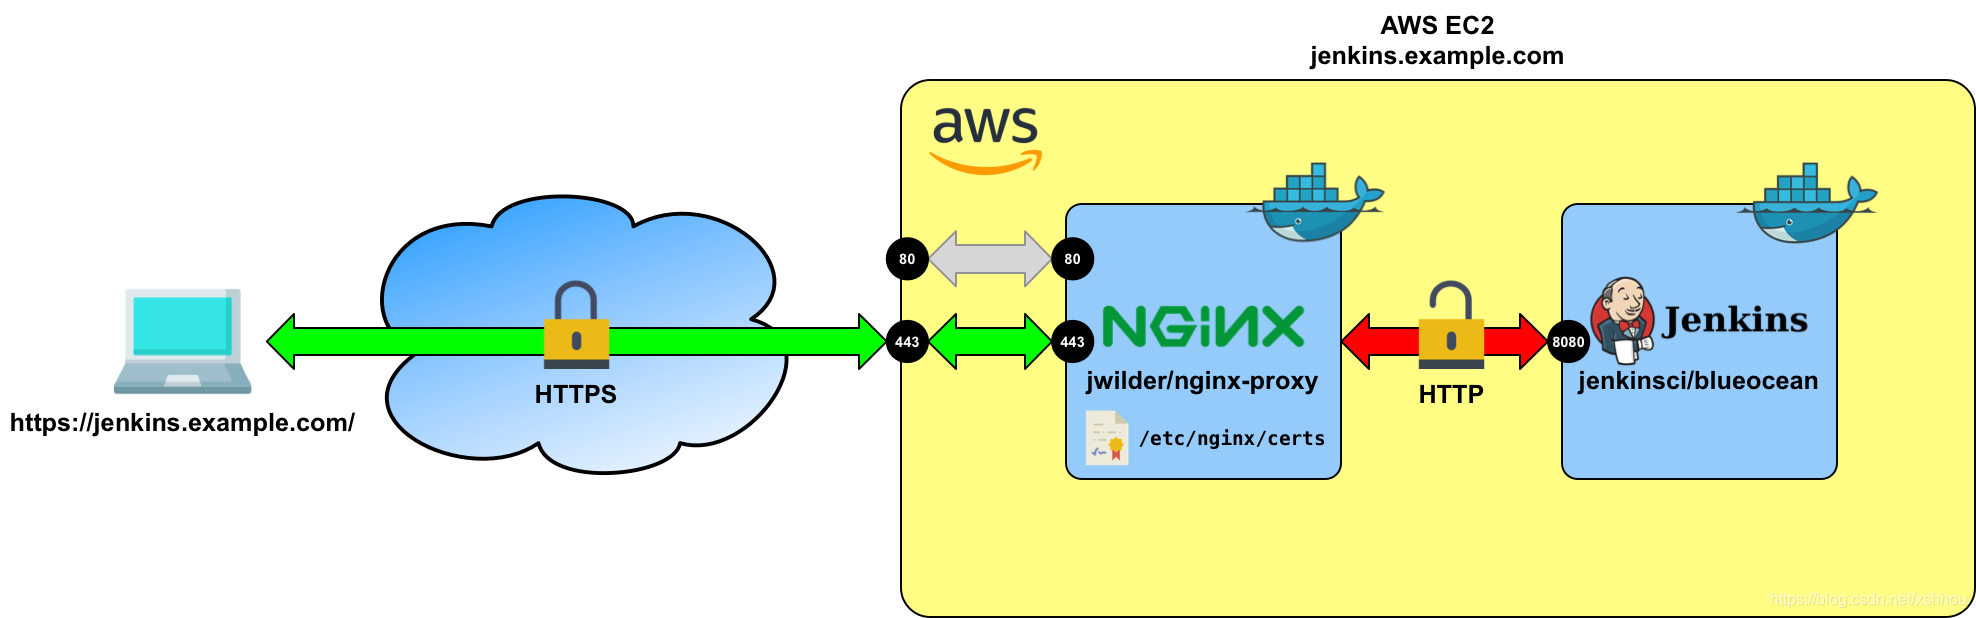
We run two separate Docker containers, one with NGINX, and one with Jenkins. For NGINX, we use the jwilder/nginx-proxy container, which greatly facilitates the configuration of the NGINX reverse proxy inside the container.
The jwilder/nginx-proxy container combines NGINX with the docker-gen file generator. docker-gen is a tool that allows to create files based on the metadata of containers that are running on the host. In the case of the jwilder/nginx-proxy container, docker-gen is able to automatically generate a configuration file for NGINX running in the same container.
The metadata for these other containers is supplied in the form of environment variables that specified with the -e option of the docker run command. The official instructions for setting up HTTPS with jwilder/nginx-proxy are here.
In our case, we want to instruct NGINX to route all requests to jenkins.mydomain.com to port 8080 of the Jenkins container (this is the default port that Jenkins listens on). Here is the command for starting the Jenkins container:
docker run \
  -d \
  --rm \
  -u root \
  -v /var/run/docker.sock:/var/run/docker.sock \
  -v jenkins-data:/var/jenkins_home \
  -v "$HOME":/home \
  -e VIRTUAL_HOST=jenkins.mydomain.com \
  -e VIRTUAL_PORT=8080 \
  jenkinsci/blueocean
The main difference to running Jenkins normally is the presence of the VIRTUAL_HOST and VIRTUAL_PORT environment variables, which allow docker-gen in the jwilder/nginx-proxy container to generate an appropriate config file for NGINX. Furthermore, the above command does not publish any port to the host (which would be usually done with the -p option), which is because Jenkins will be hidden behind the NGINX reverse proxy and does not need to handle any outside requests to the host itself.
The jwilder/nginx-proxy container requires the certificate and private key that we generated in the previous section. These files must be named in a certain way, and passed in to the container in a bind mount volume with the -v option.
To this end, copy the fullchain.pem and privkey.pem from the last section to the current host, and rename them as follows:
fullchain.pem → jenkins.mydomain.com.crtprivkey.pem → jenkins.mydomain.com.key
In the following, I will assume that these files are in the directory /home/you/certs of the local host.
Once these files are in place, run the jwilder/nginx-proxy container with the following command:
docker run \
  -d \
  --rm \
  -p 80:80 \
  -p 443:443 \
  -v /var/run/docker.sock:/tmp/docker.sock:ro \
  -v /home/you/certs:/etc/nginx/certs \
  jwilder/nginx-proxy
That’s it! Now NGINX is correctly configured to handle HTTPS on behalf of Jenkins.
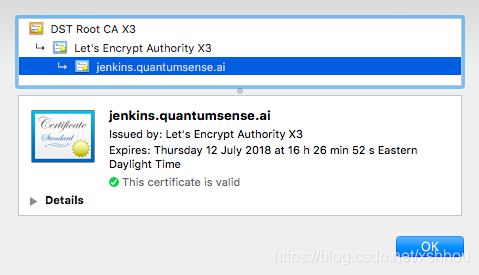
If you access https://jenkins.mydomain.com in your browser, you should see something like this:

Note that with this solution HTTP requests are automatically forced to HTTPS. That is, if somebody requests http://jenkins.mydomain.com, the request is still handled as HTTPS (and appears in the browser like in above picture), which is generally a desired behaviour.
