目前互联网分布式架构的系统基本上离不开消息中间件,也就是此篇博文要讲的,那我们就一起来认识一下这位朋友吧。
讲到MQ不得不提交异步解耦这个概念,就拿电商下订单举例(一般订单都涉及到短信、物流、邮件等各个流程),下面以图片为例子说明。
应用介绍
应用解耦
- 不用与线程池绑定,不用写短信线程任务、物流线程任务等
- 即使物流系统挂了,需要几分钟修复,在这几分钟消息物流系统待处理的消息都被缓存在MQ里,并不会影响用户下单,当系统恢复后,补充存储在MQ里的订单信息即可,终端客户察觉不到物流系统故障,提升体验。

流量消峰
淘宝双十一大部分流量系统会在期间猛增,这个时候如果没有缓冲机制难以为继,可以通过MQ把请求暂存起来,分散到较长的一段时间内处理,这也就是我们双十一为什么到了零点,下订单不能一次到位的感觉,但事实上进行流量消峰并不是因为能力不够,而是出于经济原则,比如有的业务系统流量最高峰也不会超过10000QPS,平时只有1000QPS,这种情况下就可以用个普通的服务器(支持1000QPS即可),然后加个消息队列作为高峰期缓冲,无需大笔资金购买服务器。
消息分发
在大数据时代,数据是不断产生的,各个分析团队、算法团队都需要依赖这些数据进行工作,这个时候有个持久化的消息队列就显得尤为重要。数据的产生方面只需要将各自的消息写入到消息队列即可,数据的使用方根据各自需求订阅各自感兴趣的数据,不同的团队所订阅的消息是可以重复的也可以不重复,互不干扰,也不必和数据生产方关联。
各个子系统将日志数据不停的写入到消息队列,不同的数据处理系统有各自的Offset,互不影响。甚至各个团队处理完的数据也可以写入到消息队列,作为数据的产生方,供给其它团队使用,避免重复计算。
保证最终一致性
动态扩容
消息中间件概念
1、什么是Message-Queue消息中间件
- 利用高效可靠地消息机制进行与平台无关的 数据交流
- 基于数据通信来实现分布式系统的集成
- 通过提供消息传递和消息排队模型,它可以在分布式环境下扩展进程间的通信
- 本质上就是接受请求-->保存数据-->发送数据
2、消息中间件的应用场景
- 跨系统数据传递、高并发流量消峰、数据异步处理、系统解耦等
3、常用的消息中间件
- ActiceMq、RabbitMq、Kafka、RocketMq
协议
协议是计算机通信共同遵从的一组约定,是对数据格式和计算机之间交换数据时必须遵守的规则。(http重协议,使用轻协议), 消息中间件协议:OpenWire、AMQP、MQTT、Kafka、OpenMessage
- AMQP(Advanced Message Queuing Protocol)协议:高级消息队列协议。特性:事务支持、持久化支持出生在金融行业,在可靠消息处理上具备天然优势。使用此协议的MQ:ActiceMq 、RabbitMq
- MQTT(Message Queue Telemetry Transport)协议:消息队列遥测传输,是IBM开发的一个即时通讯的通讯协议,物联网架构系统中中亚的组成部分。特性:轻量、结构简单、传输快没有事务支持、没有持久化相关设计,应用场景:适用于计算能力有限、低带宽、网路不稳定的场景。使用此协议的MQ:ActiceMq 、RabbitMq
- OpenMessage是最近一两年有阿里发起的,与雅虎、滴滴出行、Streamlio等公司共同参与创立的分布式消息中间件协议、流处理应用的开发标准,是国内首个在全球范围内发起的分布式消息领域国际标准。特性:结构简单、解析快、有事务支持、有持久化设计。使用此协议的MQ:Apache RocketMq
- Kafka协议:是基于TCP二进制协议,消息内部是通过长度来分隔,由一些基本数据类型组成。特性:结构简单,解析快无事务支持有持久化设计。使用此协议的MQ:Kafka


备注:持久化简单来说就是将数据存入磁盘,而不是存在内存中随着服务的生命周期一致同生同死,而是是数据永久保存称之为持久化。
ActiveMQ安装(得先安装JDK1.8以上版本)
- 官网:https://activemq.apache.org/ 文档:http://activemq.apache.org/components/classic/documentation
- 下载:https://activemq.apache.org/components/classic/download/
- 官网下载太鸡儿慢,我这里给下好了可到我的百度云盘自行提取(linux版本):https://pan.baidu.com/s/1ZJadXiPPTcYblGb8jq9zoQ 提取码hf4i
1、下载后解压文件
mkdir /usr/activemq 并将文件解压至此处文件夹 tar -zxvf apache-activemq-5.15.9-bin.tar.gz -C /usr/activemq 解压后目录如下(可以发现基本上和tomcat一模一样,其中data是存放日志文件,webapps是存放管理控制台程序目录 ,jar包为activemq全量包。)

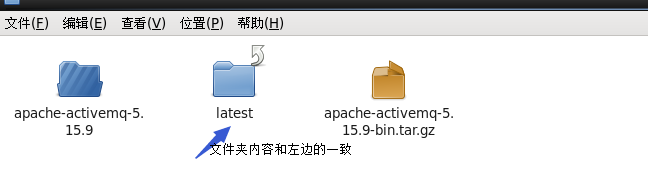
2、创建软链接并启动
为方便写配置项,创建软链接 ln -s /usr/activemq/apache-activemq-5.15.9 /usr/activemq/latest (和快捷方式一样,操作同一个文件)
启动:
- 进入bin目录 cd /usr/activemq/latest/bin
- 后台守护进程启动 (稍等会会启动进程) ./activemq start 备注:前台启动 ./activemq console

2、检测是否启动成功
方法一:访问管理控制台:http://ip:8161/admin ActiveMQ的管理页面默认开启了身份校验: 账号:admin 密码:admin
方法二:在启动Console 或 日志文件(data/activemq.log)中看到日志输出

方法三:或用jps命令查看 6193为启动的Pid
[root@zhujiname bin]# jps

6193 activemq.jar

6350 Jps备注:输入网址,因为我这里是虚拟机所以以实际ip为准(可能会被防火墙拦截,记得关闭防火墙:service iptables stop,查看防火墙状态service iptables status)。

ActiveMQ使用
使用下载好的jar包 (在ActiveMQ目录有activemq-all-5.15.9jar包)或者使用maven依赖下载
<dependency>
    <groupId>org.apache.activemq</groupId>
    <artifactId>activemq-all</artifactId>
    <version>5.15.9</version>
</dependency>
如果是springboot那么请添加一下依赖
<dependency>
    <groupId>org.springframework.boot</groupId>
    <artifactId>spring-boot-starter-activemq</artifactId>
</dependency>
普通web项目运行activemq
package activemq;

import org.apache.activemq.ActiveMQConnectionFactory;

import javax.jms.*;
import java.util.Date;

/**
 * @author Heian
 * @time 19/08/14 12:22
 * @description: 消息生产者
 */
public class Producer {

    public static void main(String[] args) {
        //启动生产者
        ProducerThread producerThread = new ProducerThread ("tcp://192.168.32.130:61616","queue1");
        producerThread.start ();
    }

    static class ProducerThread extends Thread{
        String brokerUrl;
        String destinationUrl;

        public ProducerThread(String brokerUrl,String destinationUrl){
            this.brokerUrl = brokerUrl;
            this.destinationUrl = destinationUrl;
        }

        @Override
        public void run() {

            ActiveMQConnectionFactory connectionFactory;
            Connection connection;
            Session session;

            try {
                //1、创建连接工厂
                connectionFactory = new ActiveMQConnectionFactory (brokerUrl);
                //2、创建连接
                connection = connectionFactory.createConnection ();
                connection.start ();//一定要记得start
                //3、创建会话(可以创建一个或者多个session,我这里默认一个)
                // 第一个参数:是否开启事务。true:开启事务,第二个参数忽略。第二个参数:当第一个参数为false时,才有意义。消息的应答模式。1、自动应答2、手动应答。一般是自动应答。
                session = connection.createSession (false, Session.AUTO_ACKNOWLEDGE);
                //4、创建消息发送目标 (Topic 或者 Queue  都实现了Destination)
                Destination destination = session.createQueue (destinationUrl);
                //5、用目的地创建消息生产者
                MessageProducer producer = session.createProducer (destination);
                producer.setDeliveryMode (DeliveryMode.PERSISTENT);//设置递送模式(持久化/不持久化)
                //6、创建一条文本消息
                String str = "hello activemq:from" + Thread.currentThread ().getName () + ",时间:" + new Date (System.currentTimeMillis ());
                TextMessage message = session.createTextMessage (str);
                //7、通过producer推送消息
                producer.send (message);
                //8、清理 关闭连接
                session.close ();
                connection.close ();

            }catch (JMSException e){
                e.printStackTrace ();
            }
            super.run ();
        }
    }

}
package activemq;

import org.apache.activemq.ActiveMQConnectionFactory;

import javax.jms.*;

/**
 * @author Heian
 * @time 19/08/14 20:13
 * @description: 消息消费者
 */
public class Consumer {


    public static void main(String[] args) {
        new ConsumerThread("tcp://192.168.32.130:61616","queue1").start ();
        new ConsumerThread("tcp://192.168.32.130:61616","queue1").start ();
    }

    static class ConsumerThread extends Thread{

        String brokerUrl;//ip+端口
        String destinationUrl;//目标队列

        public ConsumerThread(String brokerUrl,String destinationUrl){
            this.brokerUrl = brokerUrl;
            this.destinationUrl = destinationUrl;
        }

        @Override
        public void run() {
            ActiveMQConnectionFactory connectionFactory;
            Connection connection;
            Session session;
            MessageConsumer messageConsumer;//消息消费者
            try {
                //1、创建连接工厂
                connectionFactory = new ActiveMQConnectionFactory (brokerUrl);
                //2、创建连接
                connection = connectionFactory.createConnection ();
                connection.start ();//一定要启动
                //3、创建会话(可以创建一个或者多个session,我这里默认一个)类似于selector 可以同时监听多个连接
                // 第一个参数:是否开启事务。true:开启事务,第二个参数忽略。第二个参数:当第一个参数为false时,才有意义。消息的应答模式。1、自动应答2、手动应答。一般是自动应答。
                session = connection.createSession (false, Session.AUTO_ACKNOWLEDGE);
                //4、创建消息消费目标 (Topic 或者 Queue  都实现了Destination)
                Destination destination = session.createQueue (destinationUrl);
                //5、创建消息消费者
                messageConsumer = session.createConsumer (destination);
                //session.createDurableSubscriber ("topic",destinationUrl);持久订阅
                //6、接收消息,没有消息就持续等待  阻塞等待
                Message receiveMsg = messageConsumer.receive ();
                if (receiveMsg  instanceof TextMessage ){
                    System.out.println ("收到消息:" + ((TextMessage) receiveMsg).getText ());
                }else {
                    System.out.println (receiveMsg);
                }
                //8、清理 关闭连接
                messageConsumer.close ();
                connection.close ();
                session.close ();
            } catch (JMSException e) {
                e.printStackTrace ();
            }


        }
    }

}
可以看出其创建过程类似于我们的jdbc的创建,可参考下面的流程图:


现在分别启动一个生产和两个消费者:此时消费者已经消费了一个消息,但还有一个消费者处于阻塞状态,可查看前台页面


如果生产者创建的topic,消费者也订阅了(发布订阅),伪代码如下:那么生生产者发一条并且两个消费者订阅了,那么这两个消费者都会收到消息。
引出问题?
如何是先运行生产者,在运行消费者,也就是生产者生产了1条数据,两个消费者处于等待,那么这两个消费者会收到消息吗?答案是并不会,就像你订阅报纸一样,你开始都没订阅人家报纸,人家为什么还给你送报纸,对吧。如果想要收到,就必须的持久订阅。
备注:在发布订阅模式下,订阅者只会收到发布者的订阅以后的消息;在持久订阅模式下(在MQ登记一个有名的订阅),当前消费者消费了一段时间后可能挂了,此时发布者会将没传递到你的消息存起来,当你复活起来后,继续给你推送未收到的消息。
//生产者
public static void main(String[] args) {
        ProducerThread producerThread = new ProducerThread("tcp://192.168.32.130:61616","topic1");
        producerThread.start ();
    }
//消费者
public static void main(String[] args) {
        new ConsumerThread("tcp://192.168.32.130:61616","topic1").start ();
        new ConsumerThread("tcp://192.168.32.130:61616","topic1").start ();
    }
SpringBoot项目运行activemq
yaml配置:
spring:
  activemq:
    broker-url: tcp://192.168.32.130:61616
    #user:admin
    #password:admin
配置类:第一配置:连接mq实例配置Bean 第二个配置:对象序列化转成json类型配置Bean
package com.example.customers.activemq.day1;

import javax.jms.ConnectionFactory;

import org.springframework.boot.autoconfigure.jms.DefaultJmsListenerContainerFactoryConfigurer;
import org.springframework.context.annotation.Bean;
import org.springframework.context.annotation.Configuration;
import org.springframework.jms.config.DefaultJmsListenerContainerFactory;
import org.springframework.jms.support.converter.MappingJackson2MessageConverter;
import org.springframework.jms.support.converter.MessageConverter;
import org.springframework.jms.support.converter.MessageType;

@Configuration
public class JmsConfiguration {

	//定义 连接mq实例的工厂类  如果是多个mq实例,则要建立连接工厂,单机测试的话可有可无
	@Bean
	public DefaultJmsListenerContainerFactory myFactory(ConnectionFactory connectionFactory,
			DefaultJmsListenerContainerFactoryConfigurer configurer) {
		System.out.println ("----------创建工厂连接监听器--------------");
		DefaultJmsListenerContainerFactory factory = new DefaultJmsListenerContainerFactory();
		configurer.configure(factory, connectionFactory);
		return factory;
	}

	@Bean // 序列化对象在将其转成json形式
	public MessageConverter jacksonJmsMessageConverter() {
		MappingJackson2MessageConverter converter = new MappingJackson2MessageConverter();
		converter.setTargetType(MessageType.TEXT);
		converter.setTypeIdPropertyName("_type");
		return converter;
	}

}
生产者:
package com.example.customers.activemq.day1;

import org.springframework.beans.factory.annotation.Autowired;
import org.springframework.boot.SpringApplication;
import org.springframework.boot.autoconfigure.SpringBootApplication;
import org.springframework.jms.core.JmsTemplate;

import javax.annotation.PostConstruct;

/**
 * @author Heian
 * @time 19/08/15 21:47
 * @description: 生产者发送对象出去
 */
@SpringBootApplication
public class Producer {

    @Autowired
    private JmsTemplate jmsTemplate;

    @PostConstruct
    public void sendMessage() {
        // 发送对象出去
        System.out.println("-----发送短信中-----");
        jmsTemplate.convertAndSend("destinationName", new Emails ("[email protected]", "hello 1"));
        jmsTemplate.convertAndSend("destinationName", new Emails ("[email protected]", "hello 2"));
    }

    public static void main(String[] args) {
        SpringApplication.run(Producer.class, args);
    }

}
消费者:
package com.example.customers.activemq.day1;

import org.springframework.jms.annotation.JmsListener;
import org.springframework.stereotype.Component;

/**
 * @author Heian
 * @time 19/08/15 21:51
 * @description: 消费者接受对象
 */
@Component
public class Consumer {

    //会启动线程池创建监听线程不断的轮询指定目标地址是否有消息   必须指定连接工厂myFactory,否则无法收到消息
    @JmsListener(destination = "destinationName",containerFactory = "myFactory")
    public void receive(Emails email) {
        System.out.println(Thread.currentThread().getName() + "接受到的消息" + email);
    }

}
传输对象实体类
package com.example.customers.activemq.day1;

/**
 * @author Heian
 * @time 19/08/15 21:36
 * @description: 测试activemq
 */
public class Emails {

    private String emailsUrl;
    private String emailsContent;

    public Emails() {
    }

    public Emails(String emailsUrl, String emailsContent) {
        this.emailsUrl = emailsUrl;
        this.emailsContent = emailsContent;
    }

    public String getEmailsUrl() {
        return emailsUrl;
    }

    public void setEmailsUrl(String emailsUrl) {
        this.emailsUrl = emailsUrl;
    }

    public String getEmailsContent() {
        return emailsContent;
    }

    public void setEmailsContent(String emailsContent) {
        this.emailsContent = emailsContent;
    }

    @Override
    public String toString() {
        return "Emails{" +
                "emailsUrl='" + emailsUrl + '\'' +
                ", emailsContent='" + emailsContent + '\'' +
                '}';
    }
}
此时启动生产者,会扫描路径同时消费者也会启动,即生产者生产了两条信息,消费者自然也会消费两条,类比发布订阅。

