本篇实战项目教程涉及到的springboot知识点和参考资料在下面的文章里有详细介绍
14 微服务电商【乐优商城】:day01-springboot(理论篇)
5.SpringBoot实践
本篇博客的目的是学习并实践:使用 通用Mapper插件 在springboot集成mybatis开发SSM微服务项目中的使用。
至于mybatis整合springboot快速入门使用的步骤请参考:记录一个springboot 中集成 mybatis 的完整使用过程
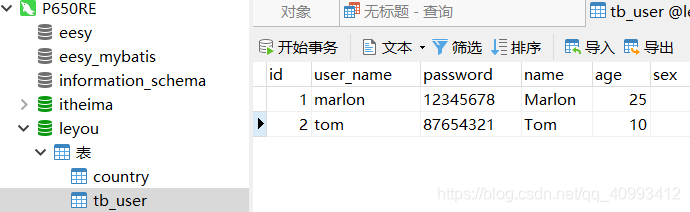
接下来,我们来看看如何用SpringBoot来玩转以前的SSM,我们沿用之前讲解SSM用到的数据库tb_user和实体类User
tb_user.sql
-- ----------------------------
-- Table structure for tb_user
-- ----------------------------
DROP TABLE IF EXISTS `tb_user`;
CREATE TABLE `tb_user` (
  `id` bigint(20) NOT NULL AUTO_INCREMENT,
  `user_name` varchar(100) DEFAULT NULL COMMENT '用户名',
  `password` varchar(100) DEFAULT  NULL COMMENT '密码',
  `name` varchar(100) DEFAULT NULL COMMENT '姓名',
  `age` int(10) DEFAULT NULL COMMENT '年龄',
  `sex` tinyint(1) DEFAULT NULL COMMENT '性别,1男性,2女性',
  `birthday` date DEFAULT NULL COMMENT '出生日期',
  `note` varchar(255) DEFAULT NULL COMMENT '备注',
  `created` datetime DEFAULT NULL COMMENT '创建时间',
  `updated` datetime DEFAULT NULL COMMENT '更新时间',
  PRIMARY KEY (`id`),
  UNIQUE KEY `username` (`user_name`)
) ENGINE=InnoDB AUTO_INCREMENT=13 DEFAULT CHARSET=utf8 COMMENT='用户表';
5.1 不使用通用Mapper插件下的springboot的SSM开发过程
实体类User
package cn.bjut.pojo;

import java.io.Serializable;
import java.util.Date;


public class User implements Serializable {


    // 用户名
    private String userName;
    // 密码
    private String password;
    // 姓名
    private String name;
    // 年龄
    private Integer age;
    // 性别,1男性,2女性
    private Integer sex;
    // 出生日期
    private Date birthday;
    // 备注
    private String note;
    // 创建时间
    private Date created;
    // 更新时间
    private Date updated;

    //=====下面省略get/set方法和toString()方法=====//
DAO层 的接口(不写接口的实现类)♪(・ω・)ノ这里的DAO层接口代码有bug缺陷,后面有提供解决方案。
package cn.bjut.mapper;

import cn.bjut.pojo.User;
import org.apache.ibatis.annotations.Delete;
import org.apache.ibatis.annotations.Param;
import org.apache.ibatis.annotations.Select;

import java.util.List;

/**
 * DAO层接口+注解的方式,使用mybatis操作SQL
 */
@Repository
public interface UserMapper {

    @Select("select * from tb_user where id = #{id}")
    User selectByPrimaryKey(@Param("id") Long id);

    @Delete("delete from tb_user where id = '${id}'")
    void deleteByPrimaryKey(Long id);

    @Select("select * from tb_user")
    List<User> selectAll();
}
mybatis集成于springboot启动器的方式使用,是如何实现DAO层接口的包的位置扫描呢?

Service层 (业务简单所以没写接口直接撸上实现类)
@Service  //springIOC注解
public class UserService {

    @Autowired  //spring注入DAO层对象
    private UserMapper userMapper;

    public User queryById(Long id){
        return this.userMapper.selectByPrimaryKey(id);
    }

    @Transactional  //spring注解管理事务
    public void deleteById(Long id){
        this.userMapper.deleteByPrimaryKey(id);
    }

    public List<User> queryAll() {
        return this.userMapper.selectAll();
    }
}
插入mysql数据,作用于测试我们的基于springboot启动器开发的SSM整合的Web项目。
INSERT INTO `tb_user` VALUES (1, 'marlon', '12345678', 'Marlon', 25, 1, '1994-10-02', '测试账号', '2019-10-02 18:16:25', NULL);
INSERT INTO `tb_user` VALUES (2, 'tom', '87654321', 'Tom', 10, 1, '2010-10-02', '查询账号', '2019-10-02 18:18:23', NULL);
控制Web视图的Controller层
@Controller
//@RequestMapping
public class HelloController {

    @Autowired  //springIOC注入service层对象
    private UserService userService;

    @GetMapping("hello")
    @ResponseBody  //返回浏览器页面一个String字符串从HTTP协议中的响应体
    public User hello() {
        User user = this.userService.queryById(2L);  //测试的ID是硬编码在源码里
        return user;
    }

    @GetMapping("/all")
    public String all(Model model) {
        // 查询所有用户
        List<User> users = this.userService.queryAll();
        // 放入模型
        model.addAttribute("users", users);
        // 返回模板名称(就是classpath:/templates/目录下的html文件名)
        return "users";
    }

    @RequestMapping(value = "/del",method = RequestMethod.GET)  //等效于@GetMapping注解
    public String del() throws Exception{

        long Id = 4l;  //测试的ID是硬编码在源码里
        userService.deleteById(Id);
        return "redirect:all";
    }
}
5.1.1.修改端口号和mybatis的个性化配置
tomcat服务器端口号通过以下方式配置:
# 映射端口
server.port=80
放在resources目录下springboot的默认配置文件
application.yml
#spring-boot-starter-parent=2.1.8.RELEASE
#mysql=8.0.17
spring:
  datasource:
    driver-class-name: com.mysql.cj.jdbc.Driver
    url: jdbc:mysql://localhost:3306/leyou?serverTimezone=Asia/Shanghai
    username: root
    password: root
    # 使用HikariCP连接池
    type: com.zaxxer.hikari.HikariDataSource
    hikari:
      idle-timeout: 60000
      maximum-pool-size: 30
      minimum-idle: 10
    # 使用Druid连接池
    #type: com.alibaba.druid.pool.DruidDataSource


#mybatis-spring-boot-starter=2.1.0
#mybatis:
  #mybatis配置Mapper.xml路径的扫描
  #mapper-locations: classpath*:cn/bjut/mapper/*Mapper.xml
  #mybatis配置model实体类的扫描包
  #type-aliases-package: cn.bjut.pojo
  #configuration:
    #mybatis的下划线转驼峰
    #map-underscore-to-camel-case: true


#tomcat服务器端口
server:
 port: 8080
# servlet:
   #对应于视图层Controller类中的@RequestMapping的("/*.do")
#   path: "*.do"


#log4j日志输出控制
logging:
 level:
  #cn.bjut.interceptor: debug
导入各项springboot启动器的pom.xml
<dependencies>
<!--相当于springMVC的依赖坐标-->
<dependency>
<groupId>org.springframework.boot</groupId>
<artifactId>spring-boot-starter-web</artifactId>
</dependency>
<!--注解@ConfigurationProperties的提示处理器-->
<dependency>
<groupId>org.springframework.boot</groupId>
<artifactId>spring-boot-configuration-processor</artifactId>
<optional>true</optional>
</dependency>
<!--SpringBoot热部署配置-->
<dependency>
<groupId>org.springframework.boot</groupId>
<artifactId>spring-boot-devtools</artifactId>
<scope>runtime</scope>
<optional>true</optional>
</dependency>
<!--springboot测试的起步依赖-->
<dependency>
<groupId>org.springframework.boot</groupId>
<artifactId>spring-boot-starter-test</artifactId>
<scope>test</scope>
</dependency>
<!-- springboot整合JDBC事务并包含HikariCP连接池的启动器-->
<dependency>
<groupId>org.springframework.boot</groupId>
<artifactId>spring-boot-starter-jdbc</artifactId>
</dependency>
<!-- MySQL连接驱动 -->
<dependency>
<groupId>mysql</groupId>
<artifactId>mysql-connector-java</artifactId>
<version>8.0.17</version>
<scope>runtime</scope>
</dependency>
<!-- DAO层mybatis框架的springboot启动器 -->
<dependency>
<groupId>org.mybatis.spring.boot</groupId>
<artifactId>mybatis-spring-boot-starter</artifactId>
<version>2.1.0</version>
</dependency>
<!-- Druid数据库连接池 -->
<!--<dependency>
<groupId>com.alibaba</groupId>
<artifactId>druid</artifactId>
<version>1.1.10</version>
</dependency>-->
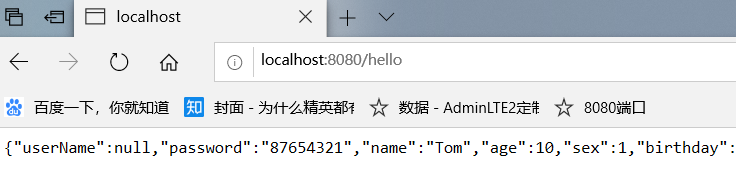
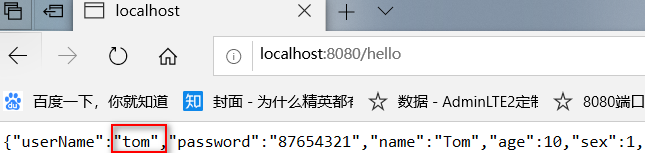
</dependencies>测试后细心的你应该发现问题:浏览器访问 http://localhost:8080/hello 返回值中的userName值为null ,与数据库不符。
/**
 * DAO层接口+注解的方式,使用mybatis操作SQL
 */
//@Mapper  //springboot集成mybatis声明接口扫描包
@Repository  //spring自动IOC注入bean
public interface UserMapper {

    @Select("select * from tb_user where id = #{id}")
    //使用@Result可以实现数据库字段名和实体类成员属性名不一致时的映射关系
    @Results({
            @Result(property = "userName",column = "user_name"),
    })
    User selectByPrimaryKey(@Param("id") Long id);
5.2 使用通用Mapper插件下的springboot的整合过程
5.2.1 直接引入通用Mapper启动器
通用Mapper的作者也为自己的插件编写了启动器,我们直接引入到pom.xml里即可:
        <!-- 通用mapper启动器 -->
        <dependency>
            <groupId>tk.mybatis</groupId>
            <artifactId>mapper-spring-boot-starter</artifactId>
            <version>2.1.5</version>
        </dependency>
单表操作的运行效率可以放心使用,多表关联查询还是需要我们手动优化。


5.2.2引入数据库驱动依赖
        <!-- MySQL数据库连接驱动 -->
        <dependency>
            <groupId>mysql</groupId>
            <artifactId>mysql-connector-java</artifactId>
            <version>8.0.17</version>
            <scope>runtime</scope>
        </dependency>
5.2.3配置连接池和实体类包路径
application-test.yml
#spring-boot-starter-parent=2.1.9.RELEASE
#mysql=8.0.17
spring:
  datasource:
    driver-class-name: com.mysql.cj.jdbc.Driver
    url: jdbc:mysql://localhost:3306/leyou?serverTimezone=Asia/Shanghai
    username: root
    password: root
    # 使用HikariCP连接池
    type: com.zaxxer.hikari.HikariDataSource
    hikari:
      idle-timeout: 60000
      maximum-pool-size: 30
      minimum-idle: 10

mybatis:
  #配置实体类entity别名扫描包
  type-aliases-package: cn.bjut.pojo,cn.bjut.model
  #mybatis配置Mapper.xml路径的扫描,如果没有映射文件,请注释掉
  #mapper-locations: classpath:cn/bjut/mapper/*Mapper.xml
  #  configuration:
  #mybatis的下划线转驼峰
  #    map-underscore-to-camel-case: true
application.yml
#选择application-*.yml作为启动加载的配置文件
spring:
  profiles:
    active: test
5.2.4 DAO层的接口 extends Mapper<E>{}
package cn.bjut.mapper;

import cn.bjut.pojo.User;
import tk.mybatis.mapper.common.Mapper;

//引入通用mapper启动器后,DAO层接口继承Mapper<E>{}
public interface IUserDao extends Mapper<User> {
}
5.2.5 去springboot的启动类重写@MapperScan注解导入的包
package cn.bjut;

import org.springframework.boot.SpringApplication;
import org.springframework.boot.autoconfigure.SpringBootApplication;
import tk.mybatis.spring.annotation.MapperScan;

@SpringBootApplication
@MapperScan("cn.bjut.mapper")  //tk.mybatis.spring.annotation.MapperScan
public class Day01BootDemoApplication {

    public static void main(String[] args) {
        SpringApplication.run(Day01BootDemoApplication.class, args);
    }

}
5.2.6 实体类和数据库表字段的映射
在pojo实体类上加注解 @Table(name = "tb_user")
在实体类私有的成员变量(主键)上加注解 @Id
@KeySql(useGeneratedKeys = true)
对于pojo实体类中非数据库字段对应属性的私有成员变量,需要添上注解 @Transient
========================================
end
