View的工作原理
一、初识ViewRoot和DecorView
ViewRoot对应于ViewRootImpl类,为连接WindowManager和DecorView的纽带。首先看看ViewRootImpl是什么时候被调用的。
1、启动Acitivity 最终会调用 ActivityThread#handleResumeActivity(),这里面会执行窗体添加 DecorView 的操作
( ViewManager wm = a.getWindowManager();
    wm.addView(decor, l);//这是窗体添加 DecorView)
2、接下来可以看第一点里面的addView方法
mGlobal.addView(view, params, mContext.getDisplay(), mParentWindow);
可见在addView方法中又调用了mGlobal的addView方法,mGlobal为WindowManagerGlobal 的实例。
3、接下来可看mGolbal的addView方法
root = new ViewRootImpl(view.getContext,display);
try {
            root.setView(view, wparams, panelParentView);//由它去设置view
        } catch (RuntimeException e) {}
通过
上述方法我们可得知,addView最后还是调用ViewRootImpl来实现将DecorView 添加到Window上。
DecorView:作为顶级View,一般情况下它内部会包含一个竖直方向的LinearLayout,上面是标题栏,下面是内容栏。在Activity中我们通过setContentView所设置的布局文件其实就是被加到内容栏之中的ViewGroup
content = findViewById(R.android.id.content)//获取内容栏
content.getChildAt(0);//获取内容栏里面的子元素
 |
|
二、初识MeasureSpec:
MeasureSpec很大程度上决定了一个View的尺寸规格,其本身为一个32为的int值,高2位为SpecMode(测量模式),低30为SpecSize(某种测量模式下的规格大小)。
其中SpecMode主要有三种:
一、UNSPECIFIED:父容器不对view有任何限制,表一种测量状态,应用于系统内部。
二、EXACTLY:精确大小,对应LayoutParamas中的match_parent和具体数值两种形式。
三、AT_MOST:父容器指定一个可用大小,对应于LayoutParams的wrap_content。
MeasureSpec的产生:系统将LayoutParams在父容器的约束下转换成对应的MeasureSpec。
(1)普通view的MeasureSpec:由父容器的MeasureSpec和自身的LayoutParams来共同决定,此外还和View的margin及padding有关。
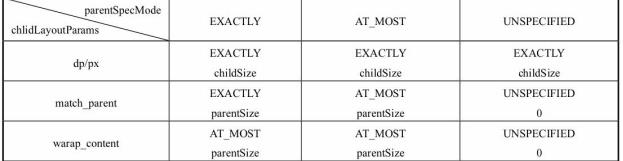
普通view的MeasureSpec的创建规则如下表
(2)DecorView的MeasureSpec:由窗口的尺寸和其自身的LayoutParams来共同决定,其MeasureSpec在ViewRootImpl中的measureHierarchy方法中决定。
三、View的工作流程(measure、layout、draw)
1、measure:
(1)view的measure:
view的measure方法是final类型的方法,子类不能去重写,在measure中调用了onMeasure方法,所以只需要关注onMeasure的实现就行。
流程: view —》measure() —》onMeasure —》setMeasuredDimension(getDefaultSize(getSuggestedMinimumWidth(),widthMeasure),getDefaultSize(getSuggestedMinimumHeight(),HeightMeasure)){设置view宽高的测量值)}—》 getDefaultSize()
以下代码为getDefaultSize方法的实现:
    public static int getDefaultSize(int size,int measureSpec) {
    int result = size;
    int specMode = MeasureSpec.getMode(measureSpec);
    int specSize = MeasureSpec.getSize(measureSpec);
    switch (specMode) {
    case MeasureSpec.UNSPECIFIED:
    result = size;//这个size为getSuggestedMinimumWidth()传入的值,下面有这个方法
                   //具体实现的代码
    break;
    case MeasureSpec.AT_MOST://AT_MOST和.EXACTLY这两种情况。简单地理解,其实
    case MeasureSpec.EXACTLY://getDefaultSize返回的大小就是measureSpec中的
    result = specSize;       //的specSize,而这个specSize就是View测量后的大小
    break;
    }
    return result
以下代码为getSuggestedMinimumWidth()方法的实现(这个方法主要针对UNSPECIFIED模式):
 protected int getSuggestedMinimumWidth() {
return (mBackground == null) ? mMinWidth : max(mMinWidth,mBackground.getMinimumWidth
}
protected int getSuggestedMinimumHeight() {
return (mBackground == null) ? mMinHeight : max(mMinHeight,mBackground.getMinimumHeight
}
根据上述方法我们可得知View没有设置背景,那么View的宽度为mMinWidth,而mMinWidth对android:minWidth这个属性所指定的值。
注意:通过getDefaultSize这个方法的实现可得知,如果直接继承View的自定义控件没有设置wrap_content的自身大小,那么在布局中使用wrap_content和使用match_parent并无区别

解决方法:其实说到底就是当为AT_MOST,也就是wrap_content,需要给其指定一个默认的宽高(mWidth、mHeight)。
protected void onMeasure(int widthMeasureSpec,int heightMeasureSpec) {
super.onMeasure(widthMeasureSpec,heightMeasureSpec);
int widthSpecMode = MeasureSpec.getMode(widthMeasureSpec);
int widthSpecSize = MeasureSpec.getSize(widthMeasureSpec);
int heightSpecMode = MeasureSpec.getMode(heightMeasureSpec);
int heightSpecSize = MeasureSpec.getSize(heightMeasureSpec);
if (widthSpecMode == MeasureSpec.AT_MOST && heightSpecMode == MeasureSpec.AT_MOST) {
setMeasuredDimension(mWidth,mHeight);
} else if (widthSpecMode == MeasureSpec.AT_MOST) {
setMeasuredDimension(mWidth,heightSpecSize);
} else if (heightSpecMode == MeasureSpec.AT_MOST) {
setMeasuredDimension(widthSpecSize,mHeight);
}
}
(2)ViewGroup的measure过程:没有重写View的onMeasure方法,提供了一个measureChildren方法。
measureChildren方法的具体实现:
 protected void measureChildren(int widthMeasureSpec,int heightMeasureSpec) {
    final int size = mChildrenCount;
    final View[] children = mChildren;
    for (int i = 0; i < size; ++i) {
        final View child = children[i];
        if ((child.mViewFlags & VISIBILITY_MASK) != GONE) {
            measureChild(child,widthMeasureSpec,heightMeasureSpec);
        }
    }
}
可见最后又调用measureChild方法。
measureChild的具体实现:
protected void measureChild(View child,int parentWidthMeasureSpec,
int parentHeightMeasureSpec) {
    final LayoutParams lp = child.getLayoutParams();
    final int childWidthMeasureSpec = getChildMeasureSpec(parentWidthMeasureSpec,
    mPaddingLeft + mPaddingRight,lp.width);
    final int childHeightMeasureSpec = getChildMeasureSpec(parentHeightMeasureSpec,
    mPaddingTop + mPaddingBottom,lp.height);
    child.measure(childWidthMeasureSpec,childHeightMeasureSpec);
}
ViewGroup是抽象类,其不对onMeasure方法进行统一实现的原因是,不同的ViewGroup子类有不同的布局特性,比如(LinearLayout和RelativeLayout)。
上述已经总结完View的大致测量流程。
接下来记录下一些注意点:
tip:什么时候去获取一个view的宽高(因为view的measure和Activity的生命周期方法不是同步执行的)?
解决办法:
1、在onWindowFocusChanged中去获取,这个时候可保证view已经绘制完毕,Activity窗口得到焦点和失去焦点都会被调用一次。
2、view.post(runnable),将runnable放到消息队列的尾部,Looper调用此runnable,view也初始化了。
3、viewTreeObserver,其中许多回调可以获取view的宽高,当View树的状态以及可见性改变时会回调onGlobalLayout方法。
2、layout(即有测量、必有布局):
(1)View的layout:
首先看下view的layout方法(伪代码):
public void layout(int l,int t,int r,int b){
    //初始化mLeft、mright、mTop、mBottom四个值
    //顶点确定,位置也就确定了
    //setFrame()
}
(2)ViewGroup的layout:
View和ViewGroup均没有实现onLayout方法,因为其的具体实现也是和布局特性有关的。
流程:父元素的layout(完成自己的定位) --》 父元素的onLayout --》setChildFrame(为子元素指定对应的位置,其实就是调用子元素的layout方法而已) --》 子元素的layout --》 setFrame;
3、Draw:
绘制过程:绘制背景 – 》绘制本身 --》绘制children(dispatchDraw)–》绘制装饰;
四、自定义View
1、自定义view的四种类型:
(1)直接继承View注意点:
需要重写onDraw方法,自己支持wrap_content、padding也需要自己处理。
(2)直接继承viewgroup注意点:
处理好measure和layout方法,同时需要考虑padding和margin的影响,不然本身padding和子元素的margin会失效
(3)继承特定的view(例如button)
(4) 继承特定的LinearLayout(例如LinearLayout)
2、自定义属性
步骤:
(1)values文件夹下创建attrs.xml<? xml version="1.0" encoding="utf-8"?>
<resource>
    <declare-styleble name="CircleView">
        <attr name="circle_color" format="color" />
     </decalare-styleable>
<resource>
(2) 代码中获取此属性//view的构造方法里面
TypeArray a = context.obtainStyledAttributes(attrs,R.styleable.CircleView);
mColor = a.getColor(styleable.CircleView_circle_color,Color.RED);
a.recyle();
(3)使用自定义属性,需要在布局文件中声明:xmlns:app=http://schemas.android.com/apk/res-auto
自定义view是一个比较复杂的事,这里只是粗略的记录下一些注意点.
