前言
在上文完成k8s集群搭建的基础上k8s(一)、1.9.0高可用集群本地离线部署记录,承接上文,本文简单介绍一下k8s对外暴露服务
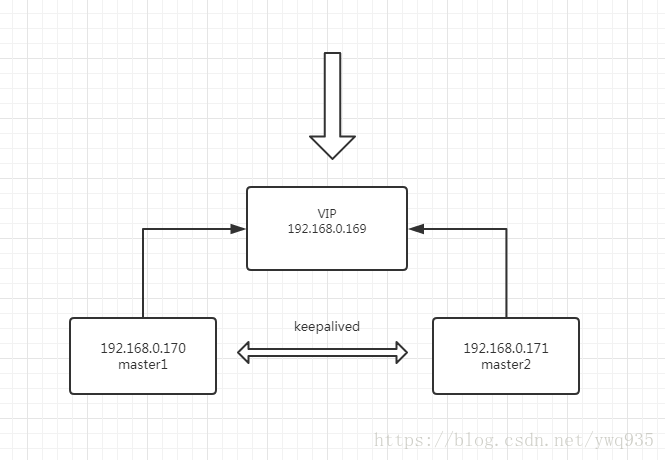
拓扑图:
一、k8s对外暴露服务方式介绍
1.Load Blance
目前已经有很多主流的公有云平台已经都提供基于k8s服务的组件,工作的原理本质上是k8s的服务向云平台申请一个负载均衡器来对外服务。因此这种方式只适合在云平台内部使用,这里略过.
2.Nodeport
针对某一个k8s service,k8s集群内的每一个node都将暴露node的一个指定接口,来为此service提供服务。此方式要求每一个node都提供一个端口,即使此node上没有承载有该service 的pod服务载体,因此此方式会带来一定资源的浪费和管理不便。
3.Ingress
 Ingress注入方式,有三个组件,来协同完成对外服务的过程:
 1.reverse proxy LB
 2.ingress controller
 3.k8s Ingress组件
1.reverse proxy LB
将服务请求反向代理至后端服务对应的node上,node收到后再由kube-proxy将请求转交给endpoint pod.
2.ingress controller
监控apiserver上的svc关联关系的变化,若svc关联发生变化(例如svc后端对应的pods发生变化),则动态地获取变化,更新前面反向代理的配置文件和热重载。
3.k8s ingress
k8s的一种资源类型,可以基于访问的虚拟主机、字段等进行区别路由映射到后端不同的k8s service上,ingress controller要实时监控每个ingress对象上指定的service来保证LB配置文件的热更新
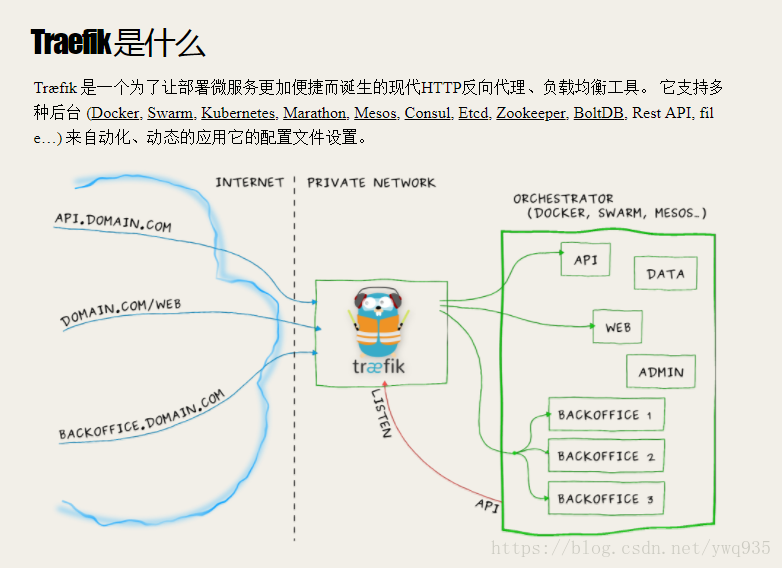
在本文,采用traefik作为ingress工具演示。
### traefik:
由于微服务架构以及 Docker 、 kubernetes 编排工具最近才开始流行,因此常用的反向代理服务器 nginx并未提供对k8s ingress的支持,所以Ingress Controller 这个中间件的存在就是用来做 kubernetes 和前端LB来做衔接的;Ingress Controller工作的方式是读取k8s ingress,通过与k8s api交互实时监控service,当serivce映射关系变化时,能重写 nginx 配置和热更新。traefik的出现简化了这个流程,traefik本身是一个轻量级的reverse proxy LB,并且它原生支持跟 kubernetes API 交互,感知后端变化,因此traefik可以取代上面的1、2组件,简化结构。
traefik官方介绍图:
二、服务部署
首先来部署一组简单的nginx应用容器。
准备好yaml文件:
[root@171 nginx]# ls
nginx-deploy.yaml nginx_ingress.yaml nginx_service.yaml[root@171 nginx]# cat nginx-deploy.yaml
apiVersion: extensions/v1beta1
kind: Deployment
metadata:
annotations:
deployment.kubernetes.io/revision: "2"
creationTimestamp: 2018-04-09T04:02:02Z
generation: 4
labels:
app: nginx
name: nginx-deploy
namespace: default
resourceVersion: "111504"
selfLink: /apis/extensions/v1beta1/namespaces/default/deployments/nginx-deploy
uid: c28090c0-3baa-11e8-b75a-000c29858eab
spec:
replicas: 2
selector:
matchLabels:
app: nginx
strategy:
rollingUpdate:
maxSurge: 1
maxUnavailable: 1
type: RollingUpdate
template:
metadata:
creationTimestamp: null
labels:
app: nginx
spec:
containers:
- image: nginx:1.9.1
imagePullPolicy: IfNotPresent
name: nginx
ports:
- containerPort: 80
protocol: TCP
resources: {}
terminationMessagePath: /dev/termination-log
terminationMessagePolicy: File
dnsPolicy: ClusterFirst
restartPolicy: Always
schedulerName: default-scheduler
securityContext: {}
terminationGracePeriodSeconds: 30
status:
availableReplicas: 2
conditions:
- lastTransitionTime: 2018-04-09T04:57:27Z
lastUpdateTime: 2018-04-09T04:57:27Z
message: Deployment has minimum availability.
reason: MinimumReplicasAvailable
status: "True"
type: Available
observedGeneration: 4
readyReplicas: 2
replicas: 2
updatedReplicas: 2
[root@171 nginx]# cat nginx_service.yaml
apiVersion: v1
kind: Service
metadata:
  creationTimestamp: 2018-04-09T11:34:09Z
  labels:
    run: nginx
  name: nginx
  namespace: default
  resourceVersion: "140236"
  selfLink: /api/v1/namespaces/default/services/nginx
  uid: eb57a21b-3be9-11e8-b75a-000c29858eab
spec:
  clusterIP: 10.99.59.56
  ports:
  - port: 80
    protocol: TCP
    targetPort: 80
  selector:
    app: nginx
  sessionAffinity: None
  type: ClusterIP
status:
  loadBalancer: {}
[root@171 nginx]# cat nginx_ingress.yaml
apiVersion: extensions/v1beta1
kind: Ingress
metadata:
  creationTimestamp: 2018-04-09T11:39:48Z
  generation: 1
  name: test
  namespace: default
  resourceVersion: "140644"
  selfLink: /apis/extensions/v1beta1/namespaces/default/ingresses/test
  uid: b54bbda8-3bea-11e8-b75a-000c29858eab
spec:
  rules:
  - host: test.nginx.com
    http:
      paths:
      - backend:
          serviceName: nginx
          servicePort: 80
status:
  loadBalancer: {}
创建nginx的deploy、svc、ing资源,使用–record命令后面可以看到revision记录:
kubectl create -f nginx-deploy.yaml --record
kubectl create -f nginx-service.yaml --record
kubectl create -f nginx-ingress.yaml --record
过1分钟后查看状态:
[root@171 nginx]# kubectl get pods -o wide | grep nginx
nginx-deploy-5964dfd755-b2xj5   1/1       Running   2          1d        10.244.0.16   170
nginx-deploy-5964dfd755-v6tdq   1/1       Running   1          4h        10.244.0.17   170


[root@171 nginx]# kubectl get ing | grep nginx
test         test.nginx.com             80        23h

[root@171 nginx]# kubectl get svc | grep nginx
nginx        ClusterIP   10.99.59.56   <none>        80/TCP    23h
在本地curl pod ip和service 的clusterIP测试:
[root@171 nginx]# curl http://10.244.0.16
<!DOCTYPE html>
<html>
<head>
<title>Welcome to nginx!</title>
<style>
    body {
        width: 35em;
        margin: 0 auto;
        font-family: Tahoma, Verdana, Arial, sans-serif;
    }
</style>
</head>
<body>
<h1>Welcome to nginx!</h1>
<p>If you see this page, the nginx web server is successfully installed and
working. Further configuration is required.</p>

<p>For online documentation and support please refer to
<a href="http://nginx.org/">nginx.org</a>.<br/>
Commercial support is available at
<a href="http://nginx.com/">nginx.com</a>.</p>

<p><em>Thank you for using nginx.</em></p>
</body>
</html>


[root@171 nginx]# curl http://10.244.0.17
<!DOCTYPE html>
<html>
<head>
<title>Welcome to nginx!</title>
<style>
    body {
        width: 35em;
        margin: 0 auto;
        font-family: Tahoma, Verdana, Arial, sans-serif;
    }
</style>
</head>
<body>
<h1>Welcome to nginx!</h1>
<p>If you see this page, the nginx web server is successfully installed and
working. Further configuration is required.</p>

<p>For online documentation and support please refer to
<a href="http://nginx.org/">nginx.org</a>.<br/>
Commercial support is available at
<a href="http://nginx.com/">nginx.com</a>.</p>

<p><em>Thank you for using nginx.</em></p>
</body>
</html>


[root@171 nginx]# curl http://10.99.59.56
<!DOCTYPE html>
<html>
<head>
<title>Welcome to nginx!</title>
<style>
    body {
        width: 35em;
        margin: 0 auto;
        font-family: Tahoma, Verdana, Arial, sans-serif;
    }
</style>
</head>
<body>
<h1>Welcome to nginx!</h1>
<p>If you see this page, the nginx web server is successfully installed and
working. Further configuration is required.</p>

<p>For online documentation and support please refer to
<a href="http://nginx.org/">nginx.org</a>.<br/>
Commercial support is available at
<a href="http://nginx.com/">nginx.com</a>.</p>

<p><em>Thank you for using nginx.</em></p>
</body>
</html>
nginx资源已经创建好了,但是目前只能在本地和集群内访问,集群外部无法访问,需要把网络路由打通
三、网络配置
1.vmware网络配置:(无网络限制这一步可跳过)
在公司的电脑上搭的wmware虚拟机,公司网络上网认证限制外网,单人只允许使用单IP访问外网,因此虚拟机为了访问外网,使用的是NAT模式转接的物理机的网络,vmware NAT方式虚拟机通信配置:
首先,每台vm都要配置:
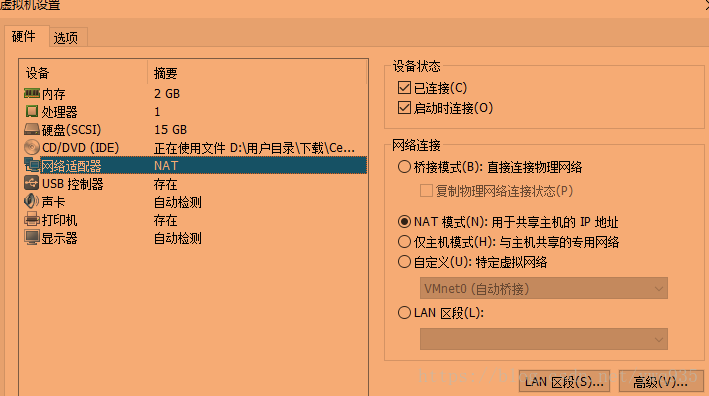
vmware–编辑–虚拟网络编辑器:
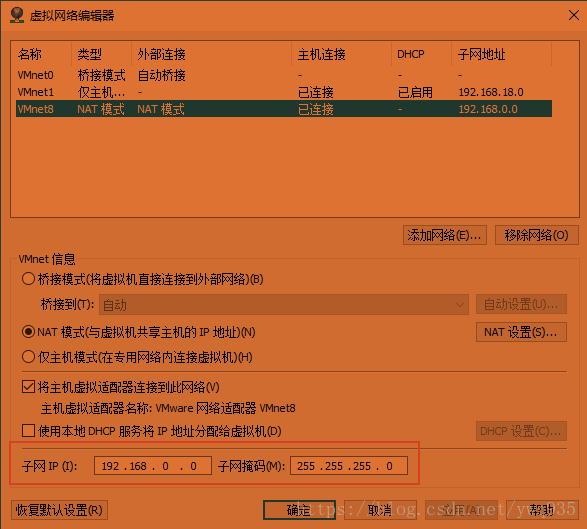
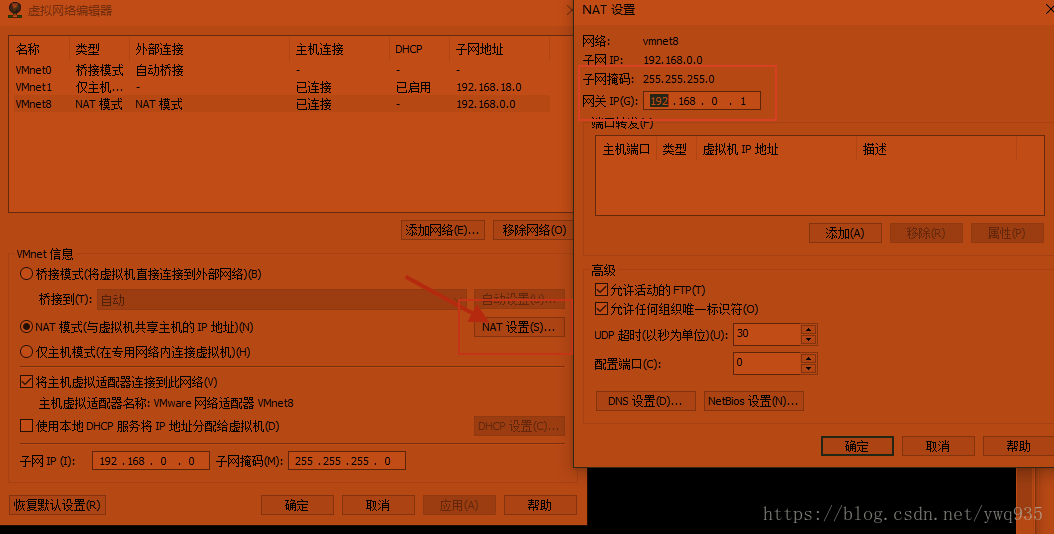
为了直接访问vm网段,在windows物理机上配置路由:
打开cmd,输入:
route add 192.168.0.0 MASK 255.255.255.0 192.168.0.1 IF 9IF是接口编号,可以使用route print查看自己电脑上vmnet8网卡对应的网卡接口编号
打开windows网络共享中心,找到物理网卡,右键–属性–共享,勾选开启网络连接共享(类似linux内核设置开启IP forward转发):

2.k8s服务网段、pods网段路由,dns配置:
步骤1是只是打通了外部到vm之间的网络,如果没有网络限制,vm跟外部在同一网段的可以跳过上面的步骤1。
步骤2是外部添加k8s的服务网段、pods网段:
windows cmd添加
route add 10.96.0.0  MASK 255.240.0.0  192.168.0.169 IF 9
route add 10.244.0.0 MASK 255.255.0.0  192.168.0.169 IF 9
windows添加dns记录:
C:\Windows\System32\drivers\etc\hosts打开编辑,添加dns记录:
192.168.0.169       test.nginx.com
192.168.0.169       ui.traefik.com
打开浏览器测试访问pod ip、服务的cluster ip:
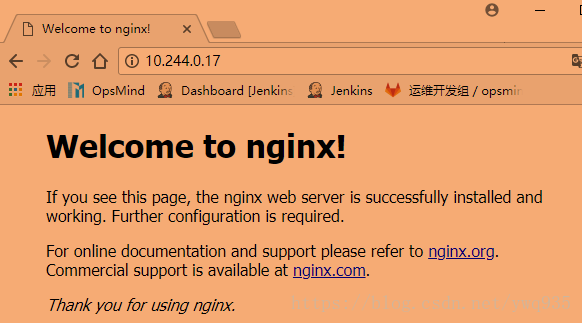
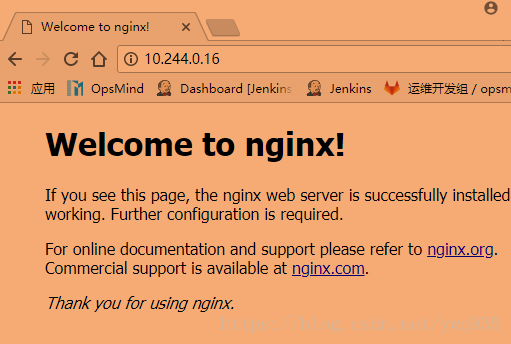
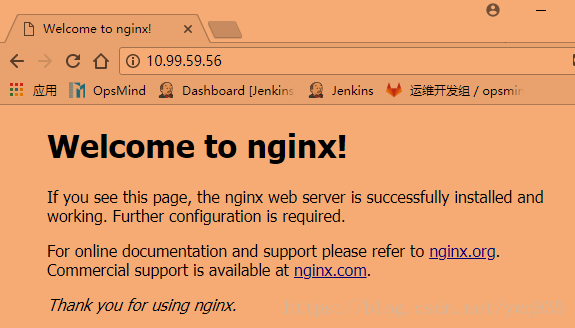
可以直接访问!
下面开始部署traefik,通过虚拟主机名访问.
四、traefik部署
[root@171 traefik]# ls
traefik-ds.yaml  traefik_ingress.yaml  traefik-rbac.yaml


[root@171 traefik]# cat traefik-rbac.yaml
---
kind: ClusterRole
apiVersion: rbac.authorization.k8s.io/v1beta1
metadata:
  name: traefik-ingress-controller
rules:
  - apiGroups:
      - ""
    resources:
      - services
      - endpoints
      - secrets
    verbs:
      - get
      - list
      - watch
  - apiGroups:
      - extensions
    resources:
      - ingresses
    verbs:
      - get
      - list
      - watch
---
kind: ClusterRoleBinding
apiVersion: rbac.authorization.k8s.io/v1beta1
metadata:
  name: traefik-ingress-controller
roleRef:
  apiGroup: rbac.authorization.k8s.io
  kind: ClusterRole
  name: traefik-ingress-controller
subjects:
- kind: ServiceAccount
  name: traefik-ingress-controller
  namespace: kube-system


[root@171 traefik]# cat traefik-ds.yaml
---
apiVersion: v1
kind: ServiceAccount
metadata:
  name: traefik-ingress-controller
  namespace: kube-system
---
kind: DaemonSet
apiVersion: extensions/v1beta1
metadata:
  name: traefik-ingress-controller
  namespace: kube-system
  labels:
    k8s-app: traefik-ingress-lb
spec:
  template:
    metadata:
      labels:
        k8s-app: traefik-ingress-lb
        name: traefik-ingress-lb
    spec:
      serviceAccountName: traefik-ingress-controller
      terminationGracePeriodSeconds: 60
      hostNetwork: true
      containers:
      - image: traefik
        name: traefik-ingress-lb
        ports:
        - name: http
          containerPort: 80
          hostPort: 80
        - name: admin
          containerPort: 8080
        securityContext:
          capabilities:
            drop:
            - ALL
            add:
            - NET_BIND_SERVICE
        args:
        - --api
        - --kubernetes
        - --logLevel=INFO
---
kind: Service
apiVersion: v1
metadata:
  name: traefik-ingress-service
  namespace: kube-system
spec:
  selector:
    k8s-app: traefik-ingress-lb
  ports:
    - protocol: TCP
      port: 80
      name: web
    - protocol: TCP
      port: 8080
      name: admin
  type: NodePort


[root@171 traefik]# cat traefik_ingress.yaml
apiVersion: extensions/v1beta1
kind: Ingress
metadata:
  creationTimestamp: 2018-04-09T11:39:48Z
  generation: 1
  name: traefik-ui
  namespace: default
  resourceVersion: "140644"
  selfLink: /apis/extensions/v1beta1/namespaces/default/ingresses/test
  uid: b54bbda8-3bea-11e8-b75a-000c29858eab
spec:
  rules:
  - host: ui.traefik.com
    http:
      paths:
      - backend:
          serviceName: traefik-ingress-service
          servicePort: 80
status:
  loadBalancer: {}
创建资源:
kubectl create -f traefik-rbac.yaml --record
kubectl create -f traefik-ds.yaml --record
kubectl create -f traefik-ingress.yaml --record
1分钟后查看创建情况:
[root@171 traefik]# kubectl get pods -o wide -n kube-system| grep trae
traefik-ingress-controller-8lht4 1/1 Running 0 3h 192.168.0.171 171
traefik-ingress-controller-ddvws 1/1 Running 0 3h 192.168.0.170 170
[root@171 traefik]# kubectl get ds -n kube-system| grep trae
traefik-ingress-controller 2 2 2 2 2 <none> 3h
[root@171 traefik]# kubectl get ing
NAME HOSTS ADDRESS PORTS AGE
test test.nginx.com 80 1d
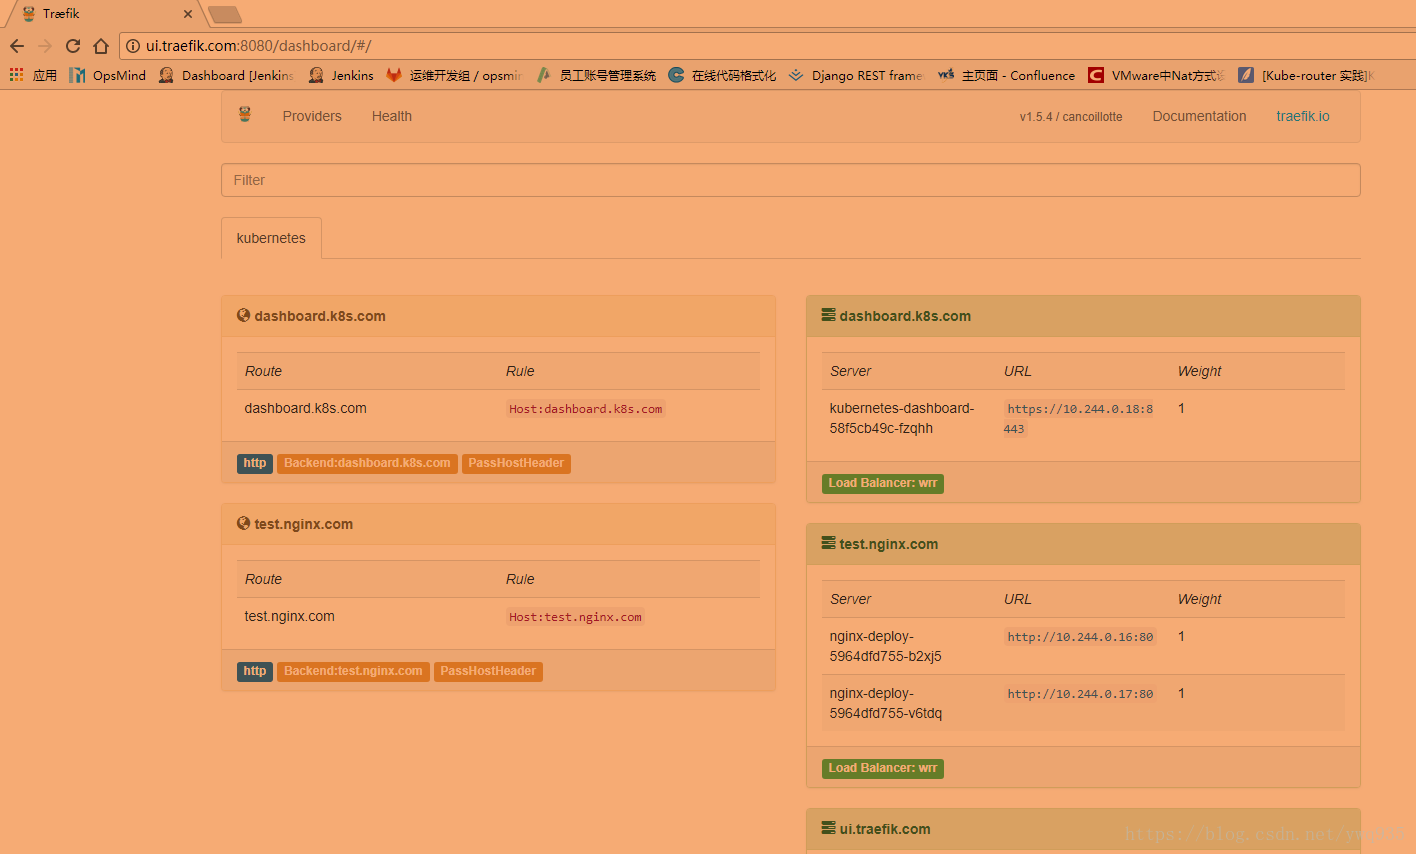
traefik-ui ui.traefik.com 80 3h打开浏览器测试:

总结
k8s的各种功能组件、名词概念、资源类型(pod/svc/ds/rs/ingress/configmap/role….)、工作流程 等颇为复杂,理解起来不太容易,需要花时间阅读官方文档,因为k8s更新很快,有一些新功能或者即将淘汰的旧功能,官方的中文文档更新不太及时,建议直接阅读英文文档。
另外这里为了方便展示,用的windows查看效果,用linux curl工具测试是一样的,且网络的限制,使用的是vmware的NAT,需要多配置一步物理机网络到vm网络之间打通,再使用静态路由让k8s内部集群网络进行通信。有时间回家里电脑尝试下GNS3模拟路由器,搭建外部bgp,发布到集群bgp内部。