某个角落,一个人,一杯酒。他看不清周遭,也没人记得住他。城市偌大,从来不缺孤单的人,离乡背井,迷失在霓虹深处。好在有天地万物与他作伴,他们或指引或守护,让他能一直记住出发以前的自己。——毛不易《消愁》
前言
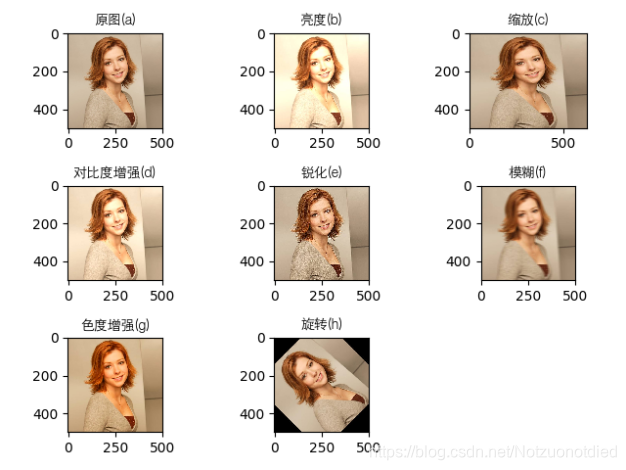
在图像仅仅出现图像缩放、图像亮度变化、图像色度变化、图像对比度变化、图像锐度变化、图像模糊的情况下,基于图像哈希计算图像的相似度计算方案有较高的准确度和执行效率。
算法介绍
图像均值哈希算法
基于均值哈希的算法称为均值哈希算法(Average Hash Algorithm,AHA),此算法是基于比较灰度图每个像素与所有像素点的平均值来实现的,最适用于缩略图,放大图搜索。

图像感知哈希算法
感知哈希,全称是Perceptual Hash,是基于像素点级别的一种散列映射方式,基于认知心理学的信息加工理论为基础,提取图像中的各种特征用于生成独特但不是唯一的指纹,即一串简短且可以表示图像可被人类感知的特征内容的感知数字序列,且这些指纹具有可比性。

- 离散余弦变换(Discrete Cosine Transform,DCT)
图像差异哈希算法
图像差异哈希,全称是Difference Hash,是基于像素点级别的一种散列映射方式。图像差异哈希是通过逐像素比对相邻像素像素值的差异,即逐像素得到当前像素与右邻像素的差值,得到一个图像差异矩阵,通过该矩阵映射生成哈希值。这个逐像素得到的图像差异矩阵的比原像素矩阵少了一列,即宽度比原像素矩阵少了1,高度不变。

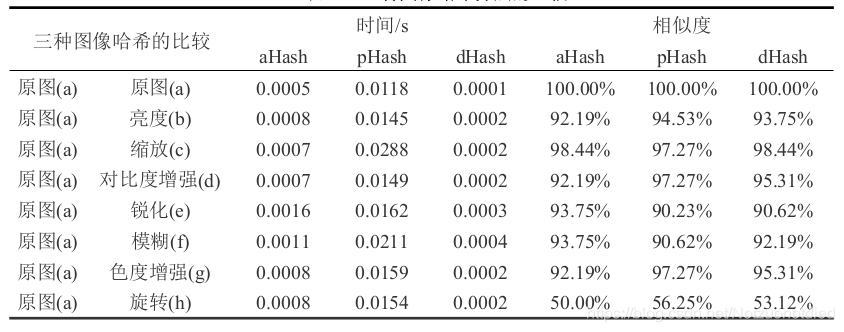
三种图像感知哈希的比较
图像均值哈希本质上是对颜色的比较,图像感知哈希由于做了 DCT 操作,本质上是对频率的比较,图像差异哈希本质上是基于渐变的感知哈希算法。
下面是对比的素材:
下面是对比的结果:
素材生成代码
import cv2 as cv
import numpy as np
from PIL import Image
import os.path as path
from PIL import ImageEnhance


def rotate(image):
    def rotate_bound(image, angle):
        # grab the dimensions of the image and then determine the
        # center
        (h, w) = image.shape[:2]
        (cX, cY) = (w // 2, h // 2)

        # grab the rotation matrix (applying the negative of the
        # angle to rotate clockwise), then grab the sine and cosine
        # (i.e., the rotation components of the matrix)
        M = cv.getRotationMatrix2D((cX, cY), -angle, 1.0)
        cos = np.abs(M[0, 0])
        sin = np.abs(M[0, 1])

        # compute the new bounding dimensions of the image
        nW = int((h * sin) + (w * cos))
        nH = int((h * cos) + (w * sin))

        # adjust the rotation matrix to take into account translation
        M[0, 2] += (nW / 2) - cX
        M[1, 2] += (nH / 2) - cY

        # perform the actual rotation and return the image
        return cv.warpAffine(image, M, (nW, nH))

    return rotate_bound(image, 45)


def enhance_color(image):
    enh_col = ImageEnhance.Color(image)
    color = 1.5
    return enh_col.enhance(color)


def blur(image):
    # 模糊操作
    return cv.blur(image, (15, 1))


def sharp(image):
    # 锐化操作
    kernel = np.array([[0, -1, 0], [-1, 5, -1], [0, -1, 0]], np.float32)
    return cv.filter2D(image, -1, kernel=kernel)


def contrast(image):
    def contrast_brightness_image(src1, a, g):
        """
        粗略的调节对比度和亮度
        :param src1: 图片
        :param a: 对比度
        :param g: 亮度
        :return:
        """

        # 获取shape的数值,height和width、通道
        h, w, ch = src1.shape

        # 新建全零图片数组src2,将height和width,类型设置为原图片的通道类型(色素全为零,输出为全黑图片)
        src2 = np.zeros([h, w, ch], src1.dtype)
        # addWeighted函数说明如下
        return cv.addWeighted(src1, a, src2, 1 - a, g)

    return contrast_brightness_image(image, 1.2, 1)


def resize(image):
    # 缩放图片
    return cv.resize(image, (0, 0), fx=1.25, fy=1)


def light(image):
    # 修改图片的亮度
    return np.uint8(np.clip((1.3 * image + 10), 0, 255))


def save_img(image, img_name, output_path=None):
    # 保存图片
    cv.imwrite(path.join(output_path, img_name), image, [int(cv.IMWRITE_JPEG_QUALITY), 70])
    pass


def show_img(image):
    cv.imshow('image', image)
    cv.waitKey(0)
    pass


def main():
    data_img_name = 'Alyson_Hannigan_200512.jpg'
    output_path = "/home/notzuonotdied/Desktop/"
    data_path = path.join(output_path, data_img_name)

    img = cv.imread(data_path)

    # 修改图片的亮度
    img_light = light(img)
    # 修改图片的大小
    img_resize = resize(img)
    # 修改图片的对比度
    img_contrast = contrast(img)
    # 锐化
    img_sharp = sharp(img)
    # 模糊
    img_blur = blur(img)
    # 色度增强
    img_color = enhance_color(Image.open(data_path))
    # 旋转
    img_rotate = rotate(img)
    img_rotate1 = Image.open(data_path).rotate(45)
    # 两张图片横向合并(便于对比显示)
    # tmp = np.hstack((img, img_rotate))

    save_img(img_light, "%s_light.jpg" % data_img_name.split(".")[0], output_path)
    save_img(img_resize, "%s_resize.jpg" % data_img_name.split(".")[0], output_path)
    save_img(img_contrast, "%s_contrast.jpg" % data_img_name.split(".")[0], output_path)
    save_img(img_sharp, "%s_sharp.jpg" % data_img_name.split(".")[0], output_path)
    save_img(img_blur, "%s_blur.jpg" % data_img_name.split(".")[0], output_path)
    # save_img(img_rotate, "%s_rotate.jpg" % data_img_name.split(".")[0], output_path)
    # 色度增强
    img_color.save(path.join(output_path, "%s_color.jpg" % data_img_name.split(".")[0]))
    img_rotate1.save(path.join(output_path, "%s_rotate.jpg" % data_img_name.split(".")[0]))

    show_img(img_rotate)
    pass


if __name__ == '__main__':
    main()
算法对比代码
这里放上我验证算法效率的代码。╮(╯▽╰)╭
几种哈希算法的实现
import cv2
import numpy as np


def aHash(img, width=8, high=8):
    """
    均值哈希算法
    :param img: 图像数据
    :param width: 图像缩放的宽度
    :param high: 图像缩放的高度
    :return:感知哈希序列
    """
    # 缩放为8*8
    img = cv2.resize(img, (width, high), interpolation=cv2.INTER_CUBIC)
    # 转换为灰度图
    gray = cv2.cvtColor(img, cv2.COLOR_BGR2GRAY)
    # s为像素和初值为0,hash_str为hash值初值为''
    s = 0
    hash_str = ''
    # 遍历累加求像素和
    for i in range(8):
        for j in range(8):
            s = s + gray[i, j]

    # 求平均灰度
    avg = s / 64
    # 灰度大于平均值为1相反为0生成图片的hash值
    for i in range(8):
        for j in range(8):
            if gray[i, j] > avg:
                hash_str = hash_str + '1'
            else:
                hash_str = hash_str + '0'
    return hash_str


def dHash(img, width=9, high=8):
    """
    差值感知算法
    :param img:图像数据
    :param width:图像缩放后的宽度
    :param high: 图像缩放后的高度
    :return:感知哈希序列
    """
    # 缩放8*8
    img = cv2.resize(img, (width, high), interpolation=cv2.INTER_CUBIC)
    # 转换灰度图
    gray = cv2.cvtColor(img, cv2.COLOR_BGR2GRAY)
    hash_str = ''
    # 每行前一个像素大于后一个像素为1,反之置为0,生成感知哈希序列(string)
    for i in range(high):
        for j in range(high):
            if gray[i, j] > gray[i, j + 1]:
                hash_str = hash_str + '1'
            else:
                hash_str = hash_str + '0'
    return hash_str


def cmp_hash(hash1, hash2):
    """
    Hash值对比
    :param hash1: 感知哈希序列1
    :param hash2: 感知哈希序列2
    :return: 返回相似度
    """
    n = 0
    # hash长度不同则返回-1代表传参出错
    if len(hash1) != len(hash2):
        return -1
    # 遍历判断
    for i in range(len(hash1)):
        # 不相等则n计数+1,n最终为相似度
        if hash1[i] != hash2[i]:
            n = n + 1

    return 1 - n / len(hash2)


def pHash(img_file, width=64, high=64):
    """
    感知哈希算法
    :param img_file: 图像数据
    :param width: 图像缩放后的宽度
    :param high:图像缩放后的高度
    :return:图像感知哈希序列
    """
    # 加载并调整图片为32x32灰度图片
    img = cv2.imread(img_file, 0)
    img = cv2.resize(img, (width, high), interpolation=cv2.INTER_CUBIC)

    # 创建二维列表
    h, w = img.shape[:2]
    vis0 = np.zeros((h, w), np.float32)
    vis0[:h, :w] = img  # 填充数据

    # 二维Dct变换
    vis1 = cv2.dct(cv2.dct(vis0))
    vis1.resize(32, 32)

    # 把二维list变成一维list
    img_list = vis1.flatten()

    # 计算均值
    avg = sum(img_list) * 1. / len(img_list)
    avg_list = ['0' if i > avg else '1' for i in img_list]

    # 得到哈希值
    return ''.join(['%x' % int(''.join(avg_list[x:x + 4]), 2) for x in range(0, 32 * 32, 4)])


def hamming_dist(s1, s2):
    return 1 - sum([ch1 != ch2 for ch1, ch2 in zip(s1, s2)]) * 1. / (32 * 32 / 4)
验证的代码
import time
import os.path as path

from core_hash.dedup_core_base import *


def concat_info(type_str, score, time):
    temp = '%s相似度:%.2f %% -----time=%.4f ms' % (type_str, score * 100, time)
    print(temp)
    return temp


def test_diff_hash(img1_path, img2_path, loops=1000):
    img1 = cv2.imread(img1_path)
    img2 = cv2.imread(img2_path)
    start_time = time.time()

    for _ in range(loops):
        hash1 = dHash(img1)
        hash2 = dHash(img2)
        cmp_hash(hash1, hash2)

    print(">>> 执行%s次耗费的时间为%.4f s." % (loops, time.time() - start_time))


def test_aHash(img1, img2):
    time1 = time.time()
    hash1 = aHash(img1)
    hash2 = aHash(img2)
    n = cmp_hash(hash1, hash2)
    return concat_info("均值哈希算法", n, time.time() - time1) + "\n"


def test_dHash(img1, img2):
    time1 = time.time()
    hash1 = dHash(img1)
    hash2 = dHash(img2)
    n = cmp_hash(hash1, hash2)
    return concat_info("差异哈希算法", n, time.time() - time1) + "\n"


def test_pHash(img1_path, img2_path):
    time1 = time.time()
    hash1 = pHash(img1_path)
    hash2 = pHash(img2_path)
    n = hamming_dist(hash1, hash2)
    return concat_info("感知哈希算法", n, time.time() - time1) + "\n"


def deal(img1_path, img2_path):
    info = ''

    img1 = cv2.imread(img1_path)
    img2 = cv2.imread(img2_path)

    # 计算图像哈希相似度
    info = info + test_aHash(img1, img2)
    info = info + test_dHash(img1, img2)
    info = info + test_pHash(img1_path, img2_path)
    return info


def contact_path(file_name):
    output_path = "/home/notzuonotdied/Desktop/hash/"
    return path.join(output_path, file_name)


def main():
    data_img_name = 'Alyson_Hannigan_200512.jpg'
    data_img_name_base = data_img_name.split(".")[0]

    base = contact_path(data_img_name)
    light = contact_path("%s_light.jpg" % data_img_name_base)
    resize = contact_path("%s_resize.jpg" % data_img_name_base)
    contrast = contact_path("%s_contrast.jpg" % data_img_name_base)
    sharp = contact_path("%s_sharp.jpg" % data_img_name_base)
    blur = contact_path("%s_blur.jpg" % data_img_name_base)
    color = contact_path("%s_color.jpg" % data_img_name_base)
    rotate = contact_path("%s_rotate.jpg" % data_img_name_base)

    # 测试算法的效率
    test_diff_hash(base, base)
    test_diff_hash(base, light)
    test_diff_hash(base, resize)
    test_diff_hash(base, contrast)
    test_diff_hash(base, sharp)
    test_diff_hash(base, blur)
    test_diff_hash(base, color)
    test_diff_hash(base, rotate)


if __name__ == '__main__':
    main()
附录
感知哈希算法作者的博客
InfoQ
论文研究
| 论文 |
|---|
| 图像感知哈希算法及应用_CNKI学问 |
| 图像感知哈希算法及应用 - 中国优秀硕士学位论文全文数据库 |
| 海量图片去重算法研究 - China Masters’ Theses Full-text Database |
| 面向图像检索的感知哈希算法的分析.pdf文档全文免费阅读、在线看 |
| 基于尺度不变与觉显著特征的图像感知哈希技术研究.pdf文档全文免费阅读、在线看 |
OpenCV
pHash
- pHash.org: Home of pHash, the open source perceptual hash library
- 较大规模图片 使用phash去重 - 简书
- 感知哈希算法——找出相似的图片 - Create Chen - 博客园
- 感知哈希算法(Perceptual hash algorithm)的OpenCV实现 - 小新识图 - CSDN博客
- 感知哈希综述 hashing - 图文 - 百度文库
- 采用感知哈希算法基于python-PIL的图像去重 - CSDN博客
文本去重
其他
- 三种基于感知哈希算法的相似图像检索技术 - Together_CZ的博客 - CSDN博客
- 图像相似性比较实践 | 鸟窝
- 感知哈希 ,平均哈希,差异值哈希 - qq_32799915的博客 - CSDN博客
- 相似图片检测:感知哈希算法之dHash的Python实现 - 常思考->有目标->重实践->善反思 - CSDN博客
- 较大规模图片 使用phash去重 - 简书
- 相似图片搜索算法介绍 - 程序园
- 基于图像识别的自动化 - 云+社区 - 腾讯云
- 老司机带你检测相似图片 - 腾讯云+社区 - 博客园
- 干货 | 机器学习在携程酒店图像数据中的应用 - 携程技术中心 | 十条
- 图像相似性匹配 快速算法 - 心之所向 - CSDN博客
