上一篇:Android DataBinding 使用教程(一)
在上一篇教程中,讲述了一些 DataBinding 的简单用法,是大家可以对DataBinding 有一个基本了解。本篇我将为大家介绍一些高级用法,比如点击事件的设置,注解的使用等。
事件绑定
前一篇说了那么多的属性绑定,相信很多人对 DataBinding 关于事件处理 也很有兴趣吧。
在事件处理中,DataBinding 同样允许有我们使用表达式来进行绑定。除了少数几个,需要绑定的事件处理 属性 是由它的监听器里的方法名称。"View.OnLongClickListener 中的onLongClick()"方法,那么该事件的绑定名称就是 "onLongClick"。处理事件有两种方法:
- 方法引用:可以直接引用 和 原本需要实现该Listener 中监听方法签名(参数和返回值) 一致的方法。如果我们使用了方法引用,那么DataBinding 会将 方法引用和持有者对象 封装成一个Listener,绑定到对应的 View 上。如果表达式为空,那么数据绑定不会监听,而是将监听设置为空。
- 监听绑定:和方法引用不一样,DataBinding 会总是设置一个 View 上的监听,当事件分派时,DataBinding 就会执行该Lambda表达式。
方法引用
以简单的 “onClick” 为例, Button的点击事件 方法名成是:public void onClick(View v),那么我们在类里需要写一个 签名一样的方法。
public class EventHandler {
    public void onBtnClick(View v) {
        Log.i("DataBinding", "heiheihei");
    }
}
<data>
<variable
name="eventHandler"
type="com.example.myapplication.EventHandler" />
</data>
<LinearLayout
android:layout_width="match_parent"
android:layout_height="wrap_content"
android:orientation="vertical">
<Button
android:id="@+id/dataBindingBtn"
android:layout_width="match_parent"
android:layout_height="wrap_content"
android:onClick="@{eventHandler.onBtnClick}"
android:text="数据绑定按钮" />
</LinearLayout>自定义了一个方法处理类,里面有一个方法 void onBtnClick(View v),在布局中 给 Button 绑定点击事件 “android:onClick=@{eventHandler.onBtnClick}”,除了这样写,还可以写成:android:onClick=@{eventHandler::onBtnClick}。请大家记住,如果表达式没写对或者格式不对,那么在编译处理时,就会报错。
监听绑定
监听绑定是事件发生时执行绑定表达式。在监听绑定中,只要方法的返回值 和 原Listener 中需要实现的方法的返回值一直就可以。
public class EventHandler {

    public void onBtnClick() {
        Log.i("DataBinding", "heiheihei");
    }
}
<Button
android:id="@+id/dataBindingBtn"
android:layout_width="match_parent"
android:layout_height="wrap_content"
android:onClick="@{() -> eventHandler.onBtnClick()}"
android:text="数据绑定按钮" />监听绑定仅允许 Lambda 表达式。可以忽略原来Listener中的参数,但是返回类型需要一致。如果需要参数,则可以这样
public class EventHandler {

    public void onBtnClick(View v, People people) {
        Log.i("DataBinding", people.getName());
    }
}
<Button
android:id="@+id/dataBindingBtn"
android:layout_width="match_parent"
android:layout_height="wrap_content"
android:onClick="@{(view) -> eventHandler.onBtnClick(view,peopleInfo)}"
android:text="数据绑定按钮" />区别:方法引用是在 数据绑定时创建的监听,而监听绑定是在事件触发时对表达式求值进行绑定。
避免混淆监听
绝大多数的点击事件是 onClick(View v),但是也有一些控件的点击事件 监听方法不是 这个,比如:


注解
@BindingConverison
可是使用这个注解 对 数据 和 类型 进行转换。
举个栗子,将 所有的 表达式返回的 string 进行更改:
  <TextView
            android:layout_width="match_parent"
            android:layout_height="wrap_content"
            android:text="@{peopleInfo.name}"
            android:textSize="25sp" />

        <TextView
            android:layout_width="match_parent"
            android:layout_height="wrap_content"
            android:text="@{peopleInfo.age}"
            android:textSize="25sp" />
activityMainBinding.setPeopleInfo(new People("张三", "22岁")); @BindingConversion
public static String parseString(String string) {
return string + "heiheihei";
}这个被注解的方法可以随便写在 某一个类里,这里DataBinding 检测到 表达式返回的 类型 和 被注解方法里的参数类型 一致,就会更新成注解方法的返回值。

接下来我们看看转换的类型:
  <TextView
            android:layout_width="match_parent"
            android:layout_height="wrap_content"
            android:background="@{@color/colorPrimary}"
            android:text="@{peopleInfo.name}"
            android:textSize="25sp" />
@BindingConversion
public static ColorDrawable colorToDrawable(int color) {
Log.i("databinding","调用转换方法");
return new ColorDrawable(color);
}这里就是把一个 整型的Color 值 转换成了 ColorDrawable。
@BindingAdapter
当我们在控件的属性上 写下一个 Databinding 表达式,那么它会自动去找 有没有 set属性的 方法,前提是表达式返回的类型要和 方法的参数类型一致。但是属性的命名空间可以不一样。
比如说,android:text 这个属性,如果我们传入的 DataBinding 表达式 返回的是 Int,那么 数据绑定就会自动去 控件里 找 setText( Int ) 这个方法,如果表达式返回的是 String,就会去找 setText(String) 这个方法。 如果一个控件没有很多属性,但是有很多 setXxx() 方法,那么我们也可以在布局里 使用 setXxxx() 中的 “Xxx” 属性值,前提参数类型要一致。
除了上述所说的 自动属性设置方法,那么我们想给 控件 增加 属性,怎么办? 回答改控件代码的请走开,源码怎么改,又有人说 那就用包装器模式,这个还靠点谱,但是每次都用一个包装器类 给控件增加属性,是不是有点繁琐。我们可以使用 @BindingAdapter 注解。
  <TextView
            android:layout_width="match_parent"
            android:layout_height="wrap_content"
            android:text="@{peopleInfo.name}"
            android:textSize="25sp"
            app:textColorRes="@{R.color.colorAccent}" />
@BindingAdapter(value = {"textColorRes"})
public static void setTextColorRes(TextView textView, int resId) {
textView.setTextColor(textView.getResources().getColor(resId));
}可以在任何一个Java 类中写下 这个 绑定方法,下面我们来说说 这个绑定方法:
- 方法必须是 public static 开头
- 方法名称可以随便起名
- 参数中 第一个参数必须是 控件或其父类 类型
- 最后还有一个 requireAll,表明 所有的属性 必不可少,默认是true。如果是false,在使用参数时 需要判空,因为有些参数没有配置。
@BindingAdapter(value = {"textColorRes", "textContent"}, requireAll = false)
    public static void setTextColorRes(TextView textView, int resId, String content) {
        textView.setTextColor(textView.getResources().getColor(resId));
        if (!TextUtils.isEmpty(content)) {
            textView.setText(content);
        }
    }
@BindingMethods @BindingMethod
当我们的控件有很多 setXxx() 设置属性的方法时,但是我们在 XML 中写的属性名字 与 setter后面的字段 不一样,怎么办呢,我们需要 将属性名字 和 setter 方法 绑定起来,这就用到了上面的注解。
@BindingMethods({@BindingMethod(type = TextView.class, attribute = "content", method = "setContentTxt")})
public class CustomText extends TextView {
    public CustomText(Context context) {
        super(context);
    }

    public CustomText(Context context, @Nullable AttributeSet attrs) {
        super(context, attrs);
    }

    public void setContentTxt(CharSequence text) {
        this.setText(text);
    }

}
自定义了 控件 CustomText,通过注解 将 属性(“content”) 和 方法(setContentTxt)绑定起来。注意了,这个 @BindingMethods 注解里可以放很多 @BindingMethod,还有,这个 注解不光可以加在相对应的控件类上方,也可以放在其他任何类上面。
 <com.example.myapplication.CustomText
            android:layout_width="wrap_content"
            android:layout_height="wrap_content"
            app:content="@{peopleInfo.name}" />
看到这里,好奇心强的同学就问了,如果控件里 有一个setXxx()方法,对应的属性是“Xxx”,这是如果 你再给这个属性 配置到另一个 方法上,那么databinding 会执行哪个方法呢?答案是 会执行 setXxx()方法。

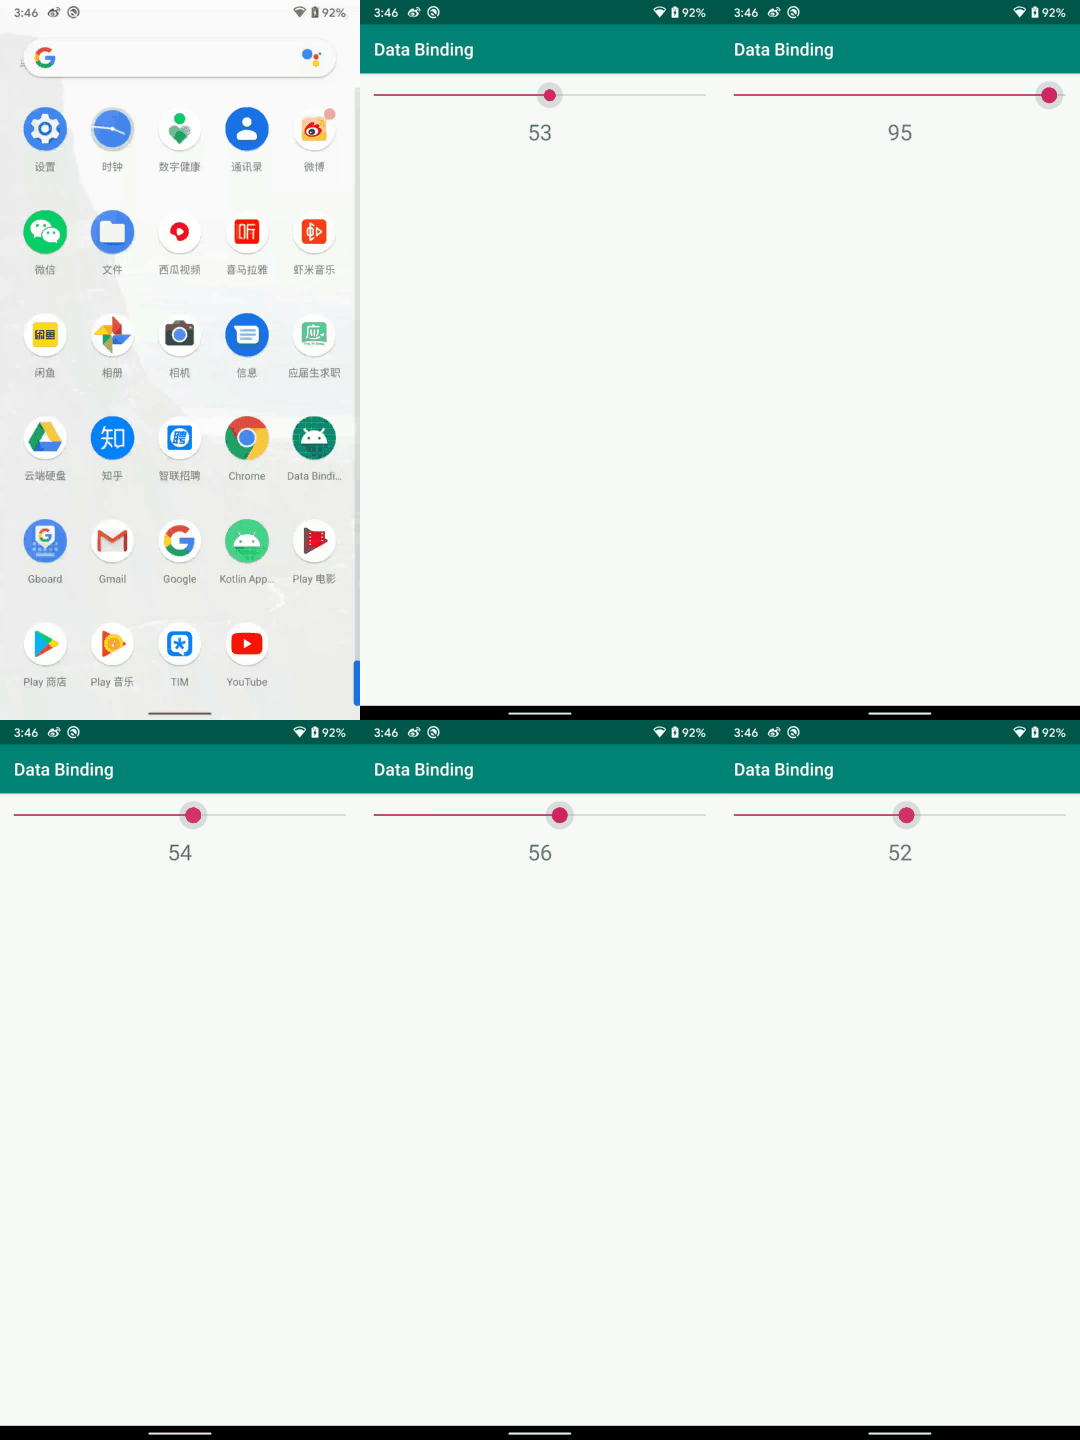
前面的注解都是单向的,即 数据改变通知 UI 更新,但是有时候,我们也需要 在一些可以操作的UI 控件上改变了状态后,数据也希望是立即更新,这就是双向绑定。
接下来我们看看双向绑定的注解。
@InverseBindingAdapter
public class CustomSeekBar extends SeekBar {
    private static InverseBindingListener mInverseBindingListener;

    public CustomSeekBar(Context context, AttributeSet attrs) {
        super(context, attrs);
        initView();
    }

    public CustomSeekBar(Context context, AttributeSet attrs, int defStyleAttr) {
        super(context, attrs, defStyleAttr);
    }

    public CustomSeekBar(Context context, AttributeSet attrs, int defStyleAttr, int defStyleRes) {
        super(context, attrs, defStyleAttr, defStyleRes);
    }


    private void initView() {
        this.setOnSeekBarChangeListener(new OnSeekBarChangeListener() {
            @Override
            public void onProgressChanged(SeekBar seekBar, int progress, boolean fromUser) {
                //UI 驱动 数据
                if (null != mInverseBindingListener) {
                    mInverseBindingListener.onChange();
                }

            }

            @Override
            public void onStartTrackingTouch(SeekBar seekBar) {

            }

            @Override
            public void onStopTrackingTouch(SeekBar seekBar) {

            }
        });
    }

    @BindingAdapter(value = {"customProgress"})
    public static void setSeekBarProgress(CustomSeekBar customSeekBar, int progress) {

        if (progress == customSeekBar.getProgress()) {
            return;
        }
        customSeekBar.setProgress(progress);
    }

    @InverseBindingAdapter(attribute = "customProgress", event = "progressAttrChanged")
    public static int getSeekBarProgress(CustomSeekBar customSeekBar) {
        return customSeekBar.getProgress();
    }

    @BindingAdapter(value = "progressAttrChanged", requireAll = false)
    public static void setProgressAttrChanged(CustomSeekBar changed, InverseBindingListener inverseBindingListener) {

        if (null != inverseBindingListener) {

            mInverseBindingListener = inverseBindingListener;
        }
    }
}
<LinearLayout
android:layout_width="match_parent"
android:layout_height="wrap_content"
android:orientation="vertical">
<com.example.myapplication.CustomSeekBar
android:layout_width="match_parent"
android:layout_height="50dp"
android:max="100"
app:customProgress="@={data.progress}" />
<TextView
android:layout_width="wrap_content"
android:layout_height="30dp"
android:layout_gravity="center_horizontal"
android:text="@{String.valueOf(data.progress)}"
android:textSize="25sp" />
</LinearLayout>- 双向绑定 请使用 "@={ xxx }"
- 数据 驱动 UI,之前的 @BindingAdapter 必不可少
- UI 驱动 数据,数据绑定 会为我们自动产生一个 InverseBindingListener 的继承者,并实现了 onChange() 方法。这个onChange()方法就是用来更新 数据 的。
- @InverseDataBinding() 中 ,event=“” 是非必填的,默认就是 “xxxAttrChanged”,这里我把它设置为 “progressAttrChanged”,所以下面那个@BindingAdapter 中的 value属性 也是“progressAttrChanged”,如果前面不设置,默认就是 “customProgressAttrChanged”。
- 当UI 改变了,我们需要调用 InverseBindingListener 中的 onChange() 方法来 更新 数据。

@InverseBindingMethods @InverseBindingMethod
@InverseBindingMethods({@InverseBindingMethod(type = CustomSeekBar.class, attribute = "customProgress",
        event = "customProgressAttrChanged")})
public class CustomSeekBar extends SeekBar {
    private InverseBindingListener mInverseBindingListener;

    public CustomSeekBar(Context context, AttributeSet attrs) {
        super(context, attrs);
        initView();
    }

    public CustomSeekBar(Context context, AttributeSet attrs, int defStyleAttr) {
        super(context, attrs, defStyleAttr);
    }

    public CustomSeekBar(Context context, AttributeSet attrs, int defStyleAttr, int defStyleRes) {
        super(context, attrs, defStyleAttr, defStyleRes);
    }


    private void initView() {
        this.setOnSeekBarChangeListener(new OnSeekBarChangeListener() {
            @Override
            public void onProgressChanged(SeekBar seekBar, int progress, boolean fromUser) {
                //UI 驱动 数据
                if (null != mInverseBindingListener) {
                    mInverseBindingListener.onChange();
                }

            }

            @Override
            public void onStartTrackingTouch(SeekBar seekBar) {

            }

            @Override
            public void onStopTrackingTouch(SeekBar seekBar) {

            }
        });
    }

    public void setCustomProgress(int progress) {

        if (progress != getProgress()) {
            super.setProgress(progress);
        }

    }

    public int getCustomProgress() {
        return this.getProgress();
    }


    public void setCustomProgressAttrChanged(InverseBindingListener inverseBindingListener) {

        if (null != inverseBindingListener) {

            mInverseBindingListener = inverseBindingListener;
        }
    }
}
这两个注解 是写在类上面的,只不过把双向绑定的各个属性 集合在一起了,这里要注意一点,就是布局中的 属性值 要和方法里 setter 和 getter 的属性名字 一致,否则会编译出错。
