redis多实例实战
4.1 创建redis的存储目录
#创建redis存储目录
[root@redis-master redis]# cat -n /usr/local/redis/conf/redis.conf | sed -n '187p'
   187  dir ./                      #修改本行的存储路径配置路径
[root@redis-master redis]# cat -n /usr/local/redis/conf/redis.conf | sed -n '187p'
   187  dir /usr/local/redis/data/              #改成这个
[root@redis-master redis]# redis-cli -a yunjisuan shutdown  #关闭redis服务
[root@redis-master redis]# mkdir /usr/local/redis/data  #创建redis存储目录
[root@redis-master redis]# redis-server /usr/local/redis/conf/redis.conf &  #后台启动redis进程


#向redis里写入数据,并保存
[root@redis-master redis]# redis-cli -a yunjisuan
127.0.0.1:6379> set name2 yunjisuan
OK
127.0.0.1:6379> save            #保存数据
[3456] 08 Oct 04:39:05.169 * DB saved on disk
OK
127.0.0.1:6379> quit
[root@redis-master redis]# ll /usr/local/redis/
total 12
drwxr-xr-x. 2 root root 4096 Oct  7 16:53 bin
drwxr-xr-x. 2 root root 4096 Oct  8 04:33 conf
drwxr-xr-x. 2 root root 4096 Oct  8 04:39 data
[root@redis-master redis]# ll /usr/local/redis/data/
total 4
-rw-r--r--. 1 root root 49 Oct  8 04:39 dump.rdb    #保存的rdb文件
4.2 创建redis多实例的存储目录及文件
#创建redis多实例存储目录
[root@redis-master redis]# mkdir -p /data/6380/data
[root@redis-master redis]# mkdir -p /data/6381/data

#创建redis多实例配置文件
[root@redis-master redis]# cp /usr/local/redis/conf/redis.conf /data/6380/
[root@redis-master redis]# cp /usr/local/redis/conf/redis.conf /data/6381/

#修改多实例配置文件的数据存储路径
[root@redis-master redis]# sed -n '187p' /data/6380/redis.conf
dir /data/6380/data                 #照此修改存储路径
[root@redis-master redis]# sed -n '187p' /data/6381/redis.conf
dir /data/6381/data                 #照此修改存储路径

#修改多实例配置文件的占用端口
[root@redis-master redis]# sed -n '45p' /data/6380/redis.conf
port 6380                       #照此修改启动端口
[root@redis-master redis]# sed -n '45p' /data/6381/redis.conf
port 6381                       #照此修改启动端口

#修改多实例配置文件的pid文件位置
[root@redis-master redis]# sed -n '41p' /data/6380/redis.conf
pidfile /data/6380/redis.pid            #照此修改
[root@redis-master redis]# sed -n '41p' /data/6381/redis.conf
pidfile /data/6381/redis.pid            #照此修改

#开启多实例配置文件的持久化日志
[root@redis-master redis]# sed -n '449p' /data/6380/redis.conf
appendonly yes                      #照此修改
[root@redis-master redis]# sed -n '449p' /data/6381/redis.conf
appendonly yes                      #照此修改
4.3 启动redis多实例进程
[root@redis-master redis]# redis-server /data/6380/redis.conf &
[root@redis-master redis]# redis-server /data/6381/redis.conf &
4.4 查看redis多实例的进程启动情况

    [root@redis-master redis]# netstat -antup | grep redis
    tcp        0      0 0.0.0.0:6379                0.0.0.0:*                   LISTEN      3456/redis-server *
    tcp        0      0 0.0.0.0:6380                0.0.0.0:*                   LISTEN      3493/redis-server *
    tcp        0      0 0.0.0.0:6381                0.0.0.0:*                   LISTEN      3496/redis-server *
    tcp        0      0 :::6379                     :::*                        LISTEN      3456/redis-server *
    tcp        0      0 :::6380                     :::*                        LISTEN      3493/redis-server *
    tcp        0      0 :::6381                     :::*                        LISTEN      3496/redis-server *
4.5 查看多实例文件夹目录树一览
[root@redis-master data]# tree /data
/data
├── 6380    #redis实例6380启动目录
│   ├── data    #redis实例6380数据目录
│   │   ├── appendonly.aof      #redis实例6380的数据持久化日志(记录了数据库的修改,类似binlog)
│   │   └── dump.rdb    #redis实例6380数据存储文件
│   └── redis.conf      #redis实例6380配置文件
└── 6381    #redis实例6381启动目录
    ├── data    #redis实例6381数据目录
    │   ├── appendonly.aof      #redis实例6381的数据持久化日志(记录了数据库的修改,类似binlog)
    │   └── dump.rdb    #redis实例6381数据存储文件
    └── redis.conf      #redis实例6381配置文件
4 directories, 6 files
或许有些同学会迷糊,appendonly.aof是做什么用的呢?
我们打开文件的内容查看如下:
[root@redis-master data]# cat /data/6380/data/appendonly.aof
*2
$6
SELECT
$1
0
*3
$3
set
$4
name
$9
yunjisuan
*1
$4
save
我们发现appendonly.aof实际上里面记录的是我们对redis数据库的修改记录,这点类似于MySQL的binlog日志。
Redis主从同步
5.1 Redis主从同步特点
- 一个master可以拥有多个slave
- 多个slave可以连接同一个master,还可以连接到其他slave
- 主从复制不会阻塞master,在同步数据时,master可以继续处理client请求。
- 提高系统的伸缩性
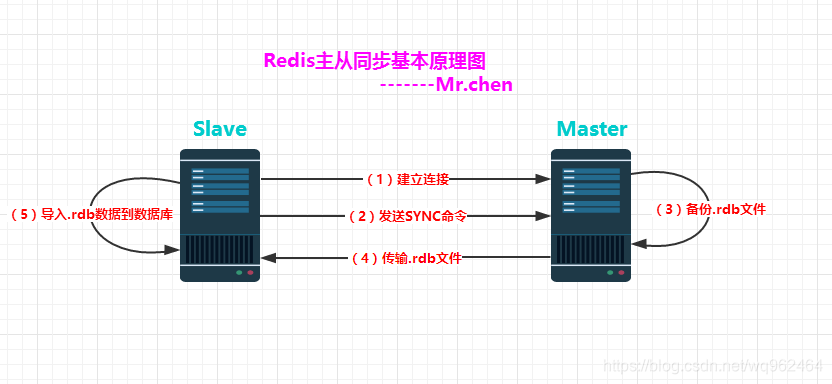
5.2 Redis主从同步的过程
配置好slave服务器连接master后,slave会建立和master的连接,然后发送sync命令。
无论是第一次同步建立的连接还是连接断开后的重新连接,master都会启动一个后台进程,将数据库快照保存到磁盘文件中,同时master主进程会开始收集新的写命令并缓存起来。
当后台进程完成写磁盘文件后,master就将快照文件发送给slave,slave将文件保存到磁盘上,然后加载到内存将数据库快照恢复到slave上。
slave完成快照文件的恢复后,master就会把缓存的命令都转发给slave,slave更新内存数据库。
后续master收到的写命令都会通过开始建立的连接发送给slave。从master到slave的同步数据的命令和从client到master发送的命令使用相同的协议格式。当master和slave的连接断开时,slave可以自动重新建立连接。如果master同时收到多个slave发来的同步连接命令,只会使用启动一个进程来写数据库镜像,然后发送给所有slave。
(1)Slave服务器连接到Master服务器
(2)Slave服务器发送SYNC命令
(3)Master服务器备份数据库到.rdb文件
(4)Master服务器把.rdb文件传输给Slave服务器
(5)Slave服务器把.rdb文件数据导入到数据库中。
Redis的主从同步具有明显的分布式缓存特点:
(1)一个master可以有多个slave,一个slave下面还可以有多个slave
(2)slave不仅可以连接到master,slave也可以连接其他slave形成树状。
(3)主从同步不会阻塞master,但是会阻塞slave。也就是说当一个或多个slave与master进行初次同步数据时,master可以继续处理client发来的请求。相反slave在初次同步数据时则会阻塞不能处理client的请求。
(4)主从同步可以同来提高系统的可伸缩性,我们可以用多个slave专门处理client端的读请求,也可以用来做简单的数据冗余或者只在slave上进行持久化从而提升集群的整体性能。
(5)对于老版本的redis,每次重连都会重新发送所有数据。
5.3 Redis主动同步设置方法
有两种方式可以用来完成进行主从Redis服务器的同步设置。都需要在slave服务器上进行,指定slave需要连接的Redis服务器(可能是master,也可能是slave)。
5.3.1 在redis.conf配置文件中设置
通过简单的配置slave(master端无需配置),用户就能使用redis的主从复制
我们让端口6379的redis做master;端口6380的redis做slave
#我们修改/data/6380/redis.conf的配置文件
[root@redis-master ~]# cat -n /data/6380/redis.conf | sed -n '189,215p'
   189  ################################# REPLICATION #################################
   190
   191  # Master-Slave replication. Use slaveof to make a Redis instance a copy of
   192  # another Redis server. Note that the configuration is local to the slave
   193  # so for example it is possible to configure the slave to save the DB with a
   194  # different interval, or to listen to another port, and so on.
   195  #
   196  # slaveof <masterip> <masterport>
   197  slaveof 192.168.0.135 6379              在此处添加本行内容,指定主master的IP和端口
   198  # If the master is password protected (using the "requirepass" configuration
   199  # directive below) it is possible to tell the slave to authenticate before
   200  # starting the replication synchronization process, otherwise the master will
   201  # refuse the slave request.
   202  #
   203  # masterauth <master-password>
   204  masterauth yunjisuan                    在此处添加本行内容,指定验证的密码
   205  # When a slave loses its connection with the master, or when the replication
   206  # is still in progress, the slave can act in two different ways:
   207  #
   208  # 1) if slave-serve-stale-data is set to 'yes' (the default) the slave will
   209  #    still reply to client requests, possibly with out of date data, or the
   210  #    data set may just be empty if this is the first synchronization.
   211  #
   212  # 2) if slave-serve-stale-data is set to 'no' the slave will reply with
   213  #    an error "SYNC with master in progress" to all the kind of commands
   214  #    but to INFO and SLAVEOF.
   215  #
接下来我们重启redis的服务进程
[root@redis-master ~]# redis-cli -p 6380 -a yunjisuan shutdown      #关闭6380redis进程
[3558] 08 Oct 09:03:10.218 # User requested shutdown...
[3558] 08 Oct 09:03:10.218 * Calling fsync() on the AOF file.
[3558] 08 Oct 09:03:10.218 * Saving the final RDB snapshot before exiting.
[3558] 08 Oct 09:03:10.220 * DB saved on disk
[3558] 08 Oct 09:03:10.220 # Redis is now ready to exit, bye bye...
[3]+  Done                    redis-server /data/6380/redis.conf  (wd: /data)
(wd now: ~)
[root@redis-master ~]# redis-server /data/6380/redis.conf &     #后台启动
当再次启动从库时出现如下信息:
[3616] 08 Oct 09:07:50.955 # Server started, Redis version 2.8.9
[3616] 08 Oct 09:07:50.965 * DB saved on disk
[3616] 08 Oct 09:07:50.965 * DB loaded from append only file: 0.010 seconds
[3616] 08 Oct 09:07:50.965 * The server is now ready to accept connections on port 6380
[3616] 08 Oct 09:07:51.958 * Connecting to MASTER 192.168.0.135:6379        #连接master
[3616] 08 Oct 09:07:51.958 * MASTER <-> SLAVE sync started              #开始发送sync
[3616] 08 Oct 09:07:51.958 * Non blocking connect for SYNC fired the event. #这是一个不阻塞事件
[3616] 08 Oct 09:07:51.958 * Master replied to PING, replication can continue...    #master应答了ping,同步开始
[3616] 08 Oct 09:07:51.959 * Partial resynchronization not possible (no cached master)  #重新进行同步不可能(master没有缓存内容)
[3616] 08 Oct 09:07:51.961 * Full resync from master:   #从master同步全部数据 933d3b0123f2d72cf106d901434898aab24d2a6e:1
[3616] 08 Oct 09:07:52.052 * MASTER <-> SLAVE sync: receiving 49 bytes from master  #从master接收到49字节数据
[3616] 08 Oct 09:07:52.052 * MASTER <-> SLAVE sync: Flushing old data       #刷新旧数据
[3616] 08 Oct 09:07:52.053 * MASTER <-> SLAVE sync: Loading DB in memory    #数据放到内存
[3616] 08 Oct 09:07:52.053 * MASTER <-> SLAVE sync: Finished with success   #同步完成
[3616] 08 Oct 09:07:52.054 * Background append only file rewriting started by pid 3620  #AOF重写
[3620] 08 Oct 09:07:52.060 * SYNC append only file rewrite performed
[3620] 08 Oct 09:07:52.060 * AOF rewrite: 6 MB of memory used by copy-on-write
[3616] 08 Oct 09:07:52.159 * Background AOF rewrite terminated with success #AOF重写成功
[3616] 08 Oct 09:07:52.159 * Parent diff successfully flushed to the rewritten AOF (0 bytes)
[3616] 08 Oct 09:07:52.159 * Background AOF rewrite finished successfully   #AOF重写完毕
5.3.2 进行redis主从同步测试
[root@redis-master ~]# redis-cli -a yunjisuan -p 6380 get name      #获取redis6380的键name的值
"benet"
[root@redis-master ~]# redis-cli -a yunjisuan -p 6379 set name xxxxx    #向redis6379里存一个key=name,value=xxxxx的数据
OK
[root@redis-master ~]# redis-cli -a yunjisuan -p 6380 get name  #获取redis6380的键name的值
"xxxxx"
