caffe初步了解
参考书目:
-
-
- blob
caffe使用blobs结构储存(storage)、交换(communication)数据
- layer
作为模型和计算的基本单元
- net
connection of layers
- solving
将模型和优化进行解耦
caffe 数据传播为bottom-to-top,所谓bottom指的是数据的入口,而top指的是数据的输出
blob承载的数据在layer构成的net之间进行训练,solving计算由net输出和gt之间的loss进行优化。
文章目录

caffe安装
初步尝试caffe安装ubuntu16.04下安装cpu版本安装,不包含opencv,python,matlab等,单步调试版本
ubuntu依赖库
cmake和caffe等依赖库,再make阶段会出现各种头文件fatal error,查找apt安装即可
caffe源码下载
安装配置git,参照1;git clone
修改makefile.config和makefile
按照需求修改相关设置
makefile.cofig
 CPU_ONLY := 1
 ...
 INCLUDE_DIRS := $(PYTHON_INCLUDE) /usr/local/include /usr/include/hdf5/serial
 LIBRARY_DIRS := $(PYTHON_LIB) /usr/local/lib /usr/lib /usr/lib/x86_64-linux-gnu/hdf5/serial
 ...
 DEBUG := 1
makefile
#Complete build flags
COMMON_FLAGS += $(foreach includedir,$(INCLUDE_DIRS),-I$(includedir))
CXXFLAGS += -pthread -fPIC $(COMMON_FLAGS) $(WARNINGS) -std=c++11
NVCCFLAGS += -ccbin=$(CXX) -Xcompiler -fPIC $(COMMON_FLAGS) -std=c++11
# mex may invoke an older gcc that is too liberal with -Wuninitalized
MATLAB_CXXFLAGS := $(CXXFLAGS) -Wno-uninitialized
LINKFLAGS += -pthread -fPIC $(COMMON_FLAGS) $(WARNINGS) -std=c++11
make
make all -j4
make test -j4
make runtest -j4
make可能会报很多头文件的错误,搜索apt安装即可
- 后面
#include<caffe/caffe.hpp>时,生成caffe.pb.h重新编译了下==>
Blob
- 数据的封装
- CPU和GPU之间数据的同步(sync)
- C风格储存的N维向量
blob数据封装和sync机制
- Blob按行储存(row-major), 最后面/最右边的维度更新最快
e.g. (N, C, H, W)的向量,取坐标为(n. c, h, w)的值为 - 一个blob单元储存了两块数据-data和diff(valus值和gradients梯度)
- 数据存在CPU&GPU上,两种数据访问方式:
- 静态方式,不改变数值(访问)
- 动态方式,改变数值
const Dtype* cpu_data() const;
Dtype* mutable_cpu_data();
使用SyncedMem来同步CPU和GPU数值,不改变数值,一直用常量调用
// Assuming that data are on the CPU initially, and we have a blob.
const Dtype* foo;
Dtype* bar;
foo = blob.gpu_data(); // data copied cpu->gpu.
foo = blob.cpu_data(); // no data copied since both have up-to-date contents.
bar = blob.mutable_gpu_data(); // no data copied.
// ... some operations ...
bar = blob.mutable_gpu_data(); // no data copied when we are still on GPU.
foo = blob.cpu_data(); // data copied gpu->cpu, since the gpu side has modified the data
foo = blob.gpu_data(); // no data copied since both have up-to-date contents
bar = blob.mutable_cpu_data(); // still no data copied.
bar = blob.mutable_gpu_data(); // data copied cpu->gpu.
bar = blob.mutable_cpu_data(); // data copied gpu->cpu.
CPU&GPU数据同步
那么blob数据是怎样在CUPU和GPU之间同步的呢?此处参考1
GPU数据访存要远大于CPU,但是CPU和GPU之间仅通过PCI总线,caffe通过:多重预缓冲(不懂)。设置DataLayer的分支线程,在GPU计算,CPU空闲期间,为显存缓冲3~4Batch的数据量
传统cuda
->计算前
cudaMalloc() //分配显存空间
cudaMemset() //显存空间置0
cudaMemcpy() // 将数据从内存复制到显存
->计算后
cudaMemcpy() //将数据从显存复制回内存
主存模型
SyncedMemory
按照参考1的博客,caffe定义了SyncedMemory的类来模拟状态转移自动机
自动机共有四种状态,以枚举类型定义于类SyncedMemory中:
enum SyncedHead { UINITIALIZED, HEAD_AT_CPU, HEAD_AT_GPU, SYNCED};
枚举类型指明状态,他们会被四个函数触发,从而使得状态转移
cpu_data(); gpu_data(); mutable_cpu_data(); mutable_gpu_data();
to_cpu(); to_gpu(); mutable_cpu(); mutable_gpu();
按照我的理解是cpu/gpu访问数据,mutable_cpu/gpu表示可修改值
caffe Net
文章目录
- 合成:合成各层输出执行任务
- 自动微分:合成各层反向传播计算损失
- caffe各层构成的是一个有向无环图(DAG),并且保存了DAG中所有的中间值
起始于:datalayer—读取加载数据
终止于:losslayer—目标函数
net通过纯文本模型语言(plaintext modeling language)定义一系列layers 和他们的连接(connections)1
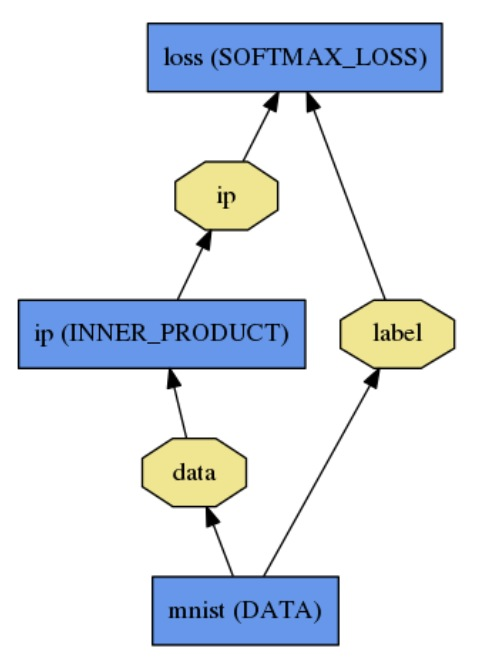
代码:
name: "LogReg"
layer {
  name: "mnist"
  type: "Data"
  top: "data"
  top: "label"
  data_param {
    source: "input_leveldb"
    batch_size: 64
  }
}
layer {
  name: "ip"
  type: "InnerProduct"
  bottom: "data"
  top: "ip"
  inner_product_param {
    num_output: 2
  }
}
layer {
  name: "loss"
  type: "SoftmaxWithLoss"
  bottom: "ip"
  bottom: "label"
  top: "loss"
}
Net::Init()进行模型初始化,包括两个操作:创建blobs&layers;构建DAG
模型格式
模型使用纯文本模型语言(plaintext modeling language),文本protocol buffer-prototxt语言定义
学习好的模型会被序列化地存储再二进制protocol buffer(binaryproto).caffemodel文件中

|

|
模型格式使用protobuf语言定义再
caffe.proto文件中,有注释(#TODO 有时间再看)
层和相应的参数都定义在caffe.pro文件里
caffe使用Google protocol buffer优势:(并不理解…)
- 按序排列时二进制字符串尺寸最小,搞笑序列化,易读的文本格式与二进制版本兼容,可用多种语言实现高效地接口,尤其是C++和pythonn,这些优势造就了caffe模型地灵活性与扩展性
caffe-layer
文章目录
layer是caffe模型和计算的基本单元
layer的操作

Layer通过bottom连接层接受数据,通过top层输出数据
每一个layer都定义了3种重要的运算
- Setup: 初始化设置,再模型初始化时重置layers及其相互之间的连接
- forward : 前向传播,从bottom层中接受数据,计算后将输出送入到top层中
- Backward : 反向传播,给定相对于top层输出的梯度,计算其相对于输入的梯度,并传播到bottom
Forward & Backward
Net::Forward()和Net::Backward()方法实现前传和后传;而Layer::Forward()和Layer::Backward()计算每一层地前传和后传
每一层都有forward_{cpu, gpu}()和backward_{cpu, gpu}()```方法来适应不同的计算模式
Loss
在caffe中loss是通过网络的前向传播计算得到的,通常某一层的输出可以作为损失函数,即layer的top blobs。
- e.g. softMaxWithLoss
layer {
	name: "loss"
	type: "SoftmaxWithLoss"
	bottom: "pred"
	bottom: "label"
	top: "loss"
}
loss weights
对于多个损失的网络,由上面介绍我们可以知道,loss是在layer中定义的,惯例为有着Loss后缀的caffe层对损失有贡献。通过在层定义中添加loss_weight:<float>字段到该层的top blob,这样任何层(layer)都可以作为一个loss。
对于带后缀Loss的层来说,该层的第一个top blob含有一个隐式的loss_weight:1;其他层所有的top blob有一个隐式的loss_weight:0.
什么叫该层的第一个top blob?caffe原文为
By convention, Caffe layer types with the suffix Loss contribute to the loss function, but other layers are assumed to be purely used for intermediate computations.
However, any layer can be used as a loss by adding a field loss_weight: <float> to a layer definition for each top blob produced by the layer.
Layers with the suffix Loss have an implicit loss_weight: 1 for the first top blob (and loss_weight: 0 for any additional tops);
other layers have an implicit loss_weight: 0 for all tops
- SoftmaxWithLoss layer也可以写作
layer{
	name: "loss"
	type: "SoftmaxWithLoss"
	bottom: "pred"
	bottom: "label"
	top: "loss"
	loss_weight: 1
}
- 当然任意反向传播的层都可以给
loss_weight一个非0的值,例如为了对网络中间层产生的激活函数正则化 - 对于多损失的
loss可由整个net所有加权损失求和计算得到
loss := 0
for layer in layers:
  for top, loss_weight in layer.tops, layer.loss_weights:
    loss += loss_weight * sum(top)
Layer catalogue
- 定义了深度学习任务所需要的层类型,如卷积,池化,归一化,激活函数,loss等
- caffe
layers和parameters通过protocol buffer定义,定义文件见caffe.proto
Data Layers
- Data enters Caffe through data layers: they lie at the bottom of nets. Data can come from efficient databases (LevelDB or LMDB), directly from memory, or, when efficiency is not critical, from files on disk in HDF5 or common image formats
- Common input preprocessing (mean subtraction, scaling, random cropping, and mirroring) is available by specifying TransformationParameters by some of the layers. The bias, scale, and crop layers can be helpful with transforming the inputs, when TransformationParameter isn’t available

Vision Layers
- 一般来说视觉层输入输出都为 images,即从bottom到top都是images。这里的images是广义上的,具有一定的空间结构。在对空间的相应区域操作后产生对应的输出

Recurrent Layers
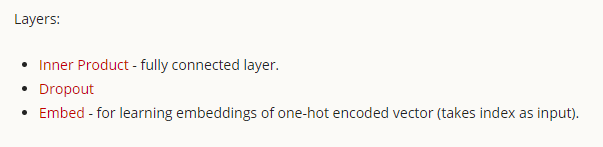
Commom Layers
Normalization Layers

Activation / Neuron Layers

Utility Layers

Loss Layers

caffe-Solver
文章目录
caffe模型的学习被分为两个部分:
- Solver 进行优化,更新参数
- Net计算loss和gradient
Caffe支持的solvers
Stochastic Gradient Descent (type: "SGD")随机梯度下降Adaptive Gradient (type: AdaGrad)自适应梯度,根据梯度大小改变学习率AdaDelta (type: "AdaDelta")由AdaGrad改进RMSprop (type: "RMSProp")上面特例Adam (type: "Adam")上面+momentumNesterov (type: "Nesterov")
- Solver功能
- 用于优化过程的记录, 创建训练网络(用于学习)和测试网络(用于评估)
- 通过forward和backward过程来迭代优化更新参数
- 周期性地测试网络评估模型性能
- 在优化过程中记录模型和solver状态地快照(snapshot) 打印还是保存?
- Solver迭代过程
- 调用Net forward 计算输出和loss
- 调用Net backward计算梯度(loss 对每层的权重w和偏置b求导)
- 根据Solver methods,利用梯度更新参数
- 根据学习率(learning rate), 历史数据和求解方法更新solver状态,是权重从初始化状态逐步更新到最终学习到的状态
- e.g. ./caffe/examples/mnist/lenet_solver.prototxt
# The train/test net protocol buffer definition
net: "examples/mnist/lenet_train_test.prototxt"
# test_iter specifies how many forward passes the test should carry out.
# In the case of MNIST, we have test batch size 100 and 100 test iterations,
# covering the full 10,000 testing images.
test_iter: 10
# Carry out testing every 500 training iterations.
test_interval: 10
# The base learning rate, momentum and the weight decay of the network.
base_lr: 0.01
momentum: 0.9
weight_decay: 0.0005
# The learning rate policy
lr_policy: "inv"
gamma: 0.0001
power: 0.75
# Display every 100 iterations
display: 100
# The maximum number of iterations
max_iter: 100
# snapshot intermediate results
snapshot: 50
snapshot_prefix: "examples/mnist/lenet"
# solver mode: CPU or GPU
solver_mode: CPU
Methods
SGD
具体优化方法待看。。。。
caffe-data
文章目录
caffe中数据流以blobs进行传输
data layer 将输入数据转为blob加载数据;将blob转为其他格式保存输出
均值消减(mean-subtraction),特征缩放等常用的transformations均可在datalayer中进行
common data layer
- mnist example
name: "LeNet"
layer {
  name: "mnist"
  type: "Data"
  top: "data"
  top: "label"
  include {
    phase: TRAIN
  }
  transform_param {
    scale: 0.00390625
  }
  data_param {
    source: "examples/mnist/mnist_train_lmdb" #path to db
    batch_size: 64
    backend: LMDB
  }
}
layer {
  name: "mnist"
  type: "Data"
  top: "data"
  top: "label"
  include {
    phase: TEST
  }
  transform_param {
    scale: 0.00390625
  }
  data_param {
    source: "examples/mnist/mnist_test_lmdb"
    batch_size: 100
    backend: LMDB
  }
}
scale参数解释,对数据进行pixel的乘法,如scale: 0.00390625即是1/255,将数据由0-255归一化到0-1之间
transformations
在data layer中定义,数据预处理通过转换参数来定义
layer {
  name: "data"
  type: "Data"
  [...]
  transform_param {
    scale: 0.1
    mean_file_size: mean.binaryproto
    # for images in particular horizontal mirroring and random cropping
    # can be done as simple data augmentations.
    mirror: 1  # 1 = on, 0 = off
    # crop a `crop_size` x `crop_size` patch:
    # - at random during training
    # - from the center during testing
    crop_size: 227
  }
}
- prefetching
- multiple inputs
ImageData
层类型:ImageData
必须设置的参数:
source: 一个文本文件的名字,每一行给定一个图片文件的名称和标签(label)
batch_size: 每一次处理的数据个数,即图片数
可选参数:
rand_skip: 在开始的时候,路过某个数据的输入。通常对异步的SGD很有用。
shuffle: 随机打乱顺序,默认值为false
new_height,new_width: 如果设置,则将图片进行resize
layer {
  name: "data"
  type: "ImageData"
  top: "data"
  top: "label"
  transform_param {
    mirror: false
    crop_size: 227
    mean_file: "data/ilsvrc12/imagenet_mean.binaryproto"
  }
  image_data_param {
    source: "examples/_temp/file_list.txt"
    batch_size: 50
    new_height: 256
    new_width: 256
  }
}
