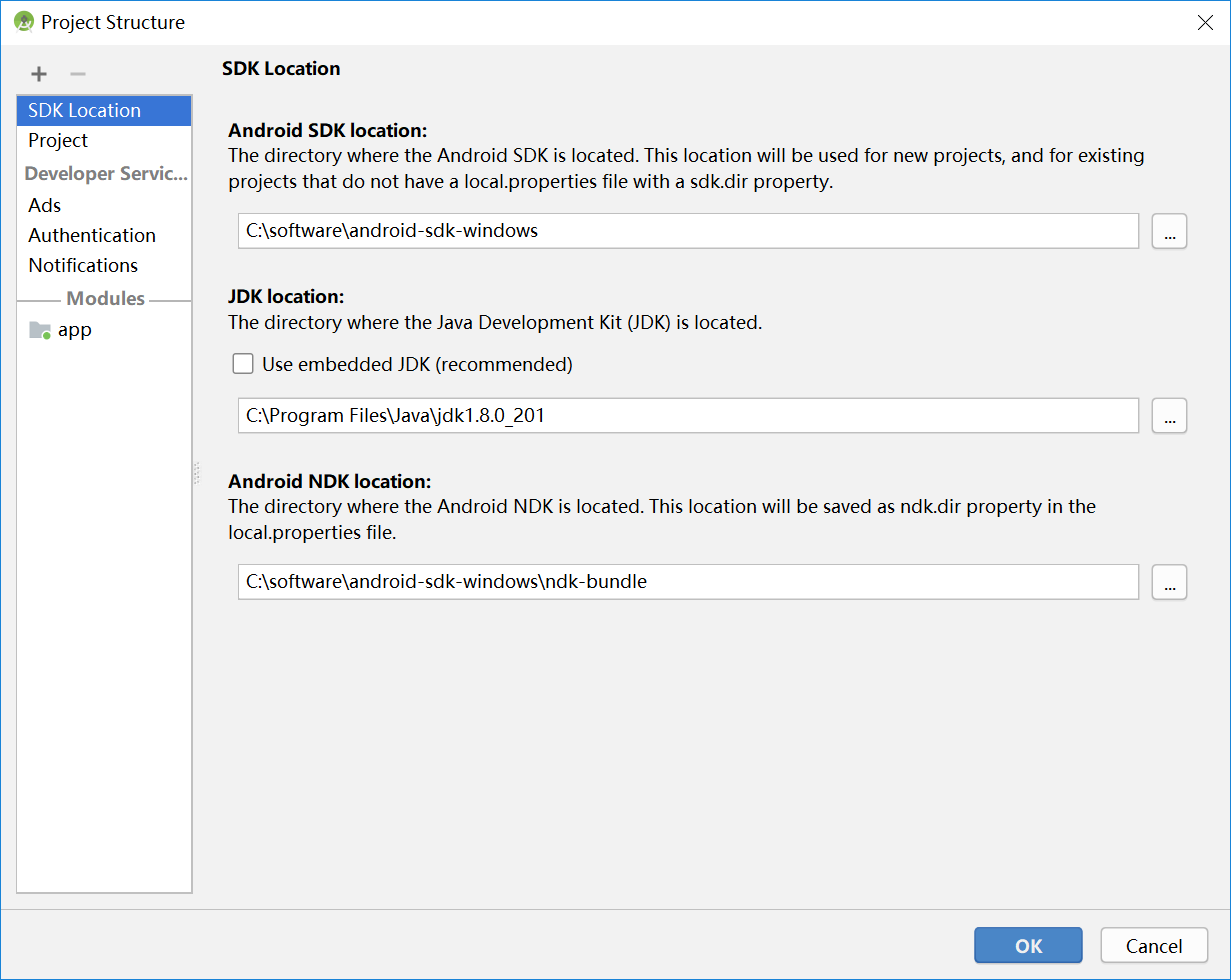
NDK 环境配置
下载 NDK,File --> Project Structure,根据自己的位置配置环境。到时候这些都会在 Androd Studio 中编程一个个环境变量的定义,通过 $$ 来指定(这个后面会介绍)。
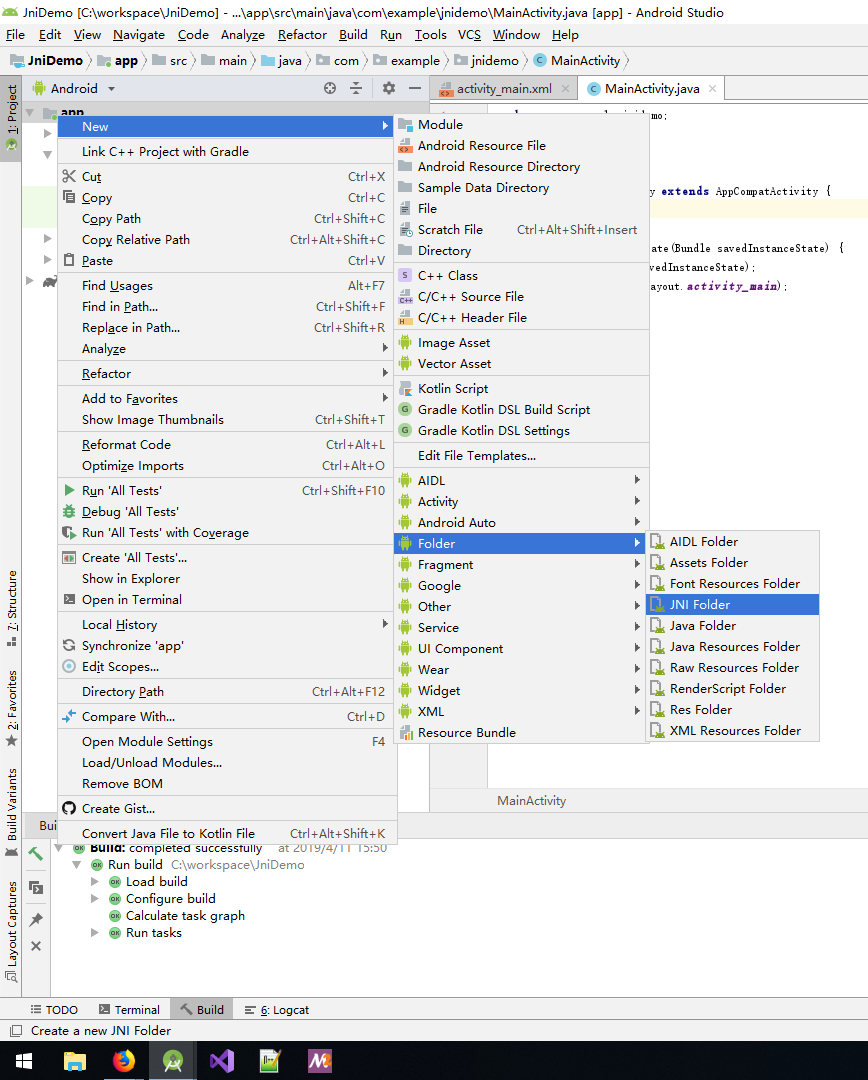
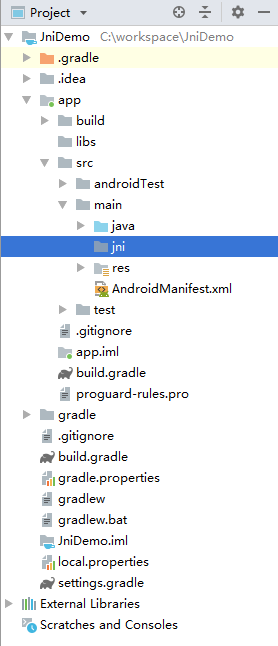
新建项目,创建JNI目录
在项目上右键 --> 新建文件夹 --> 选择JNI文件夹
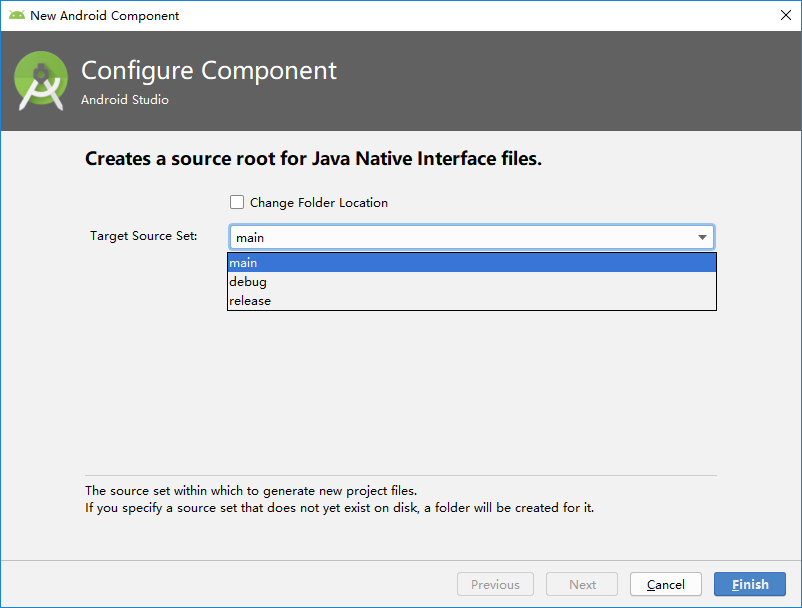
 Traget Source Set 选 “main”,即可,然后会发现仅在 main 目录下面多了一个 jni,其他的包括 build.gradle 之类的都没变。
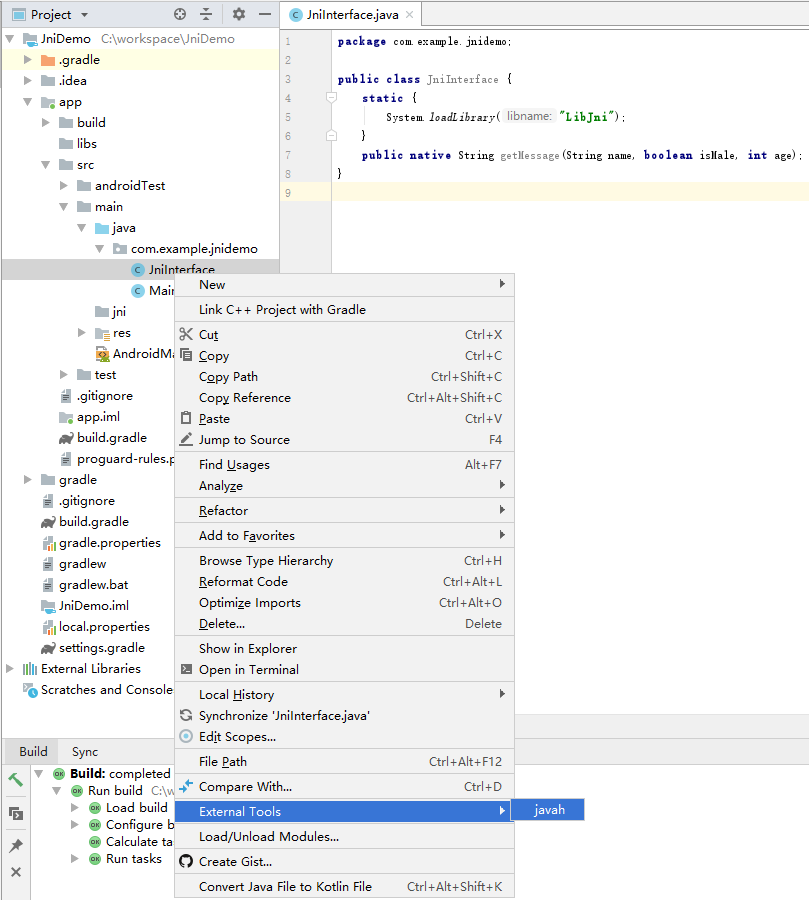
创建JNI类
public class JniInterface {
    static {
        System.loadLibrary("LibJni");
    }
    public native String getMessage(String name, boolean isMale, int age);
}
创建命令
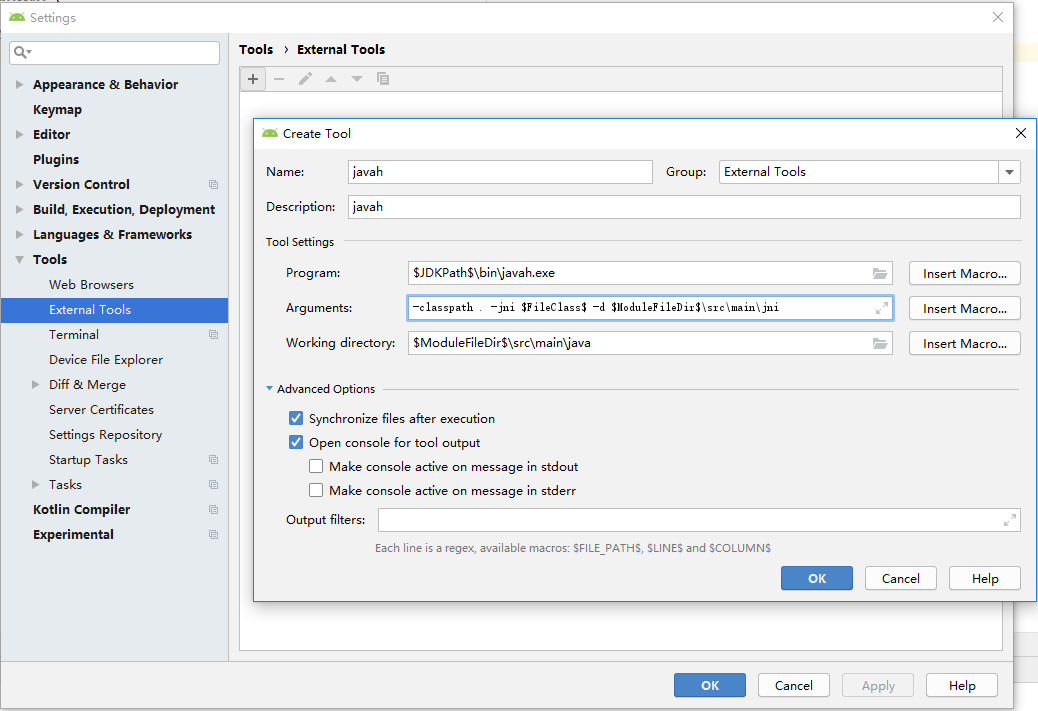
File --> Settings --> Tools --> External Tools 添加命令
Android Studio 自带的环境变量可以使用右侧的 “Insert Macros” 添加
Program:	$JDKPath$\bin\javah.exe
Arguments:	-classpath . -jni -d $ModuleFileDir$\src\main\jni $FileClass$
Working directory:	$ModuleFileDir$\src\main\java
classpath 表示class的搜索路径
. 号表示当前路径
-d 用来指定生成的 .h 头文件放置的路径
-o 用来指定生成的 .h 头文件名称,默认以类全路径名称生成(包名 + 类名.h)
注意:-d 和 -o 只能使用其中一个参数。
$JDKPath$ 是在 Android Studio 中设置JDK目录位置
$ModuleFileDir$ 是module的根路径
$FileClass$ 是对应文件的类名
生成头文件(静态注册)
有三种方法生成头文件
- 使用 External Tools 集成命令
- 在 Terminal 中使用 javah 命令
- 在 Terminal 中使用 javac 生成 class 文件,再取出头文件
使用 External Tools 集成命令
然后在 jni 对应的 java 文件右击 --> External Tools --> javah
在 Terminal 中使用 javah 命令
上面的 External Tools 实际上就是在 Terminal 执行 javah 命令帮你生成相应的头文件
"C:\Program Files\Java\jdk1.8.0_201\bin\javah.exe" -classpath . -jni -d C:\workspace\JniDemo\app\src\main\jni com.example.jnidemo.JniInterface
 这个是生成的 com_example_jnidemo_JniInterface.h 文件
/* DO NOT EDIT THIS FILE - it is machine generated */
#include <jni.h>
/* Header for class com_example_jnidemo_JniInterface */

#ifndef _Included_com_example_jnidemo_JniInterface
#define _Included_com_example_jnidemo_JniInterface
#ifdef __cplusplus
extern "C" {
#endif
/*
 * Class:     com_example_jnidemo_JniInterface
 * Method:    getMessage
 * Signature: (Ljava/lang/String;ZI)Ljava/lang/String;
 */
JNIEXPORT jstring JNICALL Java_com_example_jnidemo_JniInterface_getMessage
  (JNIEnv *, jobject, jstring, jboolean, jint);

#ifdef __cplusplus
}
#endif
#endif
- “ifndef”、“define” 这个是用来避免重复引用头文件的。
- extern “C” 的主要作用就是为了能够正确实现 C++ 代码调用其他 C 语言代码。加上extern “C” 后,会指示编译器这部分代码按 C 语言的进行编译,而不是 C++的。
- 函数以 Java 打头,然后后面跟类名加函数名
- JNIEnv类型实际上代表了Java环境
- jobject 如果 native 方法不是static的话,这个 obj 就代表这个 native 方法的类实例;如果 native 方法是 static 的话,这个 obj 就代表这个 native 方法的类的 class 对象
在 Terminal 中使用 javac 生成 class 文件,再取出头文件
- Terminal 的初始化位置是项目路径
- cd 到目标 java 文件路径下,然后执行 javac 命令生成 class
- cd 到 src\main\java 路径下,在执行 javah 生成头文件
- 最后删除 class 这个中间临时文件
C:\workspace\JniDemo>cd app\src\main\java\com\example\jnidemo
C:\workspace\JniDemo\app\src\main\java\com\example\jnidemo>javac JniInterface.java
C:\workspace\JniDemo\app\src\main\java\com\example\jnidemo>cd ..\..\..\
C:\workspace\JniDemo\app\src\main\java>javah -jni com.example.jnidemo.JniInterface
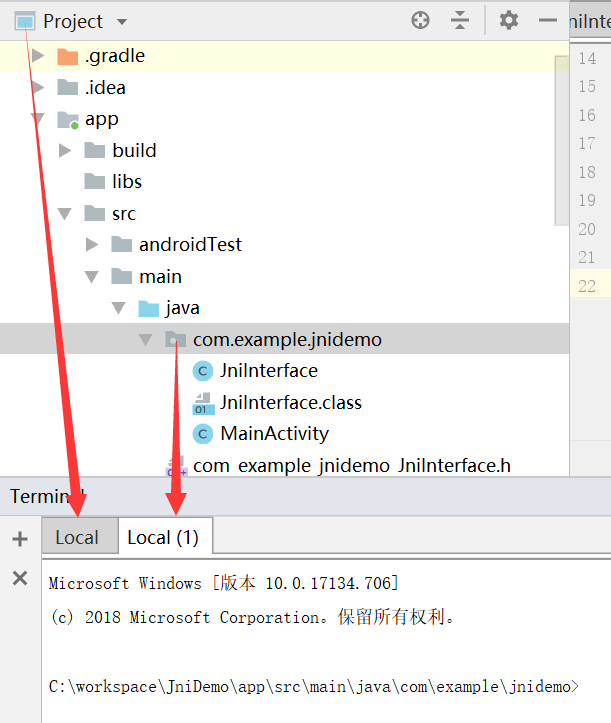
生成的目录结构如下
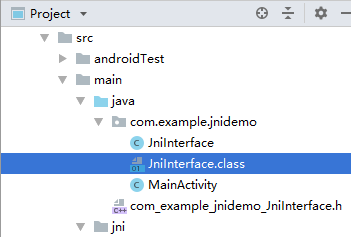
生成的 JniInterface.class 文件如下
//
// Source code recreated from a .class file by IntelliJ IDEA
// (powered by Fernflower decompiler)
//

package com.example.jnidemo;

public class JniInterface {
    public JniInterface() {
    }

    public native String getMessage(String var1, boolean var2, int var3);

    static {
        System.loadLibrary("LibJni");
    }
}
如果你觉得一直 cd 比较麻烦,可以直接使用拖拽对应目录到 Terminal 的方式,这样 Terminal 会新建一个 Session,并将该目录作为初始目录
 还有一种方法生成 class,就是利用 android studio 的 build 自动生成 class 文件
通过在 Windows 资源管理器搜索对应 java 文件名,可以找到生成的 class 文件路径。我这里的是在 app\build\intermediates\javac\debug\compileDebugJavaWithJavac\classes\com\example\jnidemo。之所以通过 Windows 资源管理器去搜索,是因为随着 Android Studio 的更新路径可能不断的变化,目前还没有一个固定的路径。
最后还是跟之前方法一样,通过class生成头文件。

创建 CPP 文件
将头文件复制一下,重命名时,把前面的类名去掉。
然后在cpp文件中删除宏定义,将原 include 改为该头文件即可。
JniInterface.cpp
/* DO NOT EDIT THIS FILE - it is machine generated */
#include <stdio.h>
#include "com_example_jnidemo_JniInterface.h"
/* Header for class com_example_jnidemo_JniInterface */

/*
 * Class:     com_example_jnidemo_JniInterface
 * Method:    getMessage
 * Signature: (Ljava/lang/String;ZI)Ljava/lang/String;
 */
JNIEXPORT jstring JNICALL Java_com_example_jnidemo_JniInterface_getMessage
    (JNIEnv *env, jobject jobject, jstring _name, jboolean _isMale, jint _age) {
    char str[50];
    const char *name = env->GetStringUTFChars(_name, 0);
    sprintf(str, "%s is %s age is %d !", name, _isMale ? "male, his" : "female, her", _age);
    return (*env).NewStringUTF(str);
}
使用 gradle 编译 NDK
新版的 Android Studio 已经不再使用之前 eclipse 的 mk 来指定 C++ 文件了,而改用 gradle 进行配置
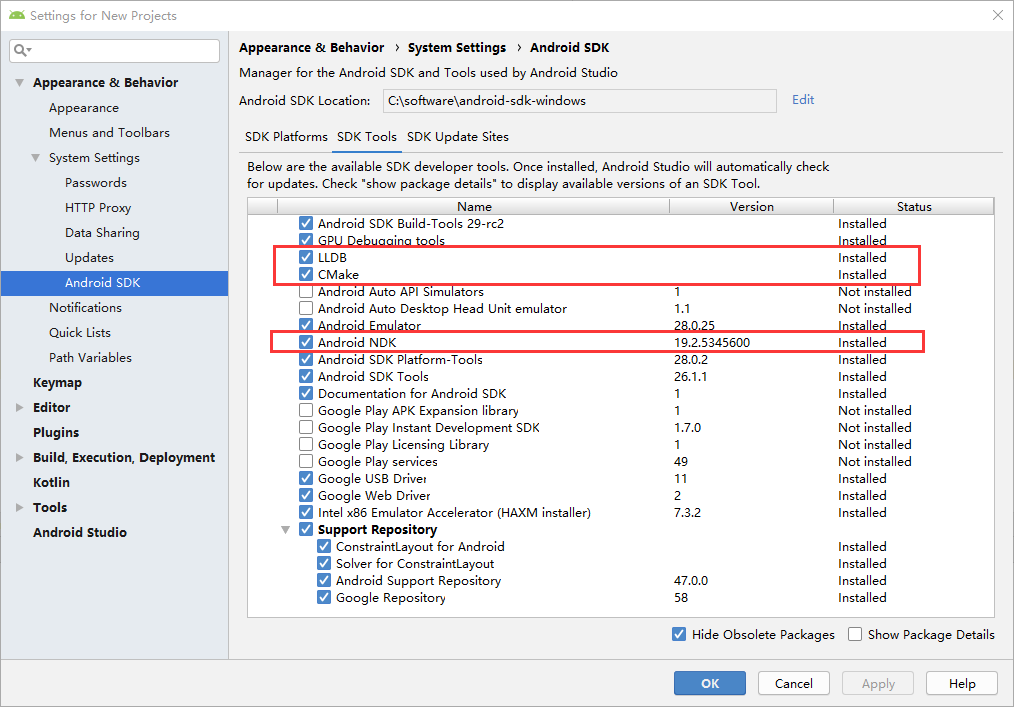
首先,在 File --> Settings --> Appearance & Behavior --> System Settings --> Android SDK 中确保 NDK、LLDB、CMake 均已安装
- CMake是一个跨平台的安装(编译)工具,可以用简单的语句来描述所有平台的安装(编译过程)。他能够输出各种各样的makefile或者project文件,能测试编译器所支持的C++特性,类似UNIX下的automake
- LLDB 是新一代高性能调试器,其是一组可重用组件的集合,这些组件大多是 LLVM 工程中的类库,如 Clang 表达式解析器或 LLVM 反汇编程序等。LLDB 是 Xcode 中默认的调试器,并且支持调试 C/C++ 程序
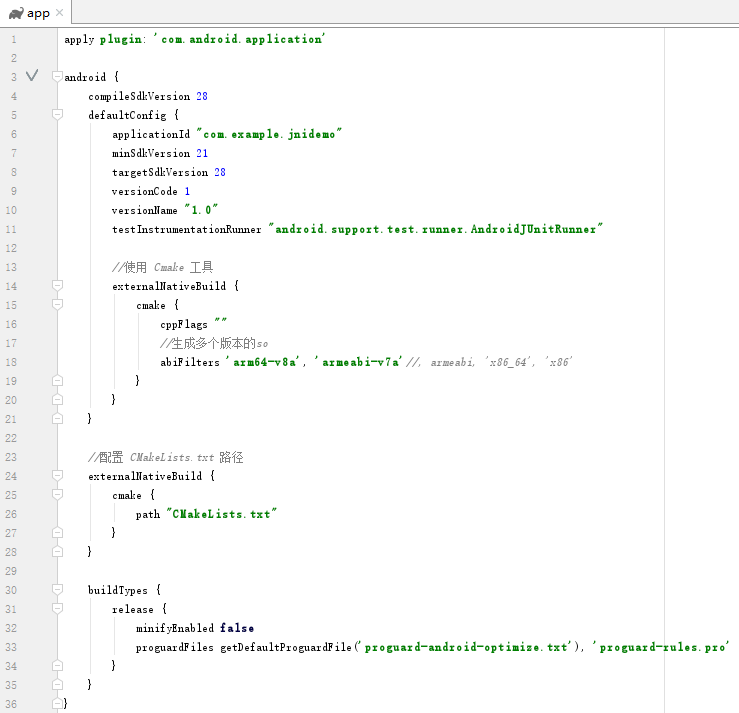
在对应 module 的 build.gradle 进行如下配置
- 在 defaultConfig 中添加
//使用 Cmake 工具
externalNativeBuild {
    cmake {
        cppFlags ""
        //生成多个版本的so,出于包大小和向下兼容性的考虑,去掉其他包
        abiFilters 'arm64-v8a', 'armeabi-v7a'//, armeabi, 'x86_64', 'x86', "mips", "mips64"
    }
}
- 在 android 下配置 CMakeLists.txt 路径
//配置 CMakeLists.txt 路径
externalNativeBuild {
    cmake {
        path "CMakeLists.txt"
    }
}
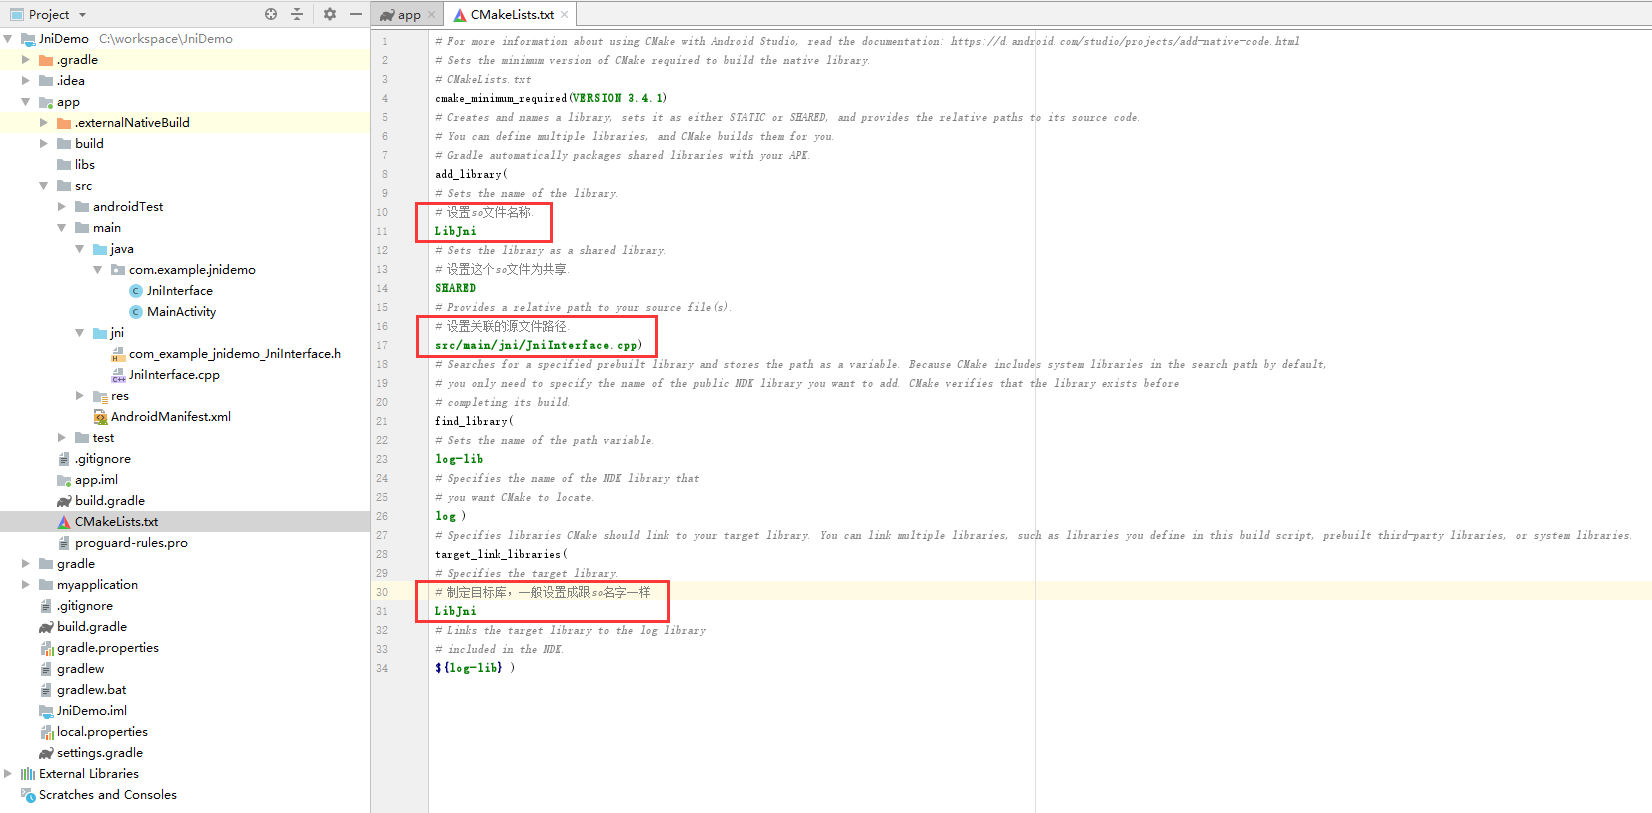
在对应 module 下添加 CMakeLists.txt
# For more information about using CMake with Android Studio, read the documentation: https://d.android.com/studio/projects/add-native-code.html
# Sets the minimum version of CMake required to build the native library.
# CMakeLists.txt
cmake_minimum_required(VERSION 3.4.1)
# Creates and names a library, sets it as either STATIC or SHARED, and provides the relative paths to its source code.
# You can define multiple libraries, and CMake builds them for you.
# Gradle automatically packages shared libraries with your APK.
add_library(
# Sets the name of the library.
# 设置so文件名称.
LibJni
# Sets the library as a shared library.
# 设置这个so文件为共享.
SHARED
# Provides a relative path to your source file(s).
# 设置关联的源文件路径.
src/main/jni/JniInterface.cpp)
# Searches for a specified prebuilt library and stores the path as a variable. Because CMake includes system libraries in the search path by default,
# you only need to specify the name of the public NDK library you want to add. CMake verifies that the library exists before
# completing its build.
find_library(
# Sets the name of the path variable.
log-lib
# Specifies the name of the NDK library that
# you want CMake to locate.
log )
# Specifies libraries CMake should link to your target library. You can link multiple libraries, such as libraries you define in this build script, prebuilt third-party libraries, or system libraries.
target_link_libraries(
# Specifies the target library.
# 制定目标库,一般设置成跟so名字一样
LibJni
# Links the target library to the log library
# included in the NDK.
${log-lib} )
主要修改如下三个加红框的地方
- add_library 将指定的源文件生成链接文件,然后添加到工程中去
- STATIC、SHARED、MODULE的作用是指定生成的库文件的类型
- STATIC 是目标文件的归档文件,在链接其它目标的时候使用(通俗意思就是:静态库和程序化为一体,不会分开)
- SHARED SHARED 会被动态链接(动态链接库),在运行时会被加载
- MODULE 是一种不会被链接到其它目标中的插件,但是可能会在运行时使用dlopen-系列的函数。默认状态下,库文件将会在于源文件目录树的构建目录树的位置被创建,该命令也会在这里被调用。
- target_link_libraries 将目标文件与库文件进行链接