一直想了解一下jni的开发流程是怎么样子的,刚好最近时间比较充裕,就学习了有关这方面的知识并且借鉴了一些优秀的blog。那为啥学写篇文章呢。。。主要是这个不常用,比较容易忘记,方便自己以后查看。当然了,如果能帮助到大家,那就更好了。好的。
接下来分两步走,第一介绍ndk以及ndk配置,第二,介绍jni的开发流程。
ndk的详细介绍
在Android developer上关于ndk的描述:The Native Development Kit (NDK) is a set of tools that allow you to leverage C and C++ code in your Android app. You can use it either to build from your own source code, or to take advantage of existing prebuilt libraries.
其大致意思就是:原生开发套件(NDK)是一套工具,使您能够充分利用C和C++代码在你的Android应用程序。你可以用它来建立你自己的源代码,或者是利用现有的lib库来创建你的应用程序。
ndk的下载,这里提供了两种途径:
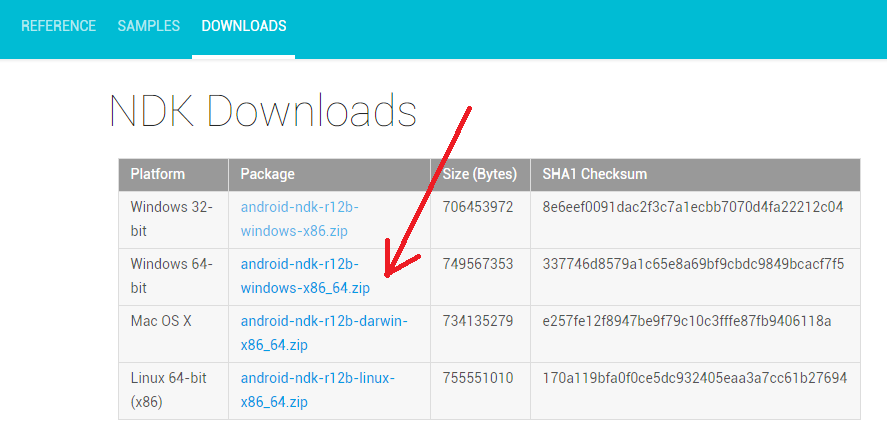
1.https://developer.android.com/ndk/downloads/index.html(Android官网)
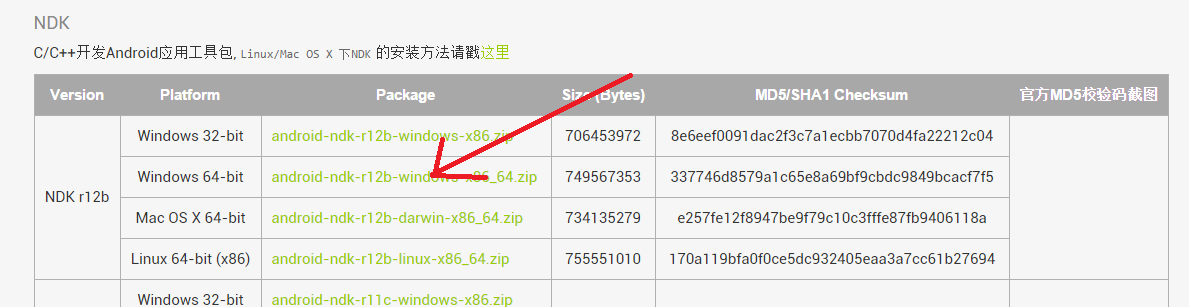
2.http://www.androiddevtools.cn/(Android镜像)
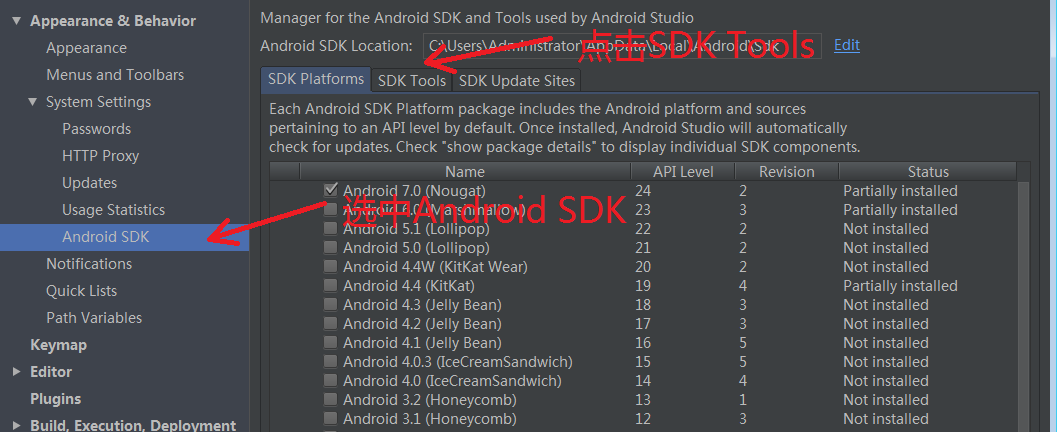
在Android Studio上ndk的配置。我用的是Android Studio 2.2 Prerview 6,其ndk可以在线下载,其ndk的配置步骤如下:
ndk的下载
1.进入Default Settings界面设置面板2.选中Android SDK一栏
3.点击右侧的SDK Tools
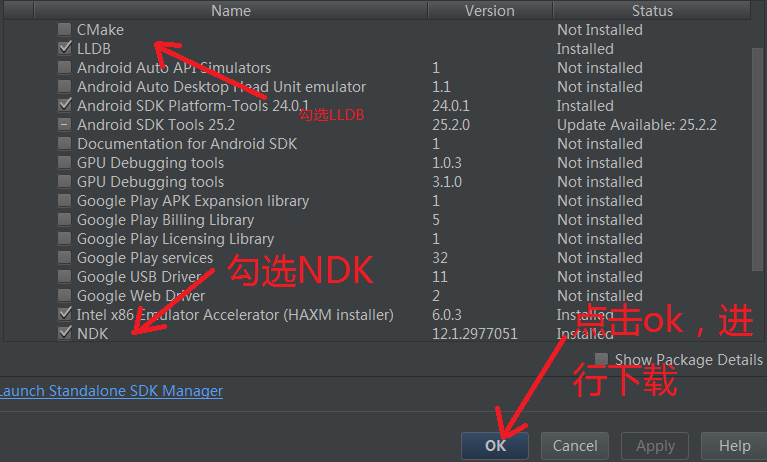
4.找到LLDB、NDK这两项,勾选,点击ok,进行下载。下载时间可能有点长,请耐心等待。(这个需要翻墙)
- ndk的配置
1.在Android Studio中,进入Default Settings -> Tools -> External Tools.
2.右侧点击“+”按钮,增加编译命令集成(个人叫法,不准勿怪啊)
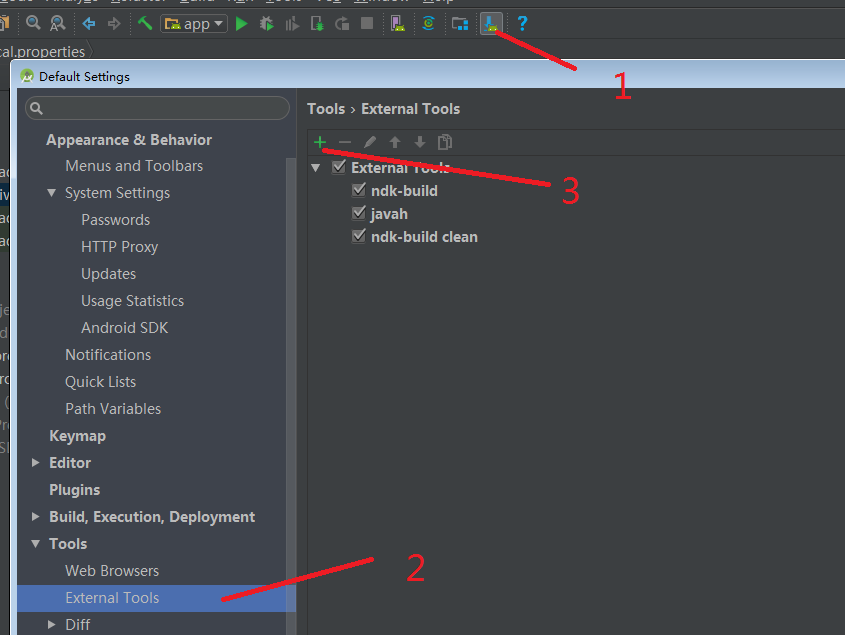
3.增加3项编译命令集成。分别是 javah、ndk-build、ndk-build clean。
4.其详细添加如下(这个参考了别人的blog):
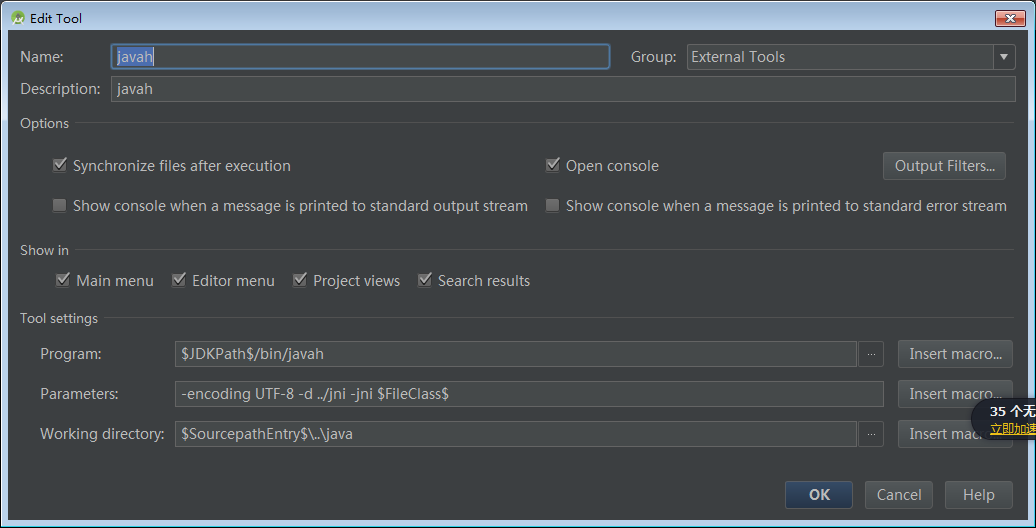
javah 用于生成头文件
Program:$JDKPath$/bin/javah
注意:这个命令我加上了-encoding UTF-8 指定编码,你可以改成你工程的编码。
Parameters:-encoding UTF-8 -d ../jni -jni $FileClass$
Working directory:$SourcepathEntry$\..\java
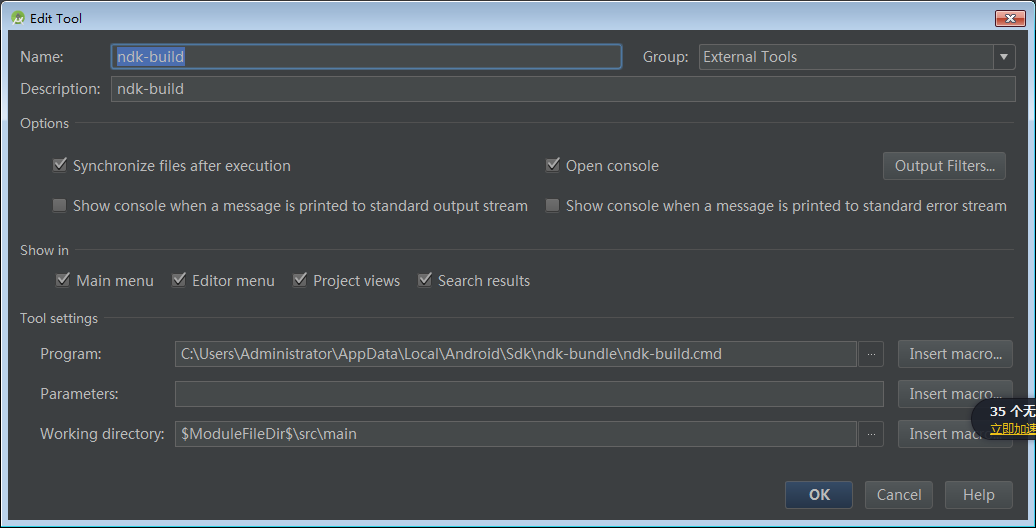
ndk-build 用于构建 so 包
注意:MAC/Linux 用 ndk-build,没有.cmd 后缀,这个是你自己的ndk-build路径
Program:C:\Develop\Android\sdk\ndk-bundle\ndk-build.cmd
Parameters:什么都不用填
Working directory:$ModuleFileDir$\src\main
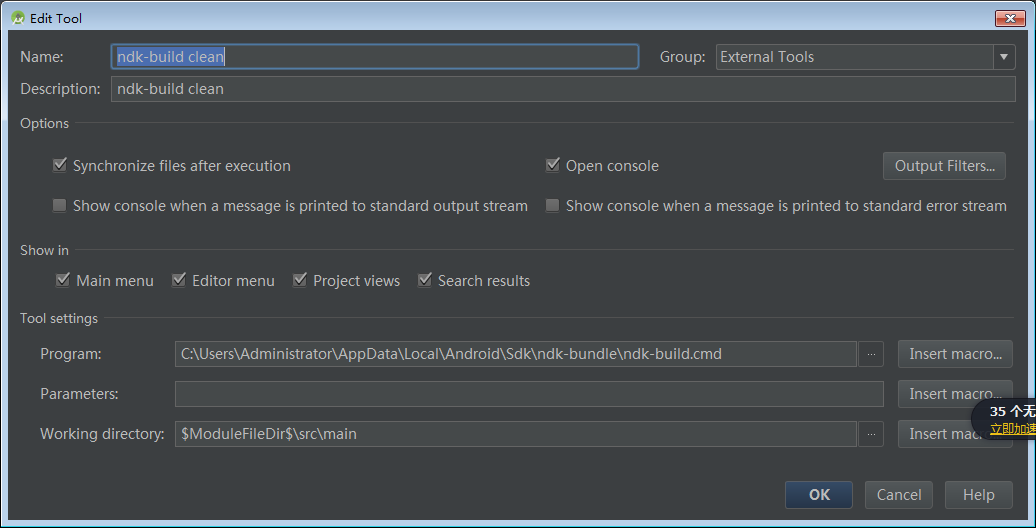
ndk-build clean 清除 so 包
注意:MAC/Linux 用 ndk-build,没有.cmd 后缀,这个是你自己的ndk-build路径
Program:C:\Develop\Android\sdk\ndk-bundle\ndk-build.cmd
Parameters:clean
Working directory:$ModuleFileDir$\src\main好的,到此,ndk的配置就完成了。
jni的开发流程 ##
1.新建一个Android Studio项目TestJniNdkDemo.
2.对TestJniNdkDemo这个项目进行配置。
- 在local.properties里面加入ndk的路径:
ndk.dir=C\:\\Users\\Administrator\\AppData\\Local\\Android\\Sdk\\ndk-bundle在gradle.properties里面末尾加入
android.useDeprecatedNdk=true这段代码在build.gradle(module:app)里面进行修改
原来的代码:
 apply plugin: 'com.android.application'

android {
    compileSdkVersion 24
    buildToolsVersion "24.0.1"
    defaultConfig {
        applicationId "com.example.administrator.testjnindkdemo"
        minSdkVersion 21
        targetSdkVersion 24
        versionCode 1
        versionName "1.0"
        testInstrumentationRunner "android.support.test.runner.AndroidJUnitRunner"
    }
    buildTypes {
        release {
            minifyEnabled false
            proguardFiles getDefaultProguardFile('proguard-android.txt'), 'proguard-rules.pro'
        }
    }
}

dependencies {
    compile fileTree(dir: 'libs', include: ['*.jar'])
    androidTestCompile('com.android.support.test.espresso:espresso-core:2.2.2', {
        exclude group: 'com.android.support', module: 'support-annotations'
    })
    compile 'com.android.support:appcompat-v7:24.1.1'
    compile 'com.android.support.constraint:constraint-layout:1.0.0-alpha4'
    testCompile 'junit:junit:4.12'
}
修改后的代码:
//apply plugin: 'com.android.application'
apply plugin: 'com.android.model.application'//修改后的
model{
    android {
        compileSdkVersion 24
        buildToolsVersion "24.0.1"
        defaultConfig {
            applicationId "com.example.administrator.testjnindkdemo"
            minSdkVersion.apiLevel 14 //修改后的
            targetSdkVersion.apiLevel 24 //修改后的
            versionCode 1
            versionName "1.0"
            testInstrumentationRunner "android.support.test.runner.AndroidJUnitRunner"
        }
        //新增
        ndk {
            moduleName   "TestJniDemo"
        }
        buildTypes {
            release {
                minifyEnabled false
//                proguardFiles getDefaultProguardFile('proguard-android.txt'), 'proguard-rules.pro'
                proguardFiles.add(file("proguard-rules.pro"))//修改后的
            }
        }
    }
}


dependencies {
    compile fileTree(dir: 'libs', include: ['*.jar'])
    androidTestCompile('com.android.support.test.espresso:espresso-core:2.2.2', {
        exclude group: 'com.android.support', module: 'support-annotations'
    })
    compile 'com.android.support:appcompat-v7:24.1.1'
    compile 'com.android.support.constraint:constraint-layout:1.0.0-alpha4'
    testCompile 'junit:junit:4.12'
}- 在build.gradle(Project:TestJniNdkDemo)里面修改。
原来的代码:
// Top-level build file where you can add configuration options common to all sub-projects/modules.

buildscript {
    repositories {
        jcenter()
    }
    dependencies {
        classpath 'com.android.tools.build:gradle:2.2.0-alpha6'

        // NOTE: Do not place your application dependencies here; they belong
        // in the individual module build.gradle files
    }
}

allprojects {
    repositories {
        jcenter()
    }
}

task clean(type: Delete) {
    delete rootProject.buildDir
}
修改后的代码:
// Top-level build file where you can add configuration options common to all sub-projects/modules.

buildscript {
    repositories {
        jcenter()
    }
    dependencies {
//        classpath 'com.android.tools.build:gradle:2.2.0-alpha6'
        //修改后的代码,注意最后面的版本,它对应着gradle-wrapper.properties里面的
        //distributionUrl=https\://services.gradle.org/distributions/gradle-2.10-all.zip的版本号
        /**对应关系如下所示
         *       Plugin Version |  Gradle Version
         *          0.1.0       |        2.5
         *          0.2.0       |        2.5
         *      0.3.0-alpha3    |        2.6
         *          0.4.0       |        2.8
         *      0.6.0-alpha1    |        2.8
         *      0.6.0-alpha5    |        2.10
         *      0.7.0-alpha1    |        2.10
         *          0.7.0       |        2.10
         *          0.7.3       |        2.14.1
         * */
        classpath "com.android.tools.build:gradle-experimental:0.7.0"
        // NOTE: Do not place your application dependencies here; they belong
        // in the individual module build.gradle files
    }
}

allprojects {
    repositories {
        jcenter()
    }
}

task clean(type: Delete) {
    delete rootProject.buildDir
}
3.项目配置完成后,进行第一次编译。
4.创建一个java文件TestJniDemo,其代码如下:
package com.example.administrator.testjnindkdemo;

/**
 * Created by Administrator on 2016/8/19.
 */

public class TestJniDemo {
    static {
        //加载要使用的 so 文件
        System.loadLibrary("TestJniDemo");
    }
    public static native String helloJni();
}
5.对TestJniDemo这个java类进行编译。
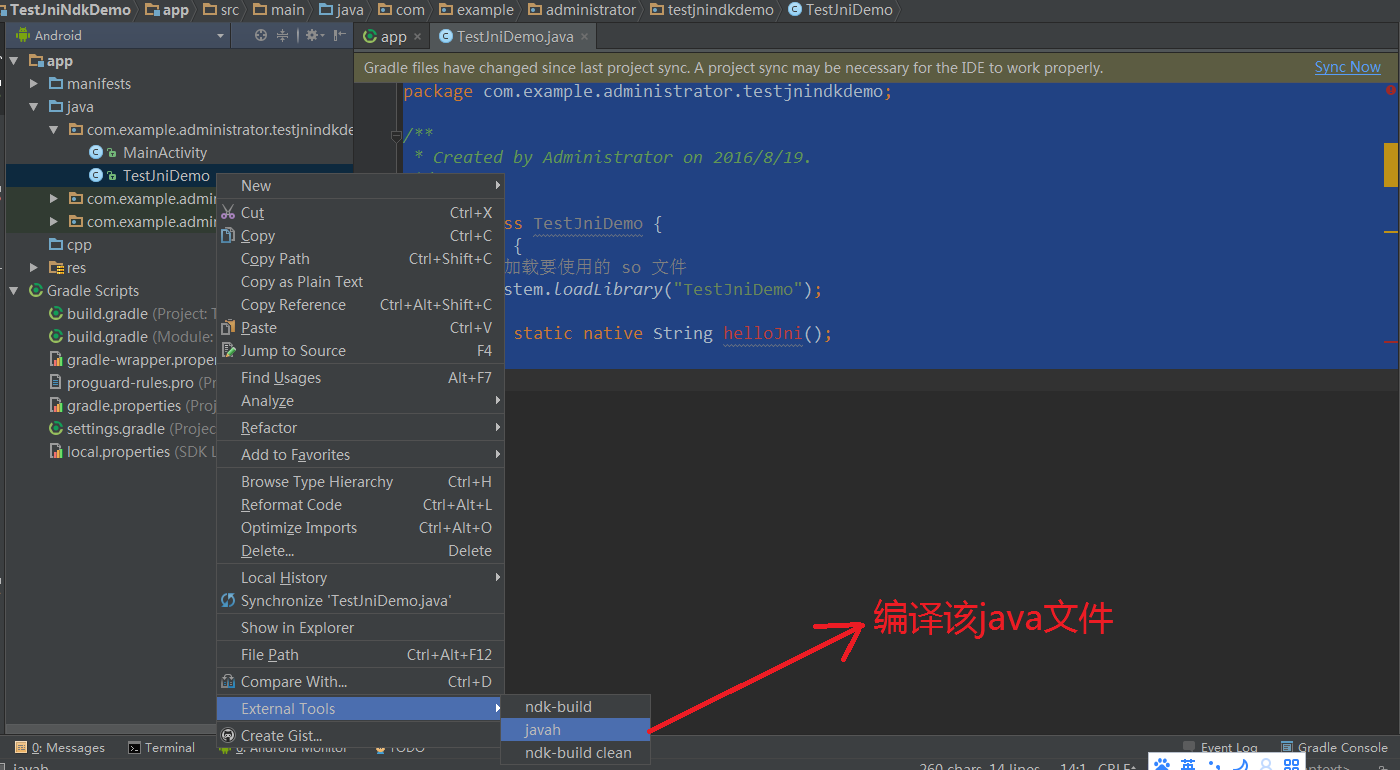
6.编译完成后,在cpp(或者是jni)文件夹下会生成一个.h文件。
com_example_administrator_testjnindkdemo_TestJniDemo.h,其内容如下:
/* DO NOT EDIT THIS FILE - it is machine generated */
#include <jni.h>
/* Header for class com_example_administrator_testjnindkdemo_TestJniDemo */
#ifndef _Included_com_example_administrator_testjnindkdemo_TestJniDemo
#define _Included_com_example_administrator_testjnindkdemo_TestJniDemo
#ifdef __cplusplus
extern "C" {
#endif
/*
* Class: com_example_administrator_testjnindkdemo_TestJniDemo
* Method: helloJni
* Signature: ()Ljava/lang/String;
*/
JNIEXPORT jstring JNICALL Java_com_example_administrator_testjnindkdemo_TestJniDemo_helloJni
(JNIEnv *, jclass);
#ifdef __cplusplus
}
#endif
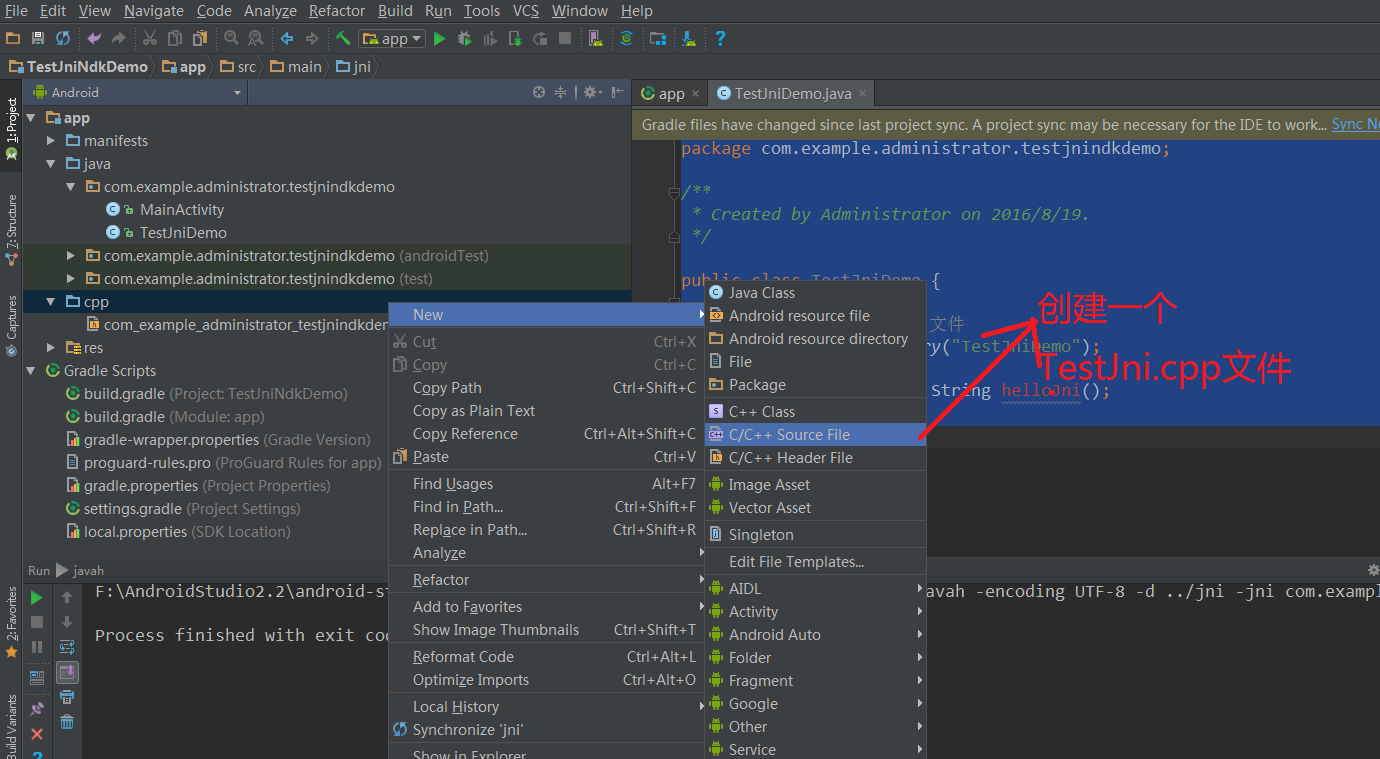
#endif7.在cpp文件夹(或者是jni文件夹)下创建一个c语言代码,后缀为.cpp的TestJni的c代码。代码如下:
#include <com_example_administrator_testjnindkdemo_TestJniDemo.h>

JNIEXPORT jstring JNICALL Java_com_example_administrator_testjnindkdemo_TestJniDemo_helloJni
        (JNIEnv *env, jclass type) {//该方法来自.h文件里面的方法

    return env->NewStringUTF("jni ndk sucess!!!");
}
8.对项目进行编译
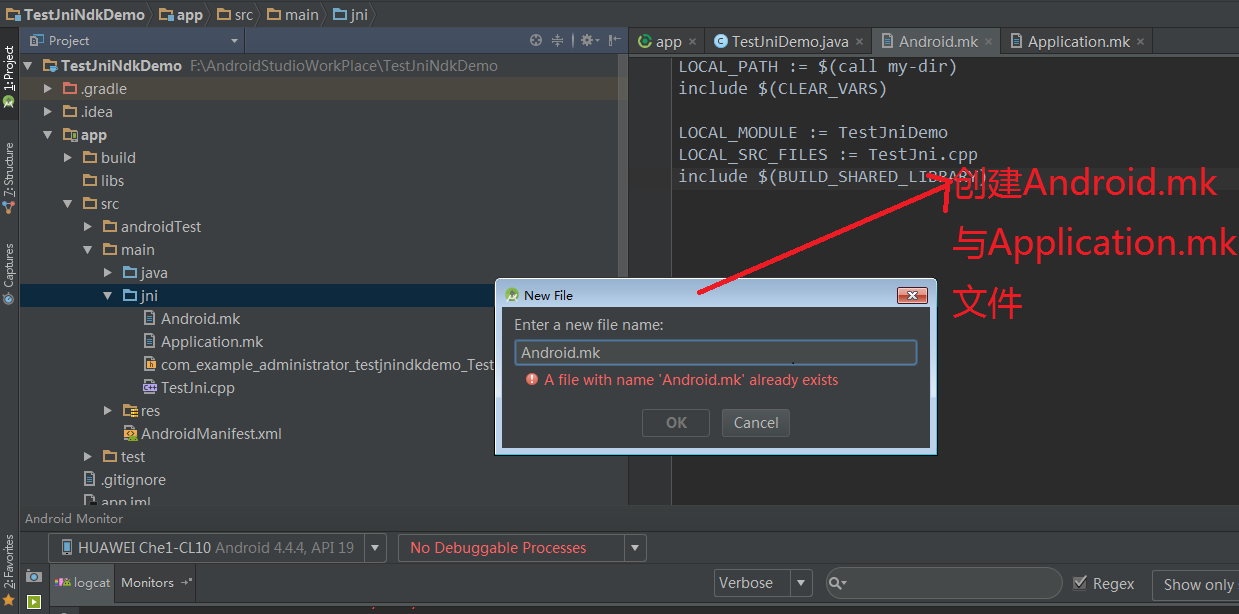
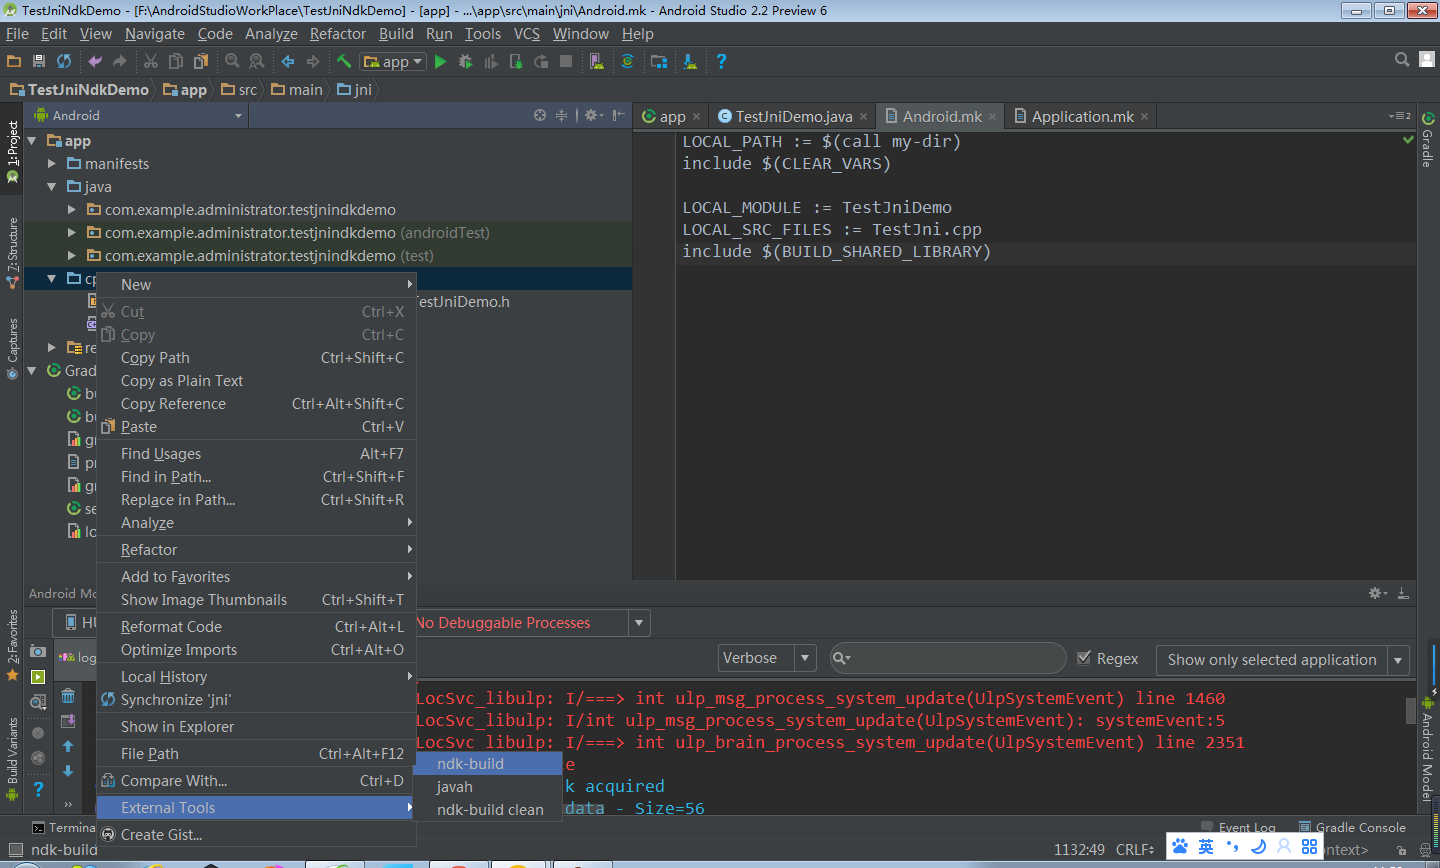
9.在cpp或者是jni文件下,创建两个.mk文件。分别是Android.mk、Application.mk。
Android.mk文件内容如下:
LOCAL_PATH := $(call my-dir)
include $(CLEAR_VARS)

LOCAL_MODULE := TestJniDemo //这个是build.gradle 里面设的ndk的moduleName
LOCAL_SRC_FILES := TestJni.cpp //这个是c语言代码类
include $(BUILD_SHARED_LIBRARY)
Application.mk文件内容如下:
APP_MODULES := TestJniDemo
APP_ABI := all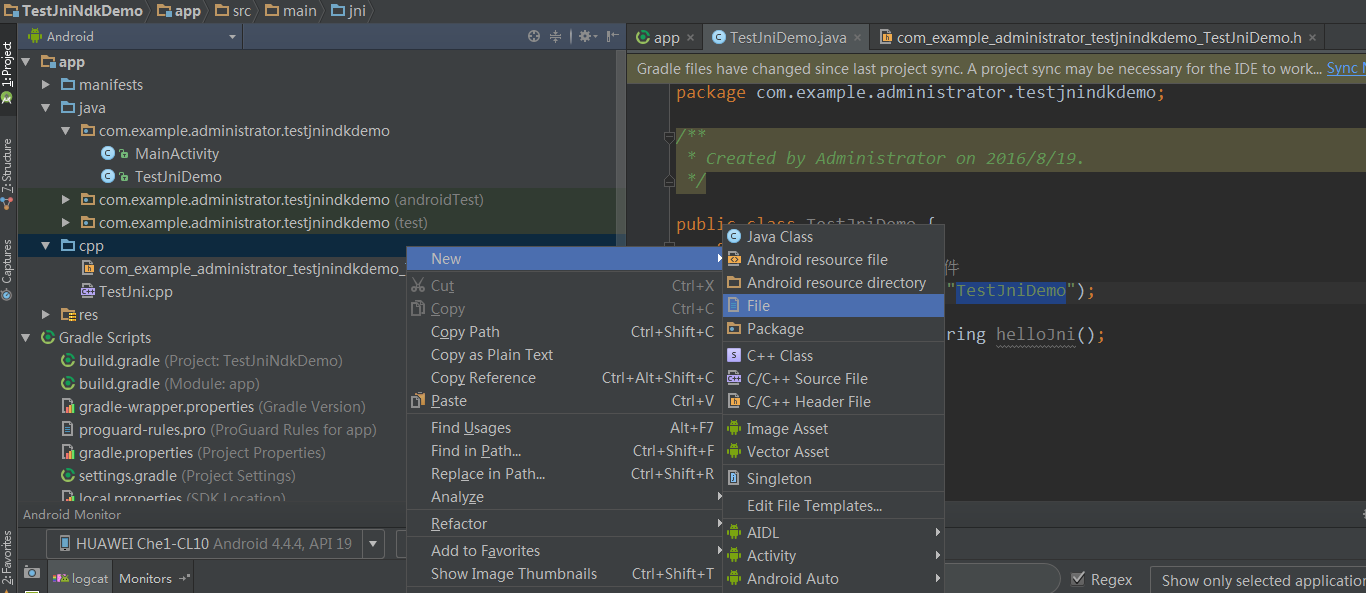
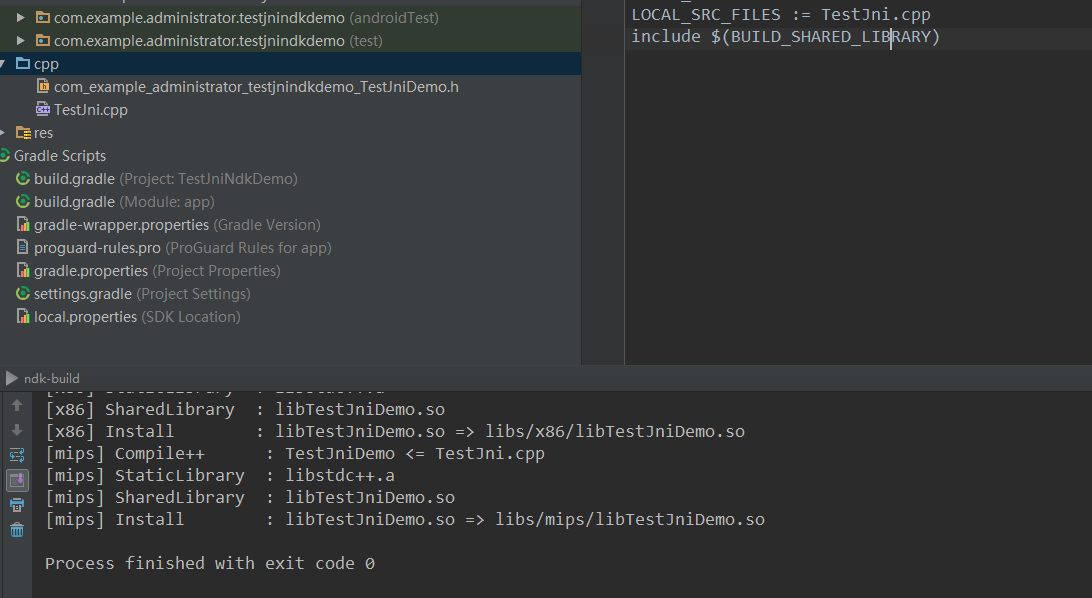
10.对jni或者是cpp文件夹进行ndk-build编译。
11.在MainActivity里面去调用TestJniDemo这个类。实现相应的功能。
代码如下:
package com.example.administrator.testjnindkdemo;

import android.support.v7.app.AppCompatActivity;
import android.os.Bundle;
import android.widget.TextView;

public class MainActivity extends AppCompatActivity {

    @Override
    protected void onCreate(Bundle savedInstanceState) {
        super.onCreate(savedInstanceState);
        setContentView(R.layout.activity_main);

        TextView tv = (TextView) findViewById(R.id.tv);
        tv.setText(TestJniDemo.helloJni());
    }
}
12.在app上运行,得到正确的结果。
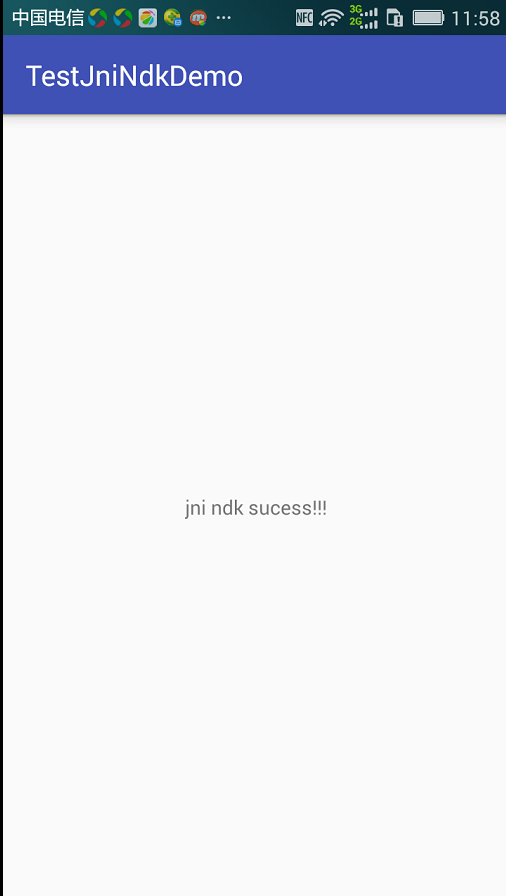
好了,到此为止,jni的基本开发流程已经走通了。