一.DUT
module dut(clk,
           rst_n,
           rxd,
           rx_dv,
           txd,
           tx_en);
input clk;
input rst_n;
input[7:0] rxd;
input rx_dv;
output [7:0] txd;
output tx_en;

reg[7:0] txd;
reg tx_en;

always @(posedge clk) begin
   if(!rst_n) begin
      txd <= 8'b0;
      tx_en <= 1'b0;
   end
   else begin
      txd <= rxd;
      tx_en <= rx_dv;
   end
end
endmodule
二.派生自uvn_driver的my_driver
`ifndef MY_DRIVER__SV
`define MY_DRIVER__SV件
class my_driver extends uvm_driver;

   function new(string name = "my_driver", uvm_component parent = null);
      super.new(name, parent);
   endfunction
   extern virtual task main_phase(uvm_phase phase);
endclass

task my_driver::main_phase(uvm_phase phase);
   top_tb.rxd <= 8'b0;
   top_tb.rx_dv <= 1'b0;
   while(!top_tb.rst_n)
      @(posedge top_tb.clk);
   for(int i = 0; i < 256; i++)begin
      @(posedge top_tb.clk);
      top_tb.rxd <= $urandom_range(0, 255);
      top_tb.rx_dv <= 1'b1;
      `uvm_info("my_driver", "data is drived", UVM_LOW)
   end
   @(posedge top_tb.clk);
   top_tb.rx_dv <= 1'b0;
endtask
`endif
三.将my_driver实例化得到最终的验证平台top_tb.sv
`timescale 1ns/1ps
`include "uvm_macros.svh"

import uvm_pkg::*;
`include "my_driver.sv"

module top_tb;

reg clk;
reg rst_n;
reg[7:0] rxd;
reg rx_dv;
wire[7:0] txd;位置位置
wire tx_en;

dut my_dut(.clk(clk),
           .rst_n(rst_n),
           .rxd(rxd),
           .rx_dv(rx_dv),
           .txd(txd),
           .tx_en(tx_en));

initial begin
   my_driver drv;
   drv = new("drv", null);
   drv.main_phase(null);
   $finish();
end

initial begin
   clk = 0;
   forever begin
      #100 clk = ~clk;
   end
end

initial begin
   rst_n = 1'b0;
   #1000;
   rst_n = 1'b1;
end

endmodule
四.filelist文件
filelist 是包含其他的仿真参数和整个工程的文件列表。
+incdir+$UVM_HOME/src
$UVM_HOME/src/uvm_pkg.sv
$WORK_HOME/src/ch2/dut/dut.sv
top_tb.sv
注:
(1)
$UVM_HOME/src表示引用 /home/example_and_uvm_source_code/uvm-1.1d /src文件,如截图

五.Makefile
Makefile做了一些小的改动,删除了一些内容,请大家按需添加。
UVM_HOME	= /home/example_and_uvm_source_code/uvm-1.1d   //uvm库的路径


all: clean compile run      //编译的依赖选项

compile:
	$(VCS) +incdir+. \           //$(vcs)表示引用变量vcs,+incdir+<directory>:指定包含使用`include 编译器指令指定的文件的目录,可以指定多个目录,用+字符分隔每个路径名称;
		top_tb.sv						//这里是编译文件的名字,每次编译只需要修改为你想要编译的名字即可。注意:此时我们终端的路径所在的位置应该是需编译文件所在的位置

run:
	$(SIMV)
	$(CHECK)
VCS =	vcs -sverilog -timescale=1ns/1ns \   //-timescale=<time_unit>/<time_precision>:指明时间精度;
	-debug_all \
	+acc +vpi \
	+define+UVM_OBJECT_MUST_HAVE_CONSTRUCTOR \
	+incdir+$(UVM_HOME)/src $(UVM_HOME)/src/uvm.sv \         //指定使用$(UVM_HOME)/src这个文件
	$(UVM_HOME)/src/dpi/uvm_dpi.cc -CFLAGS -DVCS

SIMV = 	./simv +UVM_VERBOSITY=$(UVM_VERBOSITY) -l vcs.log    //-l <filename>指定记录VCS编译和运行信息的log文件名

URG  = urg -format text -dir simv.vdb

CHECK = \
	@$(TEST) \( `grep -c 'UVM_ERROR :    $(N_ERRS)' vcs.log` -eq 1 \) -a \
		 \( `grep -c 'UVM_FATAL :    $(N_FATALS)' vcs.log` -eq 1 \)

clean:
	rm -rf *~ core csrc simv* vc_hdrs.h ucli.key urg* *.log

dve:
	dve&
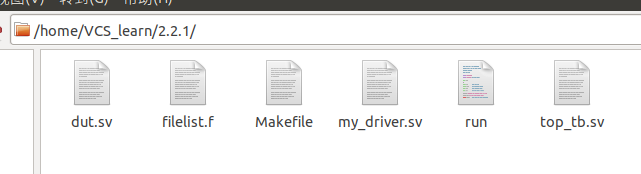
文件列表截图,如上图,其中的run文件,用Makefile脚本的话,就不用管他,放在哪里就好。
六.运行过程
6.1编译
在终端输入以下命令进行编译,编译的目的是生成一个simv文件, 这个文件是一个可执行文件。
make compile
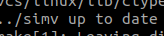
输入命令后,终端出现./simv up to date 则表明编译成功。得到如下的文件:

执行这个simv文件,就可以看到我们的仿真结果:
命令如下:
./simv 或者 ./simv -gui
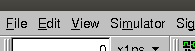
上述命令,第一个只是执行simv文件,而第二个会调用DVE,如下图表示执行成功。

调用的DVE如下图:

DVE界面,点击simulator
在点击,start/continue按钮

就可以在DVE看到结果啦!
