Session技术的应用
1.防止用户非法登录到某个页面
比如我们的用户管理系统,必须要登录成功后才能跳转到主页面,而不能直接绕过登录页面直接到主页面,这个应用是一个非常常见的应用。
这时候,我们需要使用到Session技术,如下,当在验证用户的控制器LoginClServlet.java验证用户成功后,将当前的用户信息保存在Session对象中:
// 把user对象保存在session
HttpSession session = request.getSession();
session.setAttribute("login-user", user);- 1
- 2
- 3
然后在主页面MainFrame.java最开始的地方,取出Session中的登录用户信息,如果信息为空,则为非法访问,直接跳转到登录页面,并提示相关信息:
// 取出login-user这个session
User login_user = (User)request.getSession().getAttribute("login-user");
if(login_user == null){
    // 说明用户没有登录,让他跳转到登录页面
    request.setAttribute("error", "请登录!");
    request.getRequestDispatcher("/LoginServlet").forward(request,response);
    // 这个return很重要!
    return;
}- 1
- 2
- 3
- 4
- 5
- 6
- 7
- 8
- 9
那么这里就存在一个问题,一个网站会有很多个需要防止非法访问的页面,如果都是用这种方法岂不是很麻烦?
这里有两种解决办法:
第一种是将这段验证用户的代码封装成函数,每次调用
第二种是使用过滤器(后面会介绍)
2.用户登录时验证输入的验证码是否正确
原理:使用到java的绘图技术
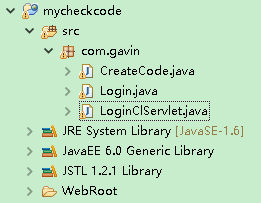
假设我们编写登录页面Login,验证用户的LoginClServlet,以及生成验证码的CreateCode,如下所示:
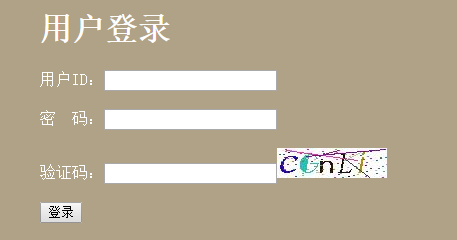
用户在访问登录页面Login的时候,Login页面会去请求CreateCode这个Servlet生成验证码,然后显示在自己的页面上,然后再提交到LoginClServlet进行验证。很显然,访问Login和请求CreateCode这是从浏览器发出的两次不同的请求,所以,CreateCode产生的验证码字符串必须放入Session中,才能让LoginClServlet拿到,然后进行验证。
那么怎么让登录页面Login显示验证码呢?其实很简单,直接将img的src指向CreateCode这个Servlet即可,如下所示:
out.println("<font color=white>验证码:<input type='text' name='checkcode'/><img src='/mycheckcode/CreateCode'>");- 1
可以看到运行结果:
这个登录表单提交到LoginClServlet进行验证,它需要从参数中获取用户输入的验证码,再从Session中取出CreateCode这个Servlet放入Session中的正确的验证码,然后对比两者,它的doGet方法的关键代码如下:

//获取用户的id/password/输入的验证码
String id = request.getParameter("id");
String passwd = request.getParameter("passwd");
// 用户输入的验证码
String input_checkcode = request.getParameter("checkcode");
// 正确的验证码
String checkcode = (String)request.getSession().getAttribute("checkcode");
// 先看验证码对不对
if(input_checkcode.toLowerCase().equals(checkcode)){
    // 验证码OK,再到数据库验证id和passwd
}else{
    request.setAttribute("error", "验证码有误");
    request.getRequestDispatcher("/Login").forward(request, response);
}- 1
- 2
- 3
- 4
- 5
- 6
- 7
- 8
- 9
- 10
- 11
- 12
- 13
- 14
这里最重要的其实是生成验证码的Servlet,Servlet代码如下:
import java.awt.Color;
import java.awt.Font;
import java.awt.Graphics;
import java.awt.image.BufferedImage;
import java.io.IOException;
import java.util.Random;

import javax.imageio.ImageIO;
import javax.servlet.ServletException;
import javax.servlet.http.HttpServlet;
import javax.servlet.http.HttpServletRequest;
import javax.servlet.http.HttpServletResponse;

public class CreateCode extends HttpServlet {

    public void doGet(HttpServletRequest request, HttpServletResponse response)
            throws ServletException, IOException {

        // 7.禁止浏览器缓存随机图片
        response.setDateHeader("Expires", -1);
        response.setHeader("Cache-Control", "no-cache");
        response.setHeader("Pragma", "no-cache");

        // 6.通知客户机以图片方式打开发送过去的数据
        response.setHeader("Content-Type", "image/jpeg");

        // 1.在内存中创建一幅图片
        BufferedImage image = new BufferedImage(110, 30,
                BufferedImage.TYPE_INT_BGR);

        // 2.向图片上写数据
        Graphics g = image.getGraphics();

        // 设背景色
        g.setColor(Color.white);
        g.fillRect(0, 0, 110, 30);

        String checkcode = "";
        // 画5个验证码字符
        for(int i=0;i<5;i++){
            g.setColor(generateColor());
            g.setFont(generateFont());
            String str = generateStr();
            checkcode += str;
            g.drawString(str,20*i,25);
        }

        // 画干扰点
        for(int i=0;i<100;i++){
            Random random = new Random();
            int x = random.nextInt(110);
            int y = random.nextInt(30);
            g.setColor(generateColor());
            g.fillOval(x, y, 2, 2);
        }
        // 画干扰线
        for(int i=0;i<5;i++){
            Random random = new Random();
            int x1 = random.nextInt(110);
            int y1 = random.nextInt(30);
            int x2 = random.nextInt(110);
            int y2 = random.nextInt(30);
            g.setColor(generateColor());
            g.drawLine(x1, y1, x2, y2);
        }

        // 这句话就是把随机生成的验证码,保存到session
        // 验证码不区分大小写,所以这里转为小写
        request.getSession().setAttribute("checkcode", checkcode.toLowerCase());

        // 5.把写好数据的图片输出给浏览器
        ImageIO.write(image, "jpg", response.getOutputStream());

    }

    /**
     * 生成随机字体
     * @return
     */
    public Font generateFont() {
        String[] font_names = new String[] { "Broadway", "方正姚体",
                "Footlight MT Light", "Sitka Text", "方正舒体", "幼圆" ,"Colonna MT"};
        int[] font_styles = new int[]{Font.BOLD, Font.ITALIC, Font.BOLD|Font.ITALIC};

        Random random = new Random();
        int name_index = random.nextInt(font_names.length);
        int style_index = random.nextInt(font_styles.length);

        return new Font(font_names[name_index],font_styles[style_index],28);
    }

    /**
     * 生成随机颜色
     *
     * @return
     */
    public Color generateColor() {
        Random random = new Random();
        return new Color(random.nextInt(256), random.nextInt(256),
                random.nextInt(256));
    }

    /**
     * 生成随机数[0-9a-zA-Z]
     *
     * @return
     */
    public String generateStr() {
        String[] nums = new String[62];
        // 添加0-9这10个数字
        for (int i = 0; i < 10; i++) {
            nums[i] = String.valueOf(i);
        }
        // 添加A-Z这26个大写字母
        for (int i = 65; i < 91; i++) {
            nums[i - 55] = Character.toString((char) i);
        }
        // 添加a-z这26个小写字母
        for (int i = 97; i < 123; i++) {
            nums[i - 61] = Character.toString((char) i);
        }
        // 产生一个随机数
        Random random = new Random();
        int index = random.nextInt(62);
        return nums[index];
    }

    public void doPost(HttpServletRequest request, HttpServletResponse response)
            throws ServletException, IOException {

        this.doGet(request, response);
    }

}- 1
- 2
- 3
- 4
- 5
- 6
- 7
- 8
- 9
- 10
- 11
- 12
- 13
- 14
- 15
- 16
- 17
- 18
- 19
- 20
- 21
- 22
- 23
- 24
- 25
- 26
- 27
- 28
- 29
- 30
- 31
- 32
- 33
- 34
- 35
- 36
- 37
- 38
- 39
- 40
- 41
- 42
- 43
- 44
- 45
- 46
- 47
- 48
- 49
- 50
- 51
- 52
- 53
- 54
- 55
- 56
- 57
- 58
- 59
- 60
- 61
- 62
- 63
- 64
- 65
- 66
- 67
- 68
- 69
- 70
- 71
- 72
- 73
- 74
- 75
- 76
- 77
- 78
- 79
- 80
- 81
- 82
- 83
- 84
- 85
- 86
- 87
- 88
- 89
- 90
- 91
- 92
- 93
- 94
- 95
- 96
- 97
- 98
- 99
- 100
- 101
- 102
- 103
- 104
- 105
- 106
- 107
- 108
- 109
- 110
- 111
- 112
- 113
- 114
- 115
- 116
- 117
- 118
- 119
- 120
- 121
- 122
- 123
- 124
- 125
- 126
- 127
- 128
- 129
- 130
- 131
- 132
- 133
- 134
3.实现简易购物车
假设我们要在网上买书,那么怎么实现添加到购物车,并可以查看购物车的功能呢?肯定要使用Session。
首先,我们先写一个Book类,该类封装Book的相关信息,这里简单起见,主要有ID号,书名,以及购买的本数。然后模拟一个数据库,如下:
import java.util.HashMap;
import java.util.LinkedHashMap;

/**
 * 模拟数据库
 */
final public class DB {
    private static HashMap<String, Book> hm = null;

    private DB(){

    }

    static{
        hm = new LinkedHashMap<String, Book>();

        Book book1 = new Book("1", "Java基础", 0);
        Book book2 = new Book("2", "Oracle数据库", 0);
        Book book3 = new Book("3", "C语言", 0);
        Book book4 = new Book("4", "Python核心教程", 0);
        Book book5 = new Book("5", "Web技术", 0);

        hm.put(book1.getId(),book1);
        hm.put(book2.getId(),book2);
        hm.put(book3.getId(),book3);
        hm.put(book4.getId(),book4);
        hm.put(book5.getId(),book5);
    }

    /**
     * 得到数据库中所有的书
     * @return
     */
    public static HashMap<String, Book> getBooks(){
        return hm;
    }

    /**
     * 根据ID得到书
     * @param id
     * @return
     */
    public static Book getBookById(String id){
        if(hm.containsKey(id)){
            return hm.get(id);
        }
        return null;
    }
}- 1
- 2
- 3
- 4
- 5
- 6
- 7
- 8
- 9
- 10
- 11
- 12
- 13
- 14
- 15
- 16
- 17
- 18
- 19
- 20
- 21
- 22
- 23
- 24
- 25
- 26
- 27
- 28
- 29
- 30
- 31
- 32
- 33
- 34
- 35
- 36
- 37
- 38
- 39
- 40
- 41
- 42
- 43
- 44
- 45
- 46
- 47
- 48
- 49
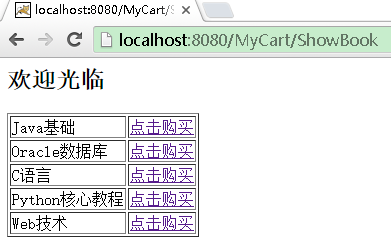
然后在我们的showBook这个Servlet中读取数据库中所有的书的信息,显示在页面上,它的doGet方法为:
public void doGet(HttpServletRequest request, HttpServletResponse response)
        throws ServletException, IOException {
    response.setContentType("text/html;charset=utf-8");
    PrintWriter out = response.getWriter();

    out.println("<h2>欢迎光临</h2>");
    out.println("<table border=1>");
    HashMap<String, Book> books = DB.getBooks();
    Iterator it = books.keySet().iterator();
    while(it.hasNext()){
        Book book = books.get(it.next());
        out.println("<tr><td>"+book.getName()+"</td><td><a href='/MyCart/BuyBookCl?id="+book.getId()+"'>点击购买</a></td></tr>");
    }
    out.println("</table>");
}- 1
- 2
- 3
- 4
- 5
- 6
- 7
- 8
- 9
- 10
- 11
- 12
- 13
- 14
- 15
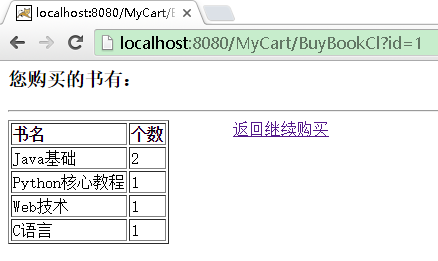
可以看到,当用户点击购买的链接时,跳到BuyBookCl这个Servlet进行处理,并且一同传递过去的参数为书的id号,我们看看BuyBookCl是怎么写的:
public void doGet(HttpServletRequest request, HttpServletResponse response)
        throws ServletException, IOException {
    response.setContentType("text/html;charset=utf-8");
    //接收用户购买书的名字
    String id = request.getParameter("id");
    String name = DB.getBookById(id).getName();
    HttpSession session = request.getSession();
    // 用HashMap更简单
    // 从session中得到购买的 书
    HashMap<String,Book> books = (HashMap<String,Book>) session.getAttribute("books");
    if(books == null){
        books = new LinkedHashMap<String,Book>();
    }
    if(books.containsKey(id)){
        Book book = books.get(id);
        book.setNum(book.getNum()+1);
    }else{
        Book book = new Book(id, name, 1);
        books.put(id, book);
    }
    session.setAttribute("books", books);
    // 转发到ShowMyCart查看购物车
    request.getRequestDispatcher("/ShowMyCart").forward(request, response);
}- 1
- 2
- 3
- 4
- 5
- 6
- 7
- 8
- 9
- 10
- 11
- 12
- 13
- 14
- 15
- 16
- 17
- 18
- 19
- 20
- 21
- 22
- 23
- 24
我们接收到书的id后,然后从Session中取出保存购物车信息的HashMap,如果这个HashMap为空,则新建一个HashMap;如果这个HashMap不为空,则去查找是否存在该书的ID号,如果已经存在,说明之前已经购买过该书,则将这本书的数量加1,,反之将新购买的书添加进去,并且数量设置为1。
看一下运行结果:
1.ShowBook的页面:
2.点击购买之后跳转到购物车的页面: