项目的最新地址:https://github.com/daxian-zhu/online_edu
说到oauth2其实很多人都不陌生,很多大的开放平台的API接口的认证都是使用的oauth2实现的,本文主要是结合spring cloud来简单的说下,如果有什么不对的地方大家可以指出来。
先说下我这里使用的spring boot和spring cloud的版本
	<!-- spring boot配置 -->
	<parent>
		<groupId>org.springframework.boot</groupId>
		<artifactId>spring-boot-starter-parent</artifactId>
		<version>2.0.5.RELEASE</version>
		<relativePath/> <!-- lookup parent from repository -->
	</parent>
	<!-- spring cloud 配置 -->
	<dependencyManagement>
		<dependencies>
			<dependency>
				<groupId>org.springframework.cloud</groupId>
				<artifactId>spring-cloud-dependencies</artifactId>
				<version>${spring-cloud.version}</version>
				<type>pom</type>
				<scope>import</scope>
			</dependency>
		</dependencies>
	</dependencyManagement>
不同的版本之间可能存在一定的差异性,所以请大家根据自己使用的版本进行调整。好了,废话就不多说了,直接进入正题。
第一步:POM文件修改
	<dependency>
		<groupId>org.springframework.cloud</groupId>
		<artifactId>spring-cloud-starter-oauth2</artifactId>
	</dependency>
	<dependency>
		<groupId>org.springframework.cloud</groupId>
		<artifactId>spring-cloud-starter-security</artifactId>
	</dependency>
第二步:创建启动类,这里是作为认证服务器,所以追加注解@EnableAuthorizationServer
@SpringBootApplication
@EnableEurekaClient
@EnableAuthorizationServer
public class OAuthApplication {

	public static void main(String[] args) throws Exception {
		SpringApplication.run(OAuthApplication.class, args);
	}

}
第三步:自定义AuthorizationServerConfig继承AuthorizationServerConfigurerAdapter修改里面的实现
/**
 * 认证服务器配置
 *
 * @author 大仙
 *
 */
@Configuration
public class AuthorizationServerConfig extends AuthorizationServerConfigurerAdapter {

	@Autowired
	private BCryptPasswordEncoder bCryptPasswordEncoder;

	@Override
	public void configure(AuthorizationServerSecurityConfigurer security) throws Exception {
		//允许表单验证
		security.allowFormAuthenticationForClients();
		// 开启/oauth/token_key验证端口无权限访问
		security.tokenKeyAccess("permitAll()");
		// 开启/oauth/check_token验证端口认证权限访问
		security.checkTokenAccess("isAuthenticated()");

	}

	@Override
	public void configure(ClientDetailsServiceConfigurer clients) throws Exception {
		clients.inMemory() // 使用in-memory存储
				.withClient("client") // client_id
				.secret(bCryptPasswordEncoder.encode("secret")) // client_secret
				.authorizedGrantTypes("authorization_code") // 该client允许的授权类型
				.scopes("app"); // 允许的授权范围
	}
}
这里注意下几个细节:
第一个对sercet要进行加密:.secret(bCryptPasswordEncoder.encode("secret")) // client_secret
第二个:如果没有下面的配置是可以正常获取code的,但是在请求access_token的时候会出现401的错误。
//允许表单验证
security.allowFormAuthenticationForClients();
// 开启/oauth/token_key验证端口无权限访问
security.tokenKeyAccess("permitAll()");
// 开启/oauth/check_token验证端口认证权限访问
security.checkTokenAccess("isAuthenticated()");
第四步:spring security配置文件配置,如果不配置改类,在请求的code的时候会报错。
/**
 *
 * @author 大仙
 *
 */
@Configuration
@Order(1)
public class SecurityConfig extends WebSecurityConfigurerAdapter {

    @Override
    protected void configure(HttpSecurity http) throws Exception { // @formatter:off
        http.requestMatchers()
            .antMatchers("/login", "/oauth/**")
            .and()
            .authorizeRequests()
            .anyRequest()
            .authenticated()
            .and()
            .formLogin()
            .permitAll()
            .and().csrf().disable();
    } // @formatter:on

    @Override
    protected void configure(AuthenticationManagerBuilder auth) throws Exception { // @formatter:off
        auth.inMemoryAuthentication()
            .withUser("daxian")
            .password(passwordEncoder().encode("123"))
            .roles("USER");
    } // @formatter:on

    @Bean
    public BCryptPasswordEncoder passwordEncoder(){
        return new BCryptPasswordEncoder();
    }
}
这里的账号密码是放内存中的,注意密码是需要加密的。
好了基本的配置完成,一次启动 eureka,config,oauth
下面是获取认证操作。
第一步:请求code
http://localhost:9004/oauth/authorize?response_type=code&client_id=client&redirect_uri=http://baidu.com请求参数说明:
response_type:code代表获取code值
client_id:客户端的ID,必选项
redirect_uri:重定向URI,必选项
scope:申请的权限范围,可选项
state:任意值,认证服务器会原样返回,用于抵制CSRF(跨站请求伪造)攻击。
如果没有登录,会调到登录页面
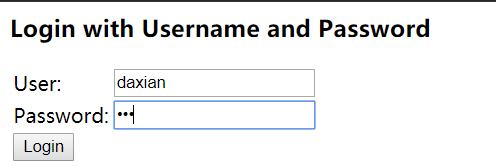
账号密码就是刚刚存内存里面的,daxian 123
登录成功之后跳转授权页面,选择授权之后会重定向到baidu

到此code获取完毕。
第二步:根据code获取access_token

请求参数说明:
client_id:客户端的ID,必选项。
client_secret:客户端的密钥,必选项。
grant_type:表示使用的授权模式,必选项。
redirect_uri:当前版本必选项
code: 当前获取的code值
好了,简单的授权模式就完成了,下一篇会讲到怎么使用数据库,redis来实现用户和token存储。
