netty概述
netty是基于java NIO封装的一款网络编程框架,可以帮助我们便捷,快速的开发网络应用程序,例如有名的dubbo框架就是基于netty实现的RPC远程服务调用。netty封装了NIO大部分的底层操作,所以需要我们对NIO有一定的了解才能更好的掌握netty框架。
java NIO采用的是同步非阻塞技术,与传统的BIO(同步阻塞)相比,能够处理更多的请求并且更好的利用CPU的资源(一个线程可以处理多个请求,而BIO一个线程只能处理一个)。同步阻塞:你去剪头发,一直站在边上等着理发师把之前的顾客头发剪完并且不做任何事情,同步非阻塞:你去剪头发,先做着自己的事情时不时回来看一下是否轮到自己。
到jdk1.7的时候,AIO技术出现,也称NIO2,它是异步非阻塞的:打电话告诉理发师自己要剪头发,然后在家里做自己的事情,理发师忙完上门剪头发。听起来这十分美好,但是令人遗憾的是它并没有得到广泛的应用,原因是读写操作交给了操作系统处理,处理速度很大程度上会依赖操作系统的稳定以及内核的优劣,所以NIO依然是主流。而netty正是根据NIO实现的一款优秀的网络编程框架。
有人会问,既然有了NIO,为什么还需要netty?这就好比既然有了Servlet,为什么还需要SpringMVC,既然有了SpringMVC,为什么还需要Springboot一样。原生NIO的操作是较为复杂的,各种机制令人头疼,让我们无法完全专注与业务需求,netty正是为了解决这个问题而产生的,下面让我们看一下netty的整体架构模型。
netty架构模型
netty的架构模型基于主从Reactor多线程模型做了进一步的改造和优化,演变为了如下图的整体架构模式:
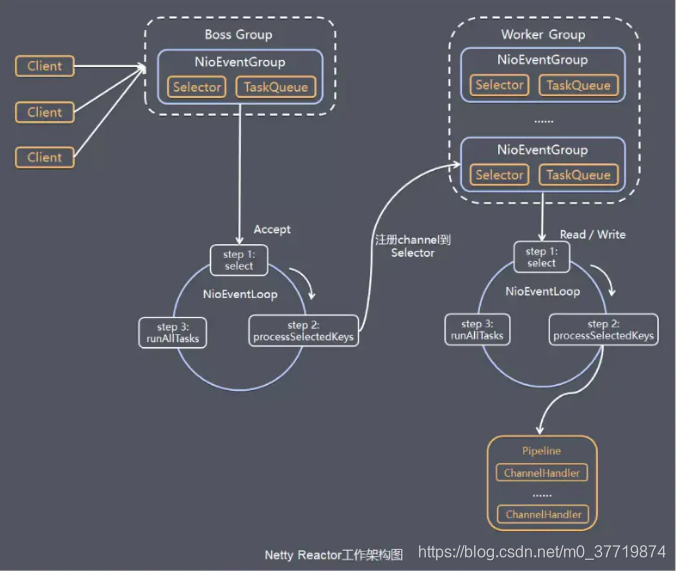
如上图,当客户端发过来请求之后,BossGroup主要负责Accept连接,WorkerGroup负责分发任务给不同的handler,每个handler处理具体的业务逻辑,有一点需要注意,netty中几乎所有的操作都是异步的,所以对于想要获取其具体状态的操作可以通过addListener来自定义监听器实现对方法的监听。NioEventLoop类似NIO中的selector,会一直处于循环之中。
手撸一个http服务器
通过语言的介绍总是晦涩难懂的,下面我们基于netty做一个简易的http服务器,让我们可以进一步理解其工作流程。
pom.xml引入netty
<?xml version="1.0" encoding="UTF-8"?>
<project xmlns="http://maven.apache.org/POM/4.0.0"
         xmlns:xsi="http://www.w3.org/2001/XMLSchema-instance"
         xsi:schemaLocation="http://maven.apache.org/POM/4.0.0 http://maven.apache.org/xsd/maven-4.0.0.xsd">
    <modelVersion>4.0.0</modelVersion>

    <groupId>netty</groupId>
    <artifactId>nettyDemo</artifactId>
    <version>1.0-SNAPSHOT</version>


    <dependencies>
        <!-- https://mvnrepository.com/artifact/io.netty/netty-all -->
        <dependency>
            <groupId>io.netty</groupId>
            <artifactId>netty-all</artifactId>
            <version>4.1.20.Final</version>
        </dependency>
    </dependencies>

    <build>
        <plugins>
            <plugin>
                <groupId>org.apache.maven.plugins</groupId>
                <artifactId>maven-compiler-plugin</artifactId>
                <configuration>
                    <source>1.8</source>
                    <target>1.8</target>
                    <encoding>utf-8</encoding>
                </configuration>
            </plugin>
        </plugins>
    </build>
</project>
编写netty服务端
package nettyhttp;

import io.netty.bootstrap.ServerBootstrap;
import io.netty.channel.ChannelFuture;
import io.netty.channel.EventLoopGroup;
import io.netty.channel.nio.NioEventLoopGroup;
import io.netty.channel.socket.nio.NioServerSocketChannel;

public class TestServer {

    public static void main(String[] args) throws Exception {
        //创建BossGroup和workerGroup
        //bossGroup处理连接请求
        //workerGroup处理客户端的业务
        EventLoopGroup bossGroup = new NioEventLoopGroup();
        EventLoopGroup workerGroup = new NioEventLoopGroup();


        try {

            //启动类
            ServerBootstrap serverBootstrap = new ServerBootstrap();
            //进行服务端参数设置
            serverBootstrap.group(bossGroup, workerGroup)//设置工作组
                    .channel(NioServerSocketChannel.class)//设置通道
                    .childHandler(new TestServerInitializer());//设置处理器

            System.out.println("server is ready");

            ChannelFuture channelFuture = serverBootstrap.bind(9090).sync();//绑定端口
            channelFuture.channel().closeFuture().sync();//异步监听

        } finally {
        	//出错优雅关闭连接
            bossGroup.shutdownGracefully();
            workerGroup.shutdownGracefully();
        }
    }

}
package nettyhttp;

import io.netty.channel.ChannelInitializer;
import io.netty.channel.ChannelPipeline;
import io.netty.channel.socket.SocketChannel;
import io.netty.handler.codec.http.HttpServerCodec;


public class TestServerInitializer extends ChannelInitializer<SocketChannel>{
	/**
	* 初始化管道
	*/
    @Override
    protected void initChannel(SocketChannel ch) throws Exception {
        //得到管道
        ChannelPipeline pipeline = ch.pipeline();
        //netty提供的httpServerCodec http 编码解码器
        pipeline.addLast("myHttpServerCodec",new HttpServerCodec());
        //添加自定义处理器
        pipeline.addLast("myHttpServerHandler",new TestHttpServerHandler());
    }

}
package nettyhttp;


import io.netty.buffer.ByteBuf;
import io.netty.buffer.Unpooled;
import io.netty.channel.ChannelHandlerContext;
import io.netty.channel.SimpleChannelInboundHandler;
import io.netty.handler.codec.http.DefaultFullHttpResponse;
import io.netty.handler.codec.http.HttpHeaderNames;
import io.netty.handler.codec.http.HttpObject;
import io.netty.handler.codec.http.HttpRequest;
import io.netty.handler.codec.http.HttpResponseStatus;
import io.netty.handler.codec.http.HttpVersion;
import io.netty.util.CharsetUtil;

import java.net.URI;

public class TestHttpServerHandler extends SimpleChannelInboundHandler<HttpObject> {

    /**
     * 读取客户端数据
     *
     * @param ctx 上下文
     * @param msg 信息
     * @throws Exception 异常
     */
    @Override
    protected void channelRead0(ChannelHandlerContext ctx, HttpObject msg) throws Exception {

        if (msg instanceof HttpRequest) {
            System.out.println("客户端地址: " + ctx.channel().remoteAddress());

            HttpRequest httpRequest = (HttpRequest) msg;

            URI uri = new URI(httpRequest.uri());
            if ("/favicon.ico".equals(uri.getPath())) {
                System.out.println("favicon.ico");
                return;
            }

            //回复信息给浏览器
            ByteBuf content = Unpooled.copiedBuffer("hello,我是服务器", CharsetUtil.UTF_8);
            //构造http响应
            DefaultFullHttpResponse response = new DefaultFullHttpResponse(HttpVersion.HTTP_1_1, HttpResponseStatus.OK, content);

            response.headers().set(HttpHeaderNames.CONTENT_TYPE, "text/plain;charset=UTF-8");
            response.headers().set(HttpHeaderNames.CONTENT_LENGTH, content.readableBytes());

            ctx.writeAndFlush(response);
        }

    }

    @Override
    public void exceptionCaught(ChannelHandlerContext ctx, Throwable cause) throws Exception {
        ctx.close();
    }
}
代码在关键的地方都进行了注释,可以对着模型图简单理解一下,关于netty的Channel,ChannelPipeline以及handler需要好好理解一下,一个Channel对应一个ChannelPipeline,而一个ChannelPipeline中可以包含多个handler来处理不同的业务请求,每个handler是采用双向链表的结构连接起来的,如下:

运行测试
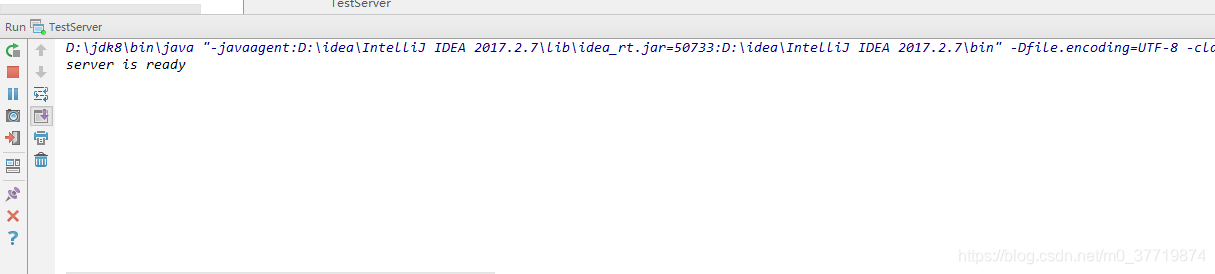
启动服务器,如下,打印出“server is ready”:
使用浏览器访问http://localhost:9090,如下:

查看控制台:

这里服务端之所以打印出了两次客户端地址是因为浏览器访问了两次,f12看一下浏览器的network:

可以看到,浏览器发送了两次请求,默认浏览器客户端的实现会去请求服务端的图标文件,所以控制台才会打印两次,比对着代码可以看的更加清晰!到这里一个简易的http服务器便搭建完成了。
小结
本博客阐述了netty的一些基本理论知识并且通过一个极其简易的demo展示了netty的用法,也许你看完有种云里雾里的感觉,这其实很正常,因为学好netty不是一天两天的事情,他需要许多的网络编程方面的理论支撑,但是一旦迈过去这道坎,那么你便可以利用netty去开发属于自己的通信协议,根据实际的业务需求定制更加适合项目的网络应用程序,让项目更加健壮,具备更高的性能。学海无涯,在此与君共勉!
