1.Keepalived高可用服务器
proxy:192.168.4.5(客户端主机)
web1:192.168.4.100(Web服务器,部署Keepalived高可用软件)
web2:192.168.4.200(Web服务器,部署Keepalived高可用软件)
Web服务器的浮动VIP地址为192.168.4.80
客户端通过访问VIP地址访问Web页面
1.1 部署两台web服务器页面:
web1 ~]# echo "web1" > /var/www/html/index.html
web2 ~]# echo "web2" > /var/www/html/index.html
web1 ~]# systemctl start httpd
web2 ~]# systemctl start httpd
1.2 web1-2安装Keepalived软件
web1 ~]# yum install -y keepalived
web2 ~]# yum install -y keepalived
1.3 部署Keepalived服务(web1-2)
1.3.1 web1:主服务器
***********************
配置介绍:
]# vim /etc/keepalived/keepalived.conf
global_defs {
notification_email {
[email protected] # 设置报警收件人邮箱
}
notification_email_from ka@localhost # 设置发件人
smtp_server 127.0.0.1 # 定义邮件服务器
smtp_connect_timeout 30
router_id web1 # 设置路由ID号(修改后)
}
vrrp_instance VI_1 {
state MASTER # 主服务器为MASTER(备服务器需要修改为BACKUP)
interface eth0 # 定义网络接口
virtual_router_id 50 # 主备服务器VRID号必须一致
priority 100 # 服务器优先级,优先级高优先获取VIP(已修改)
advert_int 1
authentication {
auth_type pass
auth_pass 1111 # 主备服务器密码必须一致
}
virtual_ipaddress { 192.168.4.80 } # 谁是主服务器谁获得该VIP(已修改)
}
***************************
配置web1:
]# vim /etc/keepalived/keepalived.conf
! Configuration File for keepalived
global_defs {
notification_email { #不需要修改
[email protected]
[email protected]
[email protected]
}
#出问题发邮件提示,暂时不要
notification_email_from [email protected]
smtp_server 192.168.200.1
smtp_connect_timeout 30
router_id web1(已改)
vrrp_skip_check_adv_addr
vrrp_strict
vrrp_garp_interval 0
vrrp_gna_interval 0
}
vrrp_instance VI_1 {
state MASTER(主服务器)
interface eth0
virtual_router_id 51(修改后)
priority 100(优先级比BACKUP高)
advert_int 1
authentication { (不要修改,但是要一致)
auth_type PASS
auth_pass 1111
}
virtual_ipaddress {
192.168.4.80 (浮动IP)
}
}
##999dd 以下暂时不要
1.3.2 web2:备用服务器
]# vim /etc/keepalived/keepalived.conf
! Configuration File for keepalived
global_defs {
notification_email { #不需要修改
[email protected]
[email protected]
[email protected]
}
#出问题发邮件提示,暂时不要
notification_email_from [email protected]
smtp_server 192.168.200.1
smtp_connect_timeout 30
router_id web2(要改)
vrrp_skip_check_adv_addr
vrrp_strict
vrrp_garp_interval 0
vrrp_gna_interval 0
}
vrrp_instance VI_1 {
state BACKUP(此处为备用服务器)
interface eth0
virtual_router_id 51(修改后)
priority 80(优先级比master低)
advert_int 1
authentication { (不要修改,但是要一致)
auth_type PASS
auth_pass 1111
}
virtual_ipaddress {
192.168.4.80 (浮动IP)
}
}
##999dd 以下暂时不要
1.3.3 web1-2启动服务(都要操作)
]# systemctl start keepalived
启动keepalived会自动添加一个drop的防火墙规则,需要清空!
]# iptables -F
1.3.4 测试(web1-2)
查看浮动IP(192.168.4.80)
]# ip a s eth0
inet 192.168.4.100/24 brd 192.168.4.255 scope global eth0
valid_lft forever preferred_lft forever
inet 192.168.4.80/32 scope global eth0
valid_lft forever preferred_lft forever
proxy 测试:
]# curl http://192.168.4.80
web1
...
关闭web1的网卡,查看备份服务情况
web1]# ifconfig eth0 down
查看浮动IP(192.168.4.80)
web2]# ip a s eth0
link/ether 52:54:00:66:da:80 brd ff:ff:ff:ff:ff:ff
inet 192.168.4.200/24 brd 192.168.4.255 scope global eth0
valid_lft forever preferred_lft forever
inet 192.168.4.80/32 scope global eth0
proxy 测试:
]# curl http://192.168.4.80
web2
...
恢复web1网卡,会恢复到web1.
2.Keepalived+LVS服务器
使用Keepalived为LVS调度器提供高可用功能,防止调度器单点故障,为用户提供Web服务:
LVS1调度器真实IP地址为192.168.4.5
LVS2调度器真实IP地址为192.168.4.6
服务器VIP地址设置为192.168.4.15
真实Web服务器地址分别为192.168.4.100、192.168.4.200
使用加权轮询调度算法,真实web服务器权重不同
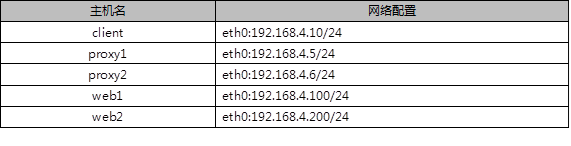
方案:使用5台虚拟机,1台作为客户端主机、2台作为LVS调度器、2台作为Real Server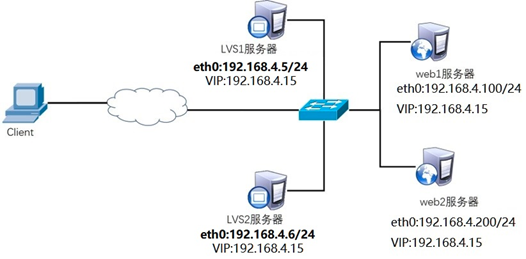
2.1 web1-2配置VIP地址
2.1.1 web1配置VIP地址
]# cd /etc/sysconfig/network-scripts/
]# cp ifcfg-lo{,:0}
]# vim ifcfg-lo:0
DEVICE=lo:0
IPADDR=192.168.4.15
NETMASK=255.255.255.255
NETWORK=192.168.4.15
BROADCAST=192.168.4.15
ONBOOT=yes
NAME=lo:0
#手动写入如下4行内容
]# vim /etc/sysctl.conf
net.ipv4.conf.all.arp_ignore = 1
net.ipv4.conf.lo.arp_ignore = 1
net.ipv4.conf.lo.arp_announce = 2
net.ipv4.conf.all.arp_announce = 2
#当有arp广播问谁是192.168.4.15时,本机忽略该ARP广播,不做任何回应
#本机不要向外宣告自己的lo回环地址是192.168.4.15
]# systemctl restart network
2.1.2 web2配置VIP地址
]# cd /etc/sysconfig/network-scripts/
]# cp ifcfg-lo{,:0}
]# vim ifcfg-lo:0
DEVICE=lo:0
IPADDR=192.168.4.15
NETMASK=255.255.255.255
NETWORK=192.168.4.15
BROADCAST=192.168.4.15
ONBOOT=yes
NAME=lo:0
#手动写入如下4行内容
]# vim /etc/sysctl.conf
net.ipv4.conf.all.arp_ignore = 1
net.ipv4.conf.lo.arp_ignore = 1
net.ipv4.conf.lo.arp_announce = 2
net.ipv4.conf.all.arp_announce = 2
#当有arp广播问谁是192.168.4.15时,本机忽略该ARP广播,不做任何回应
#本机不要向外宣告自己的lo回环地址是192.168.4.15
]# systemctl restart network
2.2 配置后端Web服务器页面
web1 ~]# echo "web1" > /var/www/html/index.html
web2 ~]# echo "web2" > /var/www/html/index.html
web1 ~]# systemctl restart httpd
web2 ~]# systemctl restart httpd
2.3 调度器安装Keepalived与ipvsadm软件(两台LVS调度器执行相同的操作)
proxy1,proxy2
]# yum install -y keepalived
]# systemctl enable keepalived
]# yum install -y ipvsadm
]# ipvsadm -C
2.4 部署Keepalived实现LVS-DR模式调度器的高可用
2.4.1 LVS1调度器设置Keepalived,并启动服务(web1)
]# vim /etc/keepalived/keepalived.conf
global_defs {
notification_email {
[email protected]
}
notification_email_from ka@localhost
smtp_server 127.0.0.1
smtp_connect_timeout 30
router_id lvs1 //设置路由ID号
}
vrrp_instance VI_1 {
state MASTER //主服务器为MASTER
interface eth0
virtual_router_id 51 //主辅VRID号必须一致
priority 100 //服务器优先级
advert_int 1
authentication {
auth_type pass
auth_pass 1111 //主辅服务器密码必须一致
}
virtual_ipaddress { 192.168.4.15 } //配置VIP
}
virtual_server 192.168.4.15 80 { //设置ipvsadm的VIP规则
delay_loop 6
lb_algo wrr //设置LVS调度算法为WRR
lb_kind DR //设置LVS的模式为DR
#persistence_timeout 50
#注意这样的作用是保持连接,开启后,客户端在一定时间内始终访问相同服务器
protocol TCP
real_server 192.168.4.100 80 { //设置后端web服务器真实IP
weight 1 //设置权重为1
TCP_CHECK { //对后台real_server做健康检查
connect_timeout 3
nb_get_retry 3
delay_before_retry 3
}
}
real_server 192.168.4.200 80 { //设置后端web服务器真实IP(实验需要修改)
weight 2 //设置权重为2
TCP_CHECK {
connect_timeout 3
nb_get_retry 3
delay_before_retry 3
}
}
}
]# systemctl start keepalived
]# ipvsadm -Ln #查看LVS规则
IP Virtual Server version 1.2.1 (size=4096)
Prot LocalAddress:Port Scheduler Flags
-> RemoteAddress:Port Forward Weight ActiveConn InActConn
TCP 192.168.4.15:80 wrr
-> 192.168.4.100:80 Route 1 0 0
-> 192.168.4.200:80 Route 2 0 0
]# ip a s eth0 #查看VIP配置(浮动IP在proxy)
inet 192.168.4.5/24 brd 192.168.4.255 scope global eth0
valid_lft forever preferred_lft forever
inet 192.168.4.15/32 scope global eth0
valid_lft forever preferred_lft forever
2.4.2 LVS2调度器设置Keepalived,并启动服务(web2)
]# vim /etc/keepalived/keepalived.conf
global_defs {
notification_email {
[email protected]
}
notification_email_from ka@localhost
smtp_server 127.0.0.1
smtp_connect_timeout 30
router_id lvs2 //设置路由ID号
}
vrrp_instance VI_1 {
state BACKUP //从服务器为BACKUP
interface eth0
virtual_router_id 51 //主辅VRID号必须一致
priority 50 //服务器优先级
advert_int 1
authentication {
auth_type pass
auth_pass 1111 //主辅服务器密码必须一致
}
virtual_ipaddress { 192.168.4.15 } //配置VIP
}
virtual_server 192.168.4.15 80 { //设置ipvsadm的VIP规则
delay_loop 6
lb_algo wrr //设置LVS调度算法为WRR
lb_kind DR //设置LVS的模式为DR
#persistence_timeout 50
#注意这样的作用是保持连接,开启后,客户端在一定时间内始终访问相同服务器
protocol TCP
real_server 192.168.4.100 80 { //设置后端web服务器真实IP
weight 1 //设置权重为1
TCP_CHECK { //对后台real_server做健康检查
connect_timeout 3
nb_get_retry 3
delay_before_retry 3
}
}
real_server 192.168.4.200 80 { //设置后端web服务器真实IP(实验需要修改)
weight 2 //设置权重为2
TCP_CHECK {
connect_timeout 3
nb_get_retry 3
delay_before_retry 3
}
}
}
]# systemctl start keepalived
]# ipvsadm -Ln #查看LVS规则
IP Virtual Server version 1.2.1 (size=4096)
Prot LocalAddress:Port Scheduler Flags
-> RemoteAddress:Port Forward Weight ActiveConn InActConn
TCP 192.168.4.15:80 wrr
-> 192.168.4.100:80 Route 1 0 0
-> 192.168.4.200:80 Route 2 0 0
]# ip a s eth0 #查看VIP配置(浮动IP在proxy)
2.4.3 客户端测试(client)
]# curl http://192.168.4.15
web1
]# curl http://192.168.4.15
web2
]# curl http://192.168.4.15
web2
]# curl http://192.168.4.15
web1
]# curl http://192.168.4.15
web2
]# curl http://192.168.4.15
web2
21_Keepalived热备 Keepalived+LVS 、 HAProxy服务器
猜你喜欢
转载自www.cnblogs.com/luwei0915/p/12194798.html
今日推荐
周排行