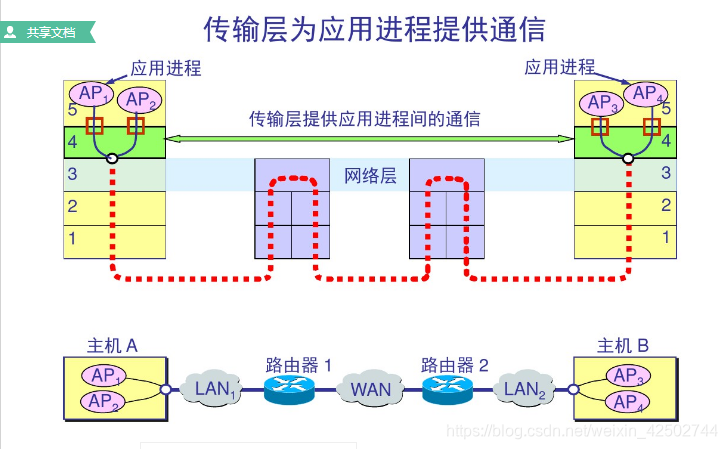
运维系统安全管理-ssh-iptables-firewall
安全
安全的范畴:
网络安全:机房 网络 硬件
	硬件防火墙
	网络:
		机房网络 流量清洗
		机柜网络 防火墙 交换机 服务器
			防火墙:配置公网地址池 做端口映射
			交换机:VLAN 仔细检查,别出广播风暴
			服务器:双网卡bonding
系统安全:centos6 7 minimal (gcc gcc-c++)
服务安全
	直接被公网客户端访问的:ftp web(apache nginx tomcat) squid
		隐藏软件信息和版本信息
		配置文件里面,安全方面的配置,有
	ssh
ssh:
无密码连接
指纹信息:如果不匹配,无法连接
172.16.0.21 被修改ssh配置的主机
172.16.0.22 操作端
1. 禁止root直连,修改默认端口
修改对应选项即可.sshd_config 是服务端的配置文件
[root@node1 /etc/ssh]# vim sshd_config
Port 24678
PermitRootLogin no

[root@node1 /etc/ssh]# systemctl restart sshd

[root@node1 ~]# useradd user1
[root@node1 ~]# passwd user1

ssh 远程连接
(1)xshell -> centos
[c:\~]$ ssh [email protected] 24678

[user1@node1 ~]$ su -
Password:

(2)centos -> centos
[root@node2 ~]# ssh -p 24678 [email protected]

[user1@node1 ~]$ su -
Password:

scp 远程拷贝
[root@node2 ~]# scp -P 24678 /etc/passwd [email protected]:/tmp/

[root@node2 ~]# scp -P 24678 [email protected]:/etc/group /tmp
2. 普通用户的管理
(1)所有的运维人员使用同一个普通用户连接
(2)每个运维人员有自己的普通用户连接
其他人每个人一个普通用户。
ldap?
密码生成器:
root 复杂密码
普通用户
服务 复杂密码
使用熵池生成密码:
使用熵池生成密码:(head -c 30 输出30个字符   xargs 输出后换行)
[root@node1 ~]# tr -dc a-zA-Z0-9_# < /dev/urandom | head -c 30 | xargs

[root@node1 ~]# vim pass.sh
#!/bin/bash
# 使用熵池生成密码
# 默认长度20位
I=$1
if [ $# -ne 1 -o "$1" == "" ]
    then
    I=20
fi
tr -dc a-zA-Z0-9_# < /dev/urandom | head -c $I | xargs
添加5个用户,设置上复杂密码:
添加5个用户,设置上复杂密码:
#!/bin/bash
# 创建用户,使用熵池乱数设置密码

echo -e "username\tpassword" > /root/userfile
for i in `seq 1 5`
do
    id u$i &> /dev/null
    if [ $? -ne 0 ]
        then
        useradd u$i
        pass=$(tr -dc a-zA-Z0-9_# < /dev/urandom | head -c 6 | xargs)
        echo $pass | passwd --stdin u$i
        echo -e "u${i}\t${pass}" >> /root/userfile
    fi
done
3. 配置空闲超时注销时间
[root@node1 /etc/ssh]# vim sshd_config
ClientAliveInterval 10
	##10秒钟无操作,退出登录
ClientAliveCountMax 0
	##连接数上限,无

[root@node1 /etc/ssh]# systemctl restart sshd
4. 约束可以访问的用户
[root@node1 /etc/ssh]# vim sshd_config
Allowusers user1
如果需要添加多个用于允许访问,就用空格分隔,如user1 user2

[root@node1 /etc/ssh]# systemctl restart sshd

结果:只有user1可以连接
5. 登录提示
设置登录提示
[root@node1 ~]# vim /etc/motd
这是运维xxx管理的.
非允许请退出.
6. 公钥指纹
应用场景:鉴别服务器的真实性。
确认身份:被连接端是不是真实的。
部署服务器:
场景1:服务器邮寄到公司
配置:完成
装箱,发送到机房
适用于少量服务器,直连公网
场景2:服务器直接邮寄到机房
公钥指纹应用在场景1。 如何确定你连的服务器是你自己的。
[root@node1 /etc/ssh]# rm -f ssh_host_*
[root@node1 /etc/ssh]# systemctl restart sshd
抽取指纹信息:
(1)ecdsa        ---> centos   连接 centos
[root@node1 /etc/ssh]# ssh-keygen -l -f ssh_host_ecdsa_key
256 SHA256:jOEXinqolv98uWCOmX36+5aUx/c3fvwUcTpTxMTEEvI ssh_host_ecdsa_key.pub (ECDSA)
[root@node1 /etc/ssh]# ssh-keygen -l -E md5 -f ssh_host_ecdsa_key
256 MD5:e0:99:39:73:83:c0:47:e6:4c:7f:73:d3:ce:96:8f:e2 ssh_host_ecdsa_key.pub (ECDSA)

(2)ed25519
[root@node1 /etc/ssh]# ssh-keygen -l -f ssh_host_ed25519_key
256 SHA256:ZAjGP6ZLLCGFt7T6441wck6OK1kIX9qhjsu3HCY0HA0 ssh_host_ed25519_key.pub (ED25519)
[root@node1 /etc/ssh]# ssh-keygen -l -E md5 -f ssh_host_ed25519_key
256 MD5:b8:09:6d:c9:32:6b:d2:6b:04:3d:61:2f:a4:8d:0d:3b ssh_host_ed25519_key.pub (ED25519)

(3)rsa		---> xshell 连接 centos
[root@node1 /etc/ssh]# ssh-keygen -l -f ssh_host_rsa_key
2048 SHA256:TywqvmVFbrETMsr0WESc2Jmvr6zUCB7Aa3f9FvNg3eA ssh_host_rsa_key.pub (RSA)
[root@node1 /etc/ssh]# ssh-keygen -l -E md5 -f ssh_host_rsa_key
2048 MD5:b9:91:a0:6d:bf:8e:97:fc:5c:7f:f3:c7:dc:40:08:84 ssh_host_rsa_key.pub (RSA)

将公钥指纹保存到文档。

[root@node2 ~]# ssh -p 24678 [email protected]
The authenticity of host '[172.16.0.21]:24678 ([172.16.0.21]:24678)' can't be established.
ECDSA key fingerprint is SHA256:jOEXinqolv98uWCOmX36+5aUx/c3fvwUcTpTxMTEEvI.
ECDSA key fingerprint is MD5:e0:99:39:73:83:c0:47:e6:4c:7f:73:d3:ce:96:8f:e2.
Are you sure you want to continue connecting (yes/no)?
7. ssh+while
shell脚本:
[root@node1 ~]# vim file
172.16.14.12  123456
172.16.0.22  123

[root@node1 ~]# vim while_ssh.sh
#!/bin/bash

while read line
do
    ip=$(echo $line | awk '{print $1}')
    pass=$(echo $line | awk '{print $2}')

    sshpass -p $pass scp -o StrictHostKeyChecking=no /etc/passwd root@${ip}:/tmp
    sshpass -p $pass ssh -o StrictHostKeyChecking=no root@${ip} touch /tmp/f1 < /dev/null
	### 添加/dev/null 否则循环到第二遍不执行touch这条命令了.
done < /root/file
总结:
生产环境中,ssh开放端口不要使用默认的22,可以修改成任意5位其它端口。设置用户登录限制,多个用户可以使用空格分隔。
作业:ssh连接对端,反应慢,怎么办?
防火墙
软件防火墙规则:
iptables + firewall
功能: 拦截非法访问的请求。
问题:
如何判断一个客户端的请求是非法的?
通过日志分析,筛选出访问量比较多的IP地址,然后再确认。
访问次数特别多。
场景1:网站的前台
黑名单
拒绝某些IP访问。
场景2:网站的后台
白名单
只允许 公司的IP 访问
场景3:直连在公网的服务器
具体情况具体分析。
配置工具:
centos6 iptables
centos7 firewall iptables
查看man手册了解iptables的用法:
[root@node2 ~]# man iptables
IPTABLES(8) 管理类的命令,只有root能执行
功能:
iptables/ip6tables — administration tool for IPv4/IPv6 packet filtering and NAT
filter 过滤
NAT 网络地址转换
动作:
ACCEPT 允许
DROP 丢弃
表:
filter 过滤
nat 网络地址转换
mangle 数据包打标记
raw 数据包跟踪
security安全
规则方式:
表
链
规则
[root@node2 ~]# iptables -L -t filter
查看filter表上的规则信息
[root@node2 ~]# iptables -L -t nat
查看nat表上的规则信息
规则的匹配顺序:
从上到下 !!!
编写规则的注意事项:
(1)规则的数量不要写太多;
(2)将匹配访问大的规则置于最下面;
工作原理:
工作空间之用户空间–iptables firewall
工作空间之内核空间–netfilter
运维工程师在用户空间使用命令,编写规则,规则编写好以后,直接作用在内核空间,立即生效。
iptables的语法结构:
iptables [-t 表名] 选项 链 规则信息 -j 动作
-t 表名
filter表,不用写
选项:
-A 增加规则
-F 清空规则
-X 删除多余的链
-L 查看
-n 跳过域名、端口解析
–line-number 显示规则编号
-I 插入规则
-D 删除1条规则
-R 修改规则
-P 修改默认规则
…
链:
(1)filter
INPUT 入栈:数据包的目的地是本机
目的地址
目的端口
源地址:是特定地址–白名单;日志分析后–黑名单
OUTPUT	出栈:数据包由本机发出
	源地址
	源端口
	目的地址:同上
基本都是在INPUT上,进行数据包拦截。
FORWARD 数据包转发
规则信息:
-p 协议
tcp
–dport 目的端口
–sport 源端口
web:80 8080
squid:3128
ftp:20 21 >1024
ssh:22
-s 源地址
-d 目的地址-i 从哪个网卡进入
-o 从哪个网卡出去
-j ACCEPT 允许访问 DROP 拒绝访问
例子:
- 允许172.16.0.20连接,其他的都拒绝
[root@node2 ~]# iptables -A INPUT -s 172.16.0.20 -p tcp --dport 22 -j ACCEPT
[root@node2 ~]# iptables -t filter -A INPUT -p tcp --dport 22 -j DROP
- apache
允许172.16.0.0/16网段访问web,其他的拒绝?
[root@node2 ~]# iptables -F
[root@node2 ~]# iptables -A INPUT -s 172.16.0.0/16 -p tcp --dport 80 -j ACCEPT
[root@node2 ~]# iptables -A INPUT -p tcp --dport 80 -j DROP
前台web-server的防火墙脚本:
[root@node2 ~]# vim www-iptables.sh
#!/bin/bash
# xxx网站前台web的防火墙脚本

ip1="x.x.x.x"
ip2="x.x.x.x"

sip="x.x.x.x"   #公司的公网地址

iptables -F		# 清除规则
iptables -X		# 删除链
iptables -A INPUT -m state --state ESTABLISHED,RELATED -j ACCEPT

#允许公司地址ssh连接
iptables -A INPUT -s $sip -p tcp --dport 22 -j ACCEPT
iptables -A INPUT -p tcp --dport 22 -j DROP
iptables -A INPUT -i lo -j ACCEPT
iptables -A OUTPUT -o lo -j ACCEPT

#拦截非法IP
iptables -A INPUT -s $ip1 -p tcp --dport 80 -j DROP
iptables -A INPUT -s $ip2 -p tcp --dport 80 -j DROP
#保存规则
service iptables save
后台web-server的防火墙脚本:
[root@node2 ~]# vim manager-iptables.sh
#!/bin/bash
# xxx网站后台web的防火墙规则


sip="x.x.x.x"   #公司的公网地址
port=8000

iptables -F
iptables -X

iptables -A INPUT -m state --state ESTABLISHED,RELATED -j ACCEPT
#允许连接ssh
iptables -A INPUT -s $sip -p tcp --dport 22 -j ACCEPT

#允许连接web
iptables -A INPUT -s $sip -p tcp --dport $port -j ACCEPT
iptables -A INPUT -i lo -j ACCEPT
iptables -A OUTPUT -o lo -j ACCEPT

#拒绝所有连接
iptables -A INPUT -j DROP
#保存规则
service iptables save
域名 <-映射-> 公网地址:80
公网地址,从机房买的
为了节省公网地址,后台访问不用80。
规则的保存:
[root@node2 ~]# yum install -y iptables-services

[root@node2 ~]# systemctl stop firewalld
[root@node2 ~]# systemctl disable firewalld
[root@node2 ~]# systemctl start iptables
[root@node2 ~]# systemctl enable iptables

[root@node2 ~]# iptables -F
[root@node2 ~]# service iptables save
iptables: Saving firewall rules to /etc/sysconfig/iptables:[  OK  ]
防火墙模块
在编写规则的过程中,让规则更人性化。
[root@node2 /usr/lib/modules/3.10.0-693.el7.x86_64/kernel/net/netfilter]# ls
路径
(1)state 状态模块
状态模块
NEW:连接中的第一个包,就是NEW;
*ESTABLISHED:连接完成后的状态;
*RELATED:在ESTABLISHED基础上,建立新的数据发送指令,数据报文和命令报文必须是有关系的(RELATED);
INVALID:无效的,数据包被丢弃或不能被识别;
UNTRACKED:数据包未被跟踪。
例子:
1. 本机禁止被连接,可以连接其他人?
[root@node1 ~]# iptables -A INPUT -m state --state NEW -j DROP

2. 开放本机的ftp服务?
	20 >1024
	21
固定ftp被动模式的端口:
[root@node2 ~]# yum install -y vsftpd

[root@node2 ~]# vim /etc/vsftpd/vsftpd.conf
pasv_min_port=10060
pasv_max_port=10069

[root@node2 ~]# systemctl start vsftpd

写防火墙脚本:
#!/bin/bash
# ftp的防火墙脚本

sip="x.x.x.x"   ##公司的公网IP

iptables -F
iptables -X

iptables -A INPUT -m state --state ESTABLISHED,RELATED -j ACCEPT
iptables -A INPUT -p tcp -m multiport --ports 20:21,10060:10069 -j ACCEPT

iptables -A INPUT -s $sip -p tcp --dport 22 -j ACCEPT
iptables -A INPUT -i lo -j ACCEPT
iptables -A OUTPUT -o lo -j ACCEPT

iptables -A INPUT -j DROP

service iptables save
(2)iprange ip地址的范围
ip地址的范围:
–src-range 源地址范围
–dst-range 目的地址范围
[root@node2 ~]# iptables -A INPUT -m iprange --src-range 172.16.0.1-172.16.0.10 -p tcp --dport 22 -j ACCEPT
[root@node2 ~]# iptables -A OUTPUT -m iprange --dst-range 172.16.0.100-172.16.0.200 -j ACCEPT

(3)multiport
	多端口模块,缩减规则的数量
[root@node2 ~]# iptables -A INPUT -p tcp -m multiport --ports 22,80 -j ACCEPT
总结:
-
软件防火墙无法阻挡DOS攻击,不要过分相信它;
-
在调试防火墙规则的时候,先写一个计划任务,5分钟关闭一次防火墙服务;提示完毕,再删除计划任务;
-
尽量不要修改默认规则;
-
打开本地回环网卡
[root@node2 ~]# iptables -A INPUT -i lo -j ACCEPT
[root@node2 ~]# iptables -A OUTPUT -o lo -j ACCEPT -
采购硬件防火墙,置于整个系统前面,保护内部环境;
如果有条件,可以考虑买2台,做冗余。
进程状态:
运行态:进程已经分配到CPU时间片
就绪态:进程已经获得资源,只要CPU时间片到,就可以执行
等待态:进程在等待资源
filter表的FORWARD:
forward可以将双网卡的设备进行数据包转换,从而实现不同网段间的数据通信
[root@node1 ~]# ping 192.168.0.30
PING 192.168.0.30 (192.168.0.30) 56(84) bytes of data.
64 bytes from 192.168.0.30: icmp_seq=1 ttl=64 time=0.777 ms

[root@node2 ~]# ping 172.16.0.30
PING 172.16.0.30 (172.16.0.30) 56(84) bytes of data.
64 bytes from 172.16.0.30: icmp_seq=1 ttl=64 time=0.280 ms

在防火墙上,设置数据包转发:
[root@firewall ~]# vim /etc/sysctl.conf
net.ipv4.ip_forward=1

[root@firewall ~]# sysctl -p
net.ipv4.ip_forward = 1

[root@node1 ~]# ping 192.168.0.22
PING 192.168.0.22 (192.168.0.22) 56(84) bytes of data.
64 bytes from 192.168.0.22: icmp_seq=1 ttl=63 time=0.900 ms

(1)转发ping包
[root@firewall ~]# iptables -A FORWARD -p icmp -j ACCEPT
[root@firewall ~]# iptables -A FORWARD -j DROP

(2)转发web请求
[root@firewall ~]# iptables -A FORWARD -m state --state ESTABLISHED,RELATED -j ACCEPT
[root@firewall ~]# iptables -A FORWARD  -p tcp --dport 80 -j ACCEPT
[root@firewall ~]# iptables -A FORWARD -j DROP
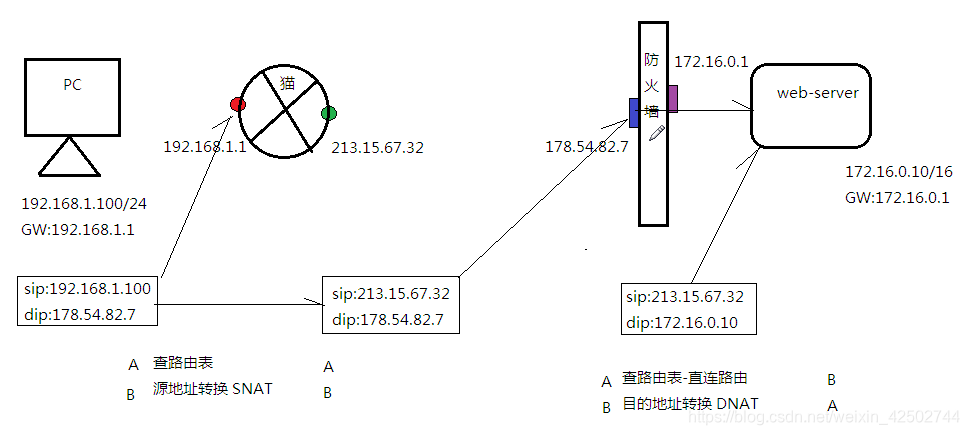 (图中ip与下文无关)
NAT表:
PREROUTING
POSTROUTING
实验1:SNAT
node1
	172.16.0.21
	GW	172.16.0.30
	(带网关)
firewall			# 双网卡的机器,只能配一个网关
	ens32	172.16.0.30
	ens34	192.168.0.30

node2-web
	192.168.0.22
	(取消网关)
配置SNAT:
[root@firewall ~]# iptables -t nat -A POSTROUTING -s 172.16.0.0/16 -p tcp --dport 80 -j SNAT --to-source 192.168.0.30

结果:
[root@node1 ~]# curl 192.168.0.22
192.168.0.22

实验2:DNAT
node1
	172.16.0.21
	(先取消node1的网关)
firewall
	ens32	172.16.0.30
	ens34	192.168.0.30

node2-web
	192.168.0.22
	GW	192.168.0.30
	(带网关)
配置DNAT:
[root@firewall ~]# iptables -t nat -A PREROUTING -d 172.16.0.30 -p tcp --dport 80 -j DNAT --to-destination 192.168.0.22:80

结果:
[root@node1 ~]# curl 172.16.0.30
192.168.0.22
====================================================
firewall
firewall
先关闭iptables防止冲突,在启动firewall
[root@firewall ~]# systemctl stop iptables
[root@firewall ~]# systemctl disable iptables

[root@firewall ~]# systemctl start firewalld
[root@firewall ~]# systemctl enable firewalld
什么是区域Zone?
定义:
网络区域定义了网络连接的可信等级。这是一个 一对多的关系,这意味着一次连接可以仅仅是一个区域的一部分,而一个区域可以用于很多连接。
9个区域:
[root@firewall ~]# firewall-cmd --get-zones
block dmz drop external home internal public trusted work
trusted 信任
drop 丢弃
block 拒绝
dmz 非军事区 ssh
external外部区域 ssh
home 家庭 ssh dhcpv6
internal内部区域 ssh dhcpv6
public 公共,默认的区域
work 工作
查看默认区域内的规则
[root@firewall ~]# firewall-cmd --list-all
public	区域的名字
  target: default	动作
  sources: 			IP地址来源
  services: ssh dhcpv6-client	服务列表

查看对应区域内的规则 --zone=
[root@firewall ~]# firewall-cmd --list-all --zone=trusted
trusted
  target: ACCEPT


向public区,添加web服务:
[root@firewall ~]# firewall-cmd --permanent --add-service=http
success
[root@firewall ~]# firewall-cmd --reload
success

结果:
[root@node1 ~]# curl 172.16.0.30
172.16.0.30 - 192.168.0.30

从public区,删除web服务:
[root@firewall ~]# firewall-cmd --permanent --remove-service=http
success
[root@firewall ~]# firewall-cmd --reload
success

向trusted区加入172.16.0.0/16网段:
[root@firewall ~]# firewall-cmd --permanent --zone=trusted --add-source=172.16.0.0/16
success
[root@firewall ~]# firewall-cmd --reload
success

[root@firewall ~]# firewall-cmd --permanent --list-all --zone=trusted
trusted (active)
  target: ACCEPT
  icmp-block-inversion: no
  interfaces:
  sources: 172.16.0.0/16

删除:
[root@firewall ~]# firewall-cmd --permanent --zone=trusted --remove-source=172.16.0.0/16
success
[root@firewall ~]# firewall-cmd --reload
success
[root@firewall ~]# firewall-cmd --permanent --list-all --zone=trusted
trusted
  target: ACCEPT
  icmp-block-inversion: no
  interfaces:
  sources:
  services:

向drop区加入172.16.0.0/16网段:
[root@firewall ~]# firewall-cmd --permanent --zone=drop --add-source=172.16.0.0/16
success
[root@firewall ~]# firewall-cmd --reload
success
[root@firewall ~]# firewall-cmd --permanent --list-all --zone=drop
drop (active)
  target: DROP
  icmp-block-inversion: no
  interfaces:
  sources: 172.16.0.0/16
firewall 的全部区
trusted
block
drop
public
home
work
internal
external
dmz
web 白名单
将公司的公网IP引入trusted
其他的都写入drop
[root@firewall ~]# firewall-cmd --list-all
public (active)
  target: default
  icmp-block-inversion: no
  interfaces: ens32 ens34
  sources:
  services: ssh dhcpv6-client

[root@firewall ~]# firewall-cmd --permanent --remove-service=ssh
success
[root@firewall ~]# firewall-cmd --permanent --remove-service=dhcpv6-client
success

[root@firewall ~]# firewall-cmd --permanent --zone=work --add-service=http
success
[root@firewall ~]# firewall-cmd --permanent --zone=work --remove-service=dhcpv6-client
success

[root@firewall ~]# firewall-cmd --permanent --zone=work --list-all
work
  target: default
  icmp-block-inversion: no
  interfaces:
  sources:
  services: ssh http

[root@firewall ~]# firewall-cmd --permanent --zone=work --add-source=172.16.0.21
success
[root@firewall ~]# firewall-cmd --permanent --zone=work --add-source=172.16.0.20
success

[root@firewall ~]# firewall-cmd --reload
success

[root@firewall ~]# firewall-cmd --permanent --zone=work --list-all
work (active)
  target: default
  icmp-block-inversion: no
  interfaces:
  sources: 172.16.0.20 172.16.0.21
  services: ssh http
web 黑名单
将所有来访问的外网ip设置允许 所有ip用0.0.0.0表示
将公司的ip设置信任
将非法ip设置禁止
先移除之前的所有设置
然后添加公司ip为信任
[root@firewall ~]# firewall-cmd --permanent --zone=work --add-service=http
[root@firewall ~]# firewall-cmd --permanent --zone=work --add-source=172.16.0.0/16
[root@firewall ~]# firewall-cmd --list-all --zone=work
work (active)
  target: default
  icmp-block-inversion: no
  interfaces:
  sources: 172.16.0.0/16 172.16.14.253
  services: ssh http


将所有来访问的外网ip设置允许 所有ip用0.0.0.0表示
[root@firewall ~]# firewall-cmd --permanent --zone=public --add-service=http
[root@firewall ~]# firewall-cmd --permanent --zone=public --add-source=0.0.0.0
[root@firewall ~]# firewall-cmd --list-all --zone=public
public (active)
  target: default
  icmp-block-inversion: no
  interfaces: ens33 ens37
  sources: 0.0.0.0
  services: http


将非法ip添加到drop,为禁止
[root@firewall ~]# firewall-cmd --permanent --zone=drop --add-source=172.16.13.44
[root@firewall ~]# firewall-cmd --list-all --zone=drop
drop (active)
  target: DROP
  icmp-block-inversion: no
  interfaces:
  sources: 10.10.10.10 172.16.13.44


重新加载防火墙配置
[root@firewall ~]# firewall-cmd --reload
Firewall 的查看命令:
查看防火墙当前状态
[root@localhost ~]# firewall-cmd --state

查看默认的区
[root@firewall ~]# firewall-cmd --get-default-zone
public
	查看默认的区

[root@firewall ~]# firewall-cmd --get-active-zone
work
  sources: 172.16.0.20 172.16.0.21
	 查看激活的区

[root@firewall ~]# firewall-cmd --get-services
	查看服务名列表

[root@firewall ~]# firewall-cmd --permanent --zone=work --add-port=8000/tcp
success
	向区域里面添加服务端口

[root@firewall ~]# firewall-cmd --permanent --zone=work --list-all
work (active)
  target: default
  icmp-block-inversion: no
  interfaces:
  sources: 172.16.0.20 172.16.0.21
  services: ssh http
  ports: 8000/tcp

查看所有服务默认对应的端口
[root@localhost ~]# cat /etc/services
参考
脚本
指定用户数量添加用户
#!/bin/bash

read -p "Please input the number of users:" -t 30 num

echo -e "username\tpassword" > /root/userfile
for i in `seq 1 ${num}`
do
    id user$i &> /dev/null
    if [ $? -ne 0 ]
        then
        useradd user$i
        pass=$(tr -dc a-zA-Z0-9_# < /dev/urandom | head -c 6 | xargs)
#        userdel -r user$i
        echo $pass | passwd --stdin user$i
        echo -e " user${i}\t${pass} " >> /root/userfile
    fi
done
