嗯,这个也是看着人家博客的点子,然后自己最后理解的写出来的
效果
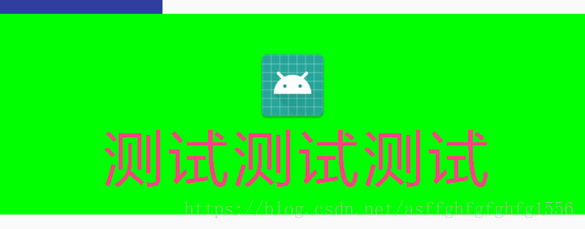
- 额,样子丑了点,但是确实帮我对自定义View理解了不少
- 我们可以去人为的设置图片,以及背景颜色,文本,字体大小,颜色
- 接下来就按照我们的要求实现吧
实现
思路
- 自定义View的思路,虽然我们前面也说过,但是重复一下吧,写的熟练了就能总结出自己的思路
- 先想出我们这个View需要的功能,定义出属性文件
- 然后在继承自View的自定义View中,在构造方法下得到用户设置的属性值,这里,我们需要在代码中写出属性的默认值,防止用户未设置某个属性而出错
- 然后接下来的就是测量(onMeasure)了,在这个方法中,我们需要测量出整个View的长和宽,最后通过setMeasuredDimension(width,height);这个方法将长和宽设置好,在这个方法中,我们需要考虑view的padding,以及一些我们可能自己需要的长宽属性值
- 然后的话就是根据我们之前的测量结果,以及我们在构造方法中得到的某些值将我们的View画出来了。
具体代码实现
- 在这个view中,我们需要用户为我们提供的是图片,背景颜色,文字,文字大小,文字颜色,看attr.xml文件吧
<declare-styleable name="MyImageAndTitleView">

    <attr name="image" format="reference"/>
     <attr name="imageTitle" format="string"/>
     <attr name="imageTitleColor" format="color"/>
     <attr name="imageTitleSize" format="dimension"/>

</declare-styleable>- 注意,这里的名字一定要跟我们定义的View名字相同
- 然后在构造方法中得到用户为我们设置的这些属性值
public MyImageAndTitleView(Context context, @Nullable AttributeSet attrs, int defStyleAttr) {
    super(context, attrs, defStyleAttr);
    TypedArray typedArray = context.obtainStyledAttributes(attrs,R.styleable.MyImageAndTitleView,
            defStyleAttr,0);
    for(int i = 0;i < typedArray.getIndexCount();i++){
        int attr = typedArray.getIndex(i);
        switch (attr){
            case R.styleable.MyImageAndTitleView_image:
                image = BitmapFactory.decodeResource(getResources(), typedArray.
                        getResourceId(attr, 0));
                break;
            case R.styleable.MyImageAndTitleView_imageTitle:
                imageTitle = typedArray.getString(attr);
                break;
            case R.styleable.MyImageAndTitleView_imageTitleColor:
                imageTitleColor = typedArray.getColor(attr,Color.GRAY);
                break;
            case R.styleable.MyImageAndTitleView_imageTitleSize:
                imageTitleSize = typedArray.getDimensionPixelSize(attr, (int) TypedValue.applyDimension
                        (TypedValue.COMPLEX_UNIT_SP,16,getResources().getDisplayMetrics()));
                break;
             case R.styleable.MyImageAndTitleView_myBackColor:
                    mBackColor = typedArray.getColor(attr,Color.BLACK);
                    break;
            default:break;
        }
    }
    //先释放资源
    typedArray.recycle();
    //根据需要new处对象
    mPaint = new Paint();
    mBackBound = new Rect();
    mTitleBound = new Rect();
    //得到字体外边框,这个会在测量的时候为得到长宽用到
    mPaint.setColor(imageTitleColor);
    mPaint.setTextSize(imageTitleSize);
    mPaint.getTextBounds(imageTitle,0,imageTitle.length(),mTitleBound);
}- 这个得到字体外边框,可以这么理解,就比方说我们小时候写字的时候会在田字格里面写,一个田字格里面一个字,这个外边框就相当于这里的田字格,只不过这里的外边框包括的不是一个汉字,而是一个字符串
- 接下来呢,就是测量了
protected void onMeasure(int widthMeasureSpec, int heightMeasureSpec) {
   int widthMeasureSize = MeasureSpec.getSize(widthMeasureSpec);
    int widthMeasureModel = MeasureSpec.getMode(widthMeasureSpec);

    int heightMeasureSize = MeasureSpec.getSize(heightMeasureSpec);
    int heightMeasureModel = MeasureSpec.getMode(heightMeasureSpec);

    if(widthMeasureModel == MeasureSpec.EXACTLY){ //如果是match_Parent
        width = widthMeasureSize;
    }else {
        //宽度应该字体和图片中宽的   再和widthMeasureSize比较  较小的
        int imageWidth = image.getWidth() + getPaddingLeft() + getPaddingRight();
        int titleWidth = mTitleBound.width() + getPaddingLeft() + getPaddingRight();
        if(widthMeasureModel == MeasureSpec.AT_MOST){
            int l = Math.max(imageWidth,titleWidth);
            width = Math.min(widthMeasureSize,l);
        }
    }

    if(heightMeasureModel == MeasureSpec.EXACTLY){  //如果是match_Parent
        height = heightMeasureSize;
    }else {
        //高度应该字体加图片的高   再和heightMeasureSize比较  较小的
        int imageAndTitleHeight = image.getHeight() + getPaddingBottom() + getPaddingTop()+
                mTitleBound.height();
        if(heightMeasureModel == MeasureSpec.AT_MOST){ //wrap_Content
            height = Math.min(heightMeasureSize,imageAndTitleHeight);
        }
    }
    mBackBound.set(0,0,width,height);
    Log.d("------","width = " + width +",height = "+height);
    setMeasuredDimension(width,height);
}- 代码结合一点注释还是比较好理解的,这里需要仔细一点,宽的话,需要图片和文字的宽度中较大的那一个,而这个较大的宽度是不能大于屏幕的最大宽度
- 高度的一样,是图片和文字(外边框)的高度之和,这个高度不能大于屏幕最大的高度
- 嗯,接下俩就把他画出来吧
protected void onDraw(Canvas canvas) {
   mPaint.setColor(mBackColor);
   Log.d("--------","mBackBound 高 = " + mBackBound.height()+ " 宽 = " + mBackBound.width());
   canvas.drawRect(mBackBound,mPaint);

   //第一个Rect 代表要绘制的bitmap 区域,第二个 Rect 代表的是要将bitmap 绘制在屏幕的什么地方
   Rect imageRect = new Rect(0,0,image.getWidth(),image.getHeight());
   Rect imageLocation = new Rect((int) (getWidth()/2 - image.getWidth() * 1.0f / 2),getPaddingTop(),
           getWidth()/2 + image.getWidth()/2,getPaddingTop()+image.getHeight());
   Log.d("--------","imageRect 高 = " + imageRect.height()+ " 宽 = " + imageRect.width());
   Log.d("--------","mTitleBound 高 = " + mTitleBound.height()+ " 宽 = " + mTitleBound.width());
   canvas.drawBitmap(image,imageRect,imageLocation,mPaint);

   mPaint.setColor(imageTitleColor);
   mPaint.setTextSize(imageTitleSize);
   if(mTitleBound.width() > width){

       TextPaint paint = new TextPaint(mPaint);
       String finalStr = TextUtils.ellipsize(imageTitle, paint, (float) width - getPaddingLeft() - getPaddingRight(),
               TextUtils.TruncateAt.END).toString();
       Log.d("------dffff--------",finalStr);
       canvas.drawText(finalStr, getPaddingLeft(), getHeight() - getPaddingBottom(), paint);
   }else {
       mPaint.getTextBounds(imageTitle,0,imageTitle.length(),mTitleBound);
       canvas.drawText(imageTitle, getWidth() / 2 - mTitleBound.width()  *1.0f / 2, getHeight() - getPaddingBottom(), mPaint);
   }
}- 好了,到这里我们的View已经定义完毕
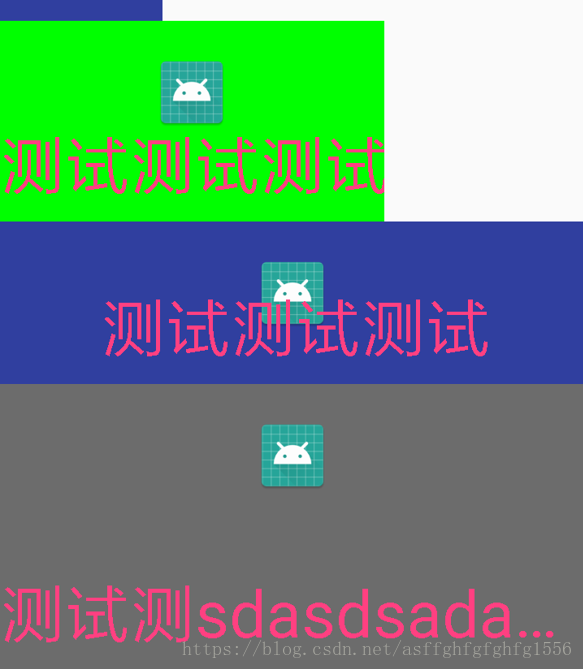
- 该讲的基本都讲到了在这里我把平时常见的几种xml书写效果展示一下
- 这里就是设置不同的宽高,我们的View做出的一系列适配,感觉情况还好,如果还想加一些效果的话,那就自行发挥吧,根据自己的需要添加就好
总结
- 我们的这个View到这里就结束了,麻雀虽小,但也五脏俱全啊,一些具体的炫酷的东西还需要自己去探索,下篇我再去试着学一下自定义View继承ViewGroup
- 关于我们上面的这个View的onDraw方法中的那个字符串处理函数我也没太看懂,回头再百度一下吧