本文基于原文有所改动和完善,作者使用的
- VMware-workstation-full-15.1.0-13591040.exe
- CentOS-7-x86_64-Minimal-1804.iso
- kernel-ml-4.18.16-1.el7.elrepo.x86_64.rpm
本文目录
11、修改docker cgroup driver为systemd
前言
本次搭建的集群共三个节点,包含一个主节点,两个工作子节点:
| 节点 | 角色 | IP |
|---|---|---|
| Node1 | Master | 192.168.56.113 |
| Node2 | Woker | 192.168.56.111 |
| Node3 | Woker | 192.168.56.112 |
根据官方推荐,节点可以是Ubuntu或CentOS操作系统,本次选择使用CentOS 7。节点最低配置如下:
| 硬件 | 配置 |
|---|---|
| 内存 | 2G |
| CPU | 2核 |
| 磁盘 | 15G |
一、环境准备
虚拟机搭建完成后,建议使用静态IP方式。
1、关闭图形界面
三个节点都需要进行如下配置,推荐将一台虚拟机配置完成后复制出另外两台虚拟机。
CentOS 7 安装好后,默认的图形界面占用大量资源,个人电脑配置较低,集群搭建后期需要同时开启多个虚拟机,电脑会卡爆,建议关闭图形界面。
执行以下命令进入命令模式
systemctl set-default multi-user.target
执行以下命令恢复图形模式
systemctl set-default graphical.target
以上命令重启后生效
2、配置yum源
不建议使用CentOS 7 自带的yum源,因为安装软件和依赖时会非常慢甚至超时失败。这里,我们使用阿里云的源予以替换,执行如下命令,替换文件 /etc/yum.repos.d/CentOS-Base.repo
wget -O /etc/yum.repos.d/CentOS-Base.repo http://mirrors.aliyun.com/repo/Centos-7.repo
yum makecache
3、关闭防火墙
systemctl stop firewalld & systemctl disable firewalld
如下所示表示正常
[root@localhost ~]# systemctl stop firewalld & systemctl disable firewalld
[1] 10341
Removed symlink /etc/systemd/system/multi-user.target.wants/firewalld.service.
Removed symlink /etc/systemd/system/dbus-org.fedoraproject.FirewallD1.service.
4、关闭SeLinux
setenforce 0
修改配置文件,设置为不可用
vi /etc/selinux/config
SELINUX=disabled
5、关闭Swap
Linux的Swap内存交换机制是一定要关闭的,否则会因为内存交换而影响性能以及稳定性。
Kubernetes 1.8开始要求关闭系统的Swap,如果不关闭,默认配置下kubelet将无法启动。
执行swapoff -a可临时关闭,但系统重启后恢复
编辑/etc/fstab,注释掉包含swap的那一行即可,重启后可永久关闭,如下所示
vim /etc/fstab

/dev/mapper/centos-root / xfs defaults 0 0
UUID=20ca01ff-c5eb-47bc-99a0-6527b8cb246e /boot xfs defaults 0 0
# /dev/mapper/centos-swap swap
或直接执行
sed -i '/ swap / s/^/#/' /etc/fstab
关闭成功后,使用top命令查看,如下图所示表示正常

6、创建配置文件
创建/etc/sysctl.d/k8s.conf文件,添加如下内容
net.bridge.bridge-nf-call-ip6tables = 1
net.bridge.bridge-nf-call-iptables = 1
net.ipv4.ip_forward = 1
执行命令使修改生效
modprobe br_netfilter
sysctl -p /etc/sysctl.d/k8s.conf
7、kube-proxy开启ipvs的前置条件
由于ipvs已经加入到了内核的主干,所以为kube-proxy开启ipvs的前提需要加载以下的内核模块:ip_vsip_vs_rrip_vs_wrrip_vs_shnf_conntrack_ipv4
执行以下脚本
cat > /etc/sysconfig/modules/ipvs.modules <<EOF
#!/bin/bash
modprobe -- ip_vs
modprobe -- ip_vs_rr
modprobe -- ip_vs_wrr
modprobe -- ip_vs_sh
modprobe -- nf_conntrack_ipv4
EOF

chmod 755 /etc/sysconfig/modules/ipvs.modules && bash /etc/sysconfig/modules/ipvs.modules && lsmod | grep -e ip_vs -e nf_conntrack_ipv4
上面脚本创建了的/etc/sysconfig/modules/ipvs.modules文件,保证在节点重启后能自动加载所需模块。 使用lsmod | grep -e ip_vs -e nf_conntrack_ipv4命令查看是否已经正确加载所需的内核模块。
接下来还需要确保各个节点上已经安装了ipset软件包yum install ipset。 为了便于查看ipvs的代理规则,最好安装一下管理工具ipvsadm yum install ipvsadm。
如果以上前提条件不满足,则即使kube-proxy的配置开启了ipvs模式,也会退回到iptables模式
8、添加仓库
添加阿里云的Docker仓库
yum install -y yum-utils device-mapper-persistent-data lvm2
yum-config-manager --add-repo http://mirrors.aliyun.com/docker-ce/linux/centos/docker-ce.repo
yum makecache
9、安装Docker
K8s 1.15当前支持的docker版本列表是1.13.1, 17.03, 17.06, 17.09, 18.06, 18.09。执行以下命令,安装最新版Docker
yum install docker-ce -y
启动Docker服务并激活开机启动
systemctl start docker
systemctl enable docker
如果是自己搭建虚拟机,此时可以将虚拟机复制一台出来,供后期搭建Harbor企业级私有镜像仓库使用。具体复制虚拟机的方法可以参考另外一篇博文
VirtualBox复制虚拟机:https://blog.csdn.net/weixin_45417347/article/details/101038111
10、确认FOWARD链默认策略
确认一下iptables filter表中FOWARD链的默认策略(pllicy)为ACCEPT。
执行命令
iptables -nvL
如下图所示表示正常

11、修改docker cgroup driver为systemd
根据文档CRI installation中的内容,对于使用systemd作为init system的Linux的发行版,使用systemd作为docker的cgroup driver可以确保服务器节点在资源紧张的情况更加稳定,因此这里修改各个节点上docker的cgroup driver为systemd。
创建或修改/etc/docker/daemon.json
vim /etc/docker/daemon.json
{
"exec-opts": ["native.cgroupdriver=systemd"]
}
重启docker
systemctl restart docker
执行以下命令检查修改是否成功
docker info | grep Cgroup
如下图所示表示正常

二、安装kubelet、kubeadm、kubectl
1、配置K8s的yum源
官方仓库在在内无法访问,建议使用阿里源的仓库, 执行以下命令添加kubernetes.repo仓库
cat <<EOF > /etc/yum.repos.d/kubernetes.repo
[kubernetes]
name=Kubernetes
baseurl=http://mirrors.aliyun.com/kubernetes/yum/repos/kubernetes-el7-x86_64
enabled=1
gpgcheck=0
repo_gpgcheck=0
gpgkey=http://mirrors.aliyun.com/kubernetes/yum/doc/yum-key.gpg
http://mirrors.aliyun.com/kubernetes/yum/doc/rpm-package-key.gpg
EOF
2、安装kubelet、kubeadm、 kubectl
yum makecache fast
yum install -y kubelet kubeadm kubectl
这里可以指定kubelet、kubeadm、 kubectl版本
yum install -y kubelet-1.15.3 kubeadm-1.15.3 kubectl-1.15.3
如果不能下载:
使用方法
1. 首先下载
wget https://github.com/cheerego/docker-wrapper/files/3385677/linux.zip2. 解压
unzip linux.zip3. 之后查看你所需要下载的镜像
kubeadm config images list╭─[email protected] ~/linux ╰─➤ kubeadm config images list 1 ↵ I0811 12:36:33.271349 18240 version.go:96] could not fetch a Kubernetes version from the internet: unable to get URL "https://dl.k8s.io/release/stable-1.txt": Get https://dl.k8s.io/release/stable-1.txt: net/http: request canceled while waiting for connection (Client.Timeout exceeded while awaiting headers) I0811 12:36:33.271477 18240 version.go:97] falling back to the local client version: v1.14.0 k8s.gcr.io/kube-apiserver:v1.14.0 k8s.gcr.io/kube-controller-manager:v1.14.0 k8s.gcr.io/kube-scheduler:v1.14.0 k8s.gcr.io/kube-proxy:v1.14.0 k8s.gcr.io/pause:3.1 k8s.gcr.io/etcd:3.3.10 k8s.gcr.io/coredns:1.3.14. 之后直接pull
cd linux./docker-wrapper pull k8s.gcr.io/kube-apiserver:v1.14.0 ./docker-wrapper pull k8s.gcr.io/kube-controller-manager:v1.14.0 ./docker-wrapper pull k8s.gcr.io/kube-scheduler:v1.14.0 ./docker-wrapper pull k8s.gcr.io/kube-proxy:v1.14.0 ./docker-wrapper pull k8s.gcr.io/pause:3.1 ./docker-wrapper pull k8s.gcr.io/etcd:3.3.10 ./docker-wrapper pull k8s.gcr.io/coredns:1.3.1
如下所示表示正常
......

已安装:
  kubeadm.x86_64 0:1.15.3-0    kubectl.x86_64 0:1.15.3-0    kubelet.x86_64 0:1.15.3-0

作为依赖被安装:
  conntrack-tools.x86_64 0:1.4.4-4.el7
  cri-tools.x86_64 0:1.13.0-0
  kubernetes-cni.x86_64 0:0.7.5-0
  libnetfilter_cthelper.x86_64 0:1.0.0-9.el7
  libnetfilter_cttimeout.x86_64 0:1.0.0-6.el7
  libnetfilter_queue.x86_64 0:1.0.2-2.el7_2
  socat.x86_64 0:1.7.3.2-2.el7

完毕!
从安装结果可以看出还安装了cri-tools, kubernetes-cni, socat三个依赖:
- 官方从Kubernetes 1.14开始将cni依赖升级到了0.7.5版本
- socat是kubelet的依赖
- cri-tools是CRI(Container Runtime Interface)容器运行时接口的命令行工具
3、swappiness参数调整
修改vim /etc/sysctl.d/k8s.conf添加下面一行:
vm.swappiness=0
执行以下命令使修改生效
sysctl -p /etc/sysctl.d/k8s.conf
如下所示表示正常
net.bridge.bridge-nf-call-ip6tables = 1
net.bridge.bridge-nf-call-iptables = 1
net.ipv4.ip_forward = 1
vm.swappiness = 0
4、开机启动kubelet服务
systemctl enable kubelet.service
此时可以将虚拟机复制两台出来,作为工作子节点node1与node2。
5、设置hosts及hostname
虚拟机复制完成后为每个节点设置hosts及hostname
hosts:
master/node1/node2
cat <<EOF >>/etc/hosts
192.168.56.113 master-1
192.168.56.111 node1
192.168.56.112 node2
EOF
请替换为自己节点实际ip
hostname:
master
hostnamectl set-hostname master-1
node1
hostnamectl set-hostname node1
node2
hostnamectl set-hostname node2
三、K8s集群配置
以下操作在master-1节点上执行
1、使用kubeadm init初始化集群
使用kubeadm config print init-defaults可以打印集群初始化默认的使用的配置
从默认的配置中可以看到,可以使用imageRepository定制在集群初始化时拉取k8s所需镜像的地址。基于默认配置定制出本次使用kubeadm初始化集群所需的配置文件kubeadm.yaml
vim kubeadm.yaml

apiVersion: kubeadm.k8s.io/v1beta2
kind: InitConfiguration
localAPIEndpoint:
  advertiseAddress: 192.168.56.113
  bindPort: 6443
nodeRegistration:
  taints:
  - effect: PreferNoSchedule
    key: node-role.kubernetes.io/master
---
apiVersion: kubeadm.k8s.io/v1beta2
kind: ClusterConfiguration
kubernetesVersion: v1.15.3
networking:
  podSubnet: 10.244.0.0/16
使用kubeadm默认配置初始化的集群,会在master节点打上node-role.kubernetes.io/master:NoSchedule的污点,阻止master节点接受调度运行工作负载。这里测试环境只有两个节点,所以将这个taint修改为node-role.kubernetes.io/master:PreferNoSchedule。
在开始初始化集群之前可以使用kubeadm config images pull预先在各个节点上拉取所k8s需要的docker镜像。
接下来使用kubeadm初始化集群
kubeadm init --config kubeadm.yaml --ignore-preflight-errors=Swap
如下所示表示正常
[root@master-1 ~]# kubeadm init --config kubeadm-config.yaml --ignore-preflight-errors=Swap
[init] Using Kubernetes version: v1.15.3
[preflight] Running pre-flight checks
[preflight] Pulling images required for setting up a Kubernetes cluster
[preflight] This might take a minute or two, depending on the speed of your internet connection
[preflight] You can also perform this action in beforehand using 'kubeadm config images pull'
[kubelet-start] Writing kubelet environment file with flags to file "/var/lib/kubelet/kubeadm-flags.env"
[kubelet-start] Writing kubelet configuration to file "/var/lib/kubelet/config.yaml"
[kubelet-start] Activating the kubelet service
[certs] Using certificateDir folder "/etc/kubernetes/pki"
[certs] Generating "etcd/ca" certificate and key
[certs] Generating "etcd/healthcheck-client" certificate and key
[certs] Generating "apiserver-etcd-client" certificate and key
[certs] Generating "etcd/server" certificate and key
[certs] etcd/server serving cert is signed for DNS names [master-1 localhost] and IPs [192.168.56.113 127.0.0.1 ::1]
[certs] Generating "etcd/peer" certificate and key
[certs] etcd/peer serving cert is signed for DNS names [master-1 localhost] and IPs [192.168.56.113 127.0.0.1 ::1]
[certs] Generating "ca" certificate and key
[certs] Generating "apiserver-kubelet-client" certificate and key
[certs] Generating "apiserver" certificate and key
[certs] apiserver serving cert is signed for DNS names [master-1 kubernetes kubernetes.default kubernetes.default.svc kubernetes.default.svc.cluster.local] and IPs [10.96.0.1 192.168.56.113]
[certs] Generating "front-proxy-ca" certificate and key
[certs] Generating "front-proxy-client" certificate and key
[certs] Generating "sa" key and public key
[kubeconfig] Using kubeconfig folder "/etc/kubernetes"
[kubeconfig] Writing "admin.conf" kubeconfig file
[kubeconfig] Writing "kubelet.conf" kubeconfig file
[kubeconfig] Writing "controller-manager.conf" kubeconfig file
[kubeconfig] Writing "scheduler.conf" kubeconfig file
[control-plane] Using manifest folder "/etc/kubernetes/manifests"
[control-plane] Creating static Pod manifest for "kube-apiserver"
[control-plane] Creating static Pod manifest for "kube-controller-manager"
[control-plane] Creating static Pod manifest for "kube-scheduler"
[etcd] Creating static Pod manifest for local etcd in "/etc/kubernetes/manifests"
[wait-control-plane] Waiting for the kubelet to boot up the control plane as static Pods from directory "/etc/kubernetes/manifests". This can take up to 4m0s
[apiclient] All control plane components are healthy after 32.506861 seconds
[upload-config] Storing the configuration used in ConfigMap "kubeadm-config" in the "kube-system" Namespace
[kubelet] Creating a ConfigMap "kubelet-config-1.15" in namespace kube-system with the configuration for the kubelets in the cluster
[upload-certs] Skipping phase. Please see --upload-certs
[mark-control-plane] Marking the node master-1 as control-plane by adding the label "node-role.kubernetes.io/master=''"
[mark-control-plane] Marking the node master-1 as control-plane by adding the taints [node-role.kubernetes.io/master:PreferNoSchedule]
[bootstrap-token] Using token: tdhmrf.rqkw6a5z0982vijw
[bootstrap-token] Configuring bootstrap tokens, cluster-info ConfigMap, RBAC Roles
[bootstrap-token] configured RBAC rules to allow Node Bootstrap tokens to post CSRs in order for nodes to get long term certificate credentials
[bootstrap-token] configured RBAC rules to allow the csrapprover controller automatically approve CSRs from a Node Bootstrap Token
[bootstrap-token] configured RBAC rules to allow certificate rotation for all node client certificates in the cluster
[bootstrap-token] Creating the "cluster-info" ConfigMap in the "kube-public" namespace
[addons] Applied essential addon: CoreDNS
[addons] Applied essential addon: kube-proxy

Your Kubernetes control-plane has initialized successfully!

To start using your cluster, you need to run the following as a regular user:

  mkdir -p $HOME/.kube
  sudo cp -i /etc/kubernetes/admin.conf $HOME/.kube/config
  sudo chown $(id -u):$(id -g) $HOME/.kube/config

You should now deploy a pod network to the cluster.
Run "kubectl apply -f [podnetwork].yaml" with one of the options listed at:
https://kubernetes.io/docs/concepts/cluster-administration/addons/

Then you can join any number of worker nodes by running the following on each as root:

kubeadm join 192.168.56.113:6443 --token tdhmrf.rqkw6a5z0982vijw \
    --discovery-token-ca-cert-hash sha256:fb0e59225a42cc0bd13a3fc1daedf239b4cf38cca88a4395329f01b2bd29edc9
上面记录了完成的初始化输出的内容,根据输出的内容基本上可以看出手动初始化安装一个Kubernetes集群所需要的关键步骤。 其中有以下关键内容:
- [kubelet-start] 生成kubelet的配置文件”/var/lib/kubelet/config.yaml”
- [certs]生成相关的各种证书
- [kubeconfig]生成相关的kubeconfig文件
- [control-plane]使用/etc/kubernetes/manifests目录中的yaml文件创建apiserver、controller-manager、scheduler的静态pod
- [bootstraptoken]生成token记录下来,后边使用kubeadm join往集群中添加节点时会用到
- 下面的命令是配置常规用户如何使用kubectl访问集群:
mkdir -p $HOME/.kube
sudo cp -i /etc/kubernetes/admin.conf $HOME/.kube/config
sudo chown (id -u): (id−u):(id -g) $HOME/.kube/config
2、移动配置文件使kubectl命令可用
rm -rf /root/.kube/
mkdir /root/.kube/
cp -i /etc/kubernetes/admin.conf /root/.kube/config
3、验证集群状态
执行命令kubectl get cs查看一下集群状态,确认个组件都处于healthy状态
如下所示表示正常
[root@master-1 ~]# kubectl get cs
NAME                         STATUS      MESSAGE             ERROR
controller-manager           Healthy     ok
scheduler                    Healthy     ok
etcd-0                       Healthy     {"health":"true"}
4、还原
集群初始化如果遇到问题,可以使用下面的命令进行清理
kubeadm reset
ifconfig cni0 down
ip link delete cni0
ifconfig flannel.1 down
ip link delete flannel.1
rm -rf /var/lib/cni/
5、安装Pod Network
接下来安装flannel network add-on
mkdir -p ~/k8s/
cd ~/k8s
curl -O https://raw.githubusercontent.com/coreos/flannel/master/Documentation/kube-flannel.yml
kubectl apply -f kube-flannel.yml
6、验证pod状态
执行以下命令确保所有的Pod都处于Running状态
kubectl get pod -n kube-system
如下所示表示正常
[root@master-1 k8s]# kubectl get pod -n kube-system
NAME								READY 		STATUS    RESTARTS 			 AGE
coredns-6967fb4995-gczbp 			1/1         Running   0                  12m
coredns-6967fb4995-mck66 			1/1         Running   0                  12m
etcd-master-1 						1/1         Running   0                  12m
kube-apiserver-master-1 			1/1         Running   0                  12m
kube-controller-manager-master-1 	1/1         Running   0                  12m
kube-flannel-ds-amd64-vbgr5 		1/1         Running   0                  10m
kube-proxy-d5ttw 					1/1         Running   0                  12m
kube-scheduler-master-1 			1/1         Running   0                  12m
7、测试集群DNS是否可用
执行命令进入镜像
kubectl run curl --image=radial/busyboxplus:curl -it
如下所示表示正常
kubectl run --generator=deployment/apps.v1beta1 is DEPRECATED and will be removed in a future version. Use kubectl create instead.If you don't see a command prompt, try pressing enter.
[ root@curl-6bf6db5c4f-hkd27:/ ]$
进入后执行以下命令确认解析正常
nslookup kubernetes.default
如下所示表示正常
[ root@curl-6bf6db5c4f-hkd27:/ ]$ nslookup kubernetes.default
Server: 10.96.0.10
Address 1: 10.96.0.10 kube-dns.kube-system.svc.cluster.local

Name: kubernetes.default
Address 1: 10.96.0.1 kubernetes.default.svc.cluster.local
8、向K8s集群中添加Node节点
在node1和node2上分别执行以下命令,此命令就是在master节点初始化最后打印出的命令,要替换为自己的命令
kubeadm join 192.168.56.113:6443 --token tdhmrf.rqkw6a5z0982vijw --discovery-token-ca-cert-hash sha256:fb0e59225a42cc0bd13a3fc1daedf239b4cf38cca88a4395329f01b2bd29edc9
如下所示表示正常
[root@node1 ~]# kubeadm join 192.168.56.113:6443 --token tdhmrf.rqkw6a5z0982vijw \
>     --discovery-token-ca-cert-hash sha256:fb0e59225a42cc0bd13a3fc1daedf239b4cf38cca88a4395329f01b2bd29edc9
[preflight] Running pre-flight checks
[preflight] Reading configuration from the cluster...
[preflight] FYI: You can look at this config file with 'kubectl -n kube-system get cm kubeadm-config -oyaml'
[kubelet-start] Downloading configuration for the kubelet from the "kubelet-config-1.15" ConfigMap in the kube-system namespace
[kubelet-start] Writing kubelet configuration to file "/var/lib/kubelet/config.yaml"
[kubelet-start] Writing kubelet environment file with flags to file "/var/lib/kubelet/kubeadm-flags.env"
[kubelet-start] Activating the kubelet service
[kubelet-start] Waiting for the kubelet to perform the TLS Bootstrap...

This node has joined the cluster:
* Certificate signing request was sent to apiserver and a response was received.
* The Kubelet was informed of the new secure connection details.

Run 'kubectl get nodes' on the control-plane to see this node join the cluster.
在master节点上执行命令kubectl get node查看集群中的节点
如下所示表示正常
[root@master-1 k8s]# kubectl get node
NAME          STATUS      ROLES    AGE   VERSION
master-1      Ready       master   15m   v1.15.3
node1         Ready       <none>   39s   v1.15.3
node2         Ready       <none>   22s   v1.15.3
9、如何从集群中移除node
在准备移除的工作子节点上执行以下命令
kubeadm reset
ifconfig cni0 down
ip link delete cni0
ifconfig flannel.1 down
ip link delete flannel.1
rm -rf /var/lib/cni/
在master节点上执行
kubectl delete node node1
注意替换node1为要删除节点的name
10、kube-proxy开启ipvs
修改ConfigMap的kube-system/kube-proxy中的config.conf,mode: “ipvs”
执行命令
kubectl edit cm kube-proxy -n kube-system
如下所示表示正常

之后重启各个节点上的kube-proxy pod
kubectl get pod -n kube-system | grep kube-proxy | awk '{system("kubectl delete pod "$1" -n kube-system")}'
执行命令查看是否重启成功
kubectl get pod -n kube-system | grep kube-proxy
如下所示表示正常
[root@master-1 k8s]# kubectl get pod -n kube-system | grep kube-proxy
kube-proxy-d26z6 		1/1     Running   0          17s
kube-proxy-sf64p 		1/1     Running   0          13s
kube-proxy-tkfwt 		1/1     Running   0          21s
执行命令查看日志,注意替换名称
kubectl logs kube-proxy-d26z6 -n kube-system
日志中打印出了Using ipvs Proxier,说明ipvs模式已经开启
[root@master-1 k8s]# kubectl logs kube-proxy-d26z6  -n kube-system
I0911 09:19:10.215117       1 server_others.go:170] Using ipvs Proxier.
W0911 09:19:10.216087       1 proxier.go:401] IPVS scheduler not specified, use rr by default
I0911 09:19:10.216414       1 server.go:534] Version: v1.15.3
I0911 09:19:10.246932       1 conntrack.go:52] Setting nf_conntrack_max to 131072
I0911 09:19:10.247384       1 config.go:96] Starting endpoints config controller
I0911 09:19:10.247427       1 controller_utils.go:1029] Waiting for caches to sync for endpoints config controller
I0911 09:19:10.247824       1 config.go:187] Starting service config controller
I0911 09:19:10.247854       1 controller_utils.go:1029] Waiting for caches to sync for service config controller
I0911 09:19:10.347904       1 controller_utils.go:1036] Caches are synced for endpoints config controller
I0911 09:19:10.348292       1 controller_utils.go:1036] Caches are synced for service config controller
四、Dashboard
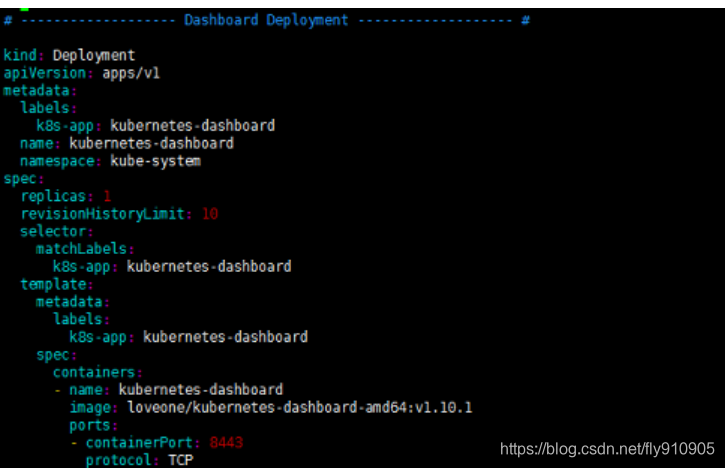
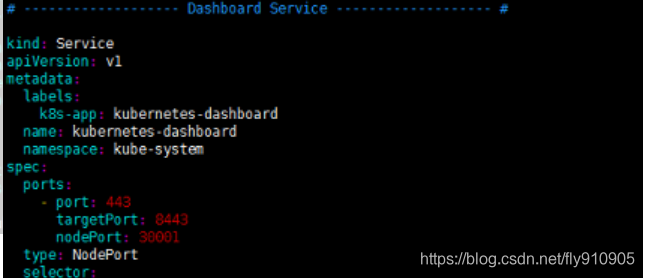
1、创建Dashboard的yaml文件
wget https://raw.githubusercontent.com/kubernetes/dashboard/v1.10.1/src/deploy/recommended/kubernetes-dashboard.yaml
使用如下命令或直接手动编辑kubernetes-dashboard.yaml文件
sed -i 's/k8s.gcr.io/loveone/g' kubernetes-dashboard.yaml
sed -i '/targetPort:/a\ \ \ \ \ \ nodePort: 30001\n\ \ type: NodePort' kubernetes-dashboard.yaml
手动编辑kubernetes-dashboard.yaml文件时,需要修改两处内容,首先在Dashboard Deployment部分修改Dashboard镜像下载链接,由于默认从官方社区下载,而不“科学上网”是无法下载的,修改为:image: loveone/kubernetes-dashboard-amd64:v1.10.1。此外,需要在Dashboard Service内容加入nodePort: 30001和type: NodePort两项内容,将Dashboard访问端口映射为节点端口,以供外部访问
如下所示表示正常
注意: 如果
image: loveone/kubernetes-dashboard-amd64:v1.10.1不能下载,请使用阿里云加速器
2、部署Dashboard
kubectl create -f kubernetes-dashboard.yaml
如下所示表示正常
创建完成后,执行以下命令检查相关服务运行状态
kubectl get deployment kubernetes-dashboard -n kube-system
kubectl get pods -n kube-system -o wide
kubectl get services -n kube-system
netstat -ntlp|grep 30001
查看访问Dashboard的认证令牌,记录token值
kubectl create serviceaccount dashboard-admin -n kube-system
kubectl create clusterrolebinding dashboard-admin --clusterrole=cluster-admin --serviceaccount=kube-system:dashboard-admin
kubectl describe secrets -n kube-system $(kubectl -n kube-system get secret | awk '/dashboard-admin/{print $1}')
如下所示表示正常

在Firefox浏览器输入Dashboard访问地址:https://192.168.56.111:30001,将ip地址替换为自己集群node1节点的ip。如果不是Firefox浏览器,需要导入证书。Firefox第一次打开会提示地址不安全,需要在高级中点击接受并继续。在登录界面选择token方式,并将上一步骤中获取到的token输入,点击登录

认证通过后,进入Dashboard首页如图
参考链接:
https://www.kubernetes.org.cn/5551.html
https://blog.csdn.net/weixin_45417347/article/details/101055424#11docker_cgroup_driversystemd_152
