Maven学习笔记
学习路径:菜鸟教程
链接:菜鸟教程
Maven 构建生命周期
Maven 构建生命周期定义了一个项目构建跟发布的过程。
一个典型的 Maven 构建(build)生命周期是由以下几个阶段的序列组成的:
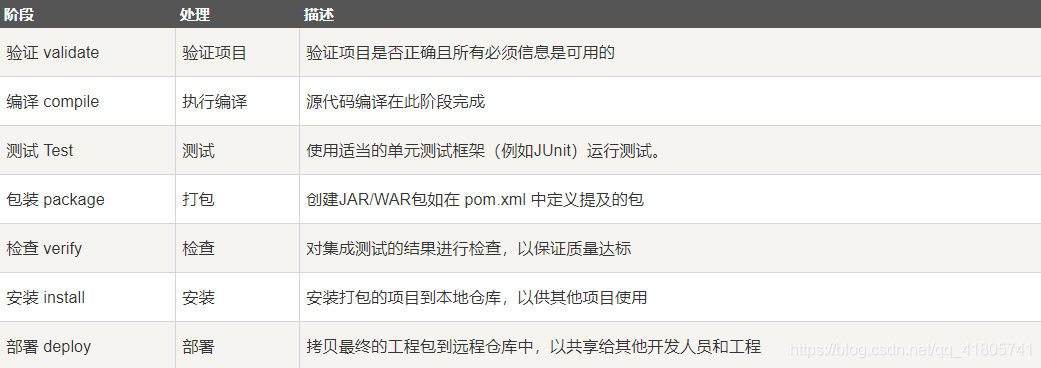
为了完成 default 生命周期,这些阶段(包括其他未在上面罗列的生命周期阶段)将被按顺序地执行。
Maven 有以下三个标准的生命周期:
- clean:项目清理的处理
- default(或 build):项目部署的处理
- site:项目站点文档创建的处理
构建阶段由插件目标构成
一个插件目标代表一个特定的任务(比构建阶段更为精细),这有助于项目的构建和管理。这些目标可能被绑定到多个阶段或者无绑定。不绑定到任何构建阶段的目标可以在构建生命周期之外通过直接调用执行。这些目标的执行顺序取决于调用目标和构建阶段的顺序。
例如,考虑下面的命令:
clean 和 pakage 是构建阶段,dependency:copy-dependencies 是目标
mvn clean dependency:copy-dependencies package
这里的 clean 阶段将会被首先执行,然后 dependency:copy-dependencies 目标会被执行,最终 package 阶段被执行。
Clean 生命周期
当我们执行 mvn post-clean 命令时,Maven 调用 clean 生命周期,它包含以下阶段:
- pre-clean:执行一些需要在clean之前完成的工作
- clean:移除所有上一次构建生成的文件
- post-clean:执行一些需要在clean之后立刻完成的工作
mvn clean 中的 clean 就是上面的 clean,在一个生命周期中,运行某个阶段的时候,它之前的所有阶段都会被运行,也就是说,如果执行 mvn clean 将运行以下两个生命周期阶段:
pre-clean, clean
如果我们运行 mvn post-clean ,则运行以下三个生命周期阶段:
pre-clean, clean, post-clean
我们可以通过在上面的 clean 生命周期的任何阶段定义目标来修改这部分的操作行为。
在下面的例子中,我们将 maven-antrun-plugin:run 目标添加到 pre-clean、clean 和 post-clean 阶段中。这样我们可以在 clean 生命周期的各个阶段显示文本信息。
我们已经在 C:\MVN\project 目录下创建了一个 pom.xml 文件。
<project xmlns="http://maven.apache.org/POM/4.0.0"
   xmlns:xsi="http://www.w3.org/2001/XMLSchema-instance"
   xsi:schemaLocation="http://maven.apache.org/POM/4.0.0
   http://maven.apache.org/xsd/maven-4.0.0.xsd">
<modelVersion>4.0.0</modelVersion>
<groupId>com.companyname.projectgroup</groupId>
<artifactId>project</artifactId>
<version>1.0</version>
<build>
<plugins>
   <plugin>
   <groupId>org.apache.maven.plugins</groupId>
   <artifactId>maven-antrun-plugin</artifactId>
   <version>1.1</version>
   <executions>
      <execution>
         <id>id.pre-clean</id>
         <phase>pre-clean</phase>
         <goals>
            <goal>run</goal>
         </goals>
         <configuration>
            <tasks>
               <echo>pre-clean phase</echo>
            </tasks>
         </configuration>
      </execution>
      <execution>
         <id>id.clean</id>
         <phase>clean</phase>
         <goals>
          <goal>run</goal>
         </goals>
         <configuration>
            <tasks>
               <echo>clean phase</echo>
            </tasks>
         </configuration>
      </execution>
      <execution>
         <id>id.post-clean</id>
         <phase>post-clean</phase>
         <goals>
            <goal>run</goal>
         </goals>
         <configuration>
            <tasks>
               <echo>post-clean phase</echo>
            </tasks>
         </configuration>
      </execution>
   </executions>
   </plugin>
</plugins>
</build>
</project>
现在打开命令控制台,跳转到 pom.xml 所在目录,并执行下面的 mvn 命令。
C:\MVN\project>mvn post-clean
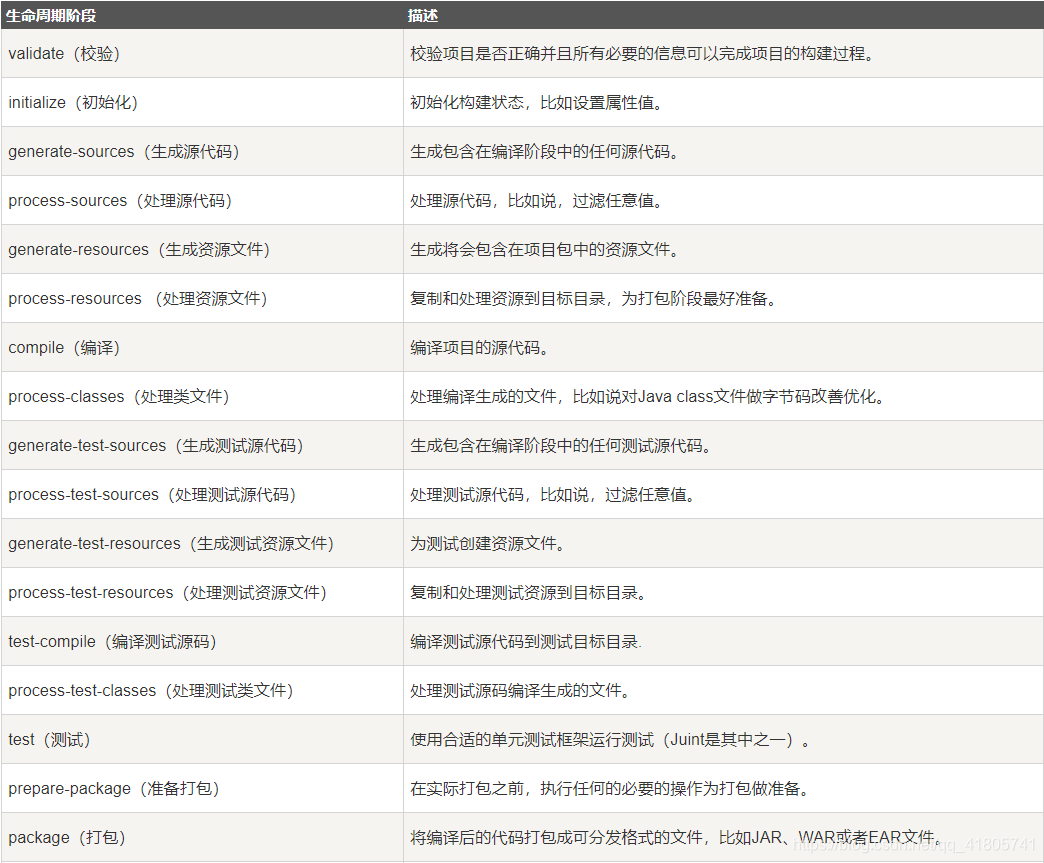
Default(Build)生命周期
这是 Maven 的主要生命周期,被用于构建应用,包括下面的 23 个阶段:

有一些与 Maven 生命周期相关的重要概念需要说明:
当一个阶段通过 Maven 命令调用时,例如 mvn compile,只有该阶段之前以及包括该阶段在内的所有阶段会被执行。
不同的 maven 目标将根据打包的类型(JAR / WAR / EAR),被绑定到不同的 Maven 生命周期阶段。
命令行调用
在开发环境中,使用下面的命令去构建、安装工程到本地仓库
mvn install
这个命令在执行 install 阶段前,按顺序执行了 default 生命周期的阶段 (validate,compile,package,等等),我们只需要调用最后一个阶段,如这里是 install。
在构建环境中,使用下面的调用来纯净地构建和部署项目到共享仓库中
mvn clean deploy
这行命令也可以用于多模块的情况下,即包含多个子项目的项目,Maven 会在每一个子项目执行 clean 命令,然后再执行 deploy 命令。
Site 生命周期
Maven Site 插件一般用来创建新的报告文档、部署站点等。
- pre-site:执行一些需要在生成站点文档之前完成的工作
- site:生成项目的站点文档
- post-site: 执行一些需要在生成站点文档之后完成的工作,并且为部署做准备
- site-deploy:将生成的站点文档部署到特定的服务器上
这里经常用到的是site阶段和site-deploy阶段,用以生成和发布Maven站点,这可是Maven相当强大的功能,Manager比较喜欢,文档及统计数据自动生成,很好看。 在下面的例子中,我们将 maven-antrun-plugin:run 目标添加到 Site 生命周期的所有阶段中。这样我们可以显示生命周期的所有文本信息。
<project xmlns="http://maven.apache.org/POM/4.0.0"
  xmlns:xsi="http://www.w3.org/2001/XMLSchema-instance"
  xsi:schemaLocation="http://maven.apache.org/POM/4.0.0
  http://maven.apache.org/xsd/maven-4.0.0.xsd">
<modelVersion>4.0.0</modelVersion>
<groupId>com.companyname.projectgroup</groupId>
<artifactId>project</artifactId>
<version>1.0</version>
<build>
<plugins>
<plugin>
<groupId>org.apache.maven.plugins</groupId>
<artifactId>maven-antrun-plugin</artifactId>
<version>1.1</version>
   <executions>
      <execution>
         <id>id.pre-site</id>
         <phase>pre-site</phase>
         <goals>
            <goal>run</goal>
         </goals>
         <configuration>
            <tasks>
               <echo>pre-site phase</echo>
            </tasks>
         </configuration>
      </execution>
      <execution>
         <id>id.site</id>
         <phase>site</phase>
         <goals>
         <goal>run</goal>
         </goals>
         <configuration>
            <tasks>
               <echo>site phase</echo>
            </tasks>
         </configuration>
      </execution>
      <execution>
         <id>id.post-site</id>
         <phase>post-site</phase>
         <goals>
            <goal>run</goal>
         </goals>
         <configuration>
            <tasks>
               <echo>post-site phase</echo>
            </tasks>
         </configuration>
      </execution>
      <execution>
         <id>id.site-deploy</id>
         <phase>site-deploy</phase>
         <goals>
            <goal>run</goal>
         </goals>
         <configuration>
            <tasks>
               <echo>site-deploy phase</echo>
            </tasks>
         </configuration>
      </execution>
   </executions>
</plugin>
</plugins>
</build>
</project>
现在打开命令控制台,跳转到 pom.xml 所在目录,并执行以下 mvn 命令。
C:\MVN\project>mvn site
Maven 将会开始处理并显示直到 site 阶段的 site 生命周期的各个阶段。
Maven 构建配置文件
构建配置文件是一系列的配置项的值,可以用来设置或者覆盖 Maven 构建默认值。
使用构建配置文件,你可以为不同的环境,比如说生产环境(Production)和开发(Development)环境,定制构建方式。
配置文件在 pom.xml 文件中使用 activeProfiles 或者 profiles 元素指定,并且可以通过各种方式触发。配置文件在构建时修改 POM,并且用来给参数设定不同的目标环境(比如说,开发(Development)、测试(Testing)和生产环境(Producation)中数据库服务器的地址)。
构建配置文件的类型
构建配置文件大体上有三种类型:

配置文件激活
Maven的构建配置文件可以通过多种方式激活。
- 使用命令控制台输入显式激活。
- 通过 maven 设置。
- 基于环境变量(用户或者系统变量)。
- 操作系统设置(比如说,Windows系列)。
- 文件的存在或者缺失。
配置文件激活实例
其中在src/main/resources文件夹下有三个用于测试文件:

注意:这三个配置文件并不是代表构建配置文件的功能,而是用于本次测试的目的;比如,我指定了构建配置文件为 prod 时,项目就使用 envprod.properties文件。
注意:下面的例子仍然是使用 AntRun 插件,因为此插件能绑定 Maven 生命周期阶段,并通过 Ant 的标签不用编写一点代码即可输出信息、复制文件等,经此而已。其余的与本次构建配置文件无关。
1.配置文件激活
profile 可以让我们定义一系列的配置信息,然后指定其激活条件。这样我们就可以定义多个 profile,然后每个 profile 对应不同的激活条件和配置信息,从而达到不同环境使用不同配置信息的效果。
以下实例,我们将 maven-antrun-plugin:run 目标添加到测试阶段中。这样我们可以在不同的 profile 中输出文本信息。我们将使用 pom.xml 来定义不同的 profile,并在命令控制台中使用 maven 命令激活 profile。
pom.xml 文件如下:
<project xmlns="http://maven.apache.org/POM/4.0.0" xmlns:xsi="http://www.w3.org/2001/XMLSchema-instance"
  xsi:schemaLocation="http://maven.apache.org/POM/4.0.0 http://maven.apache.org/maven-v4_0_0.xsd">
  <modelVersion>4.0.0</modelVersion>
  <groupId>com.jsoft.test</groupId>
  <artifactId>testproject</artifactId>
  <packaging>jar</packaging>
  <version>0.1-SNAPSHOT</version>
  <name>testproject</name>
  <url>http://maven.apache.org</url>
  <dependencies>
    <dependency>
      <groupId>junit</groupId>
      <artifactId>junit</artifactId>
      <version>3.8.1</version>
      <scope>test</scope>
    </dependency>
  </dependencies>
  <profiles>
      <profile>
          <id>test</id>
          <build>
              <plugins>
                 <plugin>
                    <groupId>org.apache.maven.plugins</groupId>
                    <artifactId>maven-antrun-plugin</artifactId>
                    <version>1.8</version>
                    <executions>
                       <execution>
                          <phase>test</phase>
                          <goals>
                             <goal>run</goal>
                          </goals>
                          <configuration>
                          <tasks>
                             <echo>Using env.test.properties</echo>
                             <copy file="src/main/resources/env.test.properties" tofile="${project.build.outputDirectory}/env.properties" overwrite="true"/>
                          </tasks>
                          </configuration>
                       </execution>
                    </executions>
                 </plugin>
              </plugins>
          </build>
      </profile>
      <profile>
          <id>normal</id>
          <build>
              <plugins>
                 <plugin>
                    <groupId>org.apache.maven.plugins</groupId>
                    <artifactId>maven-antrun-plugin</artifactId>
                    <version>1.8</version>
                    <executions>
                       <execution>
                          <phase>test</phase>
                          <goals>
                             <goal>run</goal>
                          </goals>
                          <configuration>
                          <tasks>
                             <echo>Using env.properties</echo>
                             <copy file="src/main/resources/env.properties" tofile="${project.build.outputDirectory}/env.properties" overwrite="true"/>
                          </tasks>
                          </configuration>
                       </execution>
                    </executions>
                 </plugin>
              </plugins>
          </build>
      </profile>
      <profile>
          <id>prod</id>
          <build>
              <plugins>
                 <plugin>
                    <groupId>org.apache.maven.plugins</groupId>
                    <artifactId>maven-antrun-plugin</artifactId>
                    <version>1.8</version>
                    <executions>
                       <execution>
                          <phase>test</phase>
                          <goals>
                             <goal>run</goal>
                          </goals>
                          <configuration>
                          <tasks>
                             <echo>Using env.prod.properties</echo>
                             <copy file="src/main/resources/env.prod.properties" tofile="${project.build.outputDirectory}/env.properties" overwrite="true"/>
                          </tasks>
                          </configuration>
                       </execution>
                    </executions>
                 </plugin>
              </plugins>
          </build>
      </profile>
   </profiles>
</project>
注意:构建配置文件采用的是 节点。
说明:上面新建了三个 ,其中 区分了不同的 执行不同的 AntRun 任务;而 AntRun 的任务可以这么理解,AntRun 监听 test 的 Maven 生命周期阶段,当 Maven 执行 test 时,就除了发 AntRun 的任务,任务里面为输出文本并复制文件到指定的位置;而至于要执行哪个 AntRun 任务,此时构建配置文件起到了传输指定的作用,比如,通过命令行参数输入指定的 。
执行命令:
mvn test -Ptest
提示:第一个 test 为 Maven 生命周期阶段,第 2 个 test 为构建配置文件指定的 参数,这个参数通过 -P 来传输,当然,它可以是 prod 或者 normal 这些由你定义的。
运行的结果如下:

可以看出成功的触发了AntRun的任务。并且是对应构建配置文件下的 为 test 的任务。
2.通过Maven设置激活配置文件
打开 %USER_HOME%/.m2 目录下的 settings.xml 文件,其中 %USER_HOME% 代表用户主目录。如果 setting.xml 文件不存在就直接拷贝 %M2_HOME%/conf/settings.xml 到 .m2 目录,其中 %M2_HOME% 代表 Maven 的安装目录。
配置 setting.xml 文件,增加 属性:
<settings xmlns="http://maven.apache.org/POM/4.0.0"
   xmlns:xsi="http://www.w3.org/2001/XMLSchema-instance"
   xsi:schemaLocation="http://maven.apache.org/POM/4.0.0
   http://maven.apache.org/xsd/settings-1.0.0.xsd">
   ...
   <activeProfiles>
      <activeProfile>test</activeProfile>
   </activeProfiles>
</settings>
执行命令:
mvn test
提示 1:此时不需要使用 -Ptest 来输入参数了,上面的 setting.xml 文件的 已经指定了 test 参数代替了。
提示 2:同样可以使用在 %M2_HOME%/conf/settings.xml 的文件进行配置,效果一致。
执行结果:

3.通过环境变量激活配置文件
先把上一步测试的 setting.xml 值全部去掉。
然后在 pom.xml 里面的 为 test 的 节点,加入 节点:
<project xmlns="http://maven.apache.org/POM/4.0.0" xmlns:xsi="http://www.w3.org/2001/XMLSchema-instance"
  xsi:schemaLocation="http://maven.apache.org/POM/4.0.0 http://maven.apache.org/maven-v4_0_0.xsd">
  <modelVersion>4.0.0</modelVersion>
  <groupId>com.jsoft.test</groupId>
  <artifactId>testproject</artifactId>
  <packaging>jar</packaging>
  <version>0.1-SNAPSHOT</version>
  <name>testproject</name>
  <url>http://maven.apache.org</url>
  <dependencies>
    <dependency>
      <groupId>junit</groupId>
      <artifactId>junit</artifactId>
      <version>3.8.1</version>
      <scope>test</scope>
    </dependency>
  </dependencies>
  <profiles>
      <profile>
          <id>test</id>
          <activation>
            <property>
               <name>env</name>
               <value>test</value>
            </property>
          </activation>
          <build>
              <plugins>
                 <plugin>
                    <groupId>org.apache.maven.plugins</groupId>
                    <artifactId>maven-antrun-plugin</artifactId>
                    <version>1.8</version>
                    <executions>
                       <execution>
                          <phase>test</phase>
                          <goals>
                             <goal>run</goal>
                          </goals>
                          <configuration>
                          <tasks>
                             <echo>Using env.test.properties</echo>
                             <copy file="src/main/resources/env.test.properties" tofile="${project.build.outputDirectory}/env.properties" overwrite="true"/>
                          </tasks>
                          </configuration>
                       </execution>
                    </executions>
                 </plugin>
              </plugins>
          </build>
      </profile>
      <profile>
          <id>normal</id>
          <build>
              <plugins>
                 <plugin>
                    <groupId>org.apache.maven.plugins</groupId>
                    <artifactId>maven-antrun-plugin</artifactId>
                    <version>1.8</version>
                    <executions>
                       <execution>
                          <phase>test</phase>
                          <goals>
                             <goal>run</goal>
                          </goals>
                          <configuration>
                          <tasks>
                             <echo>Using env.properties</echo>
                             <copy file="src/main/resources/env.properties" tofile="${project.build.outputDirectory}/env.properties" overwrite="true"/>
                          </tasks>
                          </configuration>
                       </execution>
                    </executions>
                 </plugin>
              </plugins>
          </build>
      </profile>
      <profile>
          <id>prod</id>
          <build>
              <plugins>
                 <plugin>
                    <groupId>org.apache.maven.plugins</groupId>
                    <artifactId>maven-antrun-plugin</artifactId>
                    <version>1.8</version>
                    <executions>
                       <execution>
                          <phase>test</phase>
                          <goals>
                             <goal>run</goal>
                          </goals>
                          <configuration>
                          <tasks>
                             <echo>Using env.prod.properties</echo>
                             <copy file="src/main/resources/env.prod.properties" tofile="${project.build.outputDirectory}/env.properties" overwrite="true"/>
                          </tasks>
                          </configuration>
                       </execution>
                    </executions>
                 </plugin>
              </plugins>
          </build>
      </profile>
   </profiles>
</project>
执行命令:
mvn test -Denv=test
提示 1:上面使用 -D 传递环境变量,其中 evn 对应刚才设置的 值,test 对应。
提示 2:在 Windows 10 上测试了系统的环境变量,但是不生效,所以,只能通过 -D 传递。
执行结果:

4.通过操作系统激活配置文件
activation 元素包含下面的操作系统信息。当系统为 windows XP 时,test Profile 将会被触发。
<profile>
   <id>test</id>
   <activation>
      <os>
         <name>Windows XP</name>
         <family>Windows</family>
         <arch>x86</arch>
         <version>5.1.2600</version>
      </os>
   </activation>
</profile>
现在打开命令控制台,跳转到 pom.xml 所在目录,并执行下面的 mvn 命令。不要使用 -P 选项指定 Profile 的名称。Maven 将显示被激活的 test Profile 的结果。
mvn test
5.通过文件的存在或者缺失激活配置文件
现在使用 activation 元素包含下面的操作系统信息。当 target/generated-sources/axistools/wsdl2java/com/companyname/group 缺失时,test Profile 将会被触发。
<profile>
   <id>test</id>
   <activation>
      <file>
         <missing>target/generated-sources/axistools/wsdl2java/
         com/companyname/group</missing>
      </file>
   </activation>
</profile>
现在打开命令控制台,跳转到 pom.xml 所在目录,并执行下面的 mvn 命令。不要使用 -P 选项指定 Profile 的名称。Maven 将显示被激活的 test Profile 的结果。
mvn test
