此文章为转载:
作者:胡说ba道
原文:https://blog.csdn.net/qq_37925032/article/details/80146256
溶解效果在游戏中十分常见,然而普通的溶解效果往往并不好看,本文将实现一种基于边缘bloom的溶解效果的实现
先上最终效果图
整体思路:将溶解的边缘提取出来,bloom之后再与原图像混合。
首先我们实现一下最基础的溶解,下面给出关键代码:

fixed4 frag(v2f i) : SV_Target

{

  fixed cutout = tex2D(_NoiseTex, i.uvNoiseTex).r;

  clip(cutout - _Threshold);

//溶解边缘颜色

  if (cutout - _Threshold < _EdgeLength)

  return _EdgeColor;

  fixed4 col = tex2D(_MainTex, i.uvMainTex);

  return col;

}
_Threshold是控制溶解程度的值,思路是噪音纹理和透明度测试这里不再赘述,这里用纯色表示边缘,当然我们可以对溶解的边缘进行更多的处理比如颜色混合和渐变纹理等,不过这不是我们的重点。得到效果如下。
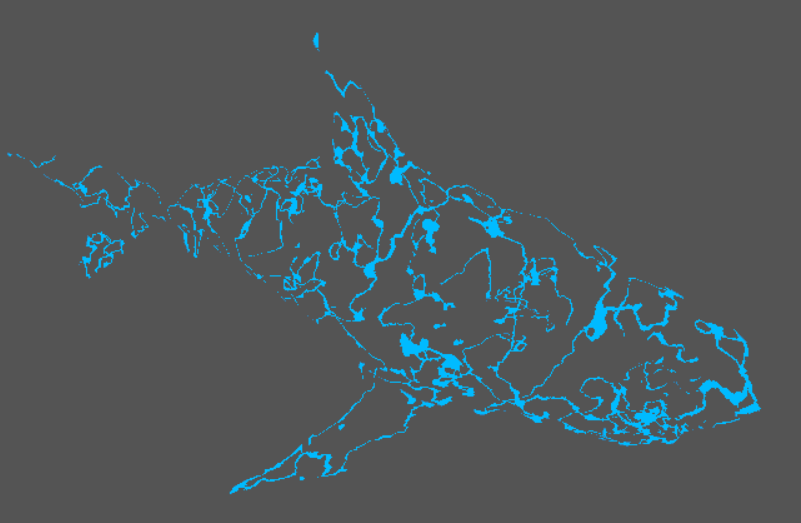
好的接下来我们想要单独获取得到溶解的边缘(DissolveEdge.shader),思路也很简单,既然我们通过clip处理了cutout - _Threshold小于0的部分,我们同样也可以将cout - _Threshold > _EdgeLength的部分clip掉,if能少用就少用所以将参数移到<的左边可得clip(_EdgeLength - cutout + _Threshold)效果是一样的。处理后得到效果如下。

等等…这个效果EMM…我们给噪音纹理加上一个流动控制,用_SpeedX,_SpeedY控制流动速度,然后在控制脚本中不断改变_Threshold的值,得到的效果如下。(和塞尔达里面神庙的激光柱的效果有点像有木有)。
Fixed cutout = tex2D(_NoiseTex,fixed2(i.uvNoiseTex.x + _Time.x * _SpeedX,i.uvNoiseTex.y + _Time.x * _SpeedY));
咳咳…扯远了,回到主线上来,当前我们得到了溶解的边缘,接下来我们需要考虑的就是如何单独对这个边缘进行bloom的处理了,提起bloom,大多数情况下bloom是基于全屏后处理的一种效果实现,用阈值采样当前场景中亮度较高的部分进行处理,然而这里我们想实现的是只对溶解的边缘进行bloom的处理,这样就不能用上算方法处理,这里我们选择使用将溶解边缘渲染到一张单独的RenderTexture上进行处理,我们创建一个新的摄像机BloomRTCam和一张RT(BloomRT),使新相机的位置和角度和主相机完全一致,将其的TargetTexture设置为BloomRT,那么如何只将溶解边缘渲染到BloomRT上呢,这里我们会用到Camera.SetReplacementShader(Shader XX,string XX);和Camera.RenderWithShader(Shader XX,string XX);这两个函数,官网对其的解释(https://docs.unity3d.com/Manual/SL-ShaderReplacement.html),简言之,它们可以使用特定的shader来渲染摄像机中的物体,而决定渲染哪些物体则由string来指明,string中的值为一个标签,系统会遍历视口中的所有物体,如果物体的shader的subpass中有对应这个标签的值,则摄像机会将其渲染,若没有则不渲染,通常我们会将string设置为”RenderType”或自定义的RenderType,因为所有的shader都带有”RenderType”标签。其次,RenderWithShader只会在一帧中替换shader,而SetReplacementShader会在调用后始终用替换后的shader渲染相应物体。

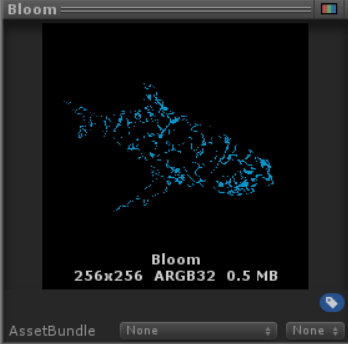
对应到我们的场景,我们将DissolveEdge 中Subpass的"RenderType”= "Bloom”,我们在BloomRTCam上挂一个控制RT渲染的脚本,然后传入DissolveEdge,在Start中调用SetReplacementShader(DissolveShader,”RenderType”)
void Start () {
        this.GetComponent<Camera>().SetReplacementShader(DissolveShader, "RenderType");
}
这样开始时遍历视口中的物体,只要该物体的shader含”RenderType” = “Bloom”就会被渲染到BloomRT上,所以我们将需要溶解的物体的shader如此设置,这样得到的BloomRT上就只有需要溶解物体的溶解边缘,效果如下:
接下来的处理就和常规bloom一样了,我们需要在主相机上挂载Bloom.cs脚本和一个材质BlurAndBlend用于做屏幕后处理。流程:降采样→高斯模糊→混合。
关于高斯模糊:
高斯模糊总体上就是图像与正态分布做卷积的过程,每一个像素点的值由本身和周围的像素值通过加权平均后得到。
关于正态分布,上学期的《概率论》课程中有所提及
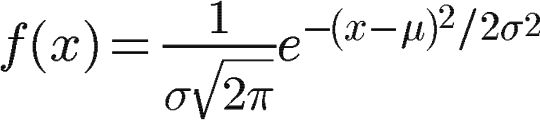
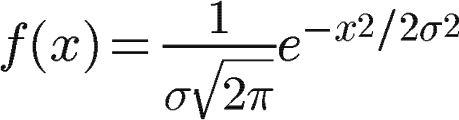
很明显高斯卷积核的原点处μ=0,因为中心点分配的权重最大,公式可化成:
其对应二维方程为:
其中,μ是x的均值(方差),σ是x的标准差(均方差),当μ=0,σ=1时,称之为标准正态分布,当x=μ时取得最大值。如果固定μ,改变σ,当σ越小时图形变得越尖,固x落在附近的概率越大,相应模糊程度越弱,σ越大相应模糊程度更强。
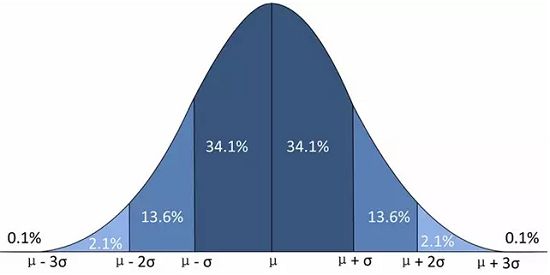

计算平均值时我们将高斯卷积核的中心点做原点,周围的点按照其在正态分布曲线上的位置分配权重即可,这里我们使用标准正态分布(σ=1)获取一个5X5的高斯卷积核。
| (-2,2) | (-1,2) | (0,2) | (1,2) | (2,2) |
|---|---|---|---|---|
| (-2,1) | (-1,2) | (0,2) | (1,2) | (2,2) |
| (-2,0) | (-1,2) | (0,2) | (1,2) | (2,2) |
| (-2,-1) | (-1,2) | (0,2) | (1,2) | (2,2) |
| (-2,-2) | (-1,2) | (0,2) | (1,2) | (2,2) |
带入上述二维方程可得
| 0.002915) | 0.013064 | 0.021539 | 0.013064 | 0.002915 |
|---|---|---|---|---|
| 0.013064 | 0.058550 | 0.096532 | 0.058550 | 0.013064 |
| 0.021539 | 0.096532 | 0.159155 | 0.096532 | 0.021539 |
| 0.013064 | 0.058550 | 0.096532 | 0.058550 | 0.013064 |
| 0.002915 | 0.013064 | 0.021539 | 0.013064 | 0.002915 |
表中所有值的和为0.981811,为计算加权平均,故将表中每个值都要除以0.981811以让权重和为1
最终得到的高斯卷积核为
| 0.002969) | 0.013306 | 0.021938 | 0.013306 | 0.002969 |
|---|---|---|---|---|
| 0.013306 | 0.059635 | 0.098320 | 0.058550 | 0.013306 |
| 0.021938 | 0.098320 | 0.162104 | 0.098320 | 0.021938 |
| 0.013306 | 0.059635 | 0.098320 | 0.059635 | 0.013306 |
| 0.002969 | 0.013306 | 0.021938 | 0.013306 | 0.002969 |
正如我们之前说过的高斯模糊总体上就是图像与正态分布做卷积的过程,得到高斯卷积核之后我们就要进行高斯核与BloomRT图像的卷积操作了,关于卷积这篇文章讲得很好,我们要将BloomRT中的每一个像素点与高斯卷积核做卷积操作得出新的像素值,由于能将二维高斯函数拆分成两个一维函数进行处理,拆分出的一维高斯核为(0.054488,0.244202,0.40262,0.244202,0.054488),所以主摄像机上挂载的BlurAndBlend的shader中含三个pass,第一个用于处理竖直方向的模糊,第二个用于处理水平方向的模糊,第三个用于合并最后的图像。
下面是Bloom.cs的实现
using System.Collections;
using System.Collections.Generic;
using UnityEngine;

//挂载在主摄像机上
public class Bloom : MonoBehaviour {
    //传入BloomRT
    public RenderTexture BloomRT;
    public Material BlurAndBlendMat;

    //控制Bloom强度
    [Range(1,5)]
    public float BloomStrength = 1;

    //迭代次数
    [Range(0, 4)]
    public int iterations = 3;
    //模糊范围大小
    [Range(0.2f, 3.0f)]
    public float blurSpread = 0.6f;
    //缩放系数
    [Range(1, 5)]
    public int downSample = 2;

    void Update()
    {
        BlurAndBlendMat.SetFloat("_BloomStrength", BloomStrength);
    }

    private void OnRenderImage(RenderTexture source, RenderTexture destination)
    {
        int rtW = BloomRT.width / downSample;
        int rtH = BloomRT.height / downSample;
        //申请RT用于降低分辨率并存入BloomRT
        RenderTexture RT0 = RenderTexture.GetTemporary(rtW,rtH,0);
        RT0.filterMode = FilterMode.Bilinear;
        Graphics.Blit(BloomRT,RT0);

        for (int i =0; i < iterations;i++) {
            BlurAndBlendMat.SetFloat("_BlurSize", 1.0f + i * blurSpread);
            RenderTexture RT1 = RenderTexture.GetTemporary(rtW, rtH, 0);
            //竖直方向模糊处理
            Graphics.Blit(RT0,RT1,BlurAndBlendMat,0);
            RenderTexture.ReleaseTemporary(RT0);
            RT0 = RT1;
            RT1 = RenderTexture.GetTemporary(rtW,rtH,0);
            //水平方向模糊处理
            Graphics.Blit(RT0,RT1,BlurAndBlendMat,1);
            RenderTexture.ReleaseTemporary(RT0);
            RT0 = RT1;
        }
        BlurAndBlendMat.SetTexture("_BloomTex",RT0);
        //将原图像与处理后的BloomRT混合
        Graphics.Blit(source,destination,BlurAndBlendMat,2);
        RenderTexture.ReleaseTemporary(RT0);

    }

}
下面是BlurAndBlend.shader的实现
Shader "Dissolve/BlurAndBlend"
{
	Properties
	{
		_MainTex("Texture", 2D) = "white" {}
		_BloomTex("BloomTex",2D) = "white"{}
		_BlurSize("BlurSize",Float) = 1
		_BloomStrength("BloomStrength",Range(1,5)) = 1
	}
		SubShader
	{
		CGINCLUDE

	#include "UnityCG.cginc"

	sampler2D _MainTex;
	half4 _MainTex_TexelSize;
	sampler2D _BloomTex;
	float _BlurSize, _BloomStrength;

	//用于高斯模糊
	struct v2f
	{
		float4 pos : SV_POSITION;
		half2 uv[5] : TEXCOORD0;
	};

	//由于最后图像混合
	struct v2fBloom {
		float4 pos: SV_POSITION;
		half2 uv: TEXCOORD0;
		half2 uv2: TEXCOORD1;
	};

	//竖直方向模糊处理
	v2f vertBlurVertical(appdata_img v) {
		v2f o;
		o.pos = UnityObjectToClipPos(v.vertex);
		half2 uv = v.texcoord;
		//定义的纹理数组用于存储采样时的像素点,由于顶点着色器到片元着色器差值线性,所以在顶点着色器中计算节省性能
		o.uv[0] = uv;
		o.uv[1] = uv + float2(0.0, _MainTex_TexelSize.y * 1.0) * _BlurSize;
		o.uv[2] = uv - float2(0.0, _MainTex_TexelSize.y * 1.0) * _BlurSize;
		o.uv[3] = uv + float2(0.0, _MainTex_TexelSize.y * 2.0) * _BlurSize;
		o.uv[4] = uv - float2(0.0, _MainTex_TexelSize.y * 2.0) * _BlurSize;
		return o;
	}

	//水平方向模糊处理
	v2f vertBlurHorizontal(appdata_img v) {
		v2f o;
		o.pos = UnityObjectToClipPos(v.vertex);
		half2 uv = v.texcoord;

		o.uv[0] = uv;
		o.uv[1] = uv + float2(_MainTex_TexelSize.x * 1.0, 0.0) * _BlurSize;
		o.uv[2] = uv - float2(_MainTex_TexelSize.x * 1.0, 0.0) * _BlurSize;
		o.uv[3] = uv + float2(_MainTex_TexelSize.x * 2.0, 0.0) * _BlurSize;
		o.uv[4] = uv - float2(_MainTex_TexelSize.x * 2.0, 0.0) * _BlurSize;
		return o;
	}


	v2fBloom vertBloom(appdata_img v) {
		v2fBloom o;
		o.pos = UnityObjectToClipPos(v.vertex);
		o.uv = v.texcoord.xy;
		o.uv2 = v.texcoord.xy;
		return o;
	}


	fixed4 fragBlur(v2f i) : SV_Target
	{
		//一维高斯核
		float weight[3] = { 0.40262,0.244202,0.054488 };
	    //最终颜色=各像素点*权重值之和
		fixed3 sum = tex2D(_MainTex,i.uv[0]).rgb * weight[0];
	    for (int it = 1; it<3; it++) {
		sum += tex2D(_MainTex,i.uv[it * 2 - 1]).rgb * weight[it];
		sum += tex2D(_MainTex,i.uv[it * 2]).rgb *weight[it];
	}
	return fixed4(sum,1.0);
	}

	fixed4 fragBloom(v2fBloom i) :SV_Target{
		//调用第三个pass前传入模糊过的BloomRT与原图像混合
		return tex2D(_MainTex,i.uv) + tex2D(_BloomTex,i.uv2) * _BloomStrength;
	}
		ENDCG

		ZTest Always Cull Off ZWrite Off

		Pass {
			CGPROGRAM
			#pragma vertex vertBlurVertical
			#pragma fragment fragBlur
			ENDCG
	    }

		Pass {
			CGPROGRAM
			#pragma vertex vertBlurHorizontal
			#pragma fragment fragBlur
			ENDCG
	    }

		Pass{
			CGPROGRAM
			#pragma vertex vertBloom
			#pragma fragment fragBloom
			ENDCG
		}
	}
		FallBack  Off
}
学生党一枚,文章中的错误,不足诚请各位指点!!
学习资料:
https://en.wikipedia.org/wiki/Gaussian_blur
https://www.jianshu.com/p/d8b535efa9db
http://www.cnblogs.com/wantnon/p/4542172.html
https://blog.csdn.net/u011047171/article/details/47977441
