作者:opLW
参考:《Android开发艺术探索》
最近在找实习,复习了一波,赶紧记起来… ?
深入理解Handler机制
目录
1.android消息机制概述
2.源码分析
3.消息机制之间联系的建立
1.android消息机制概述
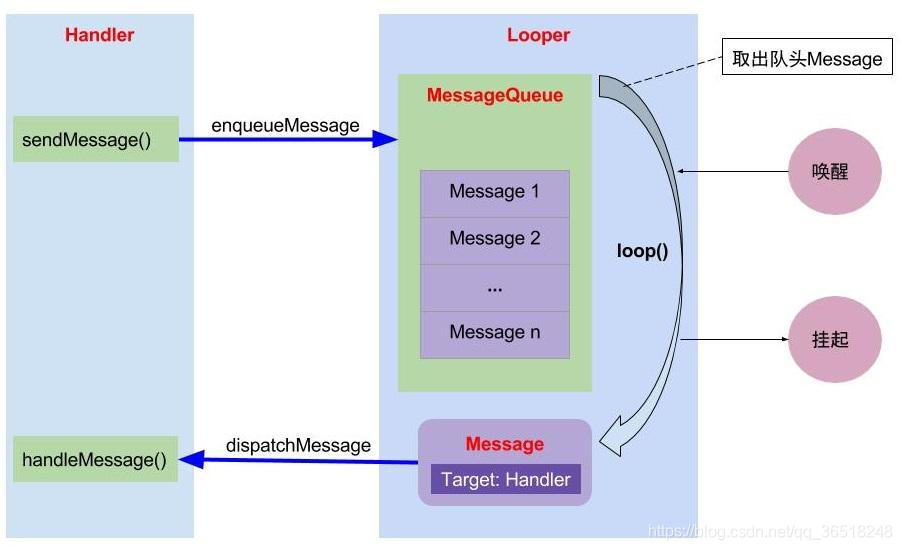
- 概述 android的消息机制主要由4部分组成:Handler,MessageQueue,Message,Looper。下面简单阐述这几个在其中的扮演的角色。
- Handler Handler是Android消息机制的上层接口,主要的作用是将任务切换到不同的线程中执行,我们在开发过程中只需要和Handler打交道就可以了,通过它便可以发送信息和处理信息。最熟悉的例子莫过于用Handler更新界面。
- MessageQueue 用来存放发送过来的信息。虽然名字叫消息队列,实则不盐,MessageQueue内部用的是单链表的结构,而不是队列。因为它要对新来的消息按延迟的时间进行排序,势必会涉及插入,所以单链表更适合插入。
- Looper Looper会以无限循环的形式去查看消息队列里是否有新消息,没有的话就一直等待着。
- Message 在这个系统中扮演着信使的角色,负责携带和传递消息。
下面举个熟悉的例子:地铁过安检(说的不好,还请各位轻锤 ?)
Handler就好比你。你在安检外将行李放在传送带上(sendMessage()),然后你和工作人员说你的行李加急的延迟少的),此时工作人员便按照时间给你排序,你的行李(Message)就这样被插入到行李队列(MessageQueue)中,随着传送带(Looper)不停的滚动,终于到了你的行李,此时工作人员便叫你去拿走(handleMessage()),此时便实现了从地铁外到地铁内的过程。(从线程A到线程B的过程)
2.源码分析
- MessageQueue的工作原理。(基于简单的目的,省略了部分代码)
(1) MessageQueue主要包含两个操作:插入和读取,分别对应函数enqueueMessage和next。插入函数的作用就是往链表中插入一条消息;读取函数本身包含读取和删除两个操作,即从链表取出后让对应handler执行并将其从链表中撤出。
(2) enqueueMessage 根据代码注释,很容易理解 ?
boolean enqueueMessage(Message msg, long when) {
        //省略部分代码
        synchronized (this) {
			//省略部分代码
            msg.markInUse(); //标记该Message已经被使用过了
            msg.when = when;
            Message p = mMessages; //指向MessageQueue消息链表中的第一个
            boolean needWake;
            if (p == null || when == 0 || when < p.when) {
            	/*
            	条件一:当前链表为空;
            	条件二:传递进来的Message没有延迟;
            	条件三:当前Message的延迟小于链表的第一个Message的延迟
            	上述三个满足其中一个则将该Message插到链表头
            	*/
                msg.next = p;
                mMessages = msg;
                needWake = mBlocked;
            } else {
                needWake = mBlocked && p.target == null && msg.isAsynchronous();
                Message prev;
                //遍历链表查找插入位置
                for (;;) {
                    prev = p;
                    p = p.next;
                    if (p == null || when < p.when) {
                    	/*
                    	条件一:到达链表尾部
                    	条件二:根据延迟找到插入的位置
                    	满足上述条件之一,退出循环
                    	*/
                        break;
                    }
                    if (needWake && p.isAsynchronous()) {
                        needWake = false;
                    }
                }
                //根据查找到的位置,插入Message
                msg.next = p;
                prev.next = msg;
            }
            //省略部分代码
        }
        return true;
    }
(3) next函数
- next 的代码很长,而且很多不是很理解的,所以不贴出来了。
- 我们只要知道Message的next方法是一个无限循环的方法,会从Message链表中取出当前链表头的元素,并将该值从链表中去除;如果当前链表没有值,则一直阻塞等待新消息的到来。
- Looper的工作原理。
下面源码会使用到ThreadLocal ,如果对它不了解的可以看下这篇文章 从源码理解ThreadLocal
(1) Looper在其中扮演着消息循环的角色,其工作就是会不停的检查MessageQueue中是否有新消息,有的话就马上处理,没有的话就一直阻塞在那里,等待新消息的到来。
(2) 创建Looper 我们知道Handler工作需要Looper,那么Looper从哪里创建呢?
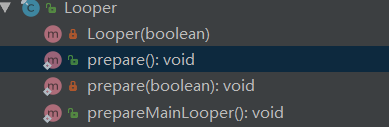
由上图可知Looper的构造方法是私有的,下面有两个public方法。让我们一起看看:
1)prepare()
public static void prepare() {
        prepare(true);
    }

    private static void prepare(boolean quitAllowed) {
        if (sThreadLocal.get() != null) {
            throw new RuntimeException("Only one Looper may be created per thread");
        }
        sThreadLocal.set(new Looper(quitAllowed));
    }
- 注意
if (sThreadLocal.get() != null) { throw new RuntimeException("Only one Looper may be created per thread"); }这个判断保证了每个线程只有一个Looper。- 由上可知prepare() 方法调用的时另外一个方法prepare(boolean quitAllowed) (这个参数是什么意思呢,我们先留个伏笔),最终调用私有的构造方法创建Looper并存放到当前线程的ThreadLocal.ThreadLocalMap 中。
2)prepareMainLooper()
//方法一
public static void prepareMainLooper() {
        prepare(false);
        synchronized (Looper.class) {
            if (sMainLooper != null) {
                throw new IllegalStateException("The main Looper has already been prepared.");
            }
            sMainLooper = myLooper();
        }
    }
//方法二
public static @Nullable Looper myLooper() {
        return sThreadLocal.get();
    }
//方法三
public static void main(String[] args) {
        //省略部分代码
        Looper.prepareMainLooper();
        //省略部分代码
        Looper.loop();
    }
- prepareMainLooper() 从名字大概可以知道这个方法是为主线程生成Looper,这个方法调用上面的 prepare() 方法。至此主线程的Looper构建完成。那什么时候调用prepareMainLooper()方法呢?
- 调用时机 请看上面方法三,这是ActivityThread中的main方法,这个方法是主线程的入口,所以在程序一开始时,系统就会自动为我们生成主线程的Looper。并调用loop,开始循环处理消息。
3)总结一点: 除了主线程不用自己创建Looper之外,其他的线程都需要通过Looper.prepare()来创建Looper。
(3)使用Looper 通过调用Looper.loop()方法,便可开始处理消息。下面看下源码:
public static void loop() {
        //省略部分代码
        for (;;) {
            Message msg = queue.next(); // 读取消息
            //省略部分代码
            try {
                msg.target.dispatchMessage(msg); //调用Message对应target即Handler来分发消息
                dispatchEnd = needEndTime ? SystemClock.uptimeMillis() : 0;
            } finally {
                if (traceTag != 0) {
                    Trace.traceEnd(traceTag);
                }
            }
            //省略部分代码
            msg.recycleUnchecked();
        }
    }
- 通过loop(),便实现了Looper的核心功能:不停的查看消息,读取消息,分发消息
msg.target.dispatchMessage(msg);msg.target是发送这条消息的Handler对象,这样Handler发送的消息最终又交给它的dispatchMessage(msg)方法处理,但是此时的线程是Looper所在的线程。至此我们就完成了从发送消息所在的线程到Looper所在线程的转变。
(4)退出Looper
- Looper提供了quit和quitSafely两个方法来退出一个Looper,区别是:quit会直接退出Looper,而quitSafely只是设定一个标记,等把消息队列中的消息,处理完毕之后才会安全地退出。
- 上面提到prepare(boolean quitAllowed) 的参数,那么有什么用呢?就是用来标记当前Looper可不可以退出,如果为true则可以退出,否则不可以。例如上面prepareMainLooper()中调用prepare就传入了false,主线程的Looper不可以退出,因为android机制就是基于处理消息的。
- Handler的工作原理。
(1)Handler的工作过程主要包含消息的发送和接受过程,消息的发送可以通过post的一系列方法以及send的一系列方法来实现,post的一系列最终都是通过send的一系列方法来实现,下面看一下发送消息的一些例子:
 	public final boolean post(Runnable r)
    {
       return  sendMessageDelayed(getPostMessage(r), 0);
    }
	public final boolean postAtTime(Runnable r, long uptimeMillis)
    {
        return sendMessageAtTime(getPostMessage(r), uptimeMillis);
    }
    public final boolean sendMessageDelayed(Message msg, long delayMillis)
    {
        if (delayMillis < 0) {
            delayMillis = 0;
        }
        return sendMessageAtTime(msg, SystemClock.uptimeMillis() + delayMillis);
    }
    public boolean sendMessageAtTime(Message msg, long uptimeMillis) {
        MessageQueue queue = mQueue;
        if (queue == null) {
            RuntimeException e = new RuntimeException(
                    this + " sendMessageAtTime() called with no mQueue");
            Log.w("Looper", e.getMessage(), e);
            return false;
        }
        return enqueueMessage(queue, msg, uptimeMillis);
    }
    private boolean enqueueMessage(MessageQueue queue, Message msg, long uptimeMillis) {
        msg.target = this;
        if (mAsynchronous) {
            msg.setAsynchronous(true);
        }
        return queue.enqueueMessage(msg, uptimeMillis);
    }
- 还有其他的一些方法,这里不一一列出,但他们最终都是调用的
queue.enqueueMessage(msg, uptimeMillis);- 接着MessageQueue会把这条消息返回给对应的Looper,接着Looper就处理,并且调用
msg.target.dispatchMessage(msg);来分发消息。
(2) 看一下msg.target.dispatchMessage(msg) 方法的内部实现。
public void dispatchMessage(Message msg) {
        if (msg.callback != null) {
            handleCallback(msg); //对应下面的模块1
        } else {
            if (mCallback != null) {
                //mCallcak是Handler的一个内部类,对应下面的模块2。
                if (mCallback.handleMessage(msg)) {
                    return;
                }
            }
            handleMessage(msg);
        }
    }
//模块1
private static void handleCallback(Message message) {
        message.callback.run(); //message.callback对应Handler.post系列方法传入的Runnable
    }
//模块2
public interface Callback {

        public boolean handleMessage(Message msg);
    }
整体流程如下:

同时我们也可以得出使用handler的结论:
1)通过调用handler.post系列方法,并且传入Runnable的实现类来使用handler。
public final boolean post(Runnable r)
public final boolean postAtTime(Runnable r, long uptimeMillis)
public final boolean postAtTime(Runnable r, Object token, long uptimeMillis)
...还有其他就不列出来了
2)通过在创建Handler时传入其内部类Callbcak的实例。
public Handler(Callback callback)
public Handler(Looper looper, Callback callback)
public Handler(Callback callback, boolean async)
3)通过派生一个Handler的子类并重写其handlerMessage方法,这个很常见就不贴代码了。
3.消息机制之间联系的建立
public Handler(Callback callback, boolean async) {
       //省略部分代码
        mLooper = Looper.myLooper();
        if (mLooper == null) {
            throw new RuntimeException(
                "Can't create handler inside thread " + Thread.currentThread()
                        + " that has not called Looper.prepare()");
        }
        mQueue = mLooper.mQueue;
        mCallback = callback;
        mAsynchronous = async;
    }
public static @Nullable Looper myLooper() {
    return sThreadLocal.get();
 }
public Handler(Looper looper, Callback callback, boolean async) {
        mLooper = looper;
        mQueue = looper.mQueue;
        mCallback = callback;
        mAsynchronous = async;
    }
- 显然,Handler先取得与Looper的联系,然后通过Looper取得与对应MessageQueue的关系。
- 数量关系: 多个Handler对应一个Looper以及一个MessageQueue。
记录美好学习的点点滴滴,希望能和各位一起学习!?
好记性不如烂笔头!!
万水千山总是情,麻烦手下别留情。
如若讲得有不妥,文末留言告知我,
如若觉得还可以,收藏点赞要一起。
opLW原创七言律诗,转载请注明出处
