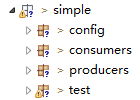
前面章节已经对RabbitMQ的五种队列模式进行了介绍,现在通过SpringBoot整合RabbitMQ来对五种队列模式进行一个更深入的描述
一、springboot集成RabbitMQ
springboot集成RabbitMQ非常简单,如果只是简单的使用配置非常少,springboot提供了spring-boot-starter-amqp对消息各种支持。
1、配置pom文件,添加spring-boot-starter-amqp的支持
<dependency>
   <groupId>org.springframework.boot</groupId>
   <artifactId>spring-boot-starter-amqp</artifactId>
</dependency>
2、配置application.yml文件,配置rabbitmq的安装地址、端口以及账户信息
#配置rabbitmq的安装地址、端口以及账户信息
spring:
  application:
    name: spirng-boot-rabbitmq
  rabbitmq:
    #服务器ip
    host: 127.0.0.1
    #端口号
    port: 5672
    #用户名
    username: admin
    #密码
    password: 123456
    #虚拟空间地址
    virtual-host: /
二、简单队列
1、配置队列
queue_simple 是队列名称
package com.springboot.rabbitmq.eimm.simple.config;

import org.springframework.amqp.core.Queue;
import org.springframework.context.annotation.Bean;
import org.springframework.context.annotation.Configuration;

/**
 *
 * 	简单队列
 * @author Mr yi
 * @time 2019年6月19日
 */
@Configuration
public class RabbitConfigSimple {

	 @Bean
	 public Queue queueSimple() {
        return new Queue("queue_simple");
    }
}
2、生产者:生产者发送消息
package com.springboot.rabbitmq.eimm.simple.producers;

import org.springframework.amqp.core.AmqpTemplate;
import org.springframework.beans.factory.annotation.Autowired;
import org.springframework.stereotype.Component;

/**
 *
 * @method 生产者
 * @author Mr yi
 * @time 2019年6月19日
 */
@Component
public class ProducersSimple {

	 @Autowired
	 private AmqpTemplate amqpTemplate;

	 public void send() {
	        String context = "Hello World! " ;
	        System.out.println("Producers sends message: " + context);
	        //简单队列的情况下routingKey即为队列名queue_simple
	        this.amqpTemplate.convertAndSend("queue_simple", context);
	    }
}
3、消费者
package com.springboot.rabbitmq.eimm.simple.consumers;

import org.springframework.amqp.rabbit.annotation.RabbitHandler;
import org.springframework.amqp.rabbit.annotation.RabbitListener;
import org.springframework.stereotype.Component;

/**
 *
 * @method 消费者
 * @author Mr yi
 * @time 2019年6月19日
 */
@Component
@RabbitListener(queues = "queue_simple")
public class ConsumersSimple {

	//@RabbitListener 标注在类上面表示当有收到消息的时候,就交给 @RabbitHandler 的方法处理,
	 //具体使用哪个方法处理,根据 MessageConverter 转换后的参数类型

	@RabbitHandler
    public void process(String message) {
        System.out.println("Consumers receiver message : " + message);
    }

	@RabbitHandler
    public void process(byte[] message) {
        System.out.println("Consumers receiver message : " + new String(message));
    }
}
4、测试
@Autowired
    private ProducersSimple producers;

	@RequestMapping("/send")
    public void send() throws Exception {
    	producers.send();
    }
5、结果
控制台打印

查看RabbitMq 服务器,发现新增了一个queue_simple的队列,点击队列名称可以查询详细信息

三、Work模式
1、配置队列
queue_work是队列名称
package com.springboot.rabbitmq.eimm.work.config;

import org.springframework.amqp.core.Queue;
import org.springframework.context.annotation.Bean;
import org.springframework.context.annotation.Configuration;

/**
 *
 * 	Work模式
 * @author Mr yi
 * @time 2019年6月19日
 */
@Configuration
public class RabbitConfigWork {

	 @Bean
	 public Queue queueWork() {
        return new Queue("queue_work");
    }
}
2、生产者:生产者发送多条消息
package com.springboot.rabbitmq.eimm.work.producers;

import org.springframework.amqp.core.AmqpTemplate;
import org.springframework.beans.factory.annotation.Autowired;
import org.springframework.stereotype.Component;

/**
 *
 * @method 生产者
 * @author Mr yi
 * @time 2019年6月19日
 */
@Component
public class ProducersWork {

	 @Autowired
	 private AmqpTemplate amqpTemplate;

	 //生产者发送多个消息
	 public void send() throws Exception {
		 for(int i=0;i<=10;i++) {
	        String context = "Work["+i+"]"  ;
	        System.out.println("Producers sends message: " + context);
	        this.amqpTemplate.convertAndSend("queue_work", context);
	        Thread.sleep(100);
		 }
	   }
}
3、消费者
这里配置了多个消费者,主要是了验证当有多个消息是消费者是如何接受消息的
package com.springboot.rabbitmq.eimm.work.consumers;

import org.springframework.amqp.rabbit.annotation.RabbitHandler;
import org.springframework.amqp.rabbit.annotation.RabbitListener;
import org.springframework.stereotype.Component;

/**
 *
 * @method 消费者A
 * @author Mr yi
 * @time 2019年6月19日
 */
@Component
@RabbitListener(queues = "queue_work")
public class ConsumersWorkA {

	@RabbitHandler
    public void process(String message) {
        System.out.println("ConsumersA receiver message : " + message);
    }

}


package com.springboot.rabbitmq.eimm.work.consumers;

import org.springframework.amqp.rabbit.annotation.RabbitHandler;
import org.springframework.amqp.rabbit.annotation.RabbitListener;
import org.springframework.stereotype.Component;

/**
 *
 * @method 消费者B
 * @author Mr yi
 * @time 2019年6月19日
 */
@Component
@RabbitListener(queues = "queue_work")
public class ConsumersWorkB {

	@RabbitHandler
    public void process(String message) {
        System.out.println("ConsumersB receiver message : " + message);
    }

}
4、测试
     @Autowired
	private ProducersWork producers;

	@RequestMapping("/send")
    public void send() throws Exception {
    	producers.send();
    }
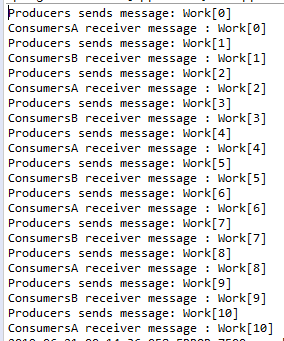
5、结果
控制台打印,发现10条消息 偶数条消费者A获取,奇数条消费者B获取,并且平均分配。
当然通过代码实现按需分配,即谁的性能强,谁优先原则,实现负载均衡。
查看RabbitMq 服务器,发现新增了一个queue_work的队列,点击队列名称可以查询详细信息

四、Fanout Exchange(订阅模式)
Fanout:广播,将消息交给所有绑定到交换机的队列
1、配置队列
配置了两个队列和一个交换机,并且两个队列要和交换机进行绑定
package com.springboot.rabbitmq.eimm.fanout.config;

import org.springframework.amqp.core.Binding;
import org.springframework.amqp.core.BindingBuilder;
import org.springframework.amqp.core.FanoutExchange;
import org.springframework.amqp.core.Queue;
import org.springframework.amqp.core.TopicExchange;
import org.springframework.context.annotation.Bean;
import org.springframework.context.annotation.Configuration;

/**
 *
 * 	Fanout Exchange(订阅模式)
 * @author Mr yi
 * @time 2019年6月19日
 */
@Configuration
public class RabbitConfigFanout {

	/**
	 * 两个消息队列名称
	 */
	final static String queueA = "queue_fanout_a";
    final static String queueB = "queue_fanout_b";

    /**
     *	 交换机名称
     */
    final static String exchange = "fanoutExchange";


    @Bean
    public Queue queueFanoutA() {
        return new Queue(RabbitConfigFanout.queueA);
    }

    @Bean
    public Queue queueFanoutB() {
        return new Queue(RabbitConfigFanout.queueB);
    }

    /**
     *
     * @method 声明一个fanout类型的交换机
     * @author Mr yi
     * @time 2019年6月19日
     * @return
     */
    @Bean
    FanoutExchange fanoutExchange() {
        return new FanoutExchange(RabbitConfigFanout.exchange);
    }

    /**
     *
     * @method 绑定Queue队列到交换机,并且指定routingKey
     * @author Mr yi
     * @time 2019年6月19日
     * @param queueFanoutA 对应注入queueFanoutA()方法
     * @param fanoutExchange 对应fanoutExchange()
     * @return
     */
    @Bean
    Binding bindingFanoutExchangeA(Queue queueFanoutA, FanoutExchange  fanoutExchange) {
        return BindingBuilder.bind(queueFanoutA).to(fanoutExchange);
    }

    @Bean
    Binding bindingFanoutExchangeB(Queue queueFanoutB, FanoutExchange  fanoutExchange) {
        return BindingBuilder.bind(queueFanoutB).to(fanoutExchange);
    }

}
2、生产者
package com.springboot.rabbitmq.eimm.fanout.producers;

import org.springframework.amqp.core.AmqpTemplate;
import org.springframework.beans.factory.annotation.Autowired;
import org.springframework.stereotype.Component;

/**
 *
 * @method 生产者
 * @author Mr yi
 * @time 2019年6月19日
 */
@Component
public class ProducersFanout {

	@Autowired
	private AmqpTemplate amqpTemplate;

	/**
	 *
	 * @method 生产者发送消息,fanout模式下routingKey为空即可
	 * @author Mr yi
	 * @time 2019年6月19日
	 * @throws Exception
	 */
	public void send() throws Exception {
		String context = "fanout message";
		System.out.println("Producers sends message: " + context);
		this.amqpTemplate.convertAndSend("fanoutExchange", "", context);
	}


}
3、消费者
这里配置了两个消费者,并且两个消费者需要和两个不同的队列进行绑定
package com.springboot.rabbitmq.eimm.fanout.consumers;

import org.springframework.amqp.rabbit.annotation.RabbitHandler;
import org.springframework.amqp.rabbit.annotation.RabbitListener;
import org.springframework.stereotype.Component;

/**
 *
 * @method 消费者A
 * @author Mr yi
 * @time 2019年6月19日
 */
@Component
@RabbitListener(queues = "queue_fanout_a")
public class ConsumersFanoutA {

	@RabbitHandler
    public void process(String message) {
        System.out.println("ConsumersFanoutA receiver message : " + message);
    }
}


package com.springboot.rabbitmq.eimm.fanout.consumers;

import org.springframework.amqp.rabbit.annotation.RabbitHandler;
import org.springframework.amqp.rabbit.annotation.RabbitListener;
import org.springframework.stereotype.Component;

/**
 *
 * @method 消费者B
 * @author Mr yi
 * @time 2019年6月19日
 */
@Component
@RabbitListener(queues = "queue_fanout_b")
public class ConsumersFanoutB {

	@RabbitHandler
    public void process(String message) {
        System.out.println("ConsumersFanoutB receiver message : " + message);
    }
}
4、测试
   @Autowired
	private ProducersFanout producers;

	@RequestMapping("/send")
    public void send() throws Exception {
    	producers.send();
    }
5、结果
控制台打印 ,发现两个绑定了不同队列的消费者都接受到了同一条消息


查看RabbitMq 服务器

五、Direct Exchange(路由模式)
Direct:定向,把消息交给符合指定routing key 的队列
1、配置队列
配置了两个队列和一个交换机,并且两个队列要和交换机进行绑定。同时交换机为两个队列指定了两个不同的routing key
package com.springboot.rabbitmq.eimm.direct.config;

import org.springframework.amqp.core.Binding;
import org.springframework.amqp.core.BindingBuilder;
import org.springframework.amqp.core.DirectExchange;
import org.springframework.amqp.core.Queue;
import org.springframework.context.annotation.Bean;
import org.springframework.context.annotation.Configuration;

/**
 *
 * 	Direct Exchange(路由模式)
 * @author Mr yi
 * @time 2019年6月19日
 */
@Configuration
public class RabbitConfigDirect {

	/**
	 * 两个消息队列名称
	 */
	final static String queueA = "queue_direct_a";
    final static String queueB = "queue_direct_b";

    /**
     *	 交换机名称
     */
    final static String exchange = "directExchange";


    @Bean
    public Queue queueDirectA() {
        return new Queue(RabbitConfigDirect.queueA);
    }

    @Bean
    public Queue queueDirectB() {
        return new Queue(RabbitConfigDirect.queueB);
    }

    /**
     *
     * @method 声明一个direct类型的交换机
     * @author Mr yi
     * @time 2019年6月19日
     * @return
     */
    @Bean
    DirectExchange directExchange() {
        return new DirectExchange(RabbitConfigDirect.exchange);
    }

    /**
     *
     * @method 绑定Queue队列到交换机,并且指定routingKey
     * @author Mr yi
     * @time 2019年6月19日
     * @param queueDirectA 对应注入queueDirectA()方法
     * @param directExchange 对应directExchange()
     * @return
     */
    @Bean
    Binding bindingDirectExchangeA(Queue queueDirectA, DirectExchange  directExchange) {
        return BindingBuilder.bind(queueDirectA).to(directExchange).with("directKeyA");
    }

    @Bean
    Binding bindingDirectExchangeB(Queue queueDirectB, DirectExchange  directExchange) {
        return BindingBuilder.bind(queueDirectB).to(directExchange).with("directKeyB");
    }

}
2、生产者
生产者发送消息包含两部分
(1)消息内容(即消费者需要接受的消息)
(2)内容标签(即routingKey),路由模式下交换机会把消息交给符合指定routing key 的队列
package com.springboot.rabbitmq.eimm.direct.producers;

import org.springframework.amqp.core.AmqpTemplate;
import org.springframework.beans.factory.annotation.Autowired;
import org.springframework.stereotype.Component;

/**
 *
 * @method 生产者
 * @author Mr yi
 * @time 2019年6月19日
 */
@Component
public class ProducersDirect {

	@Autowired
	private AmqpTemplate amqpTemplate;

	/**
	 *
	 * @method 生产者发送消息,direct模式下需要传递一个routingKey
	 * @author Mr yi
	 * @time 2019年6月19日
	 * @throws Exception
	 */
	public void sendA() throws Exception {
		String context = "direct message";
		System.out.println("Producers sends messageA: " + context);
		this.amqpTemplate.convertAndSend("directExchange", "directKeyA", context);
	}

	/**
	 *
	 * @method 生产者发送消息,direct模式下需要传递一个routingKey
	 * @author Mr yi
	 * @time 2019年6月19日
	 * @throws Exception
	 */
	public void sendB() throws Exception {
		String context = "direct message";
		System.out.println("Producers sends messageB: " + context);
		this.amqpTemplate.convertAndSend("directExchange", "directKeyB", context);
	}


}
3、消费者
这里配置了两个消费者,并且两个消费者需要和两个不同的队列进行绑定
package com.springboot.rabbitmq.eimm.fanout.consumers;

import org.springframework.amqp.rabbit.annotation.RabbitHandler;
import org.springframework.amqp.rabbit.annotation.RabbitListener;
import org.springframework.stereotype.Component;

package com.springboot.rabbitmq.eimm.direct.consumers;

import org.springframework.amqp.rabbit.annotation.RabbitHandler;
import org.springframework.amqp.rabbit.annotation.RabbitListener;
import org.springframework.stereotype.Component;

/**
 *
 * @method 消费者A
 * @author Mr yi
 * @time 2019年6月19日
 */
@Component
@RabbitListener(queues = "queue_direct_a")
public class ConsumersDirectA {

	@RabbitHandler
    public void process(String message) {
        System.out.println("ConsumersDirectA receiver message : " + message);
    }
}


package com.springboot.rabbitmq.eimm.direct.consumers;

import org.springframework.amqp.rabbit.annotation.RabbitHandler;
import org.springframework.amqp.rabbit.annotation.RabbitListener;
import org.springframework.stereotype.Component;

/**
 *
 * @method 消费者B
 * @author Mr yi
 * @time 2019年6月19日
 */
@Component
@RabbitListener(queues = "queue_direct_b")
public class ConsumersDirectB {

	@RabbitHandler
    public void process(String message) {
        System.out.println("ConsumersDirectB receiver message : " + message);
    }
}
4、测试
  @Autowired
	private ProducersDirect producers;

	@RequestMapping("/sendA")
    public void sendA() throws Exception {
    	producers.sendA();
    }

	@RequestMapping("/sendB")
    public void sendB() throws Exception {
    	producers.sendB();
    }
5、结果
控制台打印
sendA()方法 下,消费者A获取了消息


sendB()方法 下,消费者A获取了消息


查看RabbitMq 服务器

六、Topic Exchange(主题模式)
Topic:通配符,把消息交给符合routing pattern(路由模式) 的队列
1、配置队列
配置了两个队列和一个交换机,并且两个队列要和交换机进行绑定。同时交换机为两个队列指定了两个不同的routing key
package com.springboot.rabbitmq.eimm.topic.config;

import org.springframework.amqp.core.Binding;
import org.springframework.amqp.core.BindingBuilder;
import org.springframework.amqp.core.Queue;
import org.springframework.amqp.core.TopicExchange;
import org.springframework.context.annotation.Bean;
import org.springframework.context.annotation.Configuration;

/**
 *
 * 	Topic Exchange(主题模式)
 * @author Mr yi
 * @time 2019年6月19日
 */
@Configuration
public class RabbitConfigTopic {

	/**
	 * 两个消息队列名称
	 */
	final static String queueA = "queue_topic_a";
    final static String queueB = "queue_topic_b";

    /**
     *	 交换机名称
     */
    final static String exchange = "topicExchange";


    @Bean
    public Queue queueTopicA() {
        return new Queue(RabbitConfigTopic.queueA);
    }

    @Bean
    public Queue queueTopicB() {
        return new Queue(RabbitConfigTopic.queueB);
    }

    /**
     *
     * @method 声明一个Topic类型的交换机
     * @author Mr yi
     * @time 2019年6月19日
     * @return
     */
    @Bean
    TopicExchange topicExchange() {
        return new TopicExchange(RabbitConfigTopic.exchange);
    }

    /**
     *
     * @method 绑定Queue队列到交换机,并且指定routingKey
     * @author Mr yi
     * @time 2019年6月19日
     * @param queueMessage
     * @param exchange
     * @return
     */
    @Bean
    Binding bindingTopicExchangeA(Queue queueTopicA, TopicExchange topicExchange) {
        return BindingBuilder.bind(queueTopicA).to(topicExchange).with("topic.keyA");
    }

    @Bean
    Binding bindingTopicExchangeB(Queue queueTopicB, TopicExchange topicExchange) {
        return BindingBuilder.bind(queueTopicB).to(topicExchange).with("topic.#");
    }

}
2、生产者
生产者发送消息包含两部分
(1)消息内容(即消费者需要接受的消息)
(2)内容标签(即routingKey),路由模式下交换机会把消息交给符合指定routing key 的队列
package com.springboot.rabbitmq.eimm.topic.producers;

import org.springframework.amqp.core.AmqpTemplate;
import org.springframework.beans.factory.annotation.Autowired;
import org.springframework.stereotype.Component;

/**
 *
 * @method 生产者
 * @author Mr yi
 * @time 2019年6月19日
 */
@Component
public class ProducersTopic {

	@Autowired
	private AmqpTemplate amqpTemplate;

	/**
	 *
	 * @method 生产者消息,并指定routingKey为topic.keyA
	 * @author Mr yi
	 * @time 2019年6月19日
	 * @throws Exception
	 */
	public void sendA() throws Exception {
		String context = "topic messageA";
		System.out.println("Producers sends messageA: " + context);
		this.amqpTemplate.convertAndSend("topicExchange", "topic.keyA", context);
	}

	/**
	 *
	 * @method 生产者消息,并指定routingKey为topic.keyB
	 * @author Mr yi
	 * @time 2019年6月19日
	 * @throws Exception
	 */
	public void sendB() throws Exception {
		String context = "topic messageB";
		System.out.println("Producers sends messageB: " + context);
		this.amqpTemplate.convertAndSend("topicExchange", "topic.keyB", context);
	}
}
3、消费者
这里配置了两个消费者,并且两个消费者需要和两个不同的队列进行绑定
package com.springboot.rabbitmq.eimm.topic.consumers;

import org.springframework.amqp.rabbit.annotation.RabbitHandler;
import org.springframework.amqp.rabbit.annotation.RabbitListener;
import org.springframework.stereotype.Component;

/**
 *
 * @method 消费者A
 * @author Mr yi
 * @time 2019年6月19日
 */
@Component
@RabbitListener(queues = "queue_topic_a")
public class ConsumersTopicA {

	@RabbitHandler
    public void process(String message) {
        System.out.println("ConsumersTopicA receiver message : " + message);
    }
}


package com.springboot.rabbitmq.eimm.topic.consumers;

import org.springframework.amqp.rabbit.annotation.RabbitHandler;
import org.springframework.amqp.rabbit.annotation.RabbitListener;
import org.springframework.stereotype.Component;

/**
 *
 * @method 消费者B
 * @author Mr yi
 * @time 2019年6月19日
 */
@Component
@RabbitListener(queues = "queue_topic_b")
public class ConsumersTopicB {

	@RabbitHandler
    public void process(String message) {
        System.out.println("ConsumersTopicB receiver message : " + message);
    }
}
4、测试
  @Autowired
	private ProducersTopic producers;

	@RequestMapping("/sendA")
    public void sendA() throws Exception {
    	producers.sendA();
    }

	@RequestMapping("/sendB")
    public void sendB() throws Exception {
    	producers.sendB();
    }
5、结果
控制台打印
sendA()方法 下,消费者A和消费者B获取了消息


sendB()方法 下,只有消费者B获取了消息


查看RabbitMq 服务器

源码下载:https://download.csdn.net/download/qq_29914837/11252856
如果你觉得本篇文章对你有所帮助的话,麻烦请点击头像右边的关注按钮,谢谢!
技术在交流中进步,知识在分享中传播
