死信/死信队列及死信交换机是什么,和mq中队列交换机有什么关系,我这里用一张图来概括下
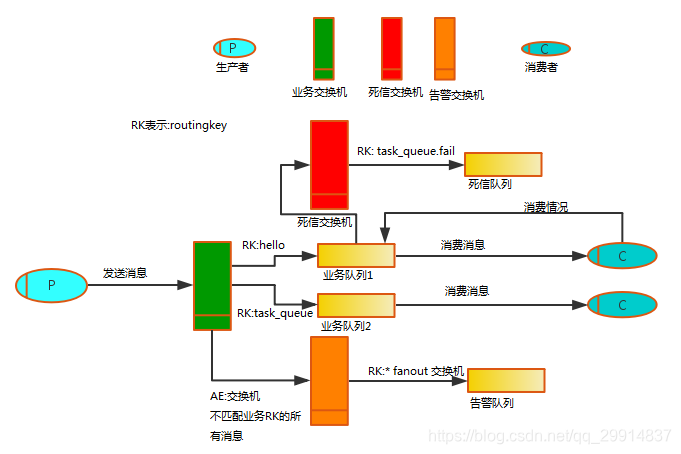
(图片来源网上)
从图中发现知:
生产者发送的消息会经由交换机传送到绑定的队列中,然后经由消费者接受消息,消息一旦被消费者消费后,就会移除队列中,表示整个流程的结束。
但是如果消息没有被消费成功(或者说消息变为了死信),那么正常来说和原来的(正常)队列绑定的消费者就无法消费消息,那么变为死信的消息怎么处理啦!
在正常的业务中,会针对这一部分进行特殊处理,可以考虑指定一个死信交换机,并绑定一个死信队列,当消息变成死信时,该消息就会被发送到该死信队列上,这样就方便我们查看消息失败的原因了。
换句话说就是 没有被消费的消息, 换个地方重新被消费。
整个流程可以表示成
生产者 --> 消息 --> 交换机 --> 队列 --> 变成死信 --> DLX交换机 -->队列 --> 消费者
一、什么是死信
(1)消息被拒绝(basic.reject或basic.nack)并且requeue=false.
(2)消息TTL超期 (rabbitmq Time-To-Live -> messageProperties.setExpiration())
(3)队列达到最大长度(队列满了,无法再添加数据到mq中)
二、什么是死信交换机(DLX)
定义业务队列的时候,要考虑指定一个死信交换机,死信交换机可以和任何一个普通的队列进行绑定,然后在业务队列出现死信的时候就会将数据发送到死信队列。
三、什么是死信队列
死信队列实际上就是一个普通的队列,只是这个队列跟死信交换机进行了绑定,用来存放死信而已。
四、如何使用死信交换机
定义业务(普通正常)队列的时候指定参数
x-dead-letter-exchange: 用来设置死信后发送的交换机
x-dead-letter-routing-key:用来设置死信的routingKey
如果高并发情况到来 某一个队列比如邮件队列满了 或者异常 或者消息过期 或者消费者拒绝消息

邮件队列 绑定一个死信交换机 一旦邮件队列满了的情况下 为了防止数据丢失情况 消息不再邮件队列存放了 放到死信交换机 然后交给私信邮件队列 最终交给 死信消费者
五、springboot整合RabbitMQ来实现死信
这里我会用实际案例来讲解 ,结合上面图,实现发送消息到邮件队列,设置消息过期,通过死信交换机,传到死信队列,再由消费者接受。
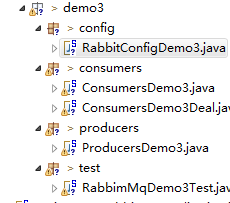
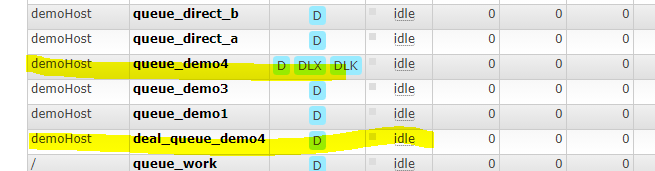
定义了普通交换机、邮件队列、死信交换机、死信队列
package com.springboot.rabbitmq.example.demo3.config;

import java.util.HashMap;
import java.util.Map;

import org.springframework.amqp.core.Binding;
import org.springframework.amqp.core.BindingBuilder;
import org.springframework.amqp.core.DirectExchange;
import org.springframework.amqp.core.Message;
import org.springframework.amqp.core.Queue;
import org.springframework.amqp.rabbit.connection.CachingConnectionFactory;
import org.springframework.amqp.rabbit.connection.CorrelationData;
import org.springframework.amqp.rabbit.core.RabbitTemplate;
import org.springframework.beans.factory.annotation.Autowired;
import org.springframework.context.annotation.Bean;
import org.springframework.context.annotation.Configuration;
import lombok.extern.slf4j.Slf4j;

/**
 * @method
 * @author Mr yi
 * @time 2019年6月23日
 */
@Configuration
@Slf4j
public class RabbitConfigDemo3    {


	//邮件队列名称
	final static String queue = "queue_demo4";

	//邮件交换机名称
	final static String exchangeName = "deom4Exchange";

	// routingKey
	final static String routingKey  = "keyDemo3";

	//死信消息队列名称
	final static String deal_queue = "deal_queue_demo4";

	//死信交换机名称
	final static String deal_exchangeName = "deal_deom4Exchange";

	//死信 routingKey
	final static String dead_RoutingKey  = "dead_routing_key";

	//死信队列 交换机标识符
    public static final String DEAD_LETTER_QUEUE_KEY = "x-dead-letter-exchange";

    //死信队列交换机绑定键标识符
    public static final String DEAD_LETTER_ROUTING_KEY = "x-dead-letter-routing-key";

    @Autowired
    private CachingConnectionFactory connectionFactory;

    //定义邮件队列(邮件队列 绑定一个死信交换机,并指定routing_key)
	@Bean
	public Queue queueDemo3() {
		// 将普通队列绑定到死信队列交换机上
        Map<String, Object> args = new HashMap<>(2);
        args.put(DEAD_LETTER_QUEUE_KEY, deal_exchangeName);
        args.put(DEAD_LETTER_ROUTING_KEY, dead_RoutingKey);
        return new Queue(RabbitConfigDemo3.queue, true, false, false, args);
	}

	//声明一个direct类型的交换机
	@Bean
	DirectExchange exchangeDemo3() {
		return new DirectExchange(RabbitConfigDemo3.exchangeName);
	}

	//绑定邮件Queue队列到交换机,并且指定routingKey
	@Bean
	Binding bindingDirectExchangeDemo3(   ) {
		return BindingBuilder.bind(queueDemo3()).to(exchangeDemo3()).with(routingKey);
	}

	//创建配置死信邮件队列
    @Bean
    public Queue deadQueue() {
        Queue queue = new Queue(deal_queue, true);
        return queue;
    }

    //创建死信交换机
     @Bean
     public DirectExchange deadExchange() {
         return new DirectExchange(deal_exchangeName);
     }

     //死信队列与死信交换机绑定
      @Bean
      public Binding bindingDeadExchange() {
          return BindingBuilder.bind(deadQueue()).to(deadExchange()).with(dead_RoutingKey);
      }

      @Bean
      public RabbitTemplate rabbitTemplate(){
  		//若使用confirm-callback ,必须要配置publisherConfirms 为true
  		connectionFactory.setPublisherConfirms(true);
  		//若使用return-callback,必须要配置publisherReturns为true
          connectionFactory.setPublisherReturns(true);
          RabbitTemplate rabbitTemplate = new RabbitTemplate(connectionFactory);
          //使用return-callback时必须设置mandatory为true,或者在配置中设置mandatory-expression的值为true
         // rabbitTemplate.setMandatory(true);

          // 如果消息没有到exchange,则confirm回调,ack=false; 如果消息到达exchange,则confirm回调,ack=true
          rabbitTemplate.setConfirmCallback(new RabbitTemplate.ConfirmCallback() {
              @Override
              public void confirm(CorrelationData correlationData, boolean ack, String cause) {
                  if(ack){
                      log.info("消息发送成功:correlationData({}),ack({}),cause({})",correlationData,ack,cause);
                  }else{
                      log.info("消息发送失败:correlationData({}),ack({}),cause({})",correlationData,ack,cause);
                  }
              }
          });

          //如果exchange到queue成功,则不回调return;如果exchange到queue失败,则回调return(需设置mandatory=true,否则不回回调,消息就丢了)
          rabbitTemplate.setReturnCallback(new RabbitTemplate.ReturnCallback() {
              @Override
              public void returnedMessage(Message message, int replyCode, String replyText, String exchange, String routingKey) {
                  log.info("消息丢失:exchange({}),route({}),replyCode({}),replyText({}),message:{}",exchange,routingKey,replyCode,replyText,message);
              }
          });
          return rabbitTemplate;
      }


}
生产者实现类,生产者发送消息
package com.springboot.rabbitmq.example.demo3.producers;

import java.util.Date;
import java.util.UUID;

import org.springframework.amqp.core.AmqpTemplate;
import org.springframework.amqp.core.Message;
import org.springframework.amqp.core.MessageBuilder;
import org.springframework.amqp.core.MessageProperties;
import org.springframework.amqp.rabbit.core.RabbitTemplate;
import org.springframework.beans.factory.annotation.Autowired;
import org.springframework.stereotype.Component;

import com.alibaba.fastjson.JSONObject;
/**
 *
 * @method 生产者
 * @author Mr yi
 * @time 2019年6月19日
 */
@Component
public class ProducersDemo3  {


    @Autowired
    private AmqpTemplate rabbitTemplate;

	/**
	 * @method 生产者发送消息,direct模式下需要传递一个routingKey
	 * @author Mr yi
	 * @time 2019年6月19日
	 * @throws Exception
	 */
	public void send( ) throws Exception {

		JSONObject jsonObject = new JSONObject();
        jsonObject.put("eamil", "[email protected]");
        jsonObject.put("message", "Hello World!");
        jsonObject.put("timestamp", 0);
        String jsonString = jsonObject.toJSONString();
        System.out.println("生产者发送的消息是:" + jsonString);
        // 设置消息唯一id 保证每次重试消息id唯一
        Message  message = MessageBuilder.withBody(jsonString.getBytes()).setContentType(MessageProperties.CONTENT_TYPE_JSON).setContentEncoding("utf-8")
                .setMessageId(UUID.randomUUID() + "").build(); //消息id设置在请求头里面 用UUID做全局ID

        //routingKey 为 keyDemo3
        rabbitTemplate.convertAndSend("deom4Exchange", "keyDemo3",message);
	}

}
邮件消费者
邮件消费者获取到了消息,但是因为消息timestamp为0,使用 channel.basicNack()手动拒绝消息,消息重新发送到死信交换机
package com.springboot.rabbitmq.example.demo3.consumers;

import java.io.IOException;
import java.util.Map;

import org.springframework.amqp.core.Message;
import org.springframework.amqp.rabbit.annotation.RabbitHandler;
import org.springframework.amqp.rabbit.annotation.RabbitListener;
import org.springframework.amqp.support.AmqpHeaders;
import org.springframework.messaging.handler.annotation.Header;
import org.springframework.messaging.handler.annotation.Headers;
import org.springframework.stereotype.Component;

import com.alibaba.fastjson.JSONObject;
import com.rabbitmq.client.Channel;

/**
 *
 * @method  邮件消费者,消费从邮件队列传来的消息
 * @author Mr yi
 * @time 2019年6月19日
 */
@Component
public class ConsumersDemo3 {

	@RabbitListener(queues = "queue_demo4")
    public void process(Message message, @Headers Map<String, Object> headers, Channel channel) throws IOException {

		// 获取消息Id
        String messageId = message.getMessageProperties().getMessageId();
        String msg = new String(message.getBody(), "UTF-8");
        System.out.println("邮件消费者获取生产者消息msg:"+msg+",消息id"+messageId);

        JSONObject jsonObject = JSONObject.parseObject(msg);
        Integer timestamp = jsonObject.getInteger("timestamp");

        try {
            int result  = 1/timestamp;
            System.out.println("result"+result);
            //手动ack
            Long deliveryTag = (Long) headers.get(AmqpHeaders.DELIVERY_TAG);
            // 手动签收
            channel.basicAck(deliveryTag, false);
        } catch (Exception e) {
            //拒绝消费消息(丢失消息) 给死信队列,第三个参数 false 表示不会重回队列
            channel.basicNack(message.getMessageProperties().getDeliveryTag(), false, false);
        }

    }

}
死信邮件消费者
package com.springboot.rabbitmq.example.demo3.consumers;

import java.io.IOException;
import java.util.Map;

import org.springframework.amqp.core.Message;
import org.springframework.amqp.rabbit.annotation.RabbitHandler;
import org.springframework.amqp.rabbit.annotation.RabbitListener;
import org.springframework.amqp.support.AmqpHeaders;
import org.springframework.messaging.handler.annotation.Header;
import org.springframework.messaging.handler.annotation.Headers;
import org.springframework.stereotype.Component;

import com.alibaba.fastjson.JSONObject;
import com.rabbitmq.client.Channel;

/**
 *
 * @method  死信邮件消费者,消费从死信队列传来的消息
 * @author Mr yi
 * @time 2019年6月19日
 */
@Component
public class ConsumersDemo3Deal {

	@RabbitListener(queues = "deal_queue_demo4")
    public void process(Message message, @Headers Map<String, Object> headers, Channel channel) throws IOException {

		// 获取消息Id
        String messageId = message.getMessageProperties().getMessageId();
        String msg = new String(message.getBody(), "UTF-8");
        System.out.println("死信邮件消费者获取生产者消息msg:"+msg+",消息id"+messageId);

        // 手动ack
        Long deliveryTag = (Long) headers.get(AmqpHeaders.DELIVERY_TAG);
        // 手动签收
        channel.basicAck(deliveryTag, false);
        System.out.println("执行结束....");

    }

}
测试类
@Autowired
	private ProducersDemo3 producers;

	@RequestMapping("/send")
    public String send() throws Exception {
    	producers.send();
    	return "success";
    }
启动程序

源码:https://download.csdn.net/download/qq_29914837/11262375
如果你觉得本篇文章对你有所帮助的话,麻烦请点击头像右边的关注按钮,谢谢!
技术在交流中进步,知识在分享中传播
