1.Redis安装
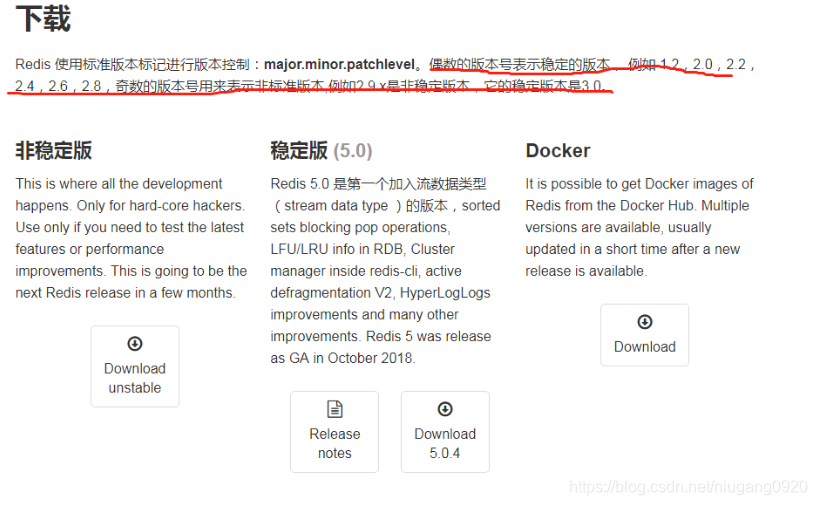
1.1.Redis下载
官网地址:http://redis.io/
中文官网地址:http://www.redis.cn/
下载地址:http://download.redis.io/releases/
1.2.Redis安装环境
Redis没有官方的Windows版本,所以建议在Linux系统上安装运行.

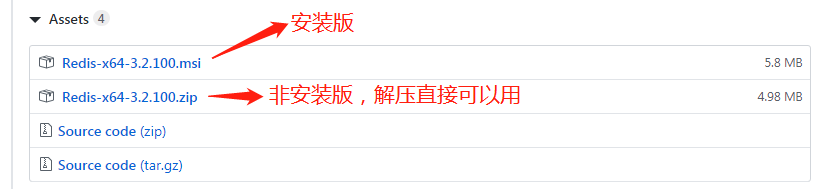
GitHub上下载地址 https://github.com/MicrosoftArchive/redis/tags
1.3.Redis安装
-
step1:在VMware中安装CentOS(参考Linux教程中的安装虚拟机)
-
step2:安装C语言需要的GCC环境
yum install gcc-c++ -
step3:解压缩Redis源码压缩包
扫描二维码关注公众号,回复: 8492355 查看本文章
tar -zxf redis-3.2.9.tar.gz -
step4:编译Redis源码,进入redis-3.2.9目录,执行编译命令
make -
step5:安装Redis,需要通过PREFIX指定安装路径
make install PREFIX=/usr/local/redis
1.4.启动
1.4.1前台启动
-
启动命令:redis-server,直接运行bin/redis-server将以前端模式启动。
./redis-server -
关闭命令:ctrl+c
启动缺点:客户端窗口关闭则redis-server程序结束,不推荐使用此方法
1.4.2后台启动
-
第一步:拷贝redis-3.2.9/redis.conf配置文件到Redis安装目录的bin目录
cp redis.conf /usr/local/redis/bin/ -
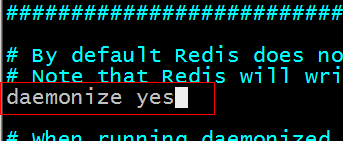
第二步:修改redis.conf,将daemonize由no改为yes
vim redis.conf
修改redis.conf中代码
默认情况下,Redis不作为守护进程运行。如果你需要,用“yes”。注意,Redis将在/var/run/ Redis中写入pid文件。当监控pid。windows守护进程
默认情况下,如果没有指定“bind”配置指令,则Redis侦听服务器上所有可用网络接口的连接,可以使用“bind”配置指令侦听一个或多个选择的接口,后面跟着一个或多个IP地址。
警告
如果运行Redis的计算机直接暴露于Internet,则绑定到所有接口是危险的,并且会将实例暴露给Internet上的每个人。 因此,默认情况下,我们取消注释以下绑定指令,这将强制Redis仅侦听IPv4回溯接口地址(这意味着Redis将只能从运行到运行的同一台计算机的客户端接受连接)。
很多开发者在一开始看到bind的这个配置时都是这么认为的: 指定Redis只接收来自于某个网段IP的客户端请求
但事实上bind指定的是Redis和哪个网卡进行绑定, 和客户端是什么网段没有关系

bind 127.0.0.1
改为
bind <redis实例所在机器的真实IP>,比如192.168.10.133
-
第三步:执行命令
./redis-server redis.conf -
让redis-server redis-cli命令随处都可访问(扩展)
创建对应的软连接
ln -s /usr/local/redis/bin/redis-server /usr/local/bin/
ln -s /usr/local/redis/bin/redis-cli /usr/local/bin/
查看软件的软连接
[root@localhost bin]# ll /usr/local/bin/
总用量 0
lrwxrwxrwx. 1 root root 30 7月  11 14:01 redis-cli -> /usr/local/redis/bin/redis-cli
lrwxrwxrwx. 1 root root 33 7月  11 14:00 redis-server -> /usr/local/redis/bin/redis-serve
·
1.4.3 关闭Redis
- 通过kill -9 redisPid,杀死redis进程,比较暴力的方式
- ./redis-cli shutdwon [这样的话rbd持久化也能执行bgsave操作]
1.4.4 Redis其他可执行命令
| 可执行文件 | 作用 |
|---|---|
| redis-server | 启动redis |
| redis-cli | redis客户端命令 |
| redis-benchmark | redis基准测试工具 |
| redis-check-aof | redis AOF持久化文件检测和修复文件 |
| redis-check-dump | redis RDB持久化文件检测和修复文件 |
| redis-sentinel | 启动redis哨兵 |
2.Redis客户端
2.1自带命令客户端

-
命令格式
./redis-cli -h 127.0.0.1 -p 6379 -
修改redis配置文件(解决IP绑定问题)
bind 127.0.0.1 绑定的IP才能访问redis服务器,注释掉该配置
保护模式是一种安全保护层,为了避免在internet上打开的Redis实例被访问和利用。
当保护模式打开时,如果:
1)服务器没有使用“bind”指令显式绑定到一组地址。
2)未配置密码。
服务器只接受从
IPv4和IPv6环回地址127.0.0.1和::1,来自Unix域套接字。
默认情况下启用了受保护模式。只有当您确定希望来自其他主机的客户机连接到Redis(即使没有配置身份验证),或者使用“bind”指令显式列出一组特定的接口时,才应该禁用它。
protected-mode yes 是否开启保护模式,由yes该为no
- 参数说明
-h:redis服务器的ip地址
-p:redis实例的端口号
- 默认方式
如果不指定主机和端口也可以
./redis-cli
默认主机地址是127.0.0.1
默认端口是6379
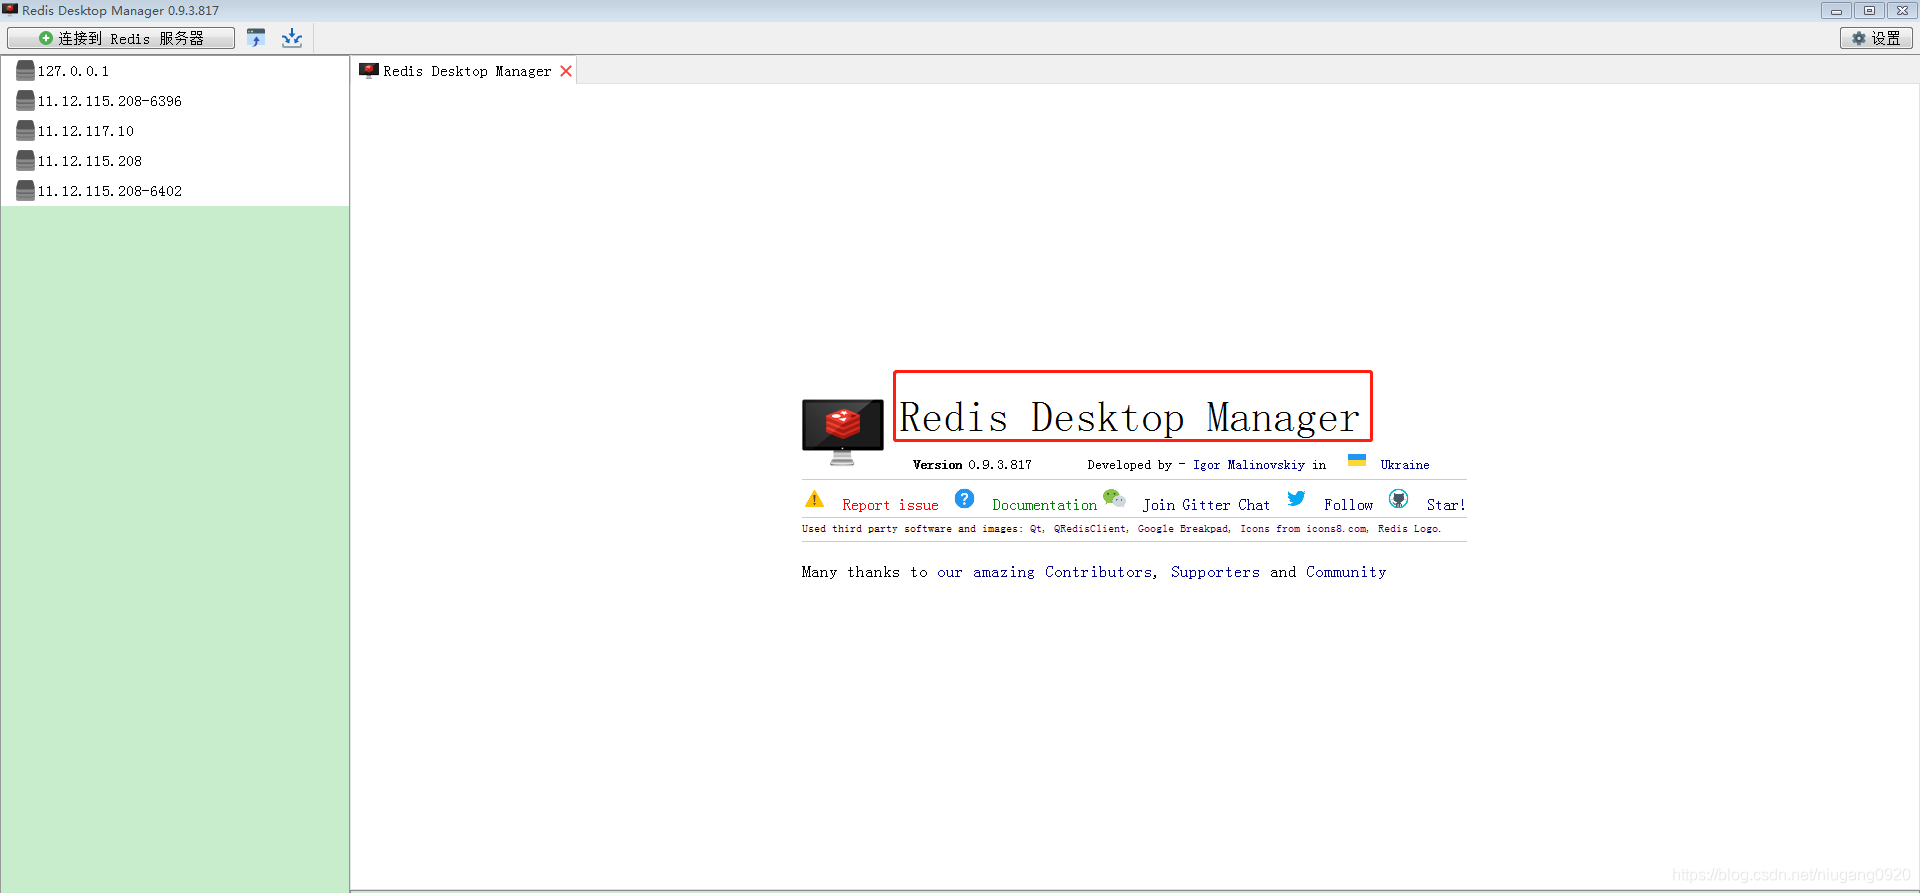
2.2图形界面客户端
下载地址:https://redisdesktop.com/
2.2.1连接超时解决
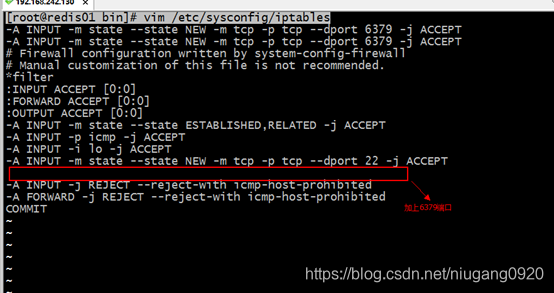
远程连接redis服务,需要关闭或者修改防火墙配置。
- 第一步:编辑iptables
vim /etc/sysconfig/iptables
在命令模式下,选定要复制的那一行的末尾,然后点击键盘yyp,就完成复制,然后修改。
-
第二步:重启防火墙
service iptables restart
iptables:清除防火墙规则: [确定]
iptables:将链设置为政策 ACCEPT:filter [确定]
iptables:正在卸载模块: [确定]
iptables:应用防火墙规则: [确定]
2.2.3 多数据库支持
-
默认一共是16个数据库,每个数据库之间是相互隔离(但是可以使用flushall一次清空所有的库)。数据库的数量是在redis.conf中配置的。
设置数据库的数量。默认数据库是DB 0,您可以使用select dbid 在每个连接的基础上选择一个不同的数据库,其中dbid是一个介于0和“databases”-1之间的数字

-
切换数据库使用命令:select 数据库编号(0-15)
例如:select 1
2.3Java客户端 Jedis连接Redis
2.3.1Jedis介绍
- Redis不仅使用命令客户端来操作,而且可以使用程序客户端操作。
- 现在基本上主流的语言都有客户端支持,比如Java、C、C#、C++、php、Node.js、Go等。
- 在官方网站里列一些Java的客户端,有Jedis、Redisson、Jredis、JDBC-Redis、等其中官方推荐使用Jedis和Redisson。
- Jedis同样也是托管在github上,地址:https://github.com/xetorthio/jedis
2.3.2POM.xml
<dependency>
   <groupId>redis.clients</groupId>
   <artifactId>jedis</artifactId>
   <version>2.9.0</version>
</dependency>
2.3.3单实例连接
	@Test
	public void testJedis() {
		//创建一个Jedis的连接
		Jedis jedis = new Jedis("127.0.0.1", 6379);
		//执行redis命令
		jedis.set("key1", "hello world");
		//从redis中取值
		String result = jedis.get("key1");
		//打印结果
		System.out.println(result);
		//关闭连接
		jedis.close();

	}
注意事项:需要去设置redis服务器的防火墙策略(临时关闭、永久关闭、端口暴露)
2.3.4连接池连接
	@Test
	public void testJedisPool() {
		//创建一连接池对象
		JedisPool jedisPool = new JedisPool("127.0.0.1", 6379);
		//从连接池中获得连接
		Jedis jedis = jedisPool.getResource();
		String result = jedis.get("key1") ;
		System.out.println(result);
		//关闭连接
		jedis.close();
		//关闭连接池
		jedisPool.close();
	}
2.3.4Spring中Redis连接
配置spring配置文件applicationContext.xml
<?xml version="1.0" encoding="UTF-8"?>
<beans xmlns="http://www.springframework.org/schema/beans"
	xmlns:xsi="http://www.w3.org/2001/XMLSchema-instance" xmlns:mvc="http://www.springframework.org/schema/mvc"
	xmlns:context="http://www.springframework.org/schema/context"
	xmlns:aop="http://www.springframework.org/schema/aop" xmlns:tx="http://www.springframework.org/schema/tx"
	xsi:schemaLocation="http://www.springframework.org/schema/beans
		http://www.springframework.org/schema/beans/spring-beans.xsd
		http://www.springframework.org/schema/mvc
		http://www.springframework.org/schema/mvc/spring-mvc.xsd
		http://www.springframework.org/schema/context
		http://www.springframework.org/schema/context/spring-context.xsd
		http://www.springframework.org/schema/aop
		http://www.springframework.org/schema/aop/spring-aop.xsd
		http://www.springframework.org/schema/tx
		http://www.springframework.org/schema/tx/spring-tx.xsd ">

	<!-- 连接池配置 -->
	<bean id="jedisPoolConfig" class="redis.clients.jedis.JedisPoolConfig">
		<!-- 最大连接数 -->
		<property name="maxTotal" value="30" />
		<!-- 最大空闲连接数 -->
		<property name="maxIdle" value="10" />
		<!-- 每次释放连接的最大数目 -->
		<property name="numTestsPerEvictionRun" value="1024" />
		<!-- 释放连接的扫描间隔(毫秒) -->
		<property name="timeBetweenEvictionRunsMillis" value="30000" />
		<!-- 连接最小空闲时间 -->
		<property name="minEvictableIdleTimeMillis" value="1800000" />
		<!-- 连接空闲多久后释放, 当空闲时间>该值 且 空闲连接>最大空闲连接数 时直接释放 -->
		<property name="softMinEvictableIdleTimeMillis" value="10000" />
		<!-- 获取连接时的最大等待毫秒数,小于零:阻塞不确定的时间,默认-1 -->
		<property name="maxWaitMillis" value="1500" />
		<!-- 在获取连接的时候检查有效性, 默认false -->
		<property name="testOnBorrow" value="false" />
		<!-- 在空闲时检查有效性, 默认false -->
		<property name="testWhileIdle" value="true" />
		<!-- 连接耗尽时是否阻塞, false报异常,ture阻塞直到超时, 默认true -->
		<property name="blockWhenExhausted" value="false" />
	</bean>

	<!-- redis单机 通过连接池 -->
	<bean id="jedisPool" class="redis.clients.jedis.JedisPool"
		destroy-method="close">
		<constructor-arg name="poolConfig" ref="jedisPoolConfig" />
		<constructor-arg name="host" value="192.168.242.130" />
		<constructor-arg name="port" value="6379" />
	</bean>
</beans>
-
测试代码
@Test
public void testJedisPool() {
		JedisPool pool = (JedisPool) applicationContext.getBean("jedisPool");
		Jedis jedis = null;
		try {
			jedis = pool.getResource();
			jedis.set("name", "lisi");
			String name = jedis.get("name");
			System.out.println(name);
		} catch (Exception ex) {
			ex.printStackTrace();
		} finally {
			if (jedis != null) {
				// 关闭连接
				jedis.close();
			}
		}
	}
2.3.5 Spring-Data-Redis
-
pom.xml
<!-- spring data redis start --> <dependency> <groupId>org.springframework.data</groupId> <artifactId>spring-data-redis</artifactId> <version>${spring_data_redis}</version> <exclusions> <exclusion> <artifactId>slf4j-api</artifactId> <groupId>org.slf4j</groupId> </exclusion> <!-- <exclusion> <artifactId>spring-core</artifactId> <groupId>org.springframework</groupId> </exclusion>--> <exclusion> <artifactId>jcl-over-slf4j</artifactId> <groupId>org.slf4j</groupId> </exclusion> <exclusion> <artifactId>spring-context-support</artifactId> <groupId>org.springframework</groupId> </exclusion> </exclusions> </dependency> -
application.xml配置
    <!--redis -->
    <bean id="jedisPoolConfig" class="redis.clients.jedis.JedisPoolConfig">
        <property name="maxTotal" value="${redis.pool.maxTotal}"/>
        <property name="maxIdle" value="${redis.pool.maxIdle}"/>
        <property name="maxWaitMillis" value="${redis.pool.maxWait}"/>
        <property name="testOnBorrow" value="${redis.pool.testOnBorrow}"/>
    </bean>
<!--spring data redis-->
    <bean id="connectionFactory"
          class="org.springframework.data.redis.connection.jedis.JedisConnectionFactory">
        <property name="hostName" value="${redis.ip}"></property>
        <property name="port" value="${redis.port}"></property>
        <property name="poolConfig">
            <ref bean="jedisPoolConfig"/>
        </property>
    </bean>

    <!--  redisTemplate序列化配置,默认采用jdk序列化 -->
    <bean id="redisTemplate" class="org.springframework.data.redis.core.StringRedisTemplate">
        <property name="connectionFactory" ref="connectionFactory"/>
        <property name="keySerializer">
            <bean
                    class="org.springframework.data.redis.serializer.StringRedisSerializer"/>
        </property>
        <property name="valueSerializer">
         <bean
             class="org.springframework.data.redis.serializer.StringRedisSerializer"/>
        </property>
        <property name="defaultSerializer">
         <bean              class="org.springframework.data.redis.serializer.StringRedisSerializer"/>
        </property>

    </bean>
微信公众号

JAVA程序猿成长之路
分享资源,记录程序猿成长点滴。专注于Java,Spring,SpringBoot,SpringCloud,分布式,微服务。
