1.安装
地址:https://github.com/php-amqplib/php-amqplib
composer require php-amqplib/php-amqplib
2. 使用
新建 RabbitMq.php
<?php
require "vendor/autoload.php";

use PhpAmqpLib\Connection\AMQPStreamConnection;
use PhpAmqpLib\Message\AMQPMessage;

abstract class RabbitMq
{
    public $config = [
        'host' => '127.0.0.1', //ip
        'port' => 5672,      //端口号
        'user' => 'guest',     //用户
        'password' => 'guest', //密码
        'vhost' => '/'         //虚拟host
    ];

    public $connection;     //链接
    public $channel;        //信道


    public $exchangeName = '';          //交换机名
    public $queueName = '';             //队列名
    public $routeKey = '';              //路由键
    public $exchangeType = 'direct';    //交换机类型


    public $autoAck = true; //是否自动ack应答

    //初始化
    public function __construct($exchangeName, $queueName, $routeKey, $exchangeType = 'direct', $config = array())
    {
        $this->exchangeName = empty($exchangeName) ? '' : $exchangeName;
        $this->queueName = empty($queueName) ? '' : $queueName;
        $this->routeKey = empty($routeKey) ? '' : $routeKey;
        $this->exchangeType = empty($exchangeType) ? '' : 'direct';
        if (!empty($config)) {
            $this->setConfig($config);
        }

        //创建链接
        $this->connection = new AMQPStreamConnection($this->config['host'], $this->config['port'],
            $this->config['user'], $this->config['password'], $this->config['vhost']);
        //创建信道
        $this->channel = $this->connection->channel();
        $this->createExchange();
    }


    //创建交换机
    private function createExchange()
    {
        //创建交换机$channel->exchange_declare($exhcange_name,$type,$passive,$durable,$auto_delete);
        //passive: 消极处理, 判断是否存在队列,存在则返回,不存在直接抛出 PhpAmqpLib\Exception\AMQPProtocolChannelException 异常
        //durable:true、false true:服务器重启会保留下来Exchange。警告:仅设置此选项,不代表消息持久化。即不保证重启后消息还在
        //autoDelete:true、false.true:当已经没有消费者时,服务器是否可以删除该Exchange
        $this->channel->exchange_declare($this->exchangeName, $this->exchangeType, false, true, false);
        //passive: 消极处理, 判断是否存在队列,存在则返回,不存在直接抛出 PhpAmqpLib\Exception\AMQPProtocolChannelException 异常
        //durable:true、false true:在服务器重启时,能够存活
        //exclusive :是否为当前连接的专用队列,在连接断开后,会自动删除该队列
        //autodelete:当没有任何消费者使用时,自动删除该队列
        //arguments: 自定义规则
        $this->channel->queue_declare($this->queueName, false, true, false, false);
    }

    //发送消息
    public function sendMessage($data)
    {
        //创建消息$msg = new AMQPMessage($data,$properties)
        //#$data  string类型 要发送的消息
        //#roperties array类型 设置的属性,比如设置该消息持久化[‘delivery_mode’=>2]
        $msg = new AMQPMessage($data, ['delivery_mode' => AMQPMessage::DELIVERY_MODE_PERSISTENT]);
        $this->channel->basic_publish($msg,$this->exchangeName, $this->routeKey);
    }

    //处理消息
    public function dealMq($flag)
    {
        $this->autoAck = $flag;
        $this->channel->queue_bind($this->queueName,$this->exchangeName, $this->routeKey);
        //prefetchSize:0
        //prefetchCount:会告诉RabbitMQ不要同时给一个消费者推送多于N个消息,即一旦有N个消息还没有ack,则该consumer将block掉,直到有消息ack
        //global:true\false 是否将上面设置应用于channel,简单点说,就是上面限制是channel级别的还是consumer级别
        //$this->channel->basic_qos(0, 1, false);
        //1:queue 要取得消息的队列名
        //2:consumer_tag 消费者标签
        //3:no_local false这个功能属于AMQP的标准,但是rabbitMQ并没有做实现.参考
        //4:no_ack  false收到消息后,是否不需要回复确认即被认为被消费
        //5:exclusive false排他消费者,即这个队列只能由一个消费者消费.适用于任务不允许进行并发处理的情况下.比如系统对接
        //6:nowait  false不返回执行结果,但是如果排他开启的话,则必须需要等待结果的,如果两个一起开就会报错
        //7:callback  null回调函数
        //8:ticket  null
        //9:arguments null
        $this->channel->basic_consume($this->queueName, '', false, $this->autoAck, false, false, function($msg){$this->get($msg);});
        //监听消息
        while(count($this->channel->callbacks)){
            $this->channel->wait();
        }
    }

    public function get($msg)
    {
        $param = $msg->body;
        $this->doProcess($param);
        if(!$this->autoAck)
        {
            //手动ack应答
            $msg->delivery_info['channel']->basic_ack($msg->delivery_info['delivery_tag']);
        }
    }

    abstract public function doProcess($param);

    public function closeConnetct()
    {
        $this->channel->close();
        $this->connection->close();
    }

    //重新设置MQ的链接配置
    public function setConfig($config)
    {
        if (!is_array($config)) {
            throw new Exception('config不是一个数组');
        }
        foreach ($config as $key => $value) {
            $this->config[$key] = $value;
        }

    }

}
2.在创建 Consumer.php 消费
<?php
require "RabbitMq.php";

class Consumer extends RabbitMqService
{
    public function __construct()
    {
        parent::__construct('exchange', 'queue', 'routeKey');
    }

    public function doProcess($msg)
    {
        echo $msg . "\n";
    }
}

$consumer = new Consumer();
//$consumer->dealMq(false);
$consumer->dealMq(false);
3. 创建生产者 Publisher .php
<?php
require "RabbitMq.php";

class Publisher extends RabbitMqService
{
    public function __construct()
    {
        parent::__construct('exchange', '', 'routeKey');
    }

    public function doProcess($msg)
    {

    }

}

$publisher = new Publisher();
$publisher->sendMessage('Hello,World!');

$publisher->closeConnetct();
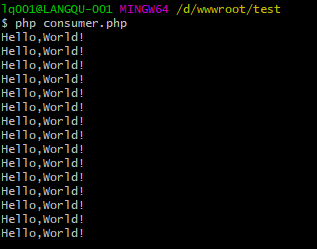
完成之后进行调试
1.先启动消费者

2.在启动生产者发送数据

3.查看消费者这边
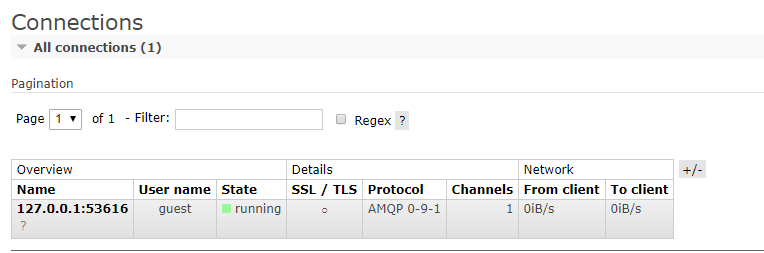
也可以到 http://127.0.0.1:15672/ 本机RabbitMq 管理查看连接情况,队列数据等