坑!
当项目决定要做宇宙星空效果的时候,我百度了一波;发现了threejs;然后就从0开始学习了;一路上坑坑洼洼的;网上确实有相关文章,但没有相对于新手的;尤其是我这种现看文档现做的;而且很多代码都是使用原生js或者jquery的;
这次是我把threejs引入angular8做的一个太阳系效果;至于后面怎么交互的;后面再补;首先把效果做出来;先上图~~~静态图,实际效果是可以动的

首先安装;
// 安装threejs
npm i three -s // npm i [email protected] -s 按版本安装
npm i @types/three -s

// 安装控制器(可以移动相机)
npm i three-orbitcontrols-ts  // 这里安装的是orbicontorls的一个替代工具,因为发现 npm i three-full 然后引入orbitcontrols 不好使,其他的也不好用,最后我百度很久发现用这个可以解决;

// 安装JavaScript性能监控器(这个酌情安装)
npm i stats.js -s
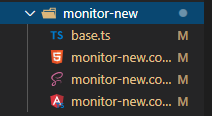
目录结构

// base.ts 这里放 three.js 的重构 代码
import {
  Scene,
  AmbientLight,
  PointLight,
  WebGLRenderer,
  PerspectiveCamera,
  GridHelper,
  Color,
  WebGLShadowMap
} from 'three';
import { OrbitControls } from 'three-orbitcontrols-ts';
import * as THREE from 'three';
import * as Stats from 'stats.js';
// import * as Stats from 'stats.js';
// import * as TWEEN from '@tweenjs/tween.js';

// 渲染器
export const RENDERER = new WebGLRenderer({
  antialias: true,
  alpha: true
});
export function initRenderer(doc: any) {
  RENDERER.setSize(doc.clientWidth, doc.clientHeight);
  doc.appendChild(RENDERER.domElement);
}

// 相机
export let CAMERA: any;
export let CONTROLS: any;
export function initCamera(doc: any) {
  CAMERA = new THREE.PerspectiveCamera(20, doc.clientWidth / doc.clientHeight, 1, 1000);
  CAMERA.position.set(0, 0, 500);
  CONTROLS = new OrbitControls(CAMERA, RENDERER.domElement); // 控制镜头
}

// 初始化场景
export const SCENE = new Scene();
export function initScene() {}

// 灯光
export let LIGHT: any;
export function initLight() {
  LIGHT = new THREE.DirectionalLight(0xff0000, 1.0);
  LIGHT.position.set(100, 100, 200);
  SCENE.add(LIGHT);
}

// 物体
export let CUBE: any;
export let CENTERBALL: any;

export function initObject() {
  // 太阳材质
  const loader = new THREE.TextureLoader();

  const sunTexture = loader.load('./assets/imgs/img-three/sun_bg.jpg');
  // const sunTexture = THREE.ImageUtils.loadTexture('./assets/imgs/img-three/sun_bg.jpg', null, () => {
  //   RENDERER.render(SCENE, CAMERA);
  // });
  // 设定太阳
  CENTERBALL = new THREE.Mesh(
    new THREE.SphereGeometry(30, 30, 30),
    new THREE.MeshBasicMaterial({
      map: sunTexture
    })
  );
  // 添加太阳发光效果

  const centerBallLite = new THREE.Sprite(
    new THREE.SpriteMaterial({
      map: new THREE.CanvasTexture(generateSprite('253,111,7')),
      blending: THREE.AdditiveBlending
    })
  );
  centerBallLite.scale.x = centerBallLite.scale.y = centerBallLite.scale.z = 90;
  // 添加太阳到场景
  SCENE.add(centerBallLite);
  SCENE.add(CENTERBALL);
  // 添加各个行星
  // 添加水星
  STARLITES.push(
    initSatellite(
      2,
      34,
      { x: -Math.PI * 0.42, y: Math.PI * 0.02, z: 0 },
      0.02,
      './assets/imgs/img-three/mercury_bg.png',
      SCENE
    )
  );
  // 添加金星
  STARLITES.push(
    initSatellite(
      3,
      38,
      { x: -Math.PI * 0.42, y: Math.PI * 0.02, z: 0 },
      0.018,
      './assets/imgs/img-three/venus_bg.png',
      SCENE
    )
  );
  // 添加地球
  STARLITES.push(
    initSatellite(
      3.2,
      42.2,
      { x: -Math.PI * 0.42, y: Math.PI * 0.02, z: 0 },
      0.016,
      './assets/imgs/img-three/earth_bg.png',
      SCENE
    )
  );
  // 添加火星
  STARLITES.push(
    initSatellite(
      2.5,
      47.1,
      { x: -Math.PI * 0.42, y: Math.PI * 0.02, z: 0 },
      0.014,
      './assets/imgs/img-three/spark_bg.png',
      SCENE
    )
  );
  // 添加木星
  STARLITES.push(
    initSatellite(
      35,
      71,
      { x: -Math.PI * 0.42, y: Math.PI * 0.02, z: 0 },
      0.012,
      './assets/imgs/img-three/jupiter_bg.png',
      SCENE
    )
  );
  // 添加土星
  STARLITES.push(
    initSatellite(
      45,
      110,
      { x: -Math.PI * 0.42, y: Math.PI * 0.02, z: 0 },
      0.01,
      './assets/imgs/img-three/saturn_bg.png',
      SCENE
    )
  );
  // 添加天王星
  STARLITES.push(
    initSatellite(
      17,
      158,
      { x: -Math.PI * 0.42, y: Math.PI * 0.02, z: 0 },
      0.008,
      './assets/imgs/img-three/uranus_bg.png',
      SCENE
    )
  );
  // 添加海王星
  STARLITES.push(
    initSatellite(
      15,
      188,
      { x: -Math.PI * 0.42, y: Math.PI * 0.02, z: 0 },
      0.006,
      './assets/imgs/img-three/neptune_bg.png',
      SCENE
    )
  );
}

//  动画混合器组(把模型的动画混合器都push到这里面,在canvas.ts里面更新动画   )
export const MIXER = [];

//  性能检测
export const STATS = new Stats();
export function initStats(doc) {
  STATS.setMode(0);
  STATS.domElement.style.position = 'absolute';
  STATS.domElement.left = '0px';
  STATS.domElement.top = '0px';
  doc.appendChild(STATS.domElement);
}
//  网格
export function initGrid() {
  const gridHelper = new GridHelper(100, 50);
  SCENE.add(gridHelper);
}

// * 返回行星轨道的组合体
// * @param starLiteSize 行星的大小
// * @param starLiteRadius 行星的旋转半径
// * @param rotation 行星组合体的x,y,z三个方向的旋转角度
// * @param speed 行星运动速度
// * @param imgUrl 行星的贴图
// * @param scene 场景
// * @returns {{satellite: THREE.Mesh, speed: *}} 卫星组合对象;速度
export let STARLITES = [];
export function initSatellite(
  starLiteSize: any,
  starLiteRadius: any,
  rotation: any,
  speed: any,
  imgUrl: any,
  scene: any
) {
  const ring = new THREE.RingGeometry(starLiteRadius, starLiteRadius + 0.05, 50, 1);
  const baseMaterial = new THREE.MeshBasicMaterial();
  const track = new THREE.Mesh(ring, baseMaterial);

  const centerMesh = new THREE.Mesh(new THREE.SphereGeometry(1, 1, 1), new THREE.MeshLambertMaterial()); // 材质设定
  const starLite = new THREE.Sprite(
    new THREE.SpriteMaterial({
      map: THREE.ImageUtils.loadTexture(imgUrl)
    })
  );
  starLite.scale.x = starLite.scale.y = starLite.scale.z = starLiteSize;
  starLite.position.set(starLiteRadius, 0, 0);

  const pivotPoint = new THREE.Object3D();
  pivotPoint.add(starLite);
  pivotPoint.add(track);
  centerMesh.add(pivotPoint);
  centerMesh.rotation.set(rotation.x, rotation.y, rotation.z);
  scene.add(centerMesh);
  return { starLite: centerMesh, speed };
}

// 实现球体发光
// @param color 颜色的r,g和b值,比如:“123,123,123”;
// @returns {Element} 返回canvas对象
export function generateSprite(color: any) {
  const canvas = document.createElement('canvas');
  canvas.width = 16;
  canvas.height = 16;
  const context = canvas.getContext('2d');
  const gradient = context.createRadialGradient(
    canvas.width / 2,
    canvas.height / 2,
    0,
    canvas.width / 2,
    canvas.height / 2,
    canvas.width / 2
  );
  gradient.addColorStop(0, 'rgba(' + color + ',1)');
  gradient.addColorStop(0.2, 'rgba(' + color + ',1)');
  gradient.addColorStop(0.4, 'rgba(' + color + ',.6)');
  gradient.addColorStop(1, 'rgba(0,0,0,0)');
  context.fillStyle = gradient;
  context.fillRect(0, 0, canvas.width, canvas.height);
  return canvas;
}

// 动画渲染
export function render() {
  RENDERER.render(SCENE, CAMERA);
  CENTERBALL.rotation.y -= 0.01;
  for (let i = 0; i < STARLITES.length; i++) {
    STARLITES[i].starLite.rotation.z -= STARLITES[i].speed;
  }
  CONTROLS.update();
  STATS.update();
  requestAnimationFrame(render);
}

// 窗口resize事件
export function resizeRender(doc: any) {
  // 重新初始化尺寸
  CAMERA.aspect = doc.clientWidth / doc.clientHeight;
  CAMERA.updateProjectionMatrix();
  RENDERER.setSize(doc.clientWidth, doc.clientHeight);
}
html:
<div class="three-container">
  <div id="starry-frame" #starry></div>
</div>
css:
.three-container {
  width: 100%;
  height: 100%;
  background: #000 url(src/assets/imgs/img-three/starry_sky_bg.jpg) no-repeat center center;
  overflow: hidden;
}
#starry-frame {
  width: 100%;
  min-height: 800px; // 这里写了最小高度,因为发现使用100%,没有办法出现效果;
  position: relative;
}
ts
import { Component, OnInit, ViewChild, ElementRef, HostListener } from '@angular/core';
import { initRenderer, initCamera, initScene, initObject, initStats, render, resizeRender } from './base';

@Component({
  selector: 'app-monitor-new',
  templateUrl: './monitor-new.component.html',
  styleUrls: ['./monitor-new.component.scss']
})
export class MonitorNewComponent implements OnInit {
  @ViewChild('starry', { static: true }) starry: ElementRef;
  constructor() {}

  ngOnInit() {
    this.init();
  }
  init() {
    initRenderer(this.starry.nativeElement);
    initCamera(this.starry.nativeElement);
    initScene();
    initObject();
    initStats(this.starry.nativeElement);
    render();
  }
  // 监听当前窗口大小
  @HostListener('window:resize', ['$event'])
  onResize(event: any) {
    resizeRender(this.starry.nativeElement);
  }
}
代码出来了;这里放几个相对于新手友好的几个入门学习网站,我就是看这些学习的:注意以下网站有免费资料和收费资料
http://www.yanhuangxueyuan.com/
当时也参考了这位博主的一些;当然我没有运行他的例子,因为我在他的oribcontrols引入就卡住了;所以他这里也有坑;
https://www.jianshu.com/p/c359480b0e08
至于太阳系的贴图image;百度可以找到,或者参考这位博主的;我就是看他的文章然后修改了一些;