网络编程(java.net)
一、网络要素
1、IP地址:InetAddress
192.168.1.255(192.168.1网段的广播地址)
2、端口号
0--65535
0-1024
3、传输协议
UDP
将数据及源和目的封装成数据包中,不需要建立连接
数据包大小限制在64K内
因无连接,不可靠协议
不需要建立连接,速度快
TCP
建立连接,形成传输数据的通道
在连接中进行大数据量传输
通过三次握手完成连接,是可靠协议
必须建立连接,效率稍低
二、UDP协议实例
网络通信:发送端
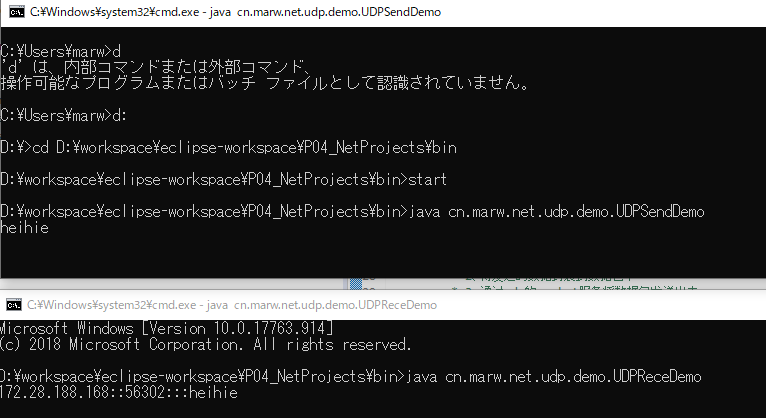
 1 public class UDPSendDemo {
 2
 3     /**
 4      * @param args
 5      * @throws IOException
 6      */
 7     public static void main(String[] args) throws IOException {
 8     /*
 9      * 创建UDP传输的发送端 思路:
10      * 1、建立udp的socket服务
11      * 2、将发送的数据封装到数据包中
12      * 3、通过udp的socket服务将数据包发送出去
13      * 4、关闭socket服务
14      */
15     // 1、
16     DatagramSocket ds = new DatagramSocket();
17     // 2、
18     BufferedReader br = new BufferedReader(new InputStreamReader(System.in));
19     String line=null;
20     while ((line=br.readLine())!=null) {
21         byte[] buff = line.getBytes();
22         DatagramPacket dp = new DatagramPacket(buff, buff.length, InetAddress.getByName("172.28.188.168"), 10000);
23         ds.send(dp);
24     }
25
26     ds.close();
27
28     }
29
30 }
二、网络通信:接收端
 1 public class UDPReceDemo {
 2
 3     /**
 4      * @param args
 5      * @throws IOException
 6      */
 7     public static void main(String[] args) throws IOException {
 8     /*
 9      * 建立UDP接收端的思路
10      * 1、建立udp socket服务
11      * 2、创建数据包,用于存储接收到的数据。方便用数据包对象的方法解析这些数据
12      * 3、使用socket服务的receive方法将接收的数据存储到数据包中。
13      * 4、通过数据包的方法解析数据包的数据
14      * 5、关闭资源
15      */
16     DatagramSocket ds = new DatagramSocket(10000);
17     while (true) {
18         byte[] buf = new byte[1024];
19         DatagramPacket dp = new DatagramPacket(buf, buf.length);
20         // 使用接收方法将数据存储到数据包中
21         ds.receive(dp);// 阻塞式
22
23         // 4、通过数据包对象的方法,解析其中的数据,比如地址,端口,数据内容
24
25         String ip = dp.getAddress().getHostAddress();
26         int port = dp.getPort();
27         String str = new String(dp.getData(), 0, dp.getLength());
28         System.out.println(ip + "::" + port + ":::" + str);
29 //    ds.close();
30     }
31     }
32
33 }
结果:
实例二、多线程
思路:多线程任务:有发送数据任务和接收数据任务,准备两个类分别用于发送和接收
发送类
 1 public class Send implements Runnable {
 2     private DatagramSocket ds;
 3
 4     Send(DatagramSocket ds) {
 5     this.ds = ds;
 6     }
 7
 8     @Override
 9     public void run() {
10     try {
11         BufferedReader br = new BufferedReader(new InputStreamReader(System.in));
12         String line = null;
13         while ((line = br.readLine()) != null) {
14         byte[] buff = line.getBytes();
15         DatagramPacket dp = new DatagramPacket(buff, buff.length, InetAddress.getByName("172.28.188.168"),
16             10000);
17         ds.send(dp);
18
19         if("886".equals(line))
20             break;
21         }
22         ds.close();
23     } catch (IOException e) {
24
25         e.printStackTrace();
26     }
27     }
28
29 }
接收类
 1 public class Rece implements Runnable {
 2     private DatagramSocket ds;
 3
 4     Rece(DatagramSocket ds) {
 5     this.ds = ds;
 6     }
 7
 8     @Override
 9     public void run() {
10     try {
11         while (true) {
12         byte[] buf = new byte[1024];
13         DatagramPacket dp = new DatagramPacket(buf, buf.length);
14         // 使用接收方法将数据存储到数据包中
15
16         ds.receive(dp);// 阻塞式
17
18         // 4、通过数据包对象的方法,解析其中的数据,比如地址,端口,数据内容
19
20         String ip = dp.getAddress().getHostAddress();
21 //        int port = dp.getPort();
22         String str = new String(dp.getData(), 0, dp.getLength());
23         System.out.println(ip + "::" + str);
24         if("886".equals(str))
25             System.out.println(ip + "退出");
26         }
27     } catch (IOException e) {
28
29         e.printStackTrace();
30     }
31     }
32 }
主函数
 1 public class ChatDemo {
 2
 3     /**
 4      * @param args
 5      * @throws IOException
 6      */
 7     public static void main(String[] args) throws IOException {
 8     DatagramSocket rece=new DatagramSocket(10000);
 9     DatagramSocket send=new DatagramSocket();
10     new Thread(new Rece(rece)).start();
11     new Thread(new Send(send)).start();
12     }
13
14 }
结果:
