最近在整理自己的简历,发现简历上面的ID照有些太老了,所以就准备重新准备一些证件照,刚好最近在弄自己的博客网站,想着直接做一个网页工具出来,直接生成证件照模板,这样还可以省去PS的麻烦。而且照片涉及到个人隐私,把照片存储到服务器后端会有诸多问题,所以我就直接全部在内存中处理了
下面是我的处理过程
上传ID照,选择需要的尺寸和底板的大小,然后保存到本地,直接打印即可。
后台主要用到的是PIL和Django。
PIL这块,我用了比较原始的方法,先处理原始照片为对应的尺寸,然后加边框,算出总的长宽,再用地板的长宽相除,算出横竖版本的张数,再用单张乘以张数算出宽高,再粘贴到背景板上。然后就是完整的照片了
我单独写了一个函数处理照片生成的过程,下面附上代码:
#!/usr/bin/env python
# -*- coding: utf-8 -*-
from PIL import Image

def preview_pic(img,photo_size,bk_size,bk_color,photo_size_background_dict,photo_size_dict):
    try:
        # id照尺寸
        idsize = photo_size
        # 底板尺寸
        bgsize = bk_size
        # 底板颜色
        bgcol = bk_color
        # 原始照片
        photopath = img
        photo = Image.open(photopath)
        #处理底板和照片的长宽,将CM转化为像素,我是以300dpi转化的,这个基本就是照片的标准了
        back_ground_hight = round(
            photo_size_background_dict[bgsize]["h"] *
            round(
                photo_size_background_dict[bgsize]["dpi"] /
                2.54))
        back_ground_width = round(
            photo_size_background_dict[bgsize]["w"] *
            round(
                photo_size_background_dict[bgsize]["dpi"] /
                2.54))
        photo_hight = round(
            photo_size_dict[idsize]["h"] *
            round(
                photo_size_dict[idsize]["dpi"] /
                2.54))
        photo_width = round(
            photo_size_dict[idsize]["w"] *
            round(
                photo_size_dict[idsize]["dpi"] /
                2.54))
        #创建空白底板
        img_bk = Image.new(
            "RGB", (back_ground_width, back_ground_hight), bgcol)
        #处理原始照片,将原始照片处理成ID照尺寸
        img_photo = photo.resize((photo_width, photo_hight))
        img_photo_width = img_photo.size[0]
        img_photo_hight = img_photo.size[1]
        #给id照加边框,左右上下各10像素
        img_photo_with_side = Image.new(
            "RGB", (img_photo_width + 20, img_photo_hight + 20), bgcol)
        img_photo_with_side.paste(img_photo, (10, 10))
        img_photo_with_side_width = img_photo_with_side.size[0]
        img_photo_with_side_hight = img_photo_with_side.size[1]
        #算出底板横向和纵向的id照张数
        width_num = divmod(back_ground_width, img_photo_with_side_width)
        hight_num = divmod(back_ground_hight, img_photo_with_side_hight)
        #创建带边框的id照的总长和总宽的空白照
        img_photo_with_side_total = Image.new(
            "RGB",
            (img_photo_with_side_width *
             width_num[0],
             img_photo_with_side_hight *
             hight_num[0]),
            bgcol)
        #开始往空白照上面粘贴id照
        for i in range(0, width_num[0]):
            for k in range(0, hight_num[0]):
                img_photo_with_side_total.paste(
                    img_photo_with_side, (img_photo_with_side_width * i, img_photo_with_side_hight * k))
        #之前已经粘贴好了id照的模板,现在要往总底板上面粘贴了,粘贴好之后会在上下左右空出空间来
        img_bk.paste(
            img_photo_with_side_total, (int(width_num[1] / 2), int(hight_num[1] / 2)))
        return img_bk

    except BaseException as e:
        print(e)


def Hex_to_RGB(hex):
    r = int(hex[1:3],16)
    g = int(hex[3:5],16)
    b = int(hex[5:7], 16)
    rgb =(r,g,b)
    return rgb
还有前端传递到后端的代码:
<div class="jumbotron">
        <div class="container">
            <div class="row">
                <div class="col-12">
                    <h3 class="text-center">照片生成工具</h3>
                </div>
                <div class="col-12 mt-3">
                    <p class="text-wrap">该工具用于批量生成证件照,只需要上传需要生成模板的照片,然后选择想要的参数,系统会自动排版照片,
                        生成新的照片,模板背景颜色也可以自由选择,目前支持的格式仅限于1寸和2寸,背景照片为A4,6寸和Letter。</p>
                    <p>照片模板</p>
                    <span>1寸证件照6寸底片</span>
                    <img class="img-fluid w-25" alt="" src={% static 'images/pic_tem1.jpg' %} >
                    <span>1寸证件照A4底片</span>
                    <img class="img-fluid w-25" alt="" src={% static 'images/pic_tem2.jpg' %} >
                    <p>使用方法:</p>
                    <form id="photo_info" role="form" enctype="multipart/form-data" action="">
                        <ol>
                            <li class="m-3">
                                <div class="col-4">
                                    <input class="btn form-control" type="file" accept=".jpg" id="photo">
                                </div>
                            </li>
                            <li class="m-3">
                                <div class="col-4">
                                    <div class="input-group">
                                        <div class="input-group-prepend">
                                            <span class="input-group-text bg-light">选择照片大小</span>
                                        </div>
                                        <select class="form-control" id="photo_size" name="photo_size">
                                            {% for p_size in photo_size %}
                                                <option value="{{ p_size }}">{{ p_size }}</option>
                                            {% endfor %}
                                        </select>
                                    </div>
                                </div>
                            </li>
                            <li class="m-3">
                                <div class="col-4">
                                    <div class="input-group">
                                        <div class="input-group-prepend">
                                            <span class="input-group-text bg-light">选择背景大小</span>
                                        </div>
                                        <select class="form-control" id="bk_size" name="bk_size">
                                            {% for p_s_b_k,p_s_b_v in photo_size_background.items %}
                                                <option value="{{ p_s_b_k}}">{{ p_s_b_k }}</option>
                                            {% endfor %}
                                        </select>
                                    </div>
                                </div>
                            </li>
                            <li class="m-3">
                                <div class="col-4">
                                    <span>选择背景颜色:</span>
                                    <label for="w">白色</label>
                                    <input id="w" type="radio" name="bk_color" value="#ffffff" checked="checked">
                                    <label for="g">灰色</label>
                                    <input id="g" type="radio" name="bk_color" value="#808080">
                                </div>
                            </li>
                            <li class="m-3">
                                <div class="col-4">
                                    <button type="button" class="btn-primary rounded" onclick="build_photo()">预览</button>
                                </div>
                            </li>
                            <li class="m-3">
                                <div id="pic" class="col-6">

                                </div>
                            </li>
                        </ol>
                    </form>
                </div>
            </div>
        </div>
    </div>
<script type="text/javascript">
    function build_photo() {
        var photo_size = document.getElementById("photo_size").value;
        var bk_size = document.getElementById("bk_size").value;
        var photo = document.getElementById("photo").files[0];
        var bk_color = $("input[name='bk_color']:checked").val();
        var formdata = new FormData();
        formdata.append("photo",photo);
        formdata.append("photo_size",photo_size);
        formdata.append("bk_size",bk_size);
        formdata.append("bk_color",bk_color);
        $.ajax({
            url:"/tools/photo_builder/",
            type:"POST",
            data:formdata,
            processData:false,
            contentType:false,
            success:function (data) {
                document.getElementById("pic").innerHTML = '<img class="img-thumbnail" src="data:image/jpg;base64,'+data["data"]+'">\n'+ //img直接用二进制表示,不指定路径
                                                            '<a class="btn btn-primary m-3 float-right" href="/download_photo" download>下载</a>'
            }
        })
    }

</script>
主要是上传图片的处理,我用了ajax上传,另外注意,form一定要加 enctype="multipart/form-data",不然django会报错
之后就是后端Django的处理了,分为照片生成和照片下载
from io import StringIO,BytesIO
from base64 import b64encode
from django.views.decorators.csrf import csrf_exempt
from Web_Demo.photo_builder import preview_pic,Hex_to_RGB
from django.shortcuts import HttpResponse, render, redirect,HttpResponseRedirect
@csrf_exempt
def photo_builder(request):
  #声明一个全局变量,后面会用到
    global byte_data
  #底板和id照类型的字典,可以自己加,我用了通用模板,加了之后会直接传递到前端
    photo_size_background_dict = {
        "6寸": {"h": 10.16, "w": 15.24, "dpi": 300},
        "A4": {"h": 21.0, "w": 29.7, "dpi": 300},
    }
    photo_size_dict = {"1寸": {"h": 3.21, "w": 2.4, "dpi": 300},
                  "2寸": {"h": 4.9, "w": 3.4, "dpi": 300}
                  }
    if request.method == "GET":
        return render(request,'../templates/photo_builder.html',{"photo_size_background":photo_size_bac
                                                                 "photo_size":photo_size_dict})
    else:
     #获取ajax传递到后端的信息
        photo = request.FILES.get("photo")
        photo_size = request.POST.get("photo_size")
        bk_size = request.POST.get("bk_size")
        bk_color_hex = request.POST.get("bk_color")
     #这里把16进制颜色处理成RGB模式的,后续会用到
        bk_color = Hex_to_RGB(bk_color_hex)
     #这个用BytesIO把前端传递过来的数据转化为二进制,方便PIL读取
        img = BytesIO(photo.read())
     #引入之前创建的函数,参数都已经给定,返回一个Image对象,过程参考前面的代码
        pic = preview_pic(img,photo_size,bk_size,bk_color,photo_size_background_dict,photo_size_dict)
     #把返回的Image对象转化为二进制代码,再转化为base64
        output_buffer = BytesIO()
        pic.save(output_buffer, format='JPEG')
        byte_data = output_buffer.getvalue()
        base64_bytes = b64encode(byte_data)
     #把base64代码转化为utf8的字符串,并用Json序列化传递到前端,前端img直接引用base64码显示
        base64_string = base64_bytes.decode('utf-8')
        raw = {"data":base64_string}
        json_data = json.dumps(raw,ensure_ascii=False)
        return HttpResponse(json_data,content_type='application/json; charset=utf-8')
下载照片代码,这里处理起来很坑,我试了下,用数据流处理的话,下载下来的会提示文件损坏,
def download_photo(request):
  #还是声明全局变量,调用之前生成的二进制数据,这样省掉了读取本地文件的过程
    global byte_data
    try:
        response = HttpResponse(byte_data)
     #这里一定要注意,千万不能用FileResponse和StreamingHttpResponse,而且type直接指定jpg就可以了,因为不是从后端读取的文件,是直接获取的二进制代码,用数据流的话一定会报错
        response['Content-Type'] = 'application/jpg'
        response['Content-Disposition'] = 'attachment;filename="ID.JPG"'
    except:
        return HttpResponse("Not Found the File")
    return response
最后就是处理之后的显示了
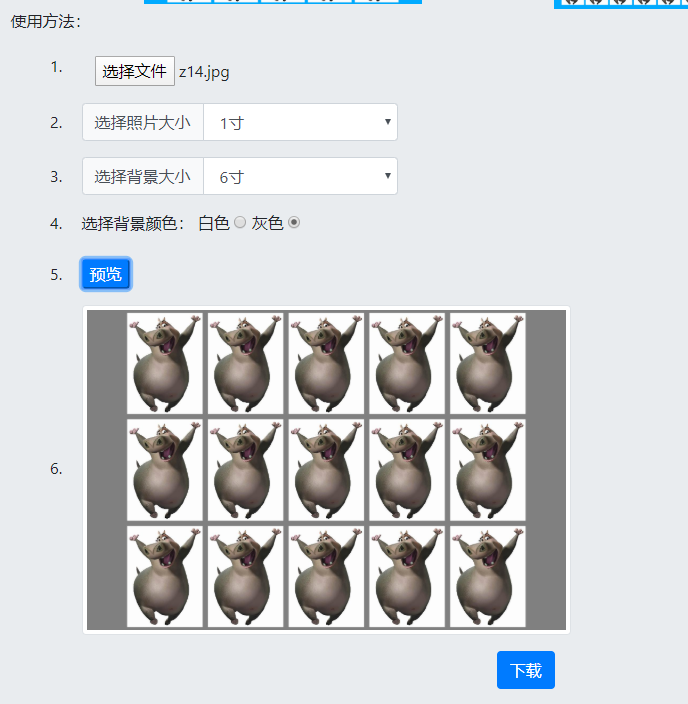
然后是下载到本地的照片,大功告成,把模板保存起来打印的时候选择对应的底板尺寸就可以大了,再也不需要去用PS花一堆时间贴图了