You must update Eclipse with the IDE plug-in package from the IDE plug-in update site. Updating Eclipse with the IDE plug-in consists of three steps:
-
Add the SuiteCloud IDE Plug-in for Eclipse Update Site.
-
Verify the Installation of SuiteCloud IDE Plug-in for Eclipse.
Important
When your NetSuite account is upgraded, your instance of the IDE plug-in is not updated. After your account upgrade, you must manually update the IDE plug-in to match the version of your NetSuite account. You may experience errors related to compatibility by using an older version of the IDE plug-in with the latest version of NetSuite.
Add the SuiteCloud IDE Plug-in for Eclipse Update Site
When you add the IDE plug-in update site to Eclipse, you can download the latest version of the IDE plug-in that is compatible with your NetSuite account.
To add the SuiteCloud IDE Plug-in update site in Eclipse:
-
Launch Eclipse. If you are prompted to select a workspace, accept the default. You can change it later. For more information, see Selecting a Workspace.
-
Go to Windows > Preferences. The Preferences window appears.
-
Add the IDE Plug-in update site as follows:
-
In the navigator, select Install/Update > Available Software Sites.
-
Click Add. The Add Site window appears.
-
Enter the following information:
Option
Description
Name
SuiteCloud IDE Plug-in for Eclipse Update SiteLocation
Note
For compatibility reasons, your IDE plug-in version must match the version of your NetSuite account.
https://system.netsuite.com/download/suitecloud-sdk/ideplugin/eclipse/19.2 -
Click OK.
SuiteCloud IDE Update Site appears in the list of Available Update Sites. Leave all other sites checked.
-
-
Click OK.
Install SuiteCloud IDE Plug-in for Eclipse
When you install the IDE plug-in, select the update site as your installation source.
To install SuiteCloud IDE plug-in for Eclipse :
-
Go to Help > Install New Software. The Install window appears.
-
In the Work with dropdown list, select SuiteCloud IDE Update Site.
-
In the Name column, select SuiteCloud IDE.
-
Click Next to view the installation details.
-
Accept the terms of the license agreement and click Finish.
Eclipse installs the IDE plug-in. When the installation is complete, click Yes to restart Eclipse.
When Eclipse restarts, the IDE plug-in Setup Wizard opens. For information and instructions, see Launching SuiteCloud IDE Plug-in for Eclipse and Using the Account Setup Wizard.
Verify the Installation of SuiteCloud IDE Plug-in for Eclipse
When you install the IDE plug-in, information about its version is added to the About Eclipse dialog box. You can verify this installation information at any time.
To verify the installation of SuiteCloud IDE plug-in for Eclipse:
-
Go to Help > About Eclipse.
-
Click the NetSuite icon or click Installation Details to open the About Eclipse Features window.
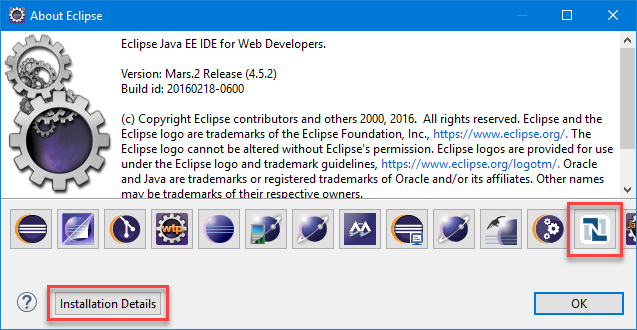
The IDE plug-in version information is displayed.
Using Existing SDF Projects with a New Eclipse Installation
You can use your existing SDF projects with a new IDE plug-in for Eclipse Mars installation.
To use existing SDF projects with a new installation:
-
Back up your existing Eclipse installation and workspace.
-
Download and install Eclipse Mars. See Downloading Eclipse for Use with SuiteCloud IDE Plug-in.
-
Install the latest version of the Eclipse plug-in. See Updating Eclipse for Use with SuiteCloud IDE Plug-in. The complete steps for the Eclipse plug-in installation and configuration are available in Setting Up SuiteCloud IDE Plug-in for Eclipse.
-
Configure the IDE plug-in to use your account. See Launching SuiteCloud IDE Plug-in for Eclipse and Using the Account Setup Wizard.
-
If you are using a new workspace for Eclipse Mars, perform the following steps to use your SDF projects with the new workspace:
-
Copy your existing SDF projects to the new workspace.
-
To add an existing SDF project to the IDE plug-in, create each project individually using the same name. The IDE plug-in populates the NS Explorer subtab with the existing files for the SDF project that matches the specified name. To create a project, see Creating an Account Customization Project in SuiteCloud IDE Plug-in for Eclipse and Creating a SuiteApp Project in SuiteCloud IDE Plug-in for Eclipse.
-