一、软件安装
1、环境说明
操作系统:CentOS 7.4 64位
nginx版本:1.16.1
安装日期:2019/10/01
安装用户:root
2、安装运行库
yum -y install gcc gcc-c++ automake autoconf libtool make
3、安装openssl(不用安装,解压即可)
$ cd /usr/local/src
$ wget https://www.openssl.org/source/openssl-1.0.1t.tar.gz
$ tar -zxvf openssl-1.0.1t.tar.gz
4、安装pcre
$ cd /usr/local/src
$ wget https://ftp.pcre.org/pub/pcre/pcre-8.38.tar.gz
$ tar -zxvf pcre-8.38.tar.gz
$ cd pcre-8.38
$ ./configure
$ make
$ make install
5、安装zlib
$ cd /usr/local/src
$ wget http://zlib.net/zlib-1.2.11.tar.gz
$ tar -zxvf zlib-1.2.11.tar.gz
$ cd zlib-1.2.11
$ ./configure
$ make
$ make install
6、安装nginx
$ cd /usr/local/src
$ wget http://nginx.org/download/nginx-1.16.1.tar.gz
$ tar -zxvf nginx-1.16.1.tar.gz
$ cd nginx-1.16.1

$ ./configure --with-http_ssl_module \
--with-pcre=/usr/local/src/pcre-8.38 \
--with-zlib=/usr/local/src/zlib-1.2.11 \
--with-openssl=/usr/local/src/openssl-1.0.1t

$ make
$ make install
二、软件使用命令
nginx默认安装路径为 /usr/local/nginx
启动:./sbin/nginx
关闭:/usr/local/nginx/sbin/nginx -s stop
重启:/usr/local/nginx/sbin/nginx -s reopen
重新加载配置文件:/usr/local/nginx/sbin/nginx -s reload
三、软件配置方法
#user  nobody;
worker_processes  1;

#error_log  logs/error.log;
#error_log  logs/error.log  notice;
#error_log  logs/error.log  info;

#pid        logs/nginx.pid;


events {
    worker_connections  1024;
}


http {
    include       mime.types;
    default_type  application/octet-stream;

    proxy_cache_path D:/nginx-1.16.1/cache levels=1:1:1 keys_zone=pcache:10m max_size=2g;

    #log_format  main  '$remote_addr - $remote_user [$time_local] "$request" '
    #                  '$status $body_bytes_sent "$http_referer" '
    #                  '"$http_user_agent" "$http_x_forwarded_for"';

    #access_log  logs/access.log  main;

    sendfile        on;
    #tcp_nopush     on;

    #keepalive_timeout  0;
    keepalive_timeout  65;

    #gzip  on;

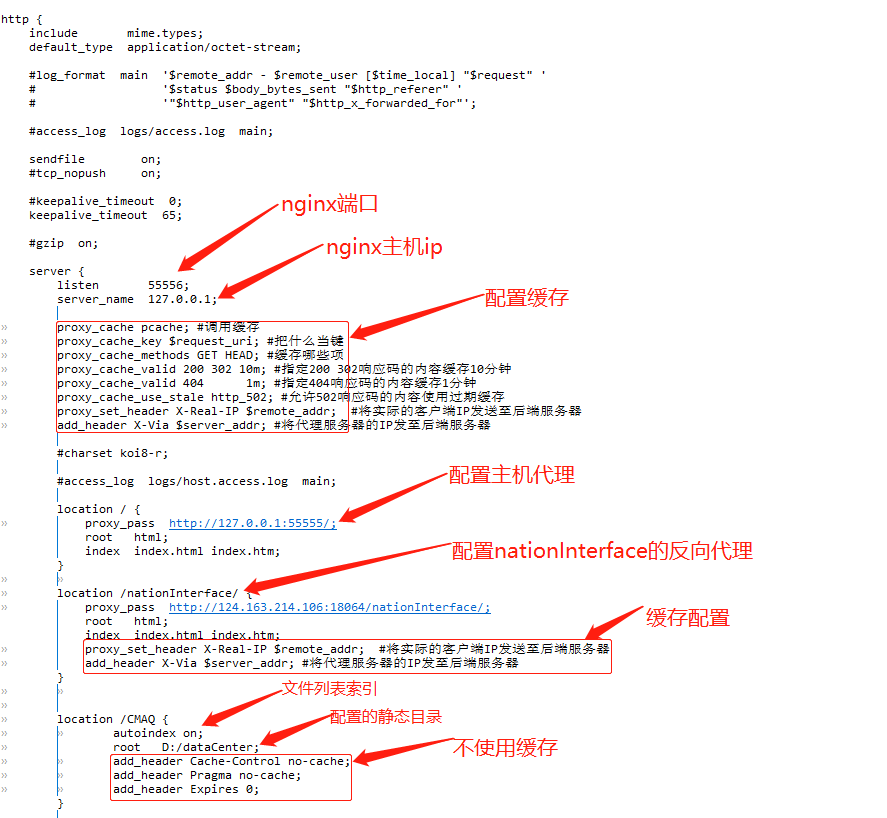
    server {
        listen       55556;
        server_name  127.0.0.1;

    proxy_cache pcache; #调用缓存
    proxy_cache_key $request_uri; #把什么当键
    proxy_cache_methods GET HEAD; #缓存哪些项
    proxy_cache_valid 200 302 10m; #指定200 302响应码的内容缓存10分钟
    proxy_cache_valid 404      1m; #指定404响应码的内容缓存1分钟
    proxy_cache_use_stale http_502; #允许502响应码的内容使用过期缓存
    proxy_set_header X-Real-IP $remote_addr;  #将实际的客户端IP发送至后端服务器
    add_header X-Via $server_addr; #将代理服务器的IP发至后端服务器

        #charset koi8-r;

        #access_log  logs/host.access.log  main;

        location / {
        proxy_pass  http://127.0.0.1:55555/;
            root   html;
            index  index.html index.htm;
        }

    location /nationInterface/ {
        proxy_pass  http://124.163.214.106:18064/nationInterface/;
            root   html;
            index  index.html index.htm;
        proxy_set_header X-Real-IP $remote_addr;  #将实际的客户端IP发送至后端服务器
        add_header X-Via $server_addr; #将代理服务器的IP发至后端服务器
        }


    location /CMAQ {
        autoindex on;
            root   D:/dataCenter;
        add_header Cache-Control no-cache;
        add_header Pragma no-cache;
        add_header Expires 0;
        }

        #error_page  404              /404.html;

        # redirect server error pages to the static page /50x.html
        #
        error_page   500 502 503 504  /50x.html;
        location = /50x.html {
            root   html;
        }

        # proxy the PHP scripts to Apache listening on 127.0.0.1:80
        #
        #location ~ \.php$ {
        #    proxy_pass   http://127.0.0.1;
        #}

        # pass the PHP scripts to FastCGI server listening on 127.0.0.1:9000
        #
        #location ~ \.php$ {
        #    root           html;
        #    fastcgi_pass   127.0.0.1:9000;
        #    fastcgi_index  index.php;
        #    fastcgi_param  SCRIPT_FILENAME  /scripts$fastcgi_script_name;
        #    include        fastcgi_params;
        #}

        # deny access to .htaccess files, if Apache's document root
        # concurs with nginx's one
        #
        #location ~ /\.ht {
        #    deny  all;
        #}
    }


    # another virtual host using mix of IP-, name-, and port-based configuration
    #
    #server {
    #    listen       8000;
    #    listen       somename:8080;
    #    server_name  somename  alias  another.alias;

    #    location / {
    #        root   html;
    #        index  index.html index.htm;
    #    }
    #}


    # HTTPS server
    #
    #server {
    #    listen       443 ssl;
    #    server_name  localhost;

    #    ssl_certificate      cert.pem;
    #    ssl_certificate_key  cert.key;

    #    ssl_session_cache    shared:SSL:1m;
    #    ssl_session_timeout  5m;

    #    ssl_ciphers  HIGH:!aNULL:!MD5;
    #    ssl_prefer_server_ciphers  on;

    #    location / {
    #        root   html;
    #        index  index.html index.htm;
    #    }
    #}

}

注意事项:配置静态目录的时候,采用的是目录拼接的方式,比如上图的静态目录是:D:/dataCenter/CMAQ/。
如果linux下遇到权限问题,比如 13: Permission denied。从以下几个方面排查:
1、root安装的,那么启动也要用root用户
2、nginx.conf配置文件第一行,#user nobody要改成user root
3、是否缺少index.html
4、修改目录权限:chmod -R 777 /data
5、要将SELinux设置为关闭。