在网上已经有跟多Bean的生命周期的博客,但是很多都是基于比较老的版本了,最近吧整个流程化成了一个流程图。待会儿使用流程图,说明以及代码的形式来说明整个声明周期的流程。注意因为代码比较多,这里的流程图只画出了大概的流程,具体的可以深入代码
一、获取Bea
第一阶段获取Bean
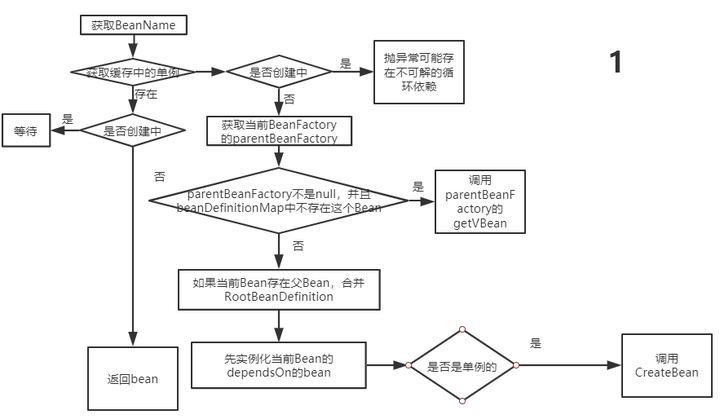
这里的流程图的入口在 AbstractBeanFactory类的 doGetBean方法,这里可以配合前面的 getBean方法分析文章进行阅读。主要流程就是
1、先处理Bean 的名称,因为如果以“&”开头的Bean名称表示获取的是对应的FactoryBean对象;
2、从缓存中获取单例Bean,有则进一步判断这个Bean是不是在创建中,如果是的就等待创建完毕,否则直接返回这个Bean对象
3、如果不存在单例Bean缓存,则先进行循环依赖的解析
4、解析完毕之后先获取父类BeanFactory,获取到了则调用父类的getBean方法,不存在则先合并然后创建Bean
二、创建Bean
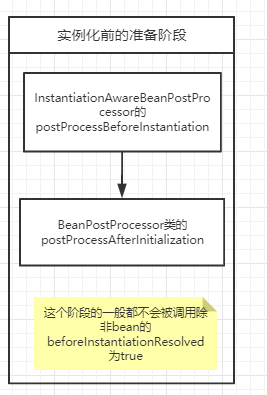
2.1 创建Bean之前
在真正创建Bean之前逻辑
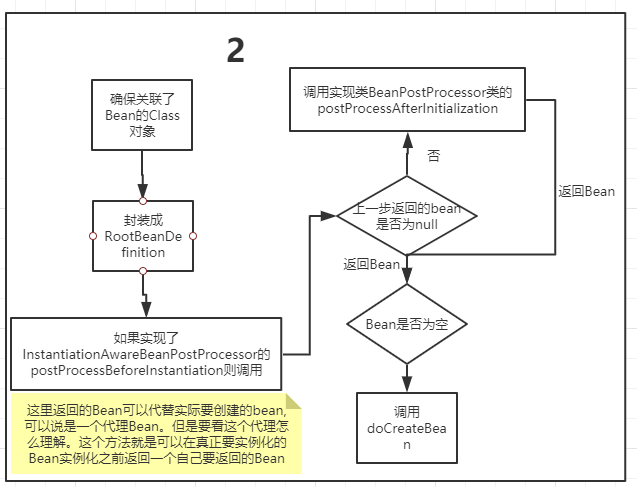
这个流程图对应的代码在 AbstractAutowireCapableBeanFactory类的 createBean方法中。
1、这里会先获取 RootBeanDefinition对象中的Class对象并确保已经关联了要创建的Bean的Class 。整编:微信公众号,搜云库技术团队,ID:souyunku
2、这里会检查3个条件
(1)Bean的属性中的 beforeInstantiationResolved字段是否为true,默认是false。
(2)Bean是原生的Bean
(3)Bean的 hasInstantiationAwareBeanPostProcessors属性为true,这个属性在Spring准备刷新容器钱转杯BeanPostProcessors的时候会设置,如果当前Bean实现了 InstantiationAwareBeanPostProcessor则这个就会是true。
当三个条件都存在的时候,就会调用实现的 InstantiationAwareBeanPostProcessor接口的 postProcessBeforeInstantiation方法,然后获取返回的Bean,如果返回的Bean不是null还会调用实现的 BeanPostProcessor接口的 postProcessAfterInitialization方法,这里用代码说明
protected Object resolveBeforeInstantiation(String beanName, RootBeanDefinition mbd) {
 Object bean = null;
 //条件1
 if (!Boolean.FALSE.equals(mbd.beforeInstantiationResolved)) {
 //条件2跟条件3
 if (!mbd.isSynthetic() && hasInstantiationAwareBeanPostProcessors()) {
 Class<?> targetType = determineTargetType(beanName, mbd);
 if (targetType != null) {
 //调用实现的postProcessBeforeInstantiation方法
                    bean = applyBeanPostProcessorsBeforeInstantiation(targetType, beanName);
 if (bean != null) {
//调用实现的postProcessAfterInitialization方法
                        bean = applyBeanPostProcessorsAfterInitialization(bean, beanName);
 }
 }
 }
 //不满足2或者3的时候就会设置为false
            mbd.beforeInstantiationResolved = (bean != null);
 }
 return bean;
 }
1、如果上面3个条件其中一个不满足就不会调用实现的方法。默认这里都不会调用的这些 BeanPostProcessors的实现方法。然后继续执行后面的 doCreateBean方法。
2.1 真正的创建Bean,doCreateBean
doCreateBean方法逻辑
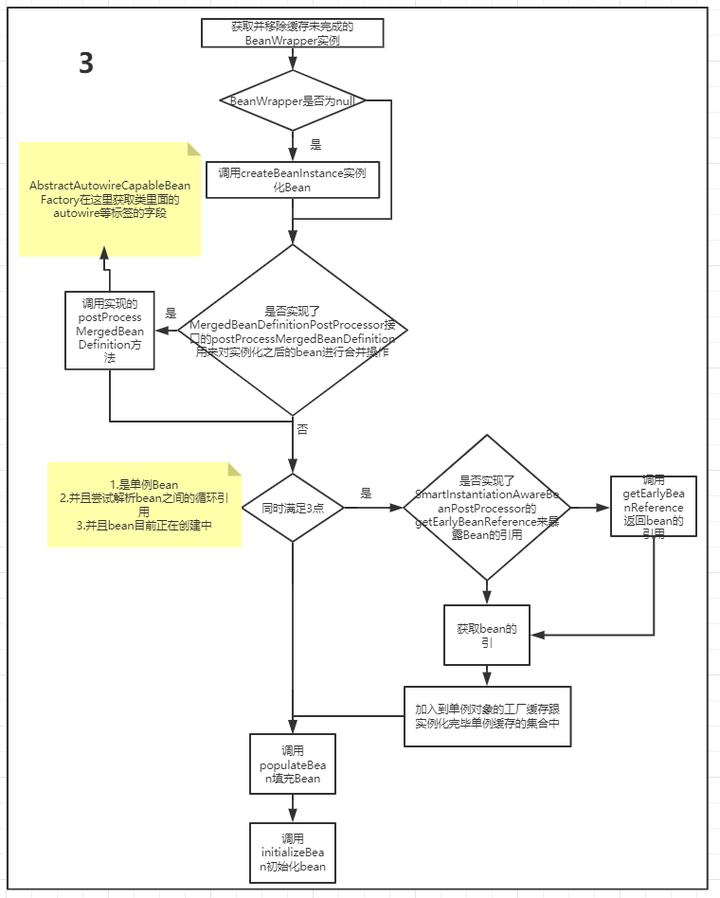
这个代码的实现还是在 AbstractAutowireCapableBeanFactory方法中。流程是
1、先检查 instanceWrapper变量是不是null,这里一般是null,除非当前正在创建的Bean在 factoryBeanInstanceCache中存在这个是保存还没创建完成的FactoryBean的集合。
2、调用createBeanInstance方法实例化Bean,这个方法在后面会讲解
3、如果当前 RootBeanDefinition对象还没有调用过实现了的 MergedBeanDefinitionPostProcessor接口的方法,则会进行调用 。整编:微信公众号,搜云库技术团队,ID:souyunku
4、 当满足以下三点
(1)是单例Bean
(2)尝试解析bean之间的循环引用
(3)bean目前正在创建中
则会进一步检查是否实现了 SmartInstantiationAwareBeanPostProcessor接口如果实现了则调用是实现的 getEarlyBeanReference方法 5、 调用 populateBean方法进行属性填充,这里后面会讲解 6、 调用 initializeBean方法对Bean进行初始化,这里后面会讲解
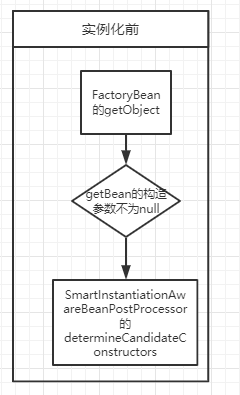
2.1.1 实例化Bean,createBeanInstance
实例化Bean
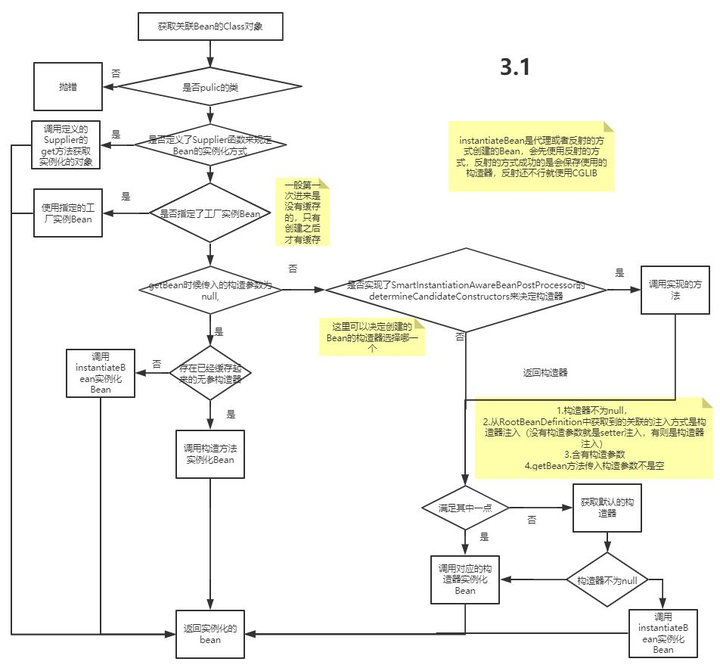
这里的逻辑稍微有一点复杂,这个流程图已经是简化过后的了。简要根据代码说明一下流程
protected BeanWrapper createBeanInstance(String beanName, RootBeanDefinition mbd, @Nullable Object[] args) {
 //步骤1
 Class<?> beanClass = resolveBeanClass(mbd, beanName);

 if (beanClass != null && !Modifier.isPublic(beanClass.getModifiers()) && !mbd.isNonPublicAccessAllowed()) {
 throw new BeanCreationException(mbd.getResourceDescription(), beanName,
 "Bean class isn't public, and non-public access not allowed: " + beanClass.getName());
 }
 //步骤2
 Supplier<?> instanceSupplier = mbd.getInstanceSupplier();
 if (instanceSupplier != null) {
 return obtainFromSupplier(instanceSupplier, beanName);
 }
 //步骤3
 if (mbd.getFactoryMethodName() != null) {
 return instantiateUsingFactoryMethod(beanName, mbd, args);
 }


 boolean resolved = false;
 boolean autowireNecessary = false;
 if (args == null) {
 synchronized (mbd.constructorArgumentLock) {
 if (mbd.resolvedConstructorOrFactoryMethod != null) {
                    resolved = true;
                    autowireNecessary = mbd.constructorArgumentsResolved;
 }
 }
 }
 //步骤4.1
 if (resolved) {

 if (autowireNecessary) {
 return autowireConstructor(beanName, mbd, null, null);
 }
 else {

 return instantiateBean(beanName, mbd);
 }
 }

 //步骤4.2
 Constructor<?>[] ctors = determineConstructorsFromBeanPostProcessors(beanClass, beanName);
 if (ctors != null || mbd.getResolvedAutowireMode() == AUTOWIRE_CONSTRUCTOR ||
                mbd.hasConstructorArgumentValues() || !ObjectUtils.isEmpty(args)) {
 return autowireConstructor(beanName, mbd, ctors, args);
 }

 //步骤5
        ctors = mbd.getPreferredConstructors();
 if (ctors != null) {
 return autowireConstructor(beanName, mbd, ctors, null);
 }


 return instantiateBean(beanName, mbd);
 }
1、先检查Class是否已经关联了,并且对应的修饰符是否是public的
2、如果用户定义了Bean实例化的函数,则调用并返回
3、如果当前Bean实现了 FactoryBean接口则调用对应的 FactoryBean接口的 getObject方法
4、根据getBean时候是否传入构造参数进行处理
4.1 如果没有传入构造参数,则检查是否存在已经缓存的无参构造器,有则使用构造器直接创建,没有就会调用 instantiateBean方法先获取实例化的策略默认是 CglibSubclassingInstantiationStrategy,然后实例化Bean。最后返回
4.2 如果传入了构造参数,则会先检查是否实现了 SmartInstantiationAwareBeanPostProcessor接口,如果实现了会调用 determineCandidateConstructors获取返回的候选构造器。整编:微信公众号,搜云库技术团队,ID:souyunku
4.3 检查4个条件是否满足一个
(1)构造器不为null,
(2)从RootBeanDefinition中获取到的关联的注入方式是构造器注入(没有构造参数就是setter注入,有则是构造器注入)
(3)含有构造参数
(4)getBean方法传入构造参数不是空
满足其中一个则会调用返回的候选构造器实例化Bean并返回,如果都不满足,则会根据构造参数选则合适的有参构造器然后实例化Bean并返回
5、如果上面都没有合适的构造器,则直接使用无参构造器创建并返回Bean。
2.1.2 填充Bean,populateBean
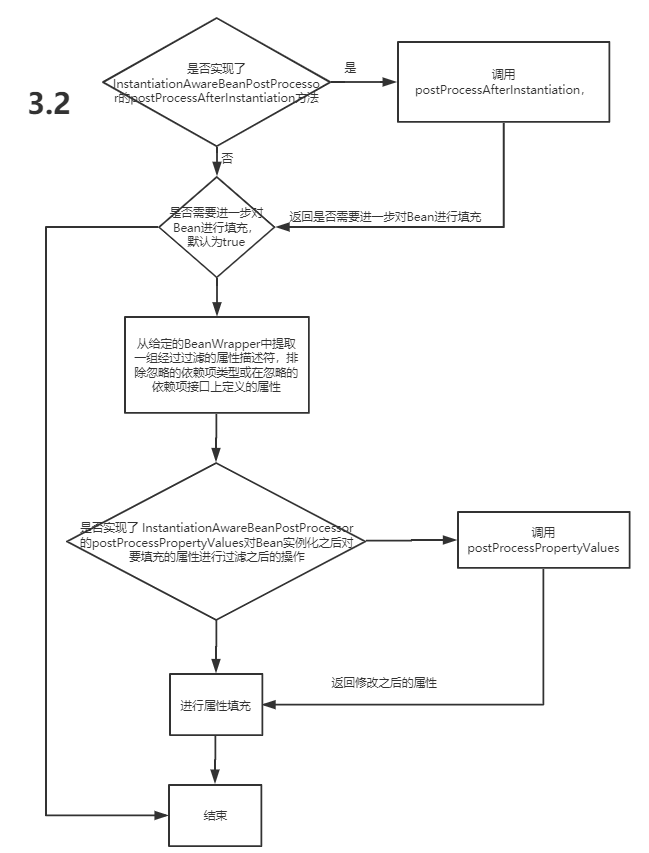
填充Bean
这里还是根据代码来说一下流程
protected void populateBean(String beanName, RootBeanDefinition mbd, @Nullable BeanWrapper bw) {
 if (bw == null) {
 if (mbd.hasPropertyValues()) {
 throw new BeanCreationException(
                        mbd.getResourceDescription(), beanName, "Cannot apply property values to null instance");
 }
 else {
 // Skip property population phase for null instance.
 return;
 }
 }
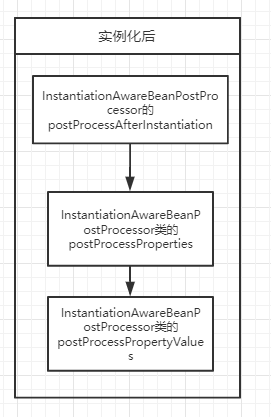
 boolean continueWithPropertyPopulation = true;
 //步骤1
 if (!mbd.isSynthetic() && hasInstantiationAwareBeanPostProcessors()) {
 for (BeanPostProcessor bp : getBeanPostProcessors()) {
 if (bp instanceof InstantiationAwareBeanPostProcessor) {
 InstantiationAwareBeanPostProcessor ibp = (InstantiationAwareBeanPostProcessor) bp;
 if (!ibp.postProcessAfterInstantiation(bw.getWrappedInstance(), beanName)) {
                        continueWithPropertyPopulation = false;
 break;
 }
 }
 }
 }

 if (!continueWithPropertyPopulation) {
 return;
 }
//步骤2--------------------
 PropertyValues pvs = (mbd.hasPropertyValues() ? mbd.getPropertyValues() : null);

 int resolvedAutowireMode = mbd.getResolvedAutowireMode();
 if (resolvedAutowireMode == AUTOWIRE_BY_NAME || resolvedAutowireMode == AUTOWIRE_BY_TYPE) {
 MutablePropertyValues newPvs = new MutablePropertyValues(pvs);
 // Add property values based on autowire by name if applicable.
 if (resolvedAutowireMode == AUTOWIRE_BY_NAME) {
                autowireByName(beanName, mbd, bw, newPvs);
 }
 // Add property values based on autowire by type if applicable.
 if (resolvedAutowireMode == AUTOWIRE_BY_TYPE) {
                autowireByType(beanName, mbd, bw, newPvs);
 }
            pvs = newPvs;
 }

 boolean hasInstAwareBpps = hasInstantiationAwareBeanPostProcessors();
 boolean needsDepCheck = (mbd.getDependencyCheck() != AbstractBeanDefinition.DEPENDENCY_CHECK_NONE);

 PropertyDescriptor[] filteredPds = null;
//步骤3
 if (hasInstAwareBpps) {
 if (pvs == null) {
                pvs = mbd.getPropertyValues();
 }
 for (BeanPostProcessor bp : getBeanPostProcessors()) {
 if (bp instanceof InstantiationAwareBeanPostProcessor) {
 InstantiationAwareBeanPostProcessor ibp = (InstantiationAwareBeanPostProcessor) bp;
 PropertyValues pvsToUse = ibp.postProcessProperties(pvs, bw.getWrappedInstance(), beanName);
 if (pvsToUse == null) {
 if (filteredPds == null) {
                            filteredPds = filterPropertyDescriptorsForDependencyCheck(bw, mbd.allowCaching);
 }
                        pvsToUse = ibp.postProcessPropertyValues(pvs, filteredPds, bw.getWrappedInstance(), beanName);
 if (pvsToUse == null) {
 return;
 }
 }
                    pvs = pvsToUse;
 }
 }
 }
 if (needsDepCheck) {
 if (filteredPds == null) {
                filteredPds = filterPropertyDescriptorsForDependencyCheck(bw, mbd.allowCaching);
 }
            checkDependencies(beanName, mbd, filteredPds, pvs);
 }
//步骤4
 if (pvs != null) {
            applyPropertyValues(beanName, mbd, bw, pvs);
 }
 }
1、检查当前Bean是否实现了 InstantiationAwareBeanPostProcessor的 postProcessAfterInstantiation方法则调用,并结束Bean的填充。
2、将按照类型跟按照名称注入的Bean分开,如果注入的Bean还没有实例化的这里会实例化,然后放到 PropertyValues对象中。
3、如果实现了 InstantiationAwareBeanPostProcessor类的 postProcessProperties则调用这个方法并获取返回值,如果返回值是null,则有可能是实现了过期的 postProcessPropertyValues方法,这里需要进一步调用 postProcessPropertyValues方法
4、进行参数填充
2.1.3 初始化Bean,initializeBean
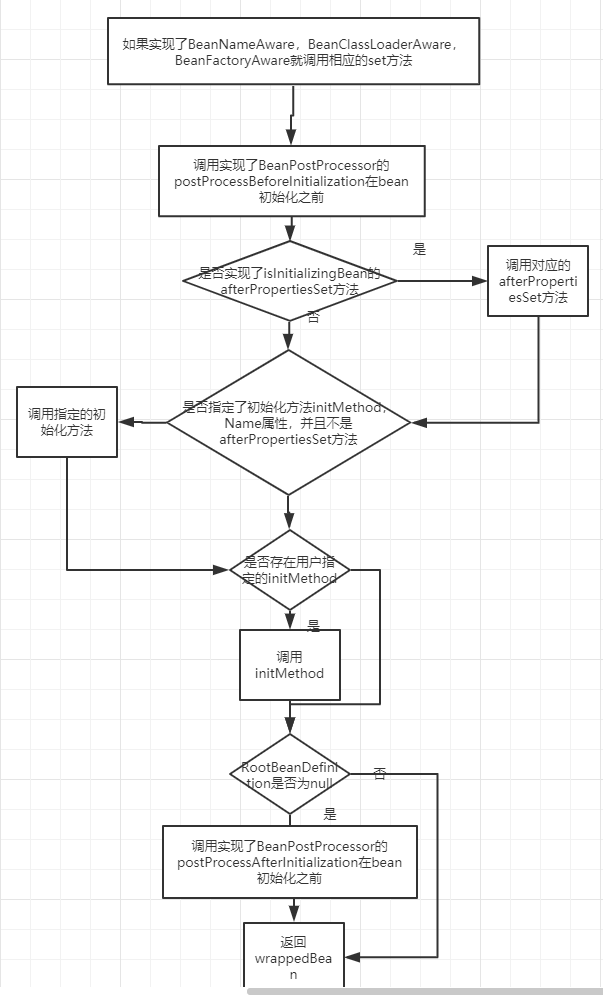
初始化Bean
同时这里根据代码跟流程图来说明
1、如果Bean实现了 BeanNameAware, BeanClassLoaderAware, BeanFactoryAware则调用对应实现的方法 。整编:微信公众号,搜云库技术团队,ID:souyunku
2、Bean不为null并且bean不是合成的,如果实现了 BeanPostProcessor的 postProcessBeforeInitialization则会调用实现的 postProcessBeforeInitialization方法。在 ApplicationContextAwareProcessor类中实现了 postProcessBeforeInitialization方法。而这个类会在Spring刷新容器准备 beanFactory的时候会加进去,这里就会被调用,而调用里面会检查Bean是不是 EnvironmentAware, EmbeddedValueResolverAware, ResourceLoaderAware, ApplicationEventPublisherAware, MessageSourceAware, ApplicationContextAware的实现类。这里就会调用对应的实现方法。代码如下
 protected void prepareBeanFactory(ConfigurableListableBeanFactory beanFactory) {
 .......
        beanFactory.addBeanPostProcessor(new ApplicationContextAwareProcessor(this));
 .......
public Object postProcessBeforeInitialization(Object bean, String beanName) throws BeansException {
 if (!(bean instanceof EnvironmentAware || bean instanceof EmbeddedValueResolverAware ||
                bean instanceof ResourceLoaderAware || bean instanceof ApplicationEventPublisherAware ||
                bean instanceof MessageSourceAware || bean instanceof ApplicationContextAware)){
 return bean;
 }

 AccessControlContext acc = null;

 if (System.getSecurityManager() != null) {
            acc = this.applicationContext.getBeanFactory().getAccessControlContext();
 }

 if (acc != null) {
 AccessController.doPrivileged((PrivilegedAction<Object>) () -> {
                invokeAwareInterfaces(bean);
 return null;
 }, acc);
 }
 else {
            invokeAwareInterfaces(bean);
 }

 return bean;
 }
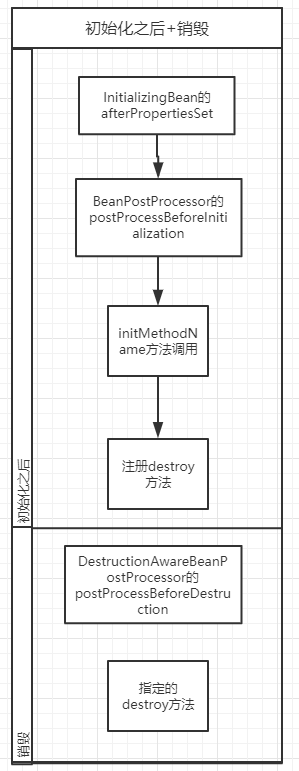
1、实例化Bean然后,检查是否实现了 InitializingBean的 afterPropertiesSet方法,如果实现了就会调用
2、Bean不为null并且bean不是合成的,如果实现了 BeanPostProcessor的 postProcessBeforeInitialization则会调用实现的 postProcessAfterInitialization方法。
到此创建Bean 的流程就没了,剩下的就是容器销毁的时候的了
三、destory方法跟销毁Bean
Bean在创建完毕之后会检查用户是否指定了 destroyMethodName以及是否实现了 DestructionAwareBeanPostProcessor接口的 requiresDestruction方法,如果指定了会记录下来保存在 DisposableBeanAdapter对象中并保存在bean的 disposableBeans属性中。代码在 AbstractBeanFactory的 registerDisposableBeanIfNecessary中
protected void registerDisposableBeanIfNecessary(String beanName, Object bean, RootBeanDefinition mbd) {
 ......
                registerDisposableBean(beanName,
 new DisposableBeanAdapter(bean, beanName, mbd, getBeanPostProcessors(), acc));
 ......
 }
public DisposableBeanAdapter(Object bean, String beanName, RootBeanDefinition beanDefinition,
 List<BeanPostProcessor> postProcessors, @Nullable AccessControlContext acc) {
 .......
 String destroyMethodName = inferDestroyMethodIfNecessary(bean, beanDefinition);
 if (destroyMethodName != null && !(this.invokeDisposableBean && "destroy".equals(destroyMethodName)) &&
 !beanDefinition.isExternallyManagedDestroyMethod(destroyMethodName)) {
 ......
 this.destroyMethod = destroyMethod;
 }
 this.beanPostProcessors = filterPostProcessors(postProcessors, bean);
 }
在销毁Bean的时候最后都会调用 AbstractAutowireCapableBeanFactory的 destroyBean方法。
 public void destroyBean(Object existingBean) {
 new DisposableBeanAdapter(existingBean, getBeanPostProcessors(), getAccessControlContext()).destroy();
 }
这里是创建一个 DisposableBeanAdapter对象,这个对象实现了Runnable接口,在实现的 run方法中会调用实现的 DisposableBean接口的 destroy方法。并且在创建 DisposableBeanAdapter对象的时候会根据传入的bean是否实现了 DisposableBean接口来设置 invokeDisposableBean变量,这个变量表实有没有实现 DisposableBean接口
 public DisposableBeanAdapter(Object bean, List<BeanPostProcessor> postProcessors, AccessControlContext acc) {
 Assert.notNull(bean, "Disposable bean must not be null");
 this.bean = bean;
 this.beanName = bean.getClass().getName();
 //根据传入的bean是否实现了`DisposableBean`接口来设置`invokeDisposableBean`变量
 this.invokeDisposableBean = (this.bean instanceof DisposableBean);
 this.nonPublicAccessAllowed = true;
 this.acc = acc;
 this.beanPostProcessors = filterPostProcessors(postProcessors, bean);
 }

 public void destroy() {
 ......
 //根据invokeDisposableBean决定是否调用destroy方法
 if (this.invokeDisposableBean) {
 if (logger.isTraceEnabled()) {
                logger.trace("Invoking destroy() on bean with name '" + this.beanName + "'");
 }
 try {
 if (System.getSecurityManager() != null) {
 AccessController.doPrivileged((PrivilegedExceptionAction<Object>) () -> {
 ((DisposableBean) this.bean).destroy();
 return null;
 }, this.acc);
 }
 else {
 ((DisposableBean) this.bean).destroy();
 }
 }
 catch (Throwable ex) {
 String msg = "Invocation of destroy method failed on bean with name '" + this.beanName + "'";
 if (logger.isDebugEnabled()) {
                    logger.warn(msg, ex);
 }
 else {
                    logger.warn(msg + ": " + ex);
 }
 }
 }
......
 }
四、总结。
最后来一个大的流程
实例化前的准备阶段
实例化前
实例化后
初始化前
————————————————