android点击桌面App图标activity启动流程

1、点击桌面App图标,Launcher进程采用Binder IPC向system_server进程发起startActivity请求;
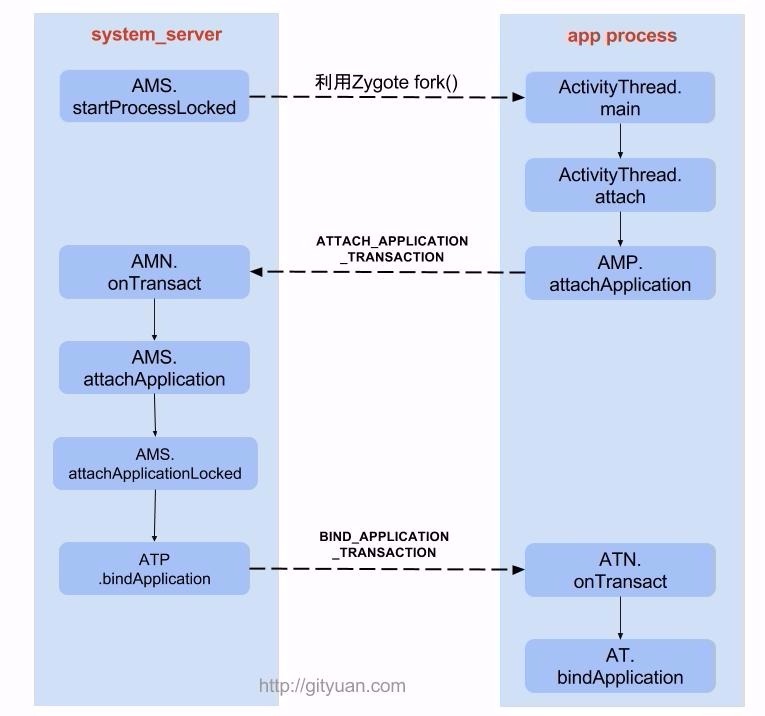
2、system_server进程接收到请求后,向zygote进程发送创建进程的请求;
3、Zygote进程fork出新的子进程,即App进程;
4、App进程,通过Binder IPC向sytem_server进程发起attachApplication请求;
5、system_server进程在收到请求后,进行一系列准备工作后,再通过binder IPC向App进程发送scheduleLaunchActivity请求;
6、App进程的binder线程(ApplicationThread)在收到请求后,通过handler向主线程发送LAUNCH_ACTIVITY消息;
7、主线程在收到Message后,通过发射机制创建目标Activity,并回调Activity.onCreate()等方法。
到此,App便正式启动,开始进入Activity生命周期,执行完onCreate/onStart/onResume方法
Android启动过程
第一个阶段:系统启动
1.首先是Android系统启动
2.紧接着是我们的所在应用的进程启动
http://androidxref.com/6.0.0_r1/xref/frameworks/base/core/java/android/app/ActivityThread.java

 public static void main(String[] args) {
        //....

        //创建Looper和MessageQueue对象,用于处理主线程的消息
        Looper.prepareMainLooper();

        //创建ActivityThread对象
        ActivityThread thread = new ActivityThread();

        //建立Binder通道 (创建新线程)
        thread.attach(false);

        Looper.loop(); //消息循环运行
        throw new RuntimeException("Main thread loop unexpectedly exited");
    }
第二个阶段:app注册
3.ActivityThread的attach()方法
public final class ActivityThread {

final ApplicationThread mAppThread = new ApplicationThread();

private void attach(boolean system) {
        sCurrentActivityThread = this;
        //true守护线程 false 用户线程  守护线程是为用户线程服务的,一般业务逻辑的处理都写在守护线程里面
        mSystemThread = system;
        if (!system) {
            ......
            //获取代表类ActivityManagerProxy实例
            final IActivityManager mgr = ActivityManagerNative.getDefault();
            try {
               //调用ActivityManagerProxy的attachApplication实施绑定,最终会调用远程类AMS的attachApplication完成绑定
                mgr.attachApplication(mAppThread);
            } catch (RemoteException ex) {
                throw ex.rethrowFromSystemServer();
            }
            ......
        } else {
           ......
            try {
                mInstrumentation = new Instrumentation();
                ContextImpl context = ContextImpl.createAppContext(
                        this, getSystemContext().mPackageInfo);
                mInitialApplication = context.mPackageInfo.makeApplication(true, null);
                //调用application onCreate函数
                mInitialApplication.onCreate();
            } catch (Exception e) {
               ......
            }
        }

        ......
        ViewRootImpl.addConfigCallback(new ComponentCallbacks2() {
            @Override
            public void onConfigurationChanged(Configuration newConfig) {
                synchronized (mResourcesManager) {
                  ......
                }
            }
            @Override
            public void onLowMemory() {
            }
            @Override
            public void onTrimMemory(int level) {
            }
        });
}
 private class ApplicationThread extends ApplicationThreadNative {
       //...
  }
   private class H extends Handler {
            //...
  }
//...
}
ApplicationThread
4.ActivityManagerService.attachApplication(mAPPThread)方法
@Override
public final void attachApplication(IApplicationThread thread) {
        synchronized (this) {
            //调用native函数获取当前进程的Id
            int callingPid = Binder.getCallingPid();
            //重置当前线程的IPC的id
            final long origId = Binder.clearCallingIdentity();
            attachApplicationLocked(thread, callingPid);
            Binder.restoreCallingIdentity(origId);
        }
}
private final boolean attachApplicationLocked(IApplicationThread thread,
            int pid) {

        // Find the application record that is being attached...  either via
        // the pid if we are running in multiple processes, or just pull the
        // next app record if we are emulating process with anonymous threads.
        ProcessRecord app;
        if (pid != MY_PID && pid >= 0) {
            synchronized (mPidsSelfLocked) {
                app = mPidsSelfLocked.get(pid);//在整个启动进程的流程中在前面已经push进入
            }
        } else {
            app = null;
        }
        if (app == null) {
            ......
            return false;//为null的时候直接返回.
        }
        //正常第一次开启时此时还是null
        if (app.thread != null) {
            handleAppDiedLocked(app, true, true);
        }
        ......
        final String processName = app.processName;
        ......
        // 用来时例化ProcessRecord的thread变量.它是一个IApplicationThread对象.
        app.makeActive(thread, mProcessStats);//在这里实现的附着!
        app.curAdj = app.setAdj = -100;
        app.curSchedGroup = app.setSchedGroup = Process.THREAD_GROUP_DEFAULT;
        app.forcingToForeground = null;
        updateProcessForegroundLocked(app, false, false);
        app.hasShownUi = false;
        app.debugging = false;
        app.cached = false;
        app.killedByAm = false;

        mHandler.removeMessages(PROC_START_TIMEOUT_MSG, app);

        boolean normalMode = mProcessesReady || isAllowedWhileBooting(app.info);
        List<ProviderInfo> providers = normalMode ? generateApplicationProvidersLocked(app) : null;
        ......
        try {
            ......
            // 这是一个远程调用,但最终会调用ApplicationThread的bindApplication函数完成绑定过程
            thread.bindApplication(processName, appInfo, providers, app.instrumentationClass,
                    profilerInfo, app.instrumentationArguments, app.instrumentationWatcher,
                    app.instrumentationUiAutomationConnection, testMode, enableOpenGlTrace,
                    isRestrictedBackupMode || !normalMode, app.persistent,
                    new Configuration(mConfiguration), app.compat,
                    getCommonServicesLocked(app.isolated),
                    mCoreSettingsObserver.getCoreSettingsLocked());
            updateLruProcessLocked(app, false, null);
            app.lastRequestedGc = app.lastLowMemory = SystemClock.uptimeMillis();
        } catch (Exception e) {
            ......
            return false;
        }
       ......return true;
}
thread是ApplicationThreadProxy的对象引用,它是代理对象,先调用ApplicationThreadProxy的bindApplication方法,接着在这个方法中又调用ApplicationThreadNative的函数onTransact,然后函数onTransact中根据code找到对应的case,最终会调用ApplicationThread的bindApplication方法。
5.调用mAPPThread.bindApplication(ProcessRecord等参数)
 public final void bindApplication(String processName, ApplicationInfo appInfo,
                List<ProviderInfo> providers, ComponentName instrumentationName,
                ProfilerInfo profilerInfo, Bundle instrumentationArgs,
                IInstrumentationWatcher instrumentationWatcher,
                IUiAutomationConnection instrumentationUiConnection, int debugMode,
                boolean enableBinderTracking, boolean trackAllocation,
                boolean isRestrictedBackupMode, boolean persistent, Configuration config,
                CompatibilityInfo compatInfo, Map<String, IBinder> services, Bundle coreSettings) {

            if (services != null) {//初始化缓存
                // Setup the service cache in the ServiceManager
                ServiceManager.initServiceCache(services);
            }

            setCoreSettings(coreSettings);
            //保存Bind数据
            AppBindData data = new AppBindData();
            data.processName = processName;
            data.appInfo = appInfo;
            data.providers = providers;
            data.instrumentationName = instrumentationName;
            data.instrumentationArgs = instrumentationArgs;
            data.instrumentationWatcher = instrumentationWatcher;
            data.instrumentationUiAutomationConnection = instrumentationUiConnection;
            data.debugMode = debugMode;
            data.enableBinderTracking = enableBinderTracking;
            data.trackAllocation = trackAllocation;
            data.restrictedBackupMode = isRestrictedBackupMode;
            data.persistent = persistent;
            data.config = config;
            data.compatInfo = compatInfo;
            data.initProfilerInfo = profilerInfo;
            //发送信息
            sendMessage(H.BIND_APPLICATION, data);
}
在这里,bindApplication方法通过向ActivityThread的消息队列发送BIND_APPLICATION消息
 case BIND_APPLICATION:
                    Trace.traceBegin(Trace.TRACE_TAG_ACTIVITY_MANAGER, "bindApplication");
                    AppBindData data = (AppBindData)msg.obj;
                    handleBindApplication(data);
                    Trace.traceEnd(Trace.TRACE_TAG_ACTIVITY_MANAGER);
                    break;
消息的处理调用handleBindApplication方法,handleBindApplication方法比较重要的是会调用如下方法
private void handleBindApplication(AppBindData data) {
    mBoundApplication = data;
    Process.setArgV0(data.processName);//设置进程名
    ...
    //获取LoadedApk对象
    data.info = getPackageInfoNoCheck(data.appInfo, data.compatInfo);
    ...

    // 创建ContextImpl上下文
    final ContextImpl appContext = ContextImpl.createAppContext(this, data.info);
    ...

    try {
        // 此处data.info是指LoadedApk, 通过反射创建目标应用Application对象
        Application app = data.info.makeApplication(data.restrictedBackupMode, null);
        mInitialApplication = app;
        ...
        mInstrumentation.onCreate(data.instrumentationArgs);
        //回调onCreate
        mInstrumentation.callApplicationOnCreate(app);

    } finally {
        StrictMode.setThreadPolicy(savedPolicy);
    }
}
在执行完bindApplication()之后进入ActivityStackSupervisor.attachApplicationLocked(),这样我们整个应用进程已经启动起来了。开始activity的启动逻辑了。
6.ActivityStackSupervisor.attachApplicationLocked(ProcessRecord)方法
boolean attachApplicationLocked(ProcessRecord app) throws RemoteException {
    final String processName = app.processName;
    boolean didSomething = false;
    for (int displayNdx = mActivityDisplays.size() - 1; displayNdx >= 0; --displayNdx) {
        ArrayList<ActivityStack> stacks = mActivityDisplays.valueAt(displayNdx).mStacks;
        for (int stackNdx = stacks.size() - 1; stackNdx >= 0; --stackNdx) {
            final ActivityStack stack = stacks.get(stackNdx);
            if (!isFocusedStack(stack)) {
                continue;
            }
            ActivityRecord hr = stack.topRunningActivityLocked();
            if (hr != null) {
                if (hr.app == null && app.uid == hr.info.applicationInfo.uid
                        && processName.equals(hr.processName)) {
                    try {
                        if (realStartActivityLocked(hr, app, true, true)) {
                            didSomething = true;
                        }
                    } ......
                }
            }
        }
    }
    if (!didSomething) {
        ensureActivitiesVisibleLocked(null, 0, !PRESERVE_WINDOWS);
    }
    return didSomething;
}
这个类是一个AMS的一个栈管理类,里面存储着ActivityStack的集合。在这个方法,会遍历各个ActivityStack,找到前台栈,找到里面的TopActivity。然后比较 传进来的ProcessRecord.processName和UID是否个和opActivity对用的ActivityRecord里面的一致。如果一致,就调用ActivityStackSupervisor.realStartAcvitiyLocked(ProcessRecord,ActivityRecord)方法。
7.ActivityStackSupervisor.realStartAcvitiyLocked(ProcessRecord,ActivityRecord)方法
final boolean realStartActivityLocked(ActivityRecord r, ProcessRecord app,
        boolean andResume, boolean checkConfig) throws RemoteException {

      //...
        app.forceProcessStateUpTo(mService.mTopProcessState);
        app.thread.scheduleLaunchActivity(new Intent(r.intent), r.appToken,
                System.identityHashCode(r), r.info, new Configuration(mService.mConfiguration),
                new Configuration(task.mOverrideConfig), r.compat, r.launchedFromPackage,
                task.voiceInteractor, app.repProcState, r.icicle, r.persistentState, results,
                newIntents, !andResume, mService.isNextTransitionForward(), profilerInfo);

       //...

    return true;
}
这个方法会调用传过来的ApplicationThread实例的ScheduelLaunchActivity(包括ActivityRecord)方法,所以真正执行的是ActivityThread中的scheduleLaunchActivity
第三个阶段:启动第一个Activity
8.ApplicationThread.ScheduelLaunchActivity(包括ActivityRecord)方法
     public final void scheduleLaunchActivity(Intent intent, IBinder token, int ident,
            ActivityInfo info, Configuration curConfig, Configuration overrideConfig,
            CompatibilityInfo compatInfo, String referrer, IVoiceInteractor voiceInteractor,
            int procState, Bundle state, PersistableBundle persistentState,
            List<ResultInfo> pendingResults, List<ReferrerIntent> pendingNewIntents,
            boolean notResumed, boolean isForward, ProfilerInfo profilerInfo) {
        updateProcessState(procState, false);
        ActivityClientRecord r = new ActivityClientRecord();
        //...
        updatePendingConfiguration(curConfig);

        sendMessage(H.LAUNCH_ACTIVITY, r);
    }
这个方法是跨进程的,会把ActivityRecord同步到App进程的ActivityRecordClient数据结构,用来后面构造Application和Activity等。
9.发送给H一个H.LAUNCH_ACTIVITY的消息
 public void handleMessage(Message msg) {
        if (DEBUG_MESSAGES) Slog.v(TAG, ">>> handling: " + codeToString(msg.what));
        switch (msg.what) {
            case LAUNCH_ACTIVITY: {
                final ActivityClientRecord r = (ActivityClientRecord) msg.obj;

                r.packageInfo = getPackageInfoNoCheck(
                        r.activityInfo.applicationInfo, r.compatInfo);
                handleLaunchActivity(r, null, "LAUNCH_ACTIVITY");
            } break;
            //...
     }
10.调用ActivityThread的HandleLaunchActivity()方法
ActivityThread接收到SystemServer进程的消息之后会通过其内部的Handler对象分发消息,经过一系列的分发之后调用了ActivityThread的handleLaunchActivity方法:
private void handleLaunchActivity(ActivityClientRecord r, Intent customIntent, String reason) {
    //...
    // Initialize before creating the activity
    WindowManagerGlobal.initialize();

    Activity a = performLaunchActivity(r, customIntent);

    if (a != null) {
        r.createdConfig = new Configuration(mConfiguration);
        reportSizeConfigurations(r);
        Bundle oldState = r.state;
        handleResumeActivity(r.token, false, r.isForward,
                !r.activity.mFinished && !r.startsNotResumed, r.lastProcessedSeq, reason);
      }
      //...
}
接着调用PerformLaunchActivity方法和HandleLaunchActivtiy()方法。performLauncherActivity,看名字应该就是执行Activity的启动操作了
PerformLaunchActivity做的事
 private Activity performLaunchActivity(ActivityClientRecord r, Intent customIntent) {

    ActivityInfo aInfo = r.activityInfo;
    if (r.packageInfo == null) {
        r.packageInfo = getPackageInfo(aInfo.applicationInfo, r.compatInfo,
                Context.CONTEXT_INCLUDE_CODE);
    }

    ComponentName component = r.intent.getComponent();
    if (component == null) {
        component = r.intent.resolveActivity(
            mInitialApplication.getPackageManager());
        r.intent.setComponent(component);
    }

    if (r.activityInfo.targetActivity != null) {
        component = new ComponentName(r.activityInfo.packageName,
                r.activityInfo.targetActivity);
    }

    Activity activity = null;
    try {
        java.lang.ClassLoader cl = r.packageInfo.getClassLoader();
        activity = mInstrumentation.newActivity(
                cl, component.getClassName(), r.intent);
        StrictMode.incrementExpectedActivityCount(activity.getClass());
        r.intent.setExtrasClassLoader(cl);
        r.intent.prepareToEnterProcess();
        if (r.state != null) {
            r.state.setClassLoader(cl);
        }
    }
   //....
    try {
        Application app = r.packageInfo.makeApplication(false, mInstrumentation);

       //...
        if (activity != null) {
            Context appContext = createBaseContextForActivity(r, activity);
            ......
            activity.attach(appContext, this, getInstrumentation(), r.token,
                    r.ident, app, r.intent, r.activityInfo, title, r.parent,
                    r.embeddedID, r.lastNonConfigurationInstances, config,
                    r.referrer, r.voiceInteractor, window);

            //...

            activity.mCalled = false;
            if (r.isPersistable()) {
                mInstrumentation.callActivityOnCreate(activity, r.state, r.persistentState);
            } else {
                mInstrumentation.callActivityOnCreate(activity, r.state);
            }
            //...
            //生命周期onStart、onresume
            if (!r.activity.mFinished) {
                activity.performStart();
                r.stopped = false;
            }
            //...
    return activity;
}
1.这个方法主要是构造Application和通过mInstrumention.newActivity()构造Activity。
2.调用Activity的attach(application的ContextImpl等信息)
可以发现这里我们需要的Activity对象终于是创建出来了,然后在代码中其调用Instrumentation的callActivityOnCreate方法。
Activity的attach(application的ContextImpl等信息)
这个方法会初始化一个Window,以后详细讲,人格视图都是附在一个window的docorView上,然后由WMS.addView显示。
HandleLaunchActivtiy
最后显示出来了
注意关于WMS.addView(window),这个系统服务,我们下次再讲,里面有一个类RootViewImpl,这个类负责管理我们contentView视图树的逐级绘制。
1、点击桌面App图标,Launcher进程采用Binder IPC向system_server进程发起startActivity请求;
2、system_server进程接收到请求后,向zygote进程发送创建进程的请求;
3、Zygote进程fork出新的子进程,即App进程;
4、App进程,通过Binder IPC向sytem_server进程发起attachApplication请求;
5、system_server进程在收到请求后,进行一系列准备工作后,再通过binder IPC向App进程发送scheduleLaunchActivity请求;
6、App进程的binder线程(ApplicationThread)在收到请求后,通过handler向主线程发送LAUNCH_ACTIVITY消息;
7、主线程在收到Message后,通过发射机制创建目标Activity,并回调Activity.onCreate()等方法。
到此,App便正式启动,开始进入Activity生命周期,执行完onCreate/onStart/onResume方法
第一个阶段:系统启动
1.首先是Android系统启动
2.紧接着是我们的所在应用的进程启动
http://androidxref.com/6.0.0_r1/xref/frameworks/base/core/java/android/app/ActivityThread.java
 public static void main(String[] args) {
        //....

        //创建Looper和MessageQueue对象,用于处理主线程的消息
        Looper.prepareMainLooper();

        //创建ActivityThread对象
        ActivityThread thread = new ActivityThread();

        //建立Binder通道 (创建新线程)
        thread.attach(false);

        Looper.loop(); //消息循环运行
        throw new RuntimeException("Main thread loop unexpectedly exited");
    }
第二个阶段:app注册
3.ActivityThread的attach()方法
public final class ActivityThread {

final ApplicationThread mAppThread = new ApplicationThread();

private void attach(boolean system) {
        sCurrentActivityThread = this;
        //true守护线程 false 用户线程  守护线程是为用户线程服务的,一般业务逻辑的处理都写在守护线程里面
        mSystemThread = system;
        if (!system) {
            ......
            //获取代表类ActivityManagerProxy实例
            final IActivityManager mgr = ActivityManagerNative.getDefault();
            try {
               //调用ActivityManagerProxy的attachApplication实施绑定,最终会调用远程类AMS的attachApplication完成绑定
                mgr.attachApplication(mAppThread);
            } catch (RemoteException ex) {
                throw ex.rethrowFromSystemServer();
            }
            ......
        } else {
           ......
            try {
                mInstrumentation = new Instrumentation();
                ContextImpl context = ContextImpl.createAppContext(
                        this, getSystemContext().mPackageInfo);
                mInitialApplication = context.mPackageInfo.makeApplication(true, null);
                //调用application onCreate函数
                mInitialApplication.onCreate();
            } catch (Exception e) {
               ......
            }
        }

        ......
        ViewRootImpl.addConfigCallback(new ComponentCallbacks2() {
            @Override
            public void onConfigurationChanged(Configuration newConfig) {
                synchronized (mResourcesManager) {
                  ......
                }
            }
            @Override
            public void onLowMemory() {
            }
            @Override
            public void onTrimMemory(int level) {
            }
        });
}
 private class ApplicationThread extends ApplicationThreadNative {
       //...
  }
   private class H extends Handler {
            //...
  }
//...
}
ApplicationThread
4.ActivityManagerService.attachApplication(mAPPThread)方法
@Override
public final void attachApplication(IApplicationThread thread) {
        synchronized (this) {
            //调用native函数获取当前进程的Id
            int callingPid = Binder.getCallingPid();
            //重置当前线程的IPC的id
            final long origId = Binder.clearCallingIdentity();
            attachApplicationLocked(thread, callingPid);
            Binder.restoreCallingIdentity(origId);
        }
}
private final boolean attachApplicationLocked(IApplicationThread thread,
            int pid) {

        // Find the application record that is being attached...  either via
        // the pid if we are running in multiple processes, or just pull the
        // next app record if we are emulating process with anonymous threads.
        ProcessRecord app;
        if (pid != MY_PID && pid >= 0) {
            synchronized (mPidsSelfLocked) {
                app = mPidsSelfLocked.get(pid);//在整个启动进程的流程中在前面已经push进入
            }
        } else {
            app = null;
        }
        if (app == null) {
            ......
            return false;//为null的时候直接返回.
        }
        //正常第一次开启时此时还是null
        if (app.thread != null) {
            handleAppDiedLocked(app, true, true);
        }
        ......
        final String processName = app.processName;
        ......
        // 用来时例化ProcessRecord的thread变量.它是一个IApplicationThread对象.
        app.makeActive(thread, mProcessStats);//在这里实现的附着!
        app.curAdj = app.setAdj = -100;
        app.curSchedGroup = app.setSchedGroup = Process.THREAD_GROUP_DEFAULT;
        app.forcingToForeground = null;
        updateProcessForegroundLocked(app, false, false);
        app.hasShownUi = false;
        app.debugging = false;
        app.cached = false;
        app.killedByAm = false;

        mHandler.removeMessages(PROC_START_TIMEOUT_MSG, app);

        boolean normalMode = mProcessesReady || isAllowedWhileBooting(app.info);
        List<ProviderInfo> providers = normalMode ? generateApplicationProvidersLocked(app) : null;
        ......
        try {
            ......
            // 这是一个远程调用,但最终会调用ApplicationThread的bindApplication函数完成绑定过程
            thread.bindApplication(processName, appInfo, providers, app.instrumentationClass,
                    profilerInfo, app.instrumentationArguments, app.instrumentationWatcher,
                    app.instrumentationUiAutomationConnection, testMode, enableOpenGlTrace,
                    isRestrictedBackupMode || !normalMode, app.persistent,
                    new Configuration(mConfiguration), app.compat,
                    getCommonServicesLocked(app.isolated),
                    mCoreSettingsObserver.getCoreSettingsLocked());
            updateLruProcessLocked(app, false, null);
            app.lastRequestedGc = app.lastLowMemory = SystemClock.uptimeMillis();
        } catch (Exception e) {
            ......
            return false;
        }
       ......return true;
}
thread是ApplicationThreadProxy的对象引用,它是代理对象,先调用ApplicationThreadProxy的bindApplication方法,接着在这个方法中又调用ApplicationThreadNative的函数onTransact,然后函数onTransact中根据code找到对应的case,最终会调用ApplicationThread的bindApplication方法。
5.调用mAPPThread.bindApplication(ProcessRecord等参数)
 public final void bindApplication(String processName, ApplicationInfo appInfo,
                List<ProviderInfo> providers, ComponentName instrumentationName,
                ProfilerInfo profilerInfo, Bundle instrumentationArgs,
                IInstrumentationWatcher instrumentationWatcher,
                IUiAutomationConnection instrumentationUiConnection, int debugMode,
                boolean enableBinderTracking, boolean trackAllocation,
                boolean isRestrictedBackupMode, boolean persistent, Configuration config,
                CompatibilityInfo compatInfo, Map<String, IBinder> services, Bundle coreSettings) {

            if (services != null) {//初始化缓存
                // Setup the service cache in the ServiceManager
                ServiceManager.initServiceCache(services);
            }

            setCoreSettings(coreSettings);
            //保存Bind数据
            AppBindData data = new AppBindData();
            data.processName = processName;
            data.appInfo = appInfo;
            data.providers = providers;
            data.instrumentationName = instrumentationName;
            data.instrumentationArgs = instrumentationArgs;
            data.instrumentationWatcher = instrumentationWatcher;
            data.instrumentationUiAutomationConnection = instrumentationUiConnection;
            data.debugMode = debugMode;
            data.enableBinderTracking = enableBinderTracking;
            data.trackAllocation = trackAllocation;
            data.restrictedBackupMode = isRestrictedBackupMode;
            data.persistent = persistent;
            data.config = config;
            data.compatInfo = compatInfo;
            data.initProfilerInfo = profilerInfo;
            //发送信息
            sendMessage(H.BIND_APPLICATION, data);
}
在这里,bindApplication方法通过向ActivityThread的消息队列发送BIND_APPLICATION消息
 case BIND_APPLICATION:
                    Trace.traceBegin(Trace.TRACE_TAG_ACTIVITY_MANAGER, "bindApplication");
                    AppBindData data = (AppBindData)msg.obj;
                    handleBindApplication(data);
                    Trace.traceEnd(Trace.TRACE_TAG_ACTIVITY_MANAGER);
                    break;
消息的处理调用handleBindApplication方法,handleBindApplication方法比较重要的是会调用如下方法
private void handleBindApplication(AppBindData data) {
    mBoundApplication = data;
    Process.setArgV0(data.processName);//设置进程名
    ...
    //获取LoadedApk对象
    data.info = getPackageInfoNoCheck(data.appInfo, data.compatInfo);
    ...

    // 创建ContextImpl上下文
    final ContextImpl appContext = ContextImpl.createAppContext(this, data.info);
    ...

    try {
        // 此处data.info是指LoadedApk, 通过反射创建目标应用Application对象
        Application app = data.info.makeApplication(data.restrictedBackupMode, null);
        mInitialApplication = app;
        ...
        mInstrumentation.onCreate(data.instrumentationArgs);
        //回调onCreate
        mInstrumentation.callApplicationOnCreate(app);

    } finally {
        StrictMode.setThreadPolicy(savedPolicy);
    }
}
在执行完bindApplication()之后进入ActivityStackSupervisor.attachApplicationLocked(),这样我们整个应用进程已经启动起来了。开始activity的启动逻辑了。
6.ActivityStackSupervisor.attachApplicationLocked(ProcessRecord)方法
boolean attachApplicationLocked(ProcessRecord app) throws RemoteException {
    final String processName = app.processName;
    boolean didSomething = false;
    for (int displayNdx = mActivityDisplays.size() - 1; displayNdx >= 0; --displayNdx) {
        ArrayList<ActivityStack> stacks = mActivityDisplays.valueAt(displayNdx).mStacks;
        for (int stackNdx = stacks.size() - 1; stackNdx >= 0; --stackNdx) {
            final ActivityStack stack = stacks.get(stackNdx);
            if (!isFocusedStack(stack)) {
                continue;
            }
            ActivityRecord hr = stack.topRunningActivityLocked();
            if (hr != null) {
                if (hr.app == null && app.uid == hr.info.applicationInfo.uid
                        && processName.equals(hr.processName)) {
                    try {
                        if (realStartActivityLocked(hr, app, true, true)) {
                            didSomething = true;
                        }
                    } ......
                }
            }
        }
    }
    if (!didSomething) {
        ensureActivitiesVisibleLocked(null, 0, !PRESERVE_WINDOWS);
    }
    return didSomething;
}
这个类是一个AMS的一个栈管理类,里面存储着ActivityStack的集合。在这个方法,会遍历各个ActivityStack,找到前台栈,找到里面的TopActivity。然后比较 传进来的ProcessRecord.processName和UID是否个和opActivity对用的ActivityRecord里面的一致。如果一致,就调用ActivityStackSupervisor.realStartAcvitiyLocked(ProcessRecord,ActivityRecord)方法。
7.ActivityStackSupervisor.realStartAcvitiyLocked(ProcessRecord,ActivityRecord)方法
final boolean realStartActivityLocked(ActivityRecord r, ProcessRecord app,
        boolean andResume, boolean checkConfig) throws RemoteException {

      //...
        app.forceProcessStateUpTo(mService.mTopProcessState);
        app.thread.scheduleLaunchActivity(new Intent(r.intent), r.appToken,
                System.identityHashCode(r), r.info, new Configuration(mService.mConfiguration),
                new Configuration(task.mOverrideConfig), r.compat, r.launchedFromPackage,
                task.voiceInteractor, app.repProcState, r.icicle, r.persistentState, results,
                newIntents, !andResume, mService.isNextTransitionForward(), profilerInfo);

       //...

    return true;
}
这个方法会调用传过来的ApplicationThread实例的ScheduelLaunchActivity(包括ActivityRecord)方法,所以真正执行的是ActivityThread中的scheduleLaunchActivity
第三个阶段:启动第一个Activity
8.ApplicationThread.ScheduelLaunchActivity(包括ActivityRecord)方法
     public final void scheduleLaunchActivity(Intent intent, IBinder token, int ident,
            ActivityInfo info, Configuration curConfig, Configuration overrideConfig,
            CompatibilityInfo compatInfo, String referrer, IVoiceInteractor voiceInteractor,
            int procState, Bundle state, PersistableBundle persistentState,
            List<ResultInfo> pendingResults, List<ReferrerIntent> pendingNewIntents,
            boolean notResumed, boolean isForward, ProfilerInfo profilerInfo) {
        updateProcessState(procState, false);
        ActivityClientRecord r = new ActivityClientRecord();
        //...
        updatePendingConfiguration(curConfig);

        sendMessage(H.LAUNCH_ACTIVITY, r);
    }
这个方法是跨进程的,会把ActivityRecord同步到App进程的ActivityRecordClient数据结构,用来后面构造Application和Activity等。
9.发送给H一个H.LAUNCH_ACTIVITY的消息
 public void handleMessage(Message msg) {
        if (DEBUG_MESSAGES) Slog.v(TAG, ">>> handling: " + codeToString(msg.what));
        switch (msg.what) {
            case LAUNCH_ACTIVITY: {
                final ActivityClientRecord r = (ActivityClientRecord) msg.obj;

                r.packageInfo = getPackageInfoNoCheck(
                        r.activityInfo.applicationInfo, r.compatInfo);
                handleLaunchActivity(r, null, "LAUNCH_ACTIVITY");
            } break;
            //...
     }
10.调用ActivityThread的HandleLaunchActivity()方法
ActivityThread接收到SystemServer进程的消息之后会通过其内部的Handler对象分发消息,经过一系列的分发之后调用了ActivityThread的handleLaunchActivity方法:
private void handleLaunchActivity(ActivityClientRecord r, Intent customIntent, String reason) {
    //...
    // Initialize before creating the activity
    WindowManagerGlobal.initialize();

    Activity a = performLaunchActivity(r, customIntent);

    if (a != null) {
        r.createdConfig = new Configuration(mConfiguration);
        reportSizeConfigurations(r);
        Bundle oldState = r.state;
        handleResumeActivity(r.token, false, r.isForward,
                !r.activity.mFinished && !r.startsNotResumed, r.lastProcessedSeq, reason);
      }
      //...
}
接着调用PerformLaunchActivity方法和HandleLaunchActivtiy()方法。performLauncherActivity,看名字应该就是执行Activity的启动操作了
PerformLaunchActivity做的事
 private Activity performLaunchActivity(ActivityClientRecord r, Intent customIntent) {

    ActivityInfo aInfo = r.activityInfo;
    if (r.packageInfo == null) {
        r.packageInfo = getPackageInfo(aInfo.applicationInfo, r.compatInfo,
                Context.CONTEXT_INCLUDE_CODE);
    }

    ComponentName component = r.intent.getComponent();
    if (component == null) {
        component = r.intent.resolveActivity(
            mInitialApplication.getPackageManager());
        r.intent.setComponent(component);
    }

    if (r.activityInfo.targetActivity != null) {
        component = new ComponentName(r.activityInfo.packageName,
                r.activityInfo.targetActivity);
    }

    Activity activity = null;
    try {
        java.lang.ClassLoader cl = r.packageInfo.getClassLoader();
        activity = mInstrumentation.newActivity(
                cl, component.getClassName(), r.intent);
        StrictMode.incrementExpectedActivityCount(activity.getClass());
        r.intent.setExtrasClassLoader(cl);
        r.intent.prepareToEnterProcess();
        if (r.state != null) {
            r.state.setClassLoader(cl);
        }
    }
   //....
    try {
        Application app = r.packageInfo.makeApplication(false, mInstrumentation);

       //...
        if (activity != null) {
            Context appContext = createBaseContextForActivity(r, activity);
            ......
            activity.attach(appContext, this, getInstrumentation(), r.token,
                    r.ident, app, r.intent, r.activityInfo, title, r.parent,
                    r.embeddedID, r.lastNonConfigurationInstances, config,
                    r.referrer, r.voiceInteractor, window);

            //...

            activity.mCalled = false;
            if (r.isPersistable()) {
                mInstrumentation.callActivityOnCreate(activity, r.state, r.persistentState);
            } else {
                mInstrumentation.callActivityOnCreate(activity, r.state);
            }
            //...
            //生命周期onStart、onresume
            if (!r.activity.mFinished) {
                activity.performStart();
                r.stopped = false;
            }
            //...
    return activity;
}
1.这个方法主要是构造Application和通过mInstrumention.newActivity()构造Activity。
2.调用Activity的attach(application的ContextImpl等信息)
可以发现这里我们需要的Activity对象终于是创建出来了,然后在代码中其调用Instrumentation的callActivityOnCreate方法。
Activity的attach(application的ContextImpl等信息)
这个方法会初始化一个Window,以后详细讲,人格视图都是附在一个window的docorView上,然后由WMS.addView显示。
HandleLaunchActivtiy
最后显示出来了
注意关于WMS.addView(window),这个系统服务,我们下次再讲,里面有一个类RootViewImpl,这个类负责管理我们contentView视图树的逐级绘制。