首先追溯到Activity的启动,随便启动一个自己写的demo项目,使用DDMS进行debug标记,然后在Debug中把主线程暂停,可以看到调用栈。如下图所示:
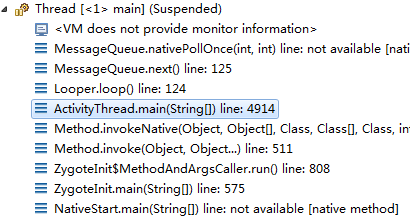
于是我们先看android.app.ActivityThread的main()方法。
android.app.ActivityThread.main()
main()方法中对一个Looper对象进行初始化,形成一个消息循环,那么任何主线程的操作都会发送到这个Looper对应的Handler中去。通过源码,辗转反侧找到Handler的定义,它是ActivityThread中定义的一个内部类,名为H,继承自Handler。
观察它的handleMessage()方法,发现了其中有一个what值为LAUNCH_ACTIVITY的switch分支,其中调用了handleLaunchActivity()方法。

接下来看android.app.ActivityThread.handleLaunchActivity()方法。
android.app.ActivityThread.handleLaunchActivity()

如上图所示,该方法中执行了两个比较关键的步骤,一个是performLaunchActivity(),另一个是handleResumeActivity()。
先来看performLaunchActivity()做了什么。
android.app.ActivityThread.performLaunchActivity()
以下是部分源码,我做了一些省略。

 1 private Activity performLaunchActivity(ActivityClientRecord r, Intent customIntent) {
 2
 3     ...
 4     Activity activity = null;
 5     try {
 6         java.lang.ClassLoader cl = r.packageInfo.getClassLoader();
 7         activity = mInstrumentation.newActivity(
 8                 cl, component.getClassName(), r.intent);
 9         StrictMode.incrementExpectedActivityCount(activity.getClass());
10         r.intent.setExtrasClassLoader(cl);
11         if (r.state != null) {
12             r.state.setClassLoader(cl);
13         }
14     } catch (Exception e) {
15         if (!mInstrumentation.onException(activity, e)) {
16             throw new RuntimeException(
17                 "Unable to instantiate activity " + component
18                 + ": " + e.toString(), e);
19         }
20     }
21
22     try {
23         ...
24         if (activity != null) {
25             ...
26
27             activity.attach(appContext, this, getInstrumentation(), r.token,
28                     r.ident, app, r.intent, r.activityInfo, title, r.parent,
29                     r.embeddedID, r.lastNonConfigurationInstances, config);
30             ...
31             activity.mCalled = false;
32             mInstrumentation.callActivityOnCreate(activity, r.state);
33             ...
34         }
35         ...
36     }
37     ...
38 }
重点关注红色加粗的部分:
7, 8行:通过Activity的类名构建一个Activity对象。
27行:调用了Activity.attach()方法。
32行:通过Instrumentation对象执行Activity的onCreate()方法,Activity的生命周期方法都是由Instrumentation对象来调用的。
其中attach()方法里面也做了很重要的事情。
android.app.Activity.attach()
 1 final void attach(Context context, ActivityThread aThread,
 2             Instrumentation instr, IBinder token, int ident,
 3             Application application, Intent intent, ActivityInfo info,
 4             CharSequence title, Activity parent, String id,
 5             NonConfigurationInstances lastNonConfigurationInstances,
 6             Configuration config) {
 7     attachBaseContext(context);
 8
 9     mFragments.attachActivity(this, mContainer, null);
10
11     mWindow = PolicyManager.makeNewWindow(this);
12
13     ... //将各种参数赋给Activity的成员变量
14
15     mWindow.setWindowManager(
16             (WindowManager)context.getSystemService(Context.WINDOW_SERVICE),
17             mToken, mComponent.flattenToString(),
18             (info.flags & ActivityInfo.FLAG_HARDWARE_ACCELERATED) != 0);
19     if (mParent != null) {
20         mWindow.setContainer(mParent.getWindow());
21     }
22     mWindowManager = mWindow.getWindowManager();
23     mCurrentConfig = config;
24 }
首先给Activity.mWindow成员变量赋值,然后给mWindow变量设置WindowManager,然后给Activity.mWindowManager赋值。
mWindow是一个Window类型的变量,但实际上它是一个PhoneWindow对象,与Activity的内容显示相关。
上面的attach()方法调用完成后,就自然而然的调用了Activity的onCreate()方法了。
按一般的情况,Activity中的onCreate()方法调用了setContentView()方法,而setContentView()方法并不是由Activity实现的,以下是android.app.Activity中的一段代码:
1 public void setContentView(View view, ViewGroup.LayoutParams params) {
2     getWindow().setContentView(view, params);
3     initActionBar();
4 }
而getWindow()返回的是一个android.app.Window对象,这个对象就是刚刚在attach()中赋值的mWindow成员变量。
android.app.Window是一个抽象类,其中setContentView()方法并没有具体的实现,而这个方法的真正实现是com.android.internal.policy.impl.PhoneWindow类。使用类图表示:

以下是PhoneWindow中的setContentView()的代码。
 1 @Override
 2 public void setContentView(View view, ViewGroup.LayoutParams params) {
 3     if (mContentParent == null) {
 4         installDecor();
 5     } else {
 6         mContentParent.removeAllViews();
 7     }
 8     mContentParent.addView(view, params);
 9     final Callback cb = getCallback();
10     if (cb != null && !isDestroyed()) {
11         cb.onContentChanged();
12     }
13 }
PhoneWindow类中有两个和视图相关的成员变量,一个是DecorView mDecor,另一个是ViewGroup mContentParent。
来看官方文档的描述:

再回到PhoneWindow.setContentView(View, ViewGroup.LayoutParams)中的installDecor()方法做了什么。
 1 private void installDecor() {
 2     if (mDecor == null) {
 3         mDecor = generateDecor();
 4         ...
 5     }
 6     if (mContentParent == null) {
 7         mContentParent = generateLayout(mDecor);
 8         ...
 9     }
10 }
mDecor是通过一个generateDecor()方法来获取的。而generateDecor()就是new了一个DecorView而已。
1 protected DecorView generateDecor() {
2     return new DecorView(getContext(), -1);
3 }
DecorView是PhoneWindow类中定义的一个内部类,它继承了FrameLayout,用来作为整个PhoneWindow的根视图。
再来看generateLayout()做了什么事情。
 1 protected ViewGroup generateLayout(DecorView decor) {
 2
 3     //...以上省去,大致上是与样式,主题,版本相关的对视图的设置。
 4
 5     //以下开始填充decor
 6
 7     // Inflate the window decor.
 8     int layoutResource;    //这个是用来inflate的id
 9
10     ...    //这里省去,内容是根据Window的各种特性(feature)选择一个合适的视图id赋给layoutResource
11
12     mDecor.startChanging();
13
14     View in = mLayoutInflater.inflate(layoutResource, null);
15     decor.addView(in, new ViewGroup.LayoutParams(MATCH_PARENT, MATCH_PARENT));
16
17     ViewGroup contentParent = (ViewGroup)findViewById(ID_ANDROID_CONTENT);    //注意这个地方
18     if (contentParent == null) {
19         throw new RuntimeException("Window couldn't find content container view");
20     }
21
22     ... //省去,内容是设置背景,设置ActionBar的一些属性。
23
24     mDecor.finishChanging();
25
26     return contentParent;
27 }
可以看出,这个方法(generateLayout())做了如下几件比较关键的事情:
1.根据各种FLAG值设置了LayoutParam参数,以上代码省略了这部分。
2.根据各种FEATURE值,选择了一个合适的类似于R.layout.something这样的布局id赋值给layoutResource。
3.将layoutResource填充为一个View对象,加入到DecorView中。
4.【不能确定,猜测】layoutResource所指示的布局文件中有一个id为ID_ANDROID_CONTENT的ViewGroup对象,上述代码中第17行,源码“非常自信”的findViewById获取到这个ViewGroup。
5.最后将contentParent返回给PhoneWindow的成员变量mContentParent。
这样,我们就知道了成员变量mDecor、mContentParent的来历。在学习的过程中,我还同时了解到,mDecor管理着一个ActionBar。
综合以上的探究,加上自己的一些思考和猜测。对PhoneWindow做一下小小的总结:
1.一个Activity对应着一个PhoneWindow对象,是一对一的关系,如果从Activity A启动到Activity B,那么Activity B会创建一个自己的PhoneWindow对象。
2.PhoneWindow管理着整个屏幕的内容,不包括屏幕最顶部的系统状态条。所以,PhoneWindow或者Window是与应用的一个页面所相关联。
3.PhoneWindow同时管理着ActionBar和下面的内容主题,setContentView()方法是用来设置内容主体的,而setTitle()等其他方法就是操作ActionBar的,Window中定义的requestFeature()等方法,有很多与ActionBar属性相关的设置。另外这些方法都是公有方法,显然是为了给客户端程序员调用的,也进一步佐证了这些操作的意义与作用。
4.PhoneWindow自己并不是一个视图(View),它的成员变量mDecor才是整个界面的视图,mDecor是在generateLayout()的时候被填充出来的,而actionBar和contentParent两个视图都是通过findViewById()直接从mDecor中获取出来的。
以上讲了这么多,其实只是把installDector()方法给执行完了。接下来是mContentParent.removeAllViews()。这个好理解,如果setContentView()被调用两次,第二次肯定要把里面的内容都给清空移除了。移除后就是添加,mContentParent.addView(view, params)。
这个方法是ViewGroup中的一个方法,贴上源代码:
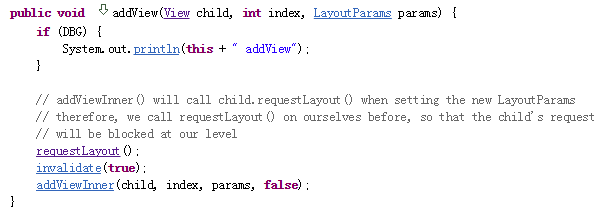
首先调用的是requestLayout(),这里的这个方法呢实际上没有起到作用的。
ViewGourp.requestLayout()实际上是调用的View.requestLayout()方法,而View.requestLayout()方法中,除去做了一些View本身的操作外,实际上调用的是View中的mParent成员变量的requestLayout()方法,而mParent这个成员变量是一个ViewParent类型的对象,ViewParent是一个接口,View中的mParent对象是通过View.assignParent(ViewParent)方法来赋值的,而assignParent()方法是由ViewRootImpl.setView()方法调用的……暂时就不考虑它了,要明确的一点,就是requestLayout()并没有起到具体的作用。
接下来观察addViewInner()方法,这个方法其实就是将child加入到自己的一个View数组中保存起来,然后在把这个child的parent标记为自己。
到此为止,setContentView()方法基本就执行完毕了,这个时候界面还没有显示出任何东西来,而仅仅是将mDecor->mContentParent->(customer layout)一个这样的树状结构给搭建好了而已。
假设setContentView()方法是onCreate()方法中唯一一个方法调用的话,那么onCreate()方法也执行完了,调用栈继续回退,就回到了android.app.ActivityThread.handleLaunchActivity()中,以上的所以就是刚刚执行完了android.app.ActivityThread.performLaunchActivity()。
接下来执行第二个关键性的方法handleResumeActivity()。
android.app.ActivityThread.handleResumeActivity()
贴上省略后的代码:
 1 final void handleResumeActivity(IBinder token, boolean clearHide, boolean isForward,
 2         boolean reallyResume) {
 3     ...
 4
 5     ActivityClientRecord r = performResumeActivity(token, clearHide);
 6
 7     if (r != null) {
 8         final Activity a = r.activity;
 9         ...
10         if (r.window == null && !a.mFinished && willBeVisible) {
11             r.window = r.activity.getWindow();
12             View decor = r.window.getDecorView();
13             decor.setVisibility(View.INVISIBLE);
14             ViewManager wm = a.getWindowManager();
15             WindowManager.LayoutParams l = r.window.getAttributes();
16             a.mDecor = decor;
17             l.type = WindowManager.LayoutParams.TYPE_BASE_APPLICATION;
18             l.softInputMode |= forwardBit;
19             if (a.mVisibleFromClient) {
20                 a.mWindowAdded = true;
21                 wm.addView(decor, l);
22             }
23             ...
24         }
25     ...
26     }
27 }
注意红色加粗的部分:
首先是performResumeActivity()方法,这个方法内就是通过Instrumentation调用Activity的onResume()方法。
下面的wm.addView()方法非常关键,wm是上面a.getWindowManager()获取到的,a是Activity,getWindowManager()就是返回它的mWindowManger对象,而这个对象是WindowManagerImpl,它的内部方法大部分是代理的WindowManagerGlobal,这个在上面的内容中已经提到了。
然而,这个WindowManger的addView()是干了什么呢?
 1 public void addView(View view, ViewGroup.LayoutParams params,
 2         Display display, Window parentWindow) {
 3     ...
 4     ViewRootImpl root;
 5     View panelParentView = null;
 6
 7     ...
 8         root = new ViewRootImpl(view.getContext(), display);
 9
10         view.setLayoutParams(wparams);
11
12         mViews.add(view);
13         mRoots.add(root);
14         mParams.add(wparams);
15     }
16
17     // do this last because it fires off messages to start doing things
18     try {
19         root.setView(view, wparams, panelParentView);
20     } catch (RuntimeException e) {
21         ...
22         throw e;
23     }
24 }
从上面的代码可以看出,addView方法中,new了一个ViewRootImpl对象,然后调用ViewRootImpl.setView()方法。
android.view.ViewRootImpl.setView()
 1 /**
 2  * We have one child
 3  */
 4 public void setView(View view, WindowManager.LayoutParams attrs, View panelParentView) {
 5     synchronized (this) {
 6         if (mView == null) {
 7             mView = view;
 8             ...
 9
10             // Schedule the first layout -before- adding to the window
11             // manager, to make sure we do the relayout before receiving
12             // any other events from the system.
13             requestLayout();
14
15             ...
16
17             view.assignParent(this);
18             ...
19         }
20     }
21 }
省略后的代码如上所示,首先将传进来的参数view赋值给mView,这里有一点要明确ViewRootImpl其实并不是一个View的子类……因此我认为,mView将是这个对象所认识的root节点,也是整个Activity的root的节点。
接下来调用了requestLayout()方法,这个方法是有效的!
最后将view的父亲注册为自己。终于终于,mDecor知道了自己父亲是谁,或者说,整个Activity设置了一个根节点,在此之前,我们setContentView()将自己的layout布局add到PhoneWindow.mContentParent的时候,mDecor都不知道自己的parent是哪个,现在整个view的树形结构中有了根节点,也就是ViewRootImpl,那么requestLayout()就有效了,就可以进行后面的measure,layout,draw三步操作了。
android.view.ViewRootImpl.requestLayout()
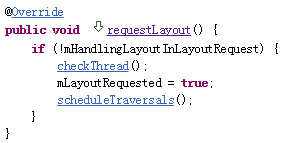
该方法首先检查了是否在主线程,然后就执行了scheduleTraversals()方法。看这个方法的名字,就知道是执行一次遍历,遍历的对象就是根节点开始的view tree。
android.view.ViewRootImpl.scheduleTraversals()
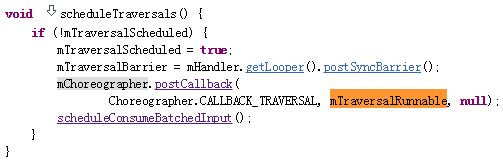
注意标记出来的Runnable对象,这个Runnable的run()方法中,调用了doTraversal()方法。而doTraversal()方法又调用了performTraversals()方法,这个方法非常长,依次调用了performMeasure(),performLayout(),performDraw()三个方法,终于开始了控件层的测量,布局,绘制三个步骤。对于这些的探究就留到下一篇博客中好了,这篇已经写的够长了。